How to Automatically Document API Endpoints via Swagger
No one likes doing documentation. Here's a way for developers to automate generation of API endpoint documentation using Swagger.
Join the DZone community and get the full member experience.
Join For FreeDocumentation of any code is usually the most boring part, and as a developer, you probably always look for ways to automate it. One of the ways to do so is by creating your own automation. However, nowadays we can enjoy the luxury of a fast growing IT industry that brings lots of tools and frameworks to the table.
One of these tools is Swagger, and in this article, we will learn how to automate documentation of API Endpoints via Swagger.
The complete source can be found here. This article will show code fragments.
The environment we will auto document with Swagger will be Java and Spring Boot API, together with the Gradle build tool. As usual, my articles are related to the JAVA development environment.
1. First, like in any library, we need to add all the dependencies.
For Maven users:
<dependency>
    <groupId>io.springfox</groupId>
    <artifactId>springfox-swagger2</artifactId>
    <version>2.7.0</version>
</dependency>
<dependency>
    <groupId>io.springfox</groupId>
    <artifactId>springfox-swagger-ui</artifactId>
    <version>2.7.0</version>
</dependency>
For Gradle users:
compile group: 'io.springfox', name: 'springfox-swagger2', version: '2.7.0'
compile group: 'io.springfox', name: 'springfox-swagger-ui', version: '2.7.0'
2. The next step is to enable Swagger for full Spring Boot Application. This can be done in the following way:
@EnableSwagger2
@SpringBootApplication
public class BlazeMeterApi {
   public static void main(String[] args) {
       SpringApplication.run(BlazeMeterApi.class, args);
   }

   @Bean
   public Docket api() {
       return new Docket(DocumentationType.SWAGGER_2).select()
               .apis(RequestHandlerSelectors.withClassAnnotation(Api.class))
               .paths(PathSelectors.any()).build().pathMapping("/")
               .apiInfo(apiInfo()).useDefaultResponseMessages(false);
   }

   @Bean
   ApiInfo apiInfo() {
       final ApiInfoBuilder builder = new ApiInfoBuilder();
       builder.title("BlazeMeter Spring Boot API").version("1.0").license("(C) Copyright BlazeMeter")
               .description("List of all endpoints used in API");
       return builder.build();
   }
}
Let’s understand the code. The @EnableSwagger2 annotation is telling the application and Swagger that this is our starting point and application. Then we have 2 @Bean annotated methods, or just beans.
The first (api) is a configuration for what to cover, where to look and where the documentation will be living (main path - / ). The second one (apiInfo) is the informational part of documentation: title, version, license, description, etc.
3. The next step will be to create a main controller for Swagger, for opening Swagger UI via redirection to swagger-ui.html:@Controller
import org.springframework.stereotype.Controller;
import org.springframework.web.bind.annotation.RequestMapping;
import org.springframework.web.bind.annotation.RequestMethod;

@Controller
@RequestMapping("/")
public class RootController {
   @RequestMapping(method = RequestMethod.GET)
   public String swaggerUi() {
       return "redirect:/swagger-ui.html";
   }
}
This code is quite simple: it is creating a GET request holder controller that is redirecting GET requests from the application / to the /swagger-ui.html, and that’s it.
4. The next and final step is to annotate API Controllers with @Api and @ApiOperation:
@Controller
@RequestMapping(value = VERSION + ARRIVAL)
@Api(value = VERSION + ARRIVAL)
public class ArrivalController {

   @Autowired
   private ArrivalRepository arrivalRepository;

   @ApiOperation(value = "Get all arrivals")
   @RequestMapping(value = "all", method = GET)
   @ResponseBody
   public List<Arrival> getAllArrivals() {
       return arrivalRepository.findAll();
   }

   @ApiOperation(value = "Get arrival by ID")
   @RequestMapping(value = "{id}", method = GET)
   @ResponseBody
   public Arrival getArrivalById(@PathVariable(value = "id") int id) {
       return arrivalRepository.findAllById(id);
   }
}
The @Api annotation should be used on top of the controller class and have a value of high-level mapping, if there is one (it’s best practice to have one).
The @ApiOperation annotation can be on any method level that you want to cover with Swagger, and it may have a value that is a short description of the endpoint.
That’s all folks. After executing the project we will have fully documented API endpoints. It will look like this:
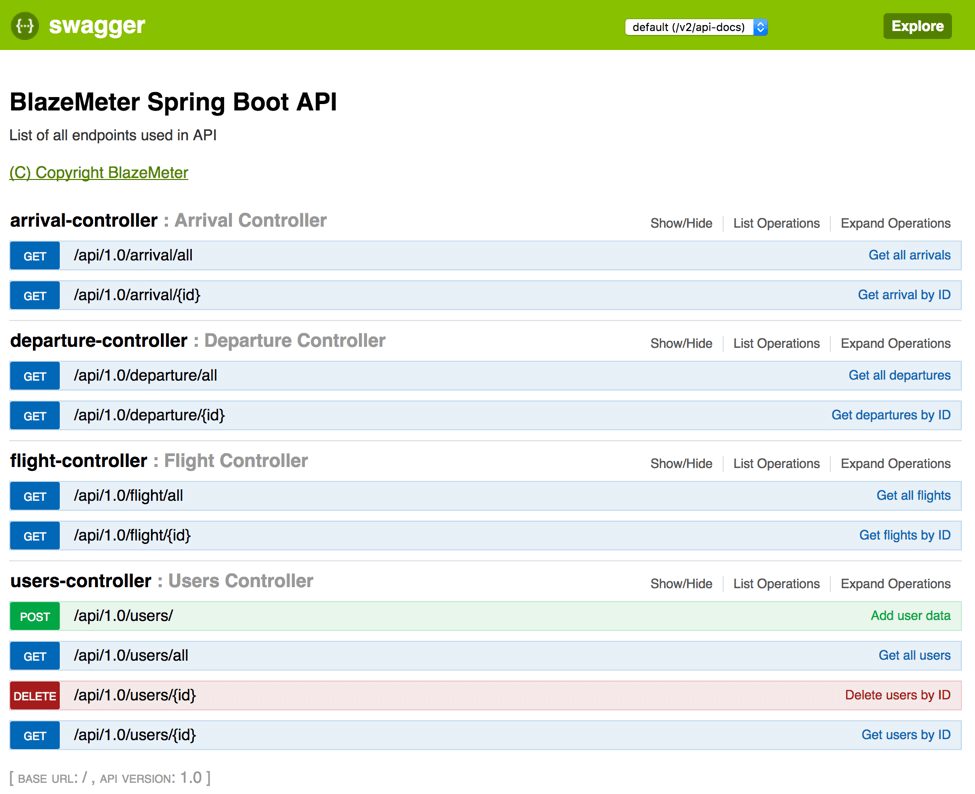
This is Swagger’s main page, containing all the annotated API endpoints in the list, grouped by controllers.
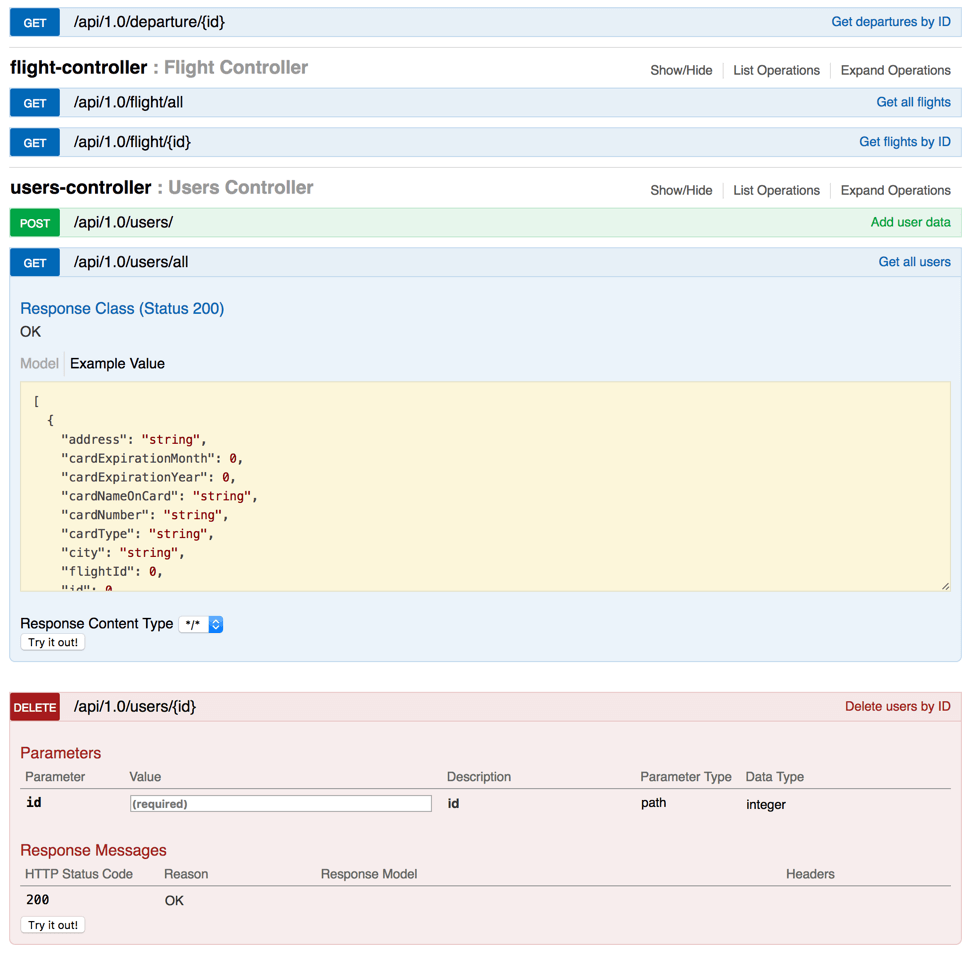
And after expanding a few of endpoints to check more details:
That’s it! You can now save time and effort by automatically documenting your API endpoints with Swagger.
Published at DZone with permission of . See the original article here.
Opinions expressed by DZone contributors are their own.
Comments