How to Build a Pokedex React App with a Slash GraphQL Backend
Take a look at how you can use use GraphQL to create a demo application of a Pokemon Pokedex app with React.
Join the DZone community and get the full member experience.
Join For FreeFrontend developers want interactions with the backends of their web applications to be as painless as possible. Requesting data from the database or making updates to records stored in the database should be simple so that frontend developer can focus on what they do best: creating beautiful and intuitive user interfaces.
GraphQL makes working with databases easy. Rather than relying on backend developers to create specific API endpoints that return pre-selected data fields when querying the database, frontend developers can make simple requests to the backend and retrieve the exact data that they need—no more, no less. This level of flexibility is one reason why GraphQL is so appealing.
Even better, you can use a hosted GraphQL backend—Slash GraphQL (by Dgraph). This service is brand new and was publicly released on September 10, 2020. With Slash GraphQL, I can create a new backend endpoint, specify the schema I want for my graph database, and—voila!—be up and running in just a few steps.
The beauty of a hosted backend is that you don't need to manage your own backend infrastructure, create and manage your own database, or create API endpoints. All of that is taken care of for you.
In this article, we're going to walk through some of the basic setup for Slash GraphQL and then take a look at how I built a Pokémon Pokédex app with React and Slash GraphQL in just a few hours!
You can view all of the code here on GitHub.
Overview of the Demo App
What 90s child (or adult, for that matter) didn't dream of catching all 150 original Pokémon? Our demo app will help us keep track of our progress in becoming Pokémon masters.
As we build out our app, we'll cover all the CRUD operations for working with an API: create, read, update, and delete.
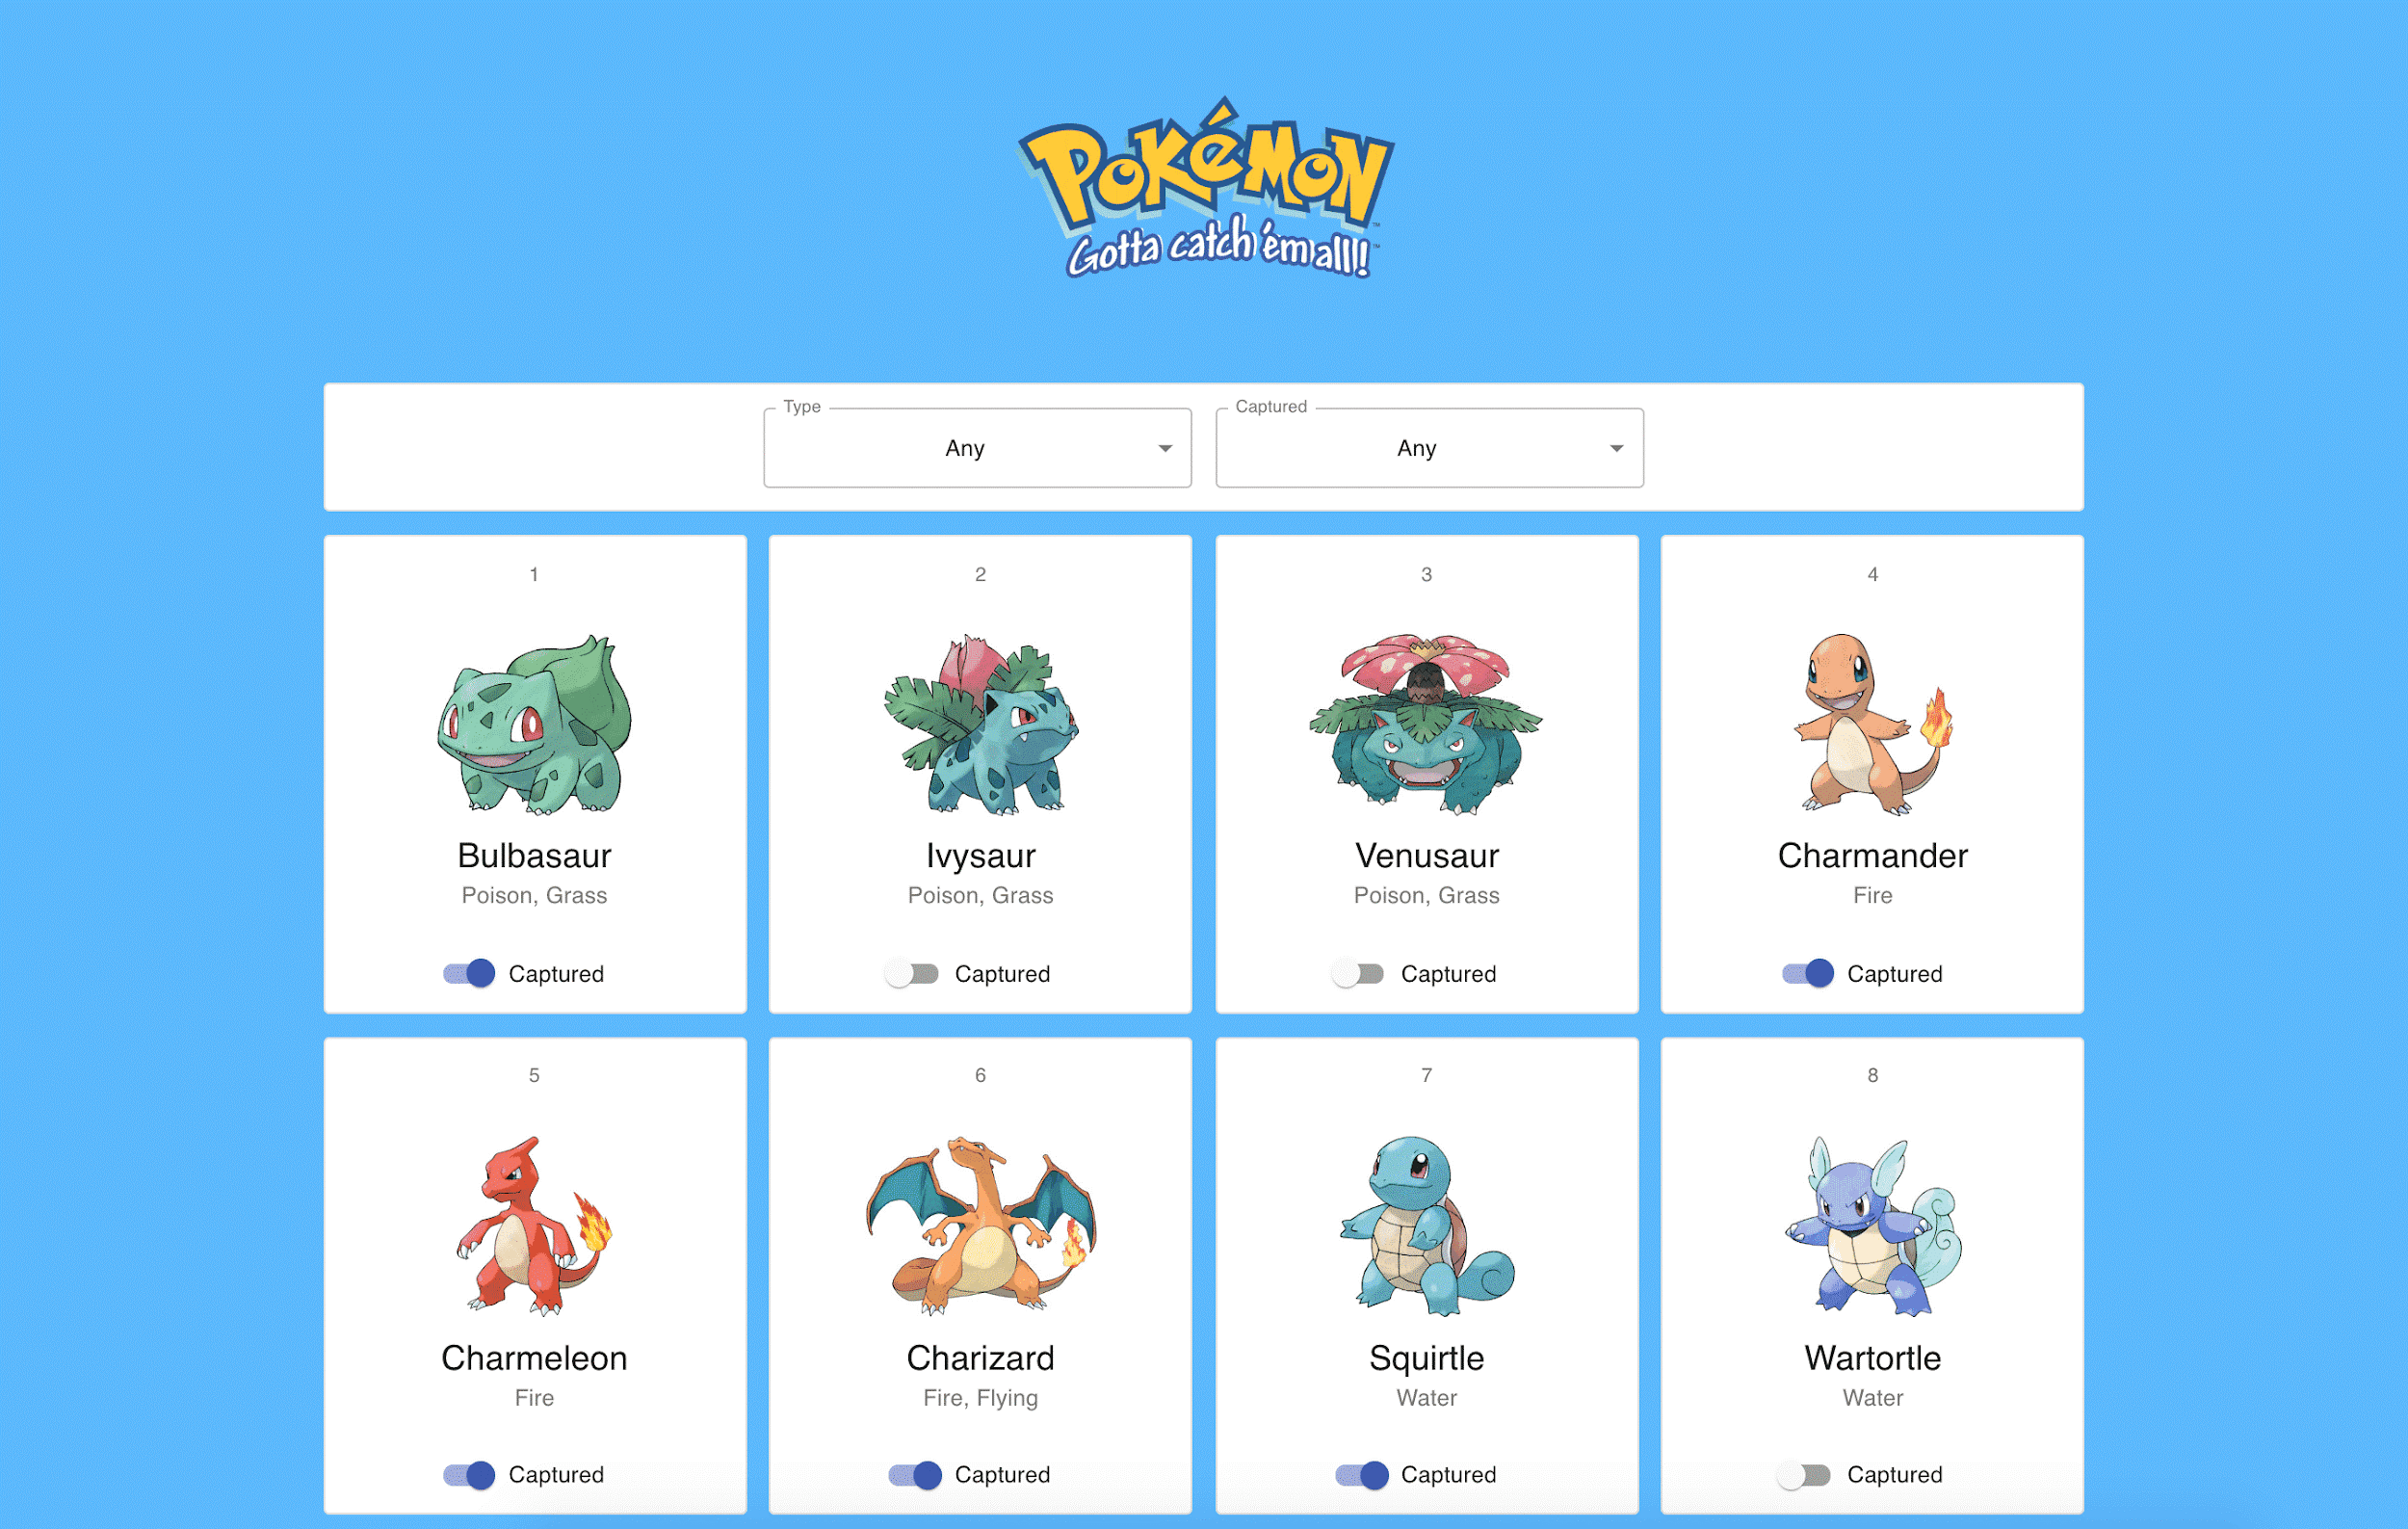
We'll start by adding all our Pokémon to the database online in Slash GraphQL's API Explorer. Then, in the Pokédex app UI, we'll display all 151 Pokémon queried from the database. (Hey, I couldn't leave out Mew, could I?) At the top of the screen, we'll show two dropdown menus that will allow us to filter the shown results by Pokémon type and by whether or not the Pokémon has been captured. Each Pokémon will also have a toggle switch next to it that will allow us to mark the Pokémon as captured or not. We won't be deleting any Pokémon from our database via the app's UI, but I'll walk you through how that could be done in the event that you need to clean up some data.
Ready to begin our journey?
Getting Started with Slash GraphQL
Creating a New Backend
Once you've created your Slash GraphQL account, you can have your GraphQL backend up and running in just a few steps:
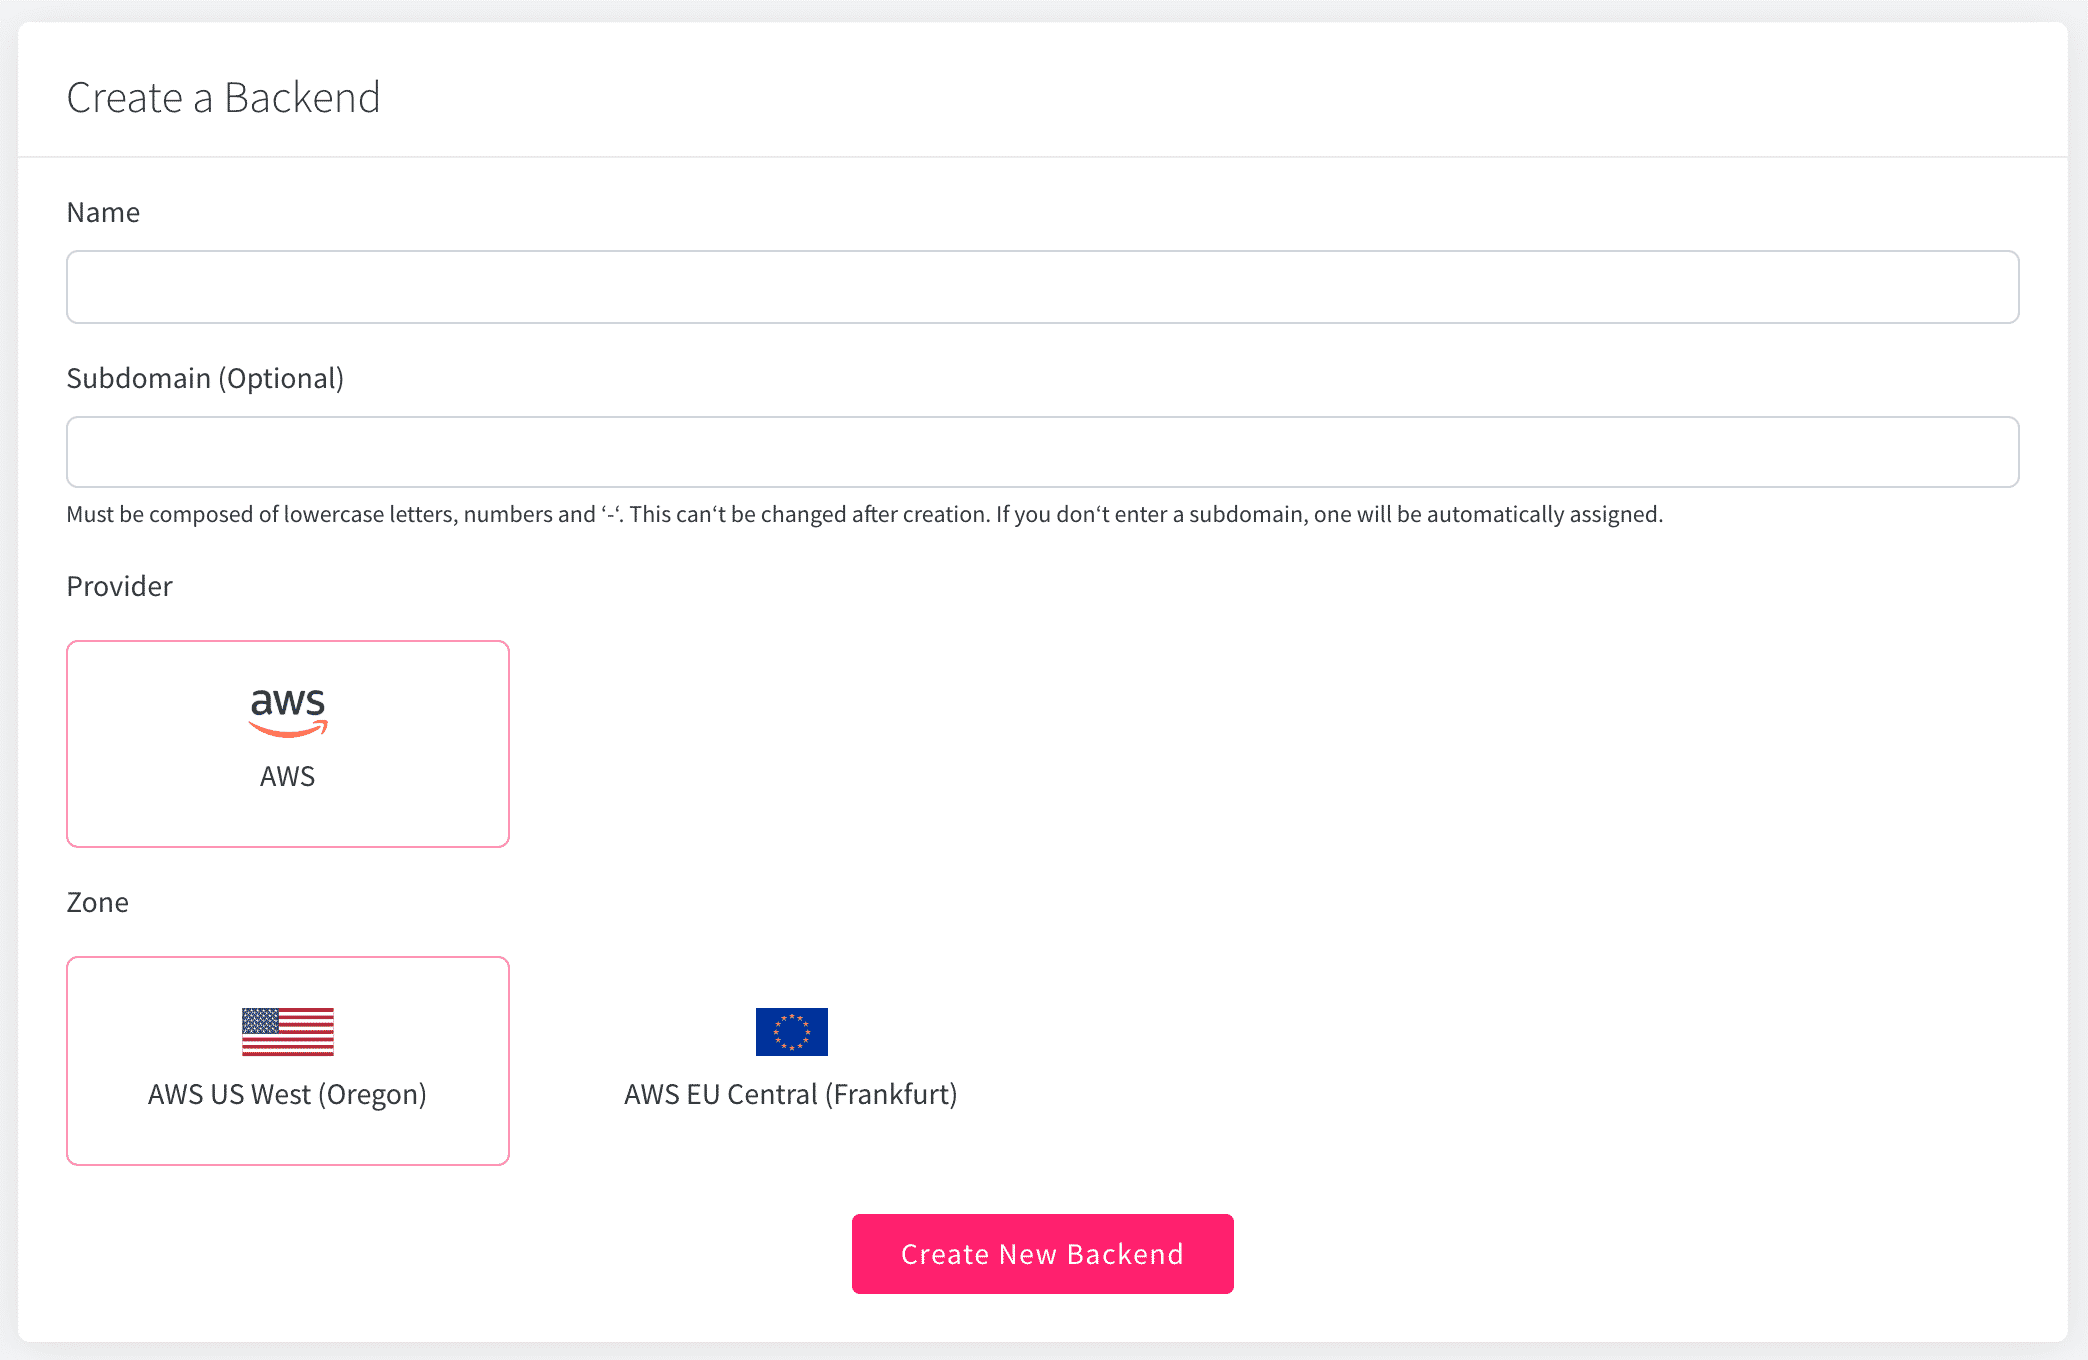
- Click the "Create a Backend" button.
- Give it a name. (For example, I chose "pokedex".)
- Optionally, give the API endpoint URL a subdomain name. (Again, I chose "pokedex".)
- Optionally, choose a provider and a zone. (This defaults to using AWS in the US West region.)
- Click the "Create New Backend" button to confirm your choices.
- Get your backend endpoint. (Mine looks like this: https://pokedex.us-west-2.aws.cloud.dgraph.io/graphql.)
- Click the "Create your Schema" button.
That's it! After creating a new backend, you'll have a live GraphQL database and API endpoint ready to go.
Creating a Schema
Now that we have our backend up and running, we need to create the schema for the type of data we'll have in our database. For the Pokédex app, we'll have a Pokémon type and a PokémonType enum.
xxxxxxxxxx
enum PokemonType {
Bug
Dark
Dragon
Electric
Fairy
Fighting
Fire
Flying
Ghost
Grass
Ground
Ice
Normal
Poison
Psychic
Rock
Steel
Water
}
type Pokemon {
id: Int! @search
name: String! @search(by: [fulltext])
captured: Boolean! @search
imgUrl: String!
pokemonTypes: [PokemonType!]! @search
}
There's a lot to unpack in that small amount of code! The PokémonType enum is straightforward enough—it's a set of all the Pokémon types, including Fire, Water, Grass, and Electric. The Pokémon type describes the shape of our data that we'll have for each Pokémon. Each Pokémon will have an ID, a name, an image URL for displaying the Pokémon's picture, the types of Pokémon it is, and a status indicating whether or not the Pokémon is captured.
You can see that each field has a data type associated with it. For example, id is an Int (integer), name and imgUrl are String types, and captured is a Boolean. The presence of an exclamation point ! means the field is required. Finally, adding the @search keyword makes the field searchable in your queries and mutations.
To test out working with our database and newly created schema, we can use the API Explorer, which is a neat feature that allows us to run queries and mutations against our database right from within the Slash GraphQL web console.
Populating Our Database
Let's use the API Explorer to insert all of our Pokémon into the Pokédex database. We'll use the following mutation:
xxxxxxxxxx
mutation AddPokemon {
addPokemon(input: [
{ id: 1, name: "Bulbasaur", captured: false, imgUrl: "http://img.pokemondb.net/artwork/bulbasaur.jpg", pokemonTypes: [Grass, Poison] },
{ id: 2, name: "Ivysaur", captured: false, imgUrl: "http://img.pokemondb.net/artwork/ivysaur.jpg", pokemonTypes: [Grass, Poison] },
{ id: 3, name: "Venusaur", captured: false, imgUrl: "http://img.pokemondb.net/artwork/venusaur.jpg", pokemonTypes: [Grass, Poison] },
{ id: 4, name: "Charmander", captured: false, imgUrl: "http://img.pokemondb.net/artwork/charmander.jpg", pokemonTypes: [Fire] },
{ id: 5, name: "Charmeleon", captured: false, imgUrl: "http://img.pokemondb.net/artwork/charmeleon.jpg", pokemonTypes: [Fire] },
{ id: 6, name: "Charizard", captured: false, imgUrl: "http://img.pokemondb.net/artwork/charizard.jpg", pokemonTypes: [Fire, Flying] },
{ id: 7, name: "Squirtle", captured: false, imgUrl: "http://img.pokemondb.net/artwork/squirtle.jpg", pokemonTypes: [Water] },
{ id: 8, name: "Wartortle", captured: false, imgUrl: "http://img.pokemondb.net/artwork/wartortle.jpg", pokemonTypes: [Water] },
{ id: 9, name: "Blastoise", captured: false, imgUrl: "http://img.pokemondb.net/artwork/blastoise.jpg", pokemonTypes: [Water] },
]) {
pokemon {
id
name
captured
imgUrl
pokemonTypes
}
}
}
For brevity I've only shown the first nine Pokémon in the snippet above. Feel free to check out the full code snippet for adding all the Pokémon.
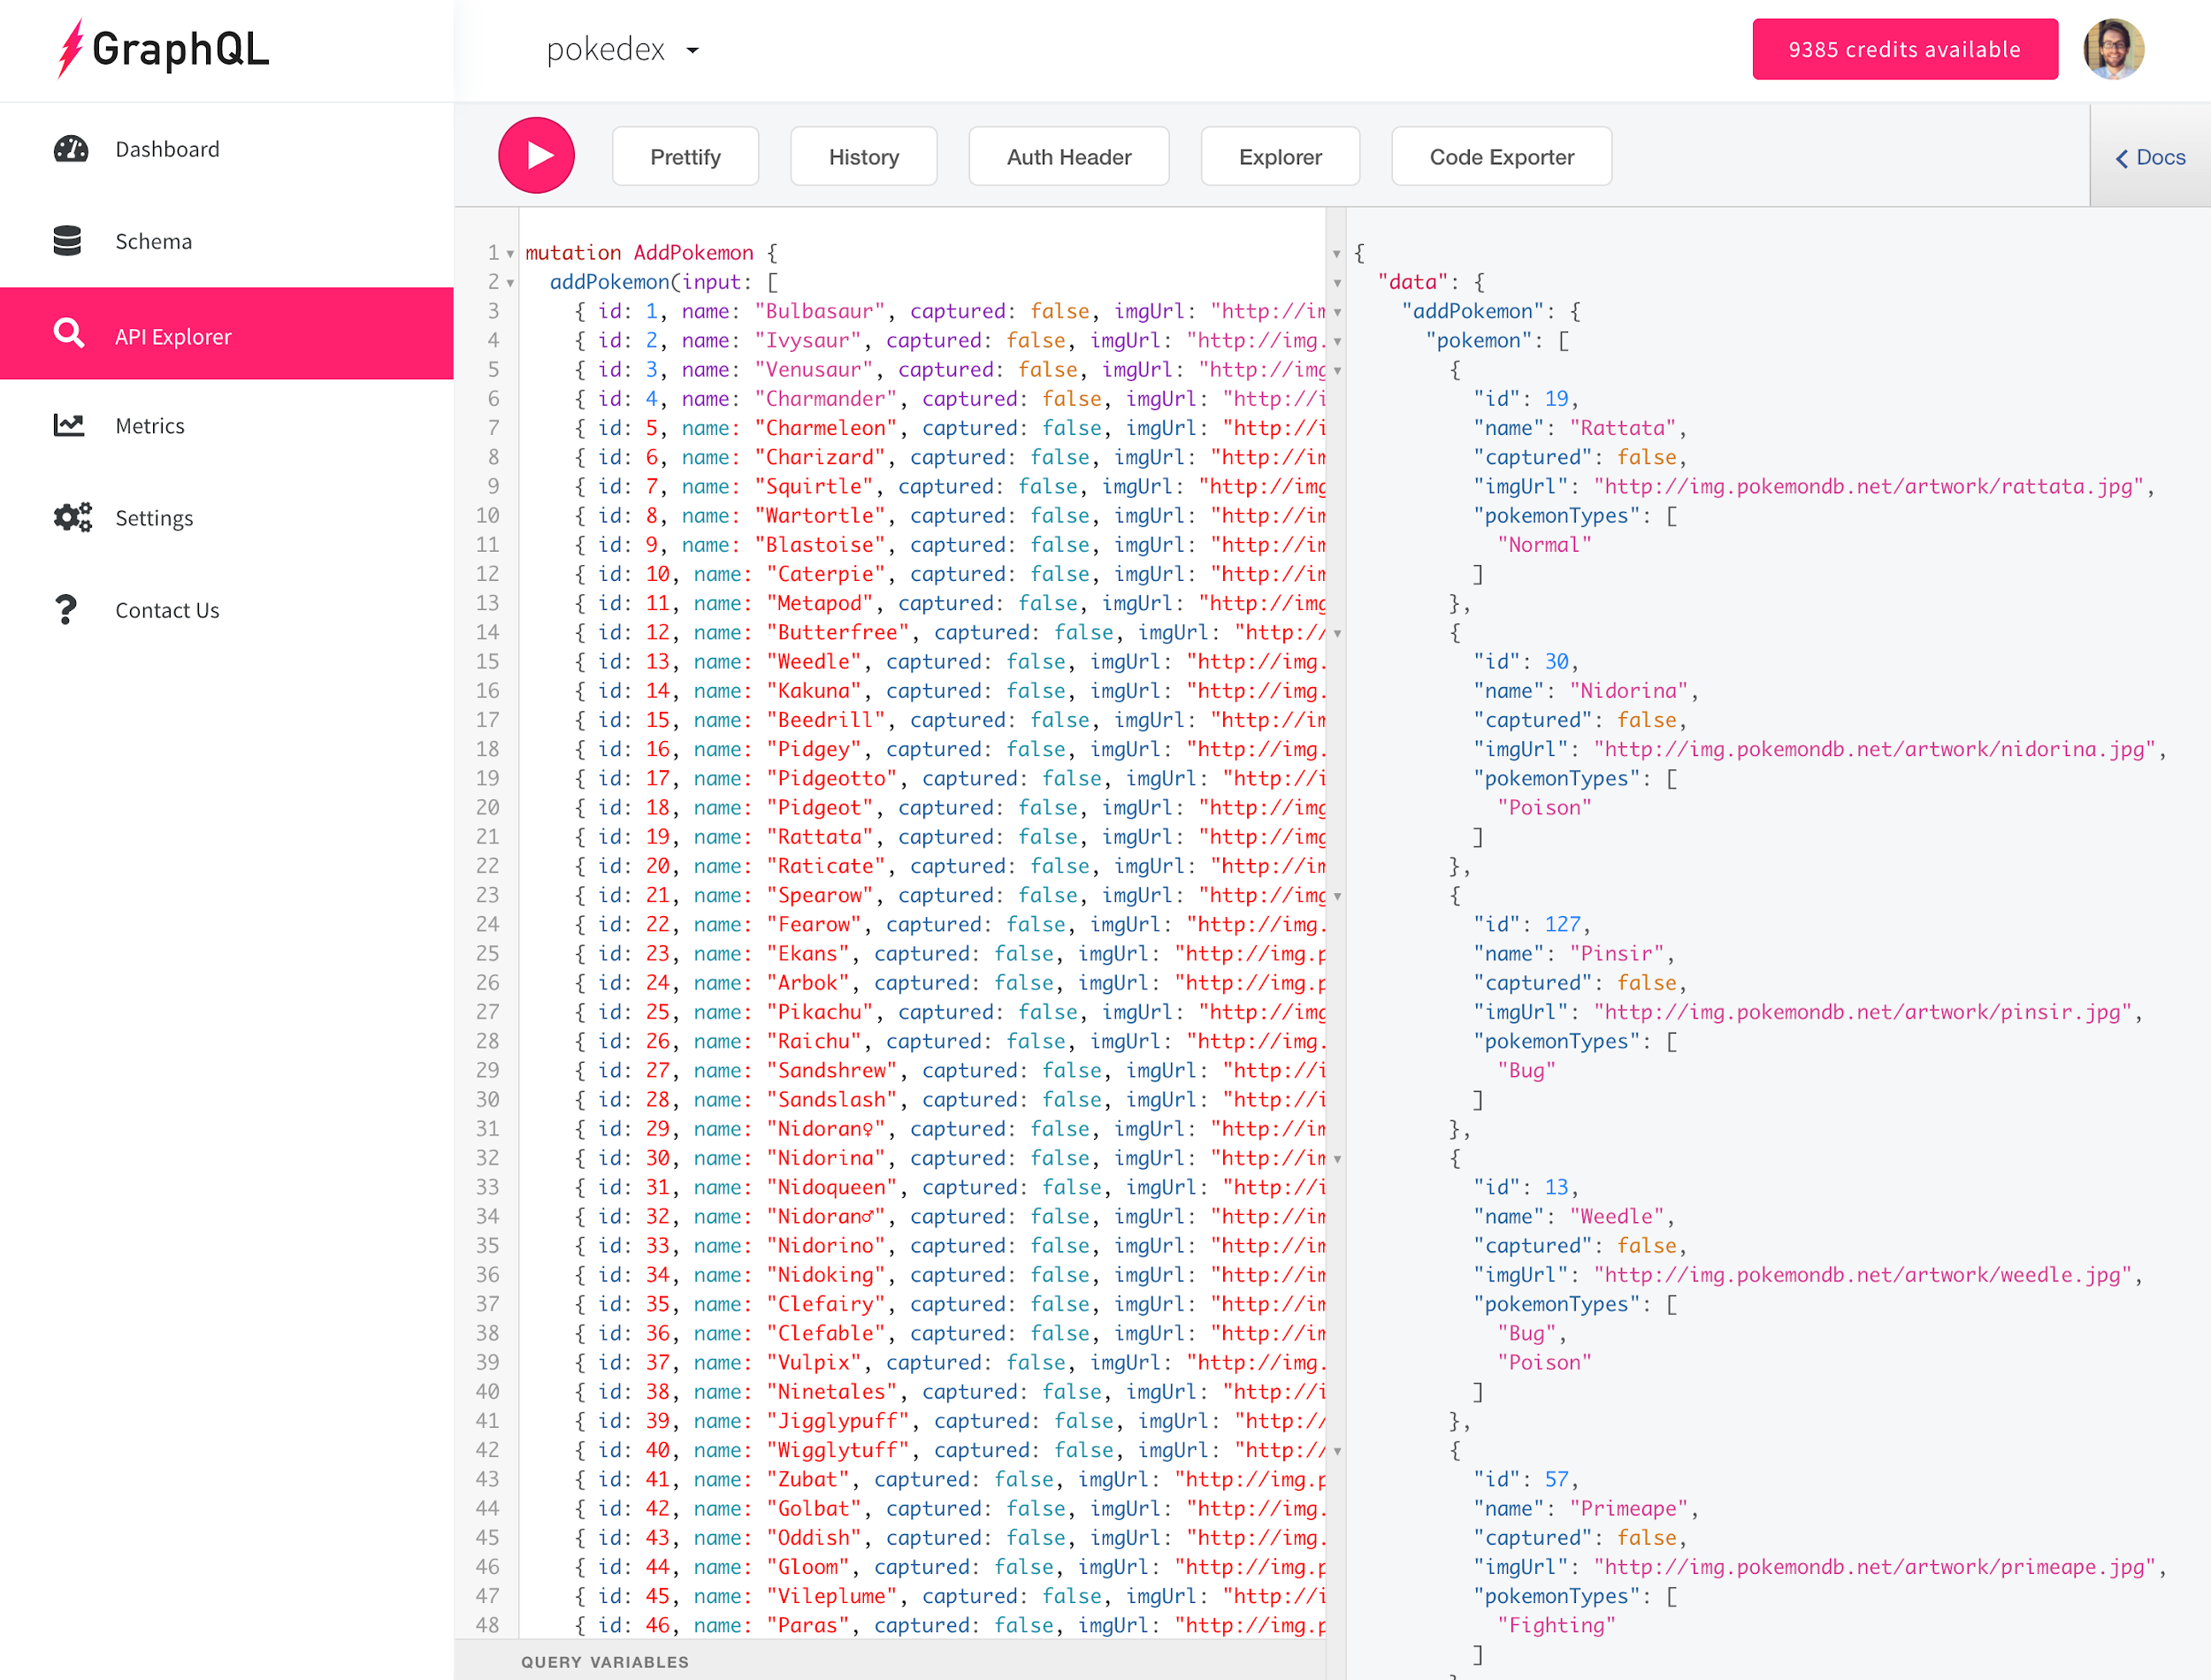
Now, for a quick sanity check, we can query our database to make sure that all our Pokémon have been added correctly. We'll request the data for all our Pokémon like so:
xxxxxxxxxx
query GetAllPokemon {
queryPokemon {
id
name
captured
imgUrl
pokemonTypes
}
}
Here's what it looks like in the API Explorer:

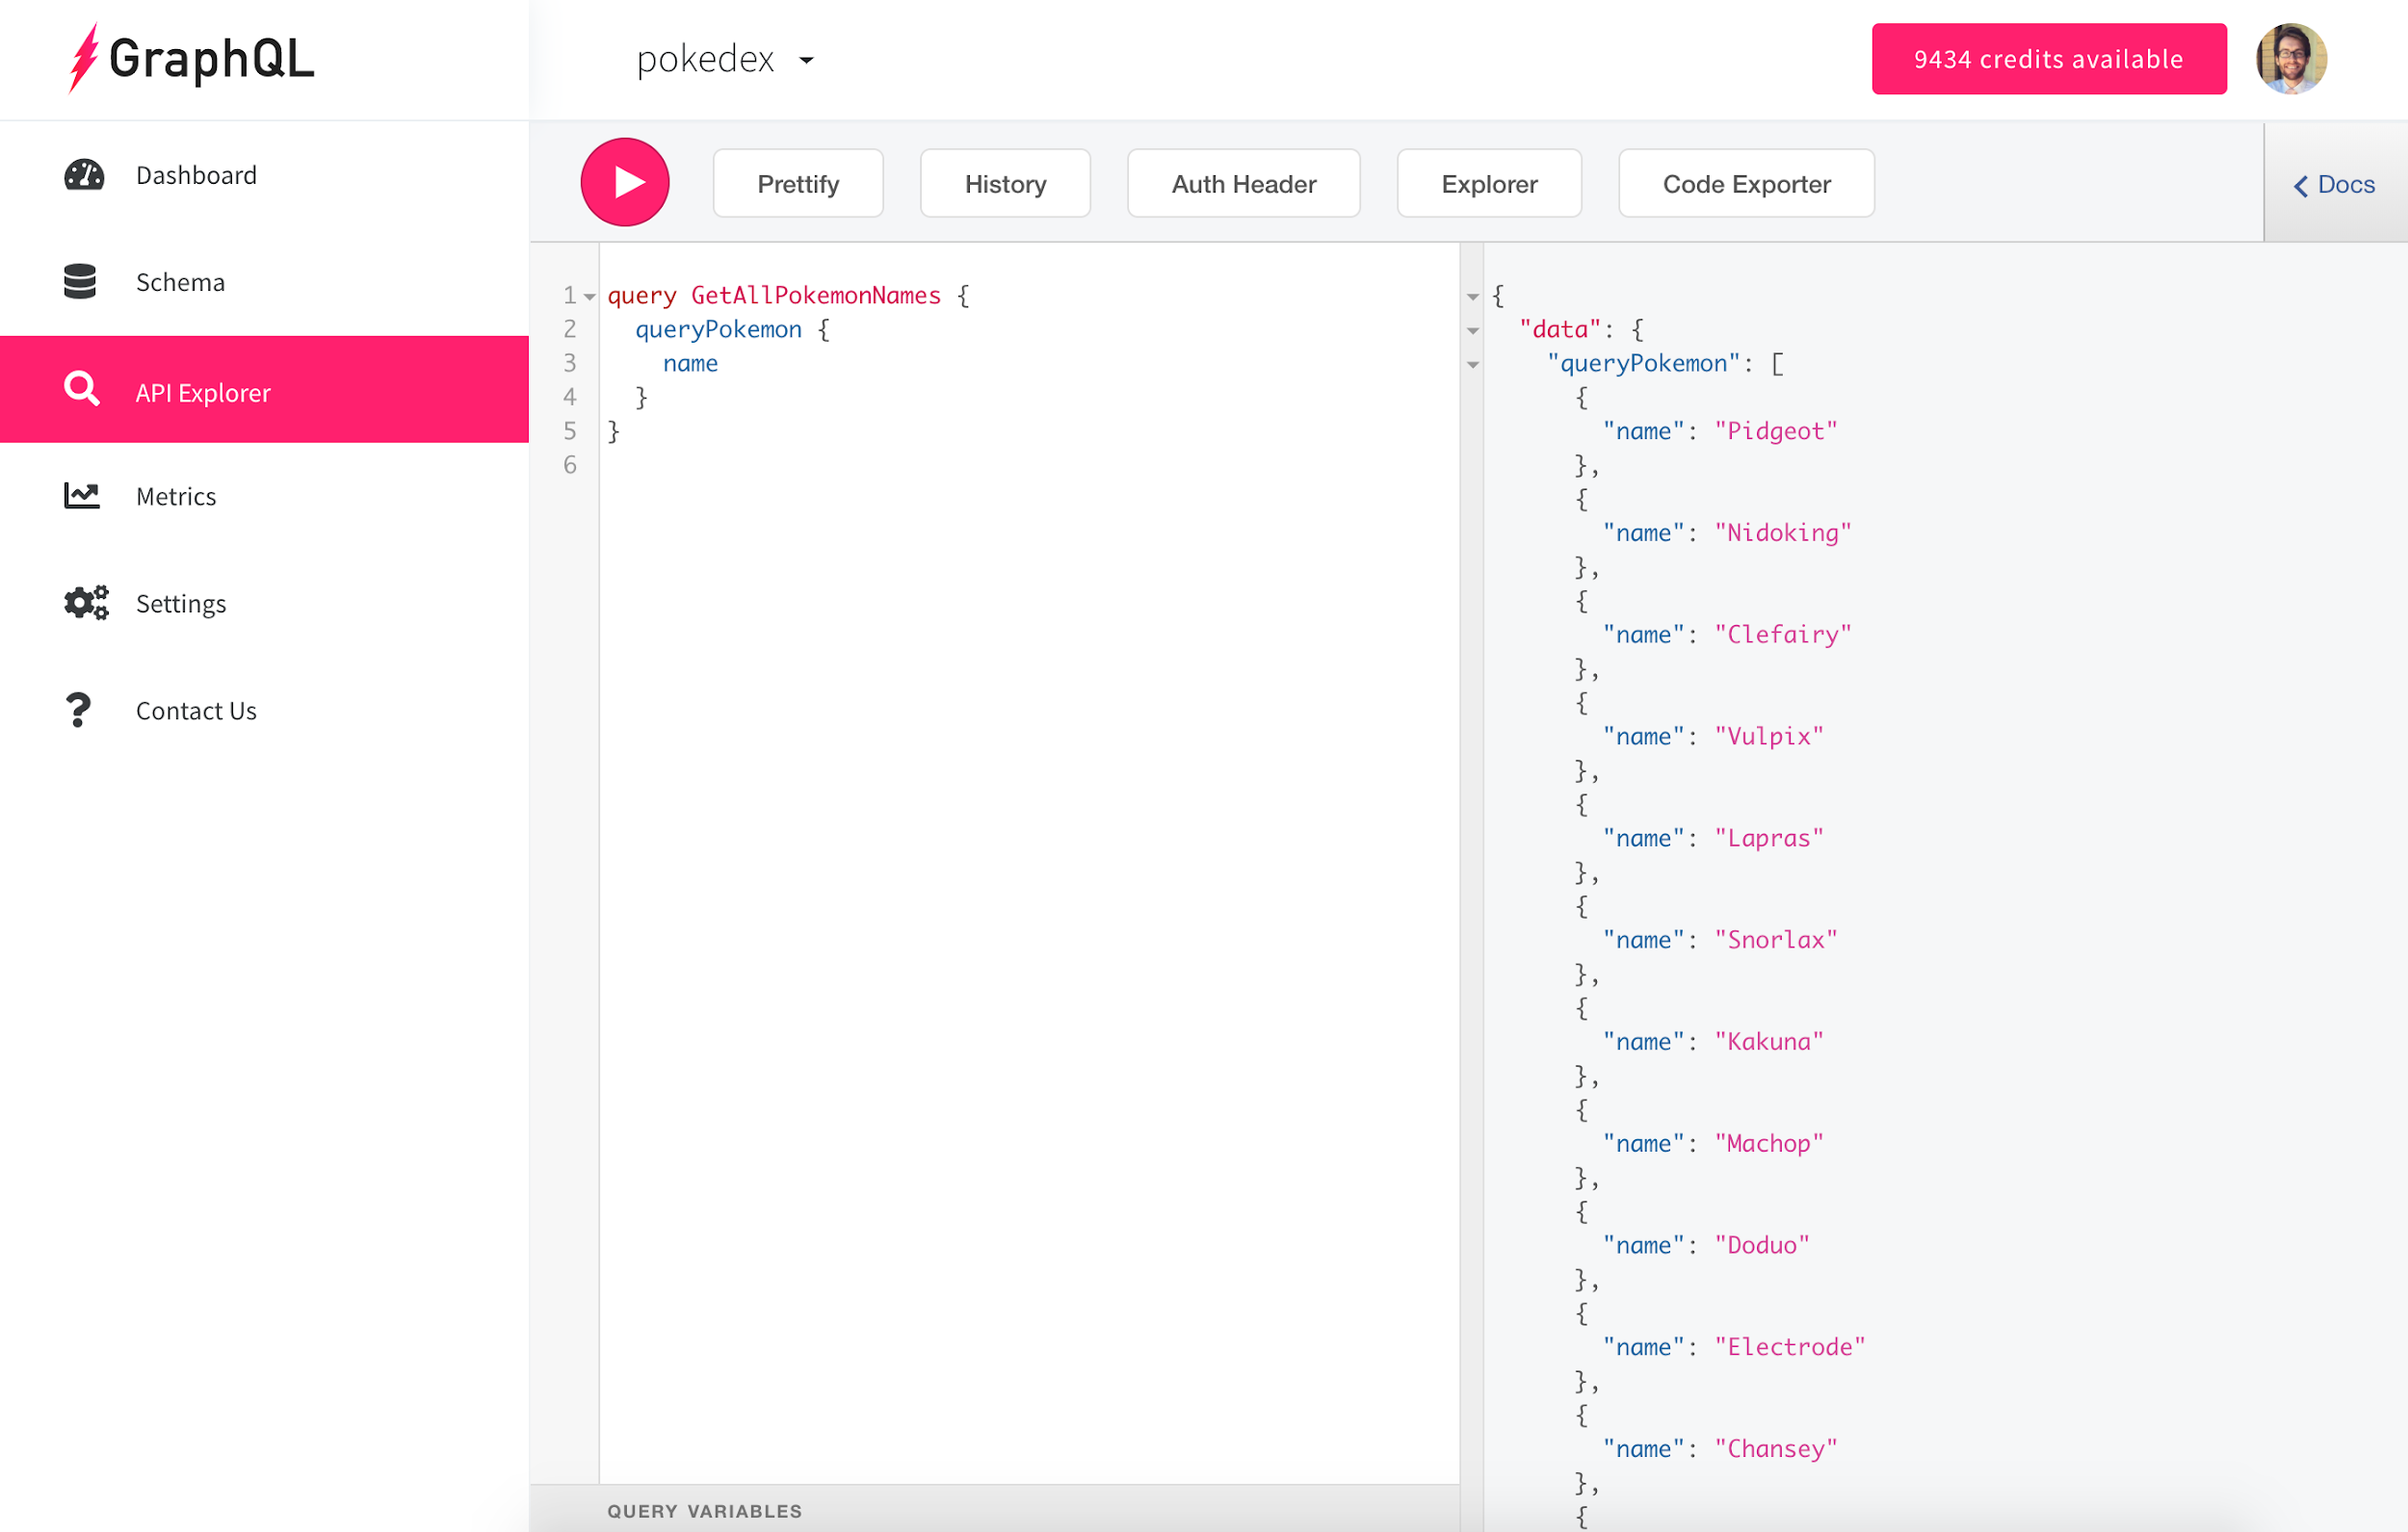
We could also write a similar query that only returns the Pokémon names if that's all the data we need. Behold, the beauty of GraphQL!
xxxxxxxxxx
query GetAllPokemonNames {
queryPokemon {
name
}
}
Fetching Data in the App
Now that we've added our Pokémon to the Pokédex and verified the data is in fact there, let's get it to show up in our app. Our app was built with React and Material UI for the frontend and was bootstrapped using create-react-app. We won't be going through step-by-step how to build the app, but we'll highlight some of the key parts. Again, the full code is available on GitHub if you'd like to clone the repo or just take a look.
When using Slash GraphQL in our frontend code, we essentially just make a POST request to our single API endpoint that we were provided when creating the backend. In the body of the request, we provide our GraphQL code as the query, we write a descriptive name for the query or mutation as the operationName, and then we optionally provide an object of any variables we reference in our GraphQL code.
Here's a simplified version of how we follow this pattern to fetch our Pokémon in the app:
xxxxxxxxxx
// Main generic GraphQL request
async function fetchGraphQL(operationsDoc, operationName, variables) {
const result = await fetch(
'https://pokedex.us-west-2.aws.cloud.dgraph.io/graphql',
{
method: 'POST',
headers: {
'Content-Type': 'application/json',
},
body: JSON.stringify({
query: operationsDoc,
operationName,
variables,
}),
}
)
return await result.json()
}
// Fetch all Pokemon - GraphQL
const fetchAllPokemonOperationsDoc = `
query fetchAllPokemon {
queryPokemon {
id
name
captured
imgUrl
pokemonTypes
}
}
`
// Fetch all Pokemon - Function
function fetchAllPokemon() {
return fetchGraphQL(fetchAllPokemonOperationsDoc, 'fetchAllPokemon', {})
}
// The rest of the following code is called in the main App component:
const { errors, data } = await fetchAllPokemon()
if (errors) {
console.error(errors)
}
const result = data.queryPokemon.sort(
(pokemonA, pokemonB) => pokemonA.id - pokemonB.id
)
// setPokedexData is a setter method from using the `useState` React hook, not shown in this gist
setPokedexData(result)
We then take that data and loop over it using the Array map helper function to display each Pokémon in the UI.
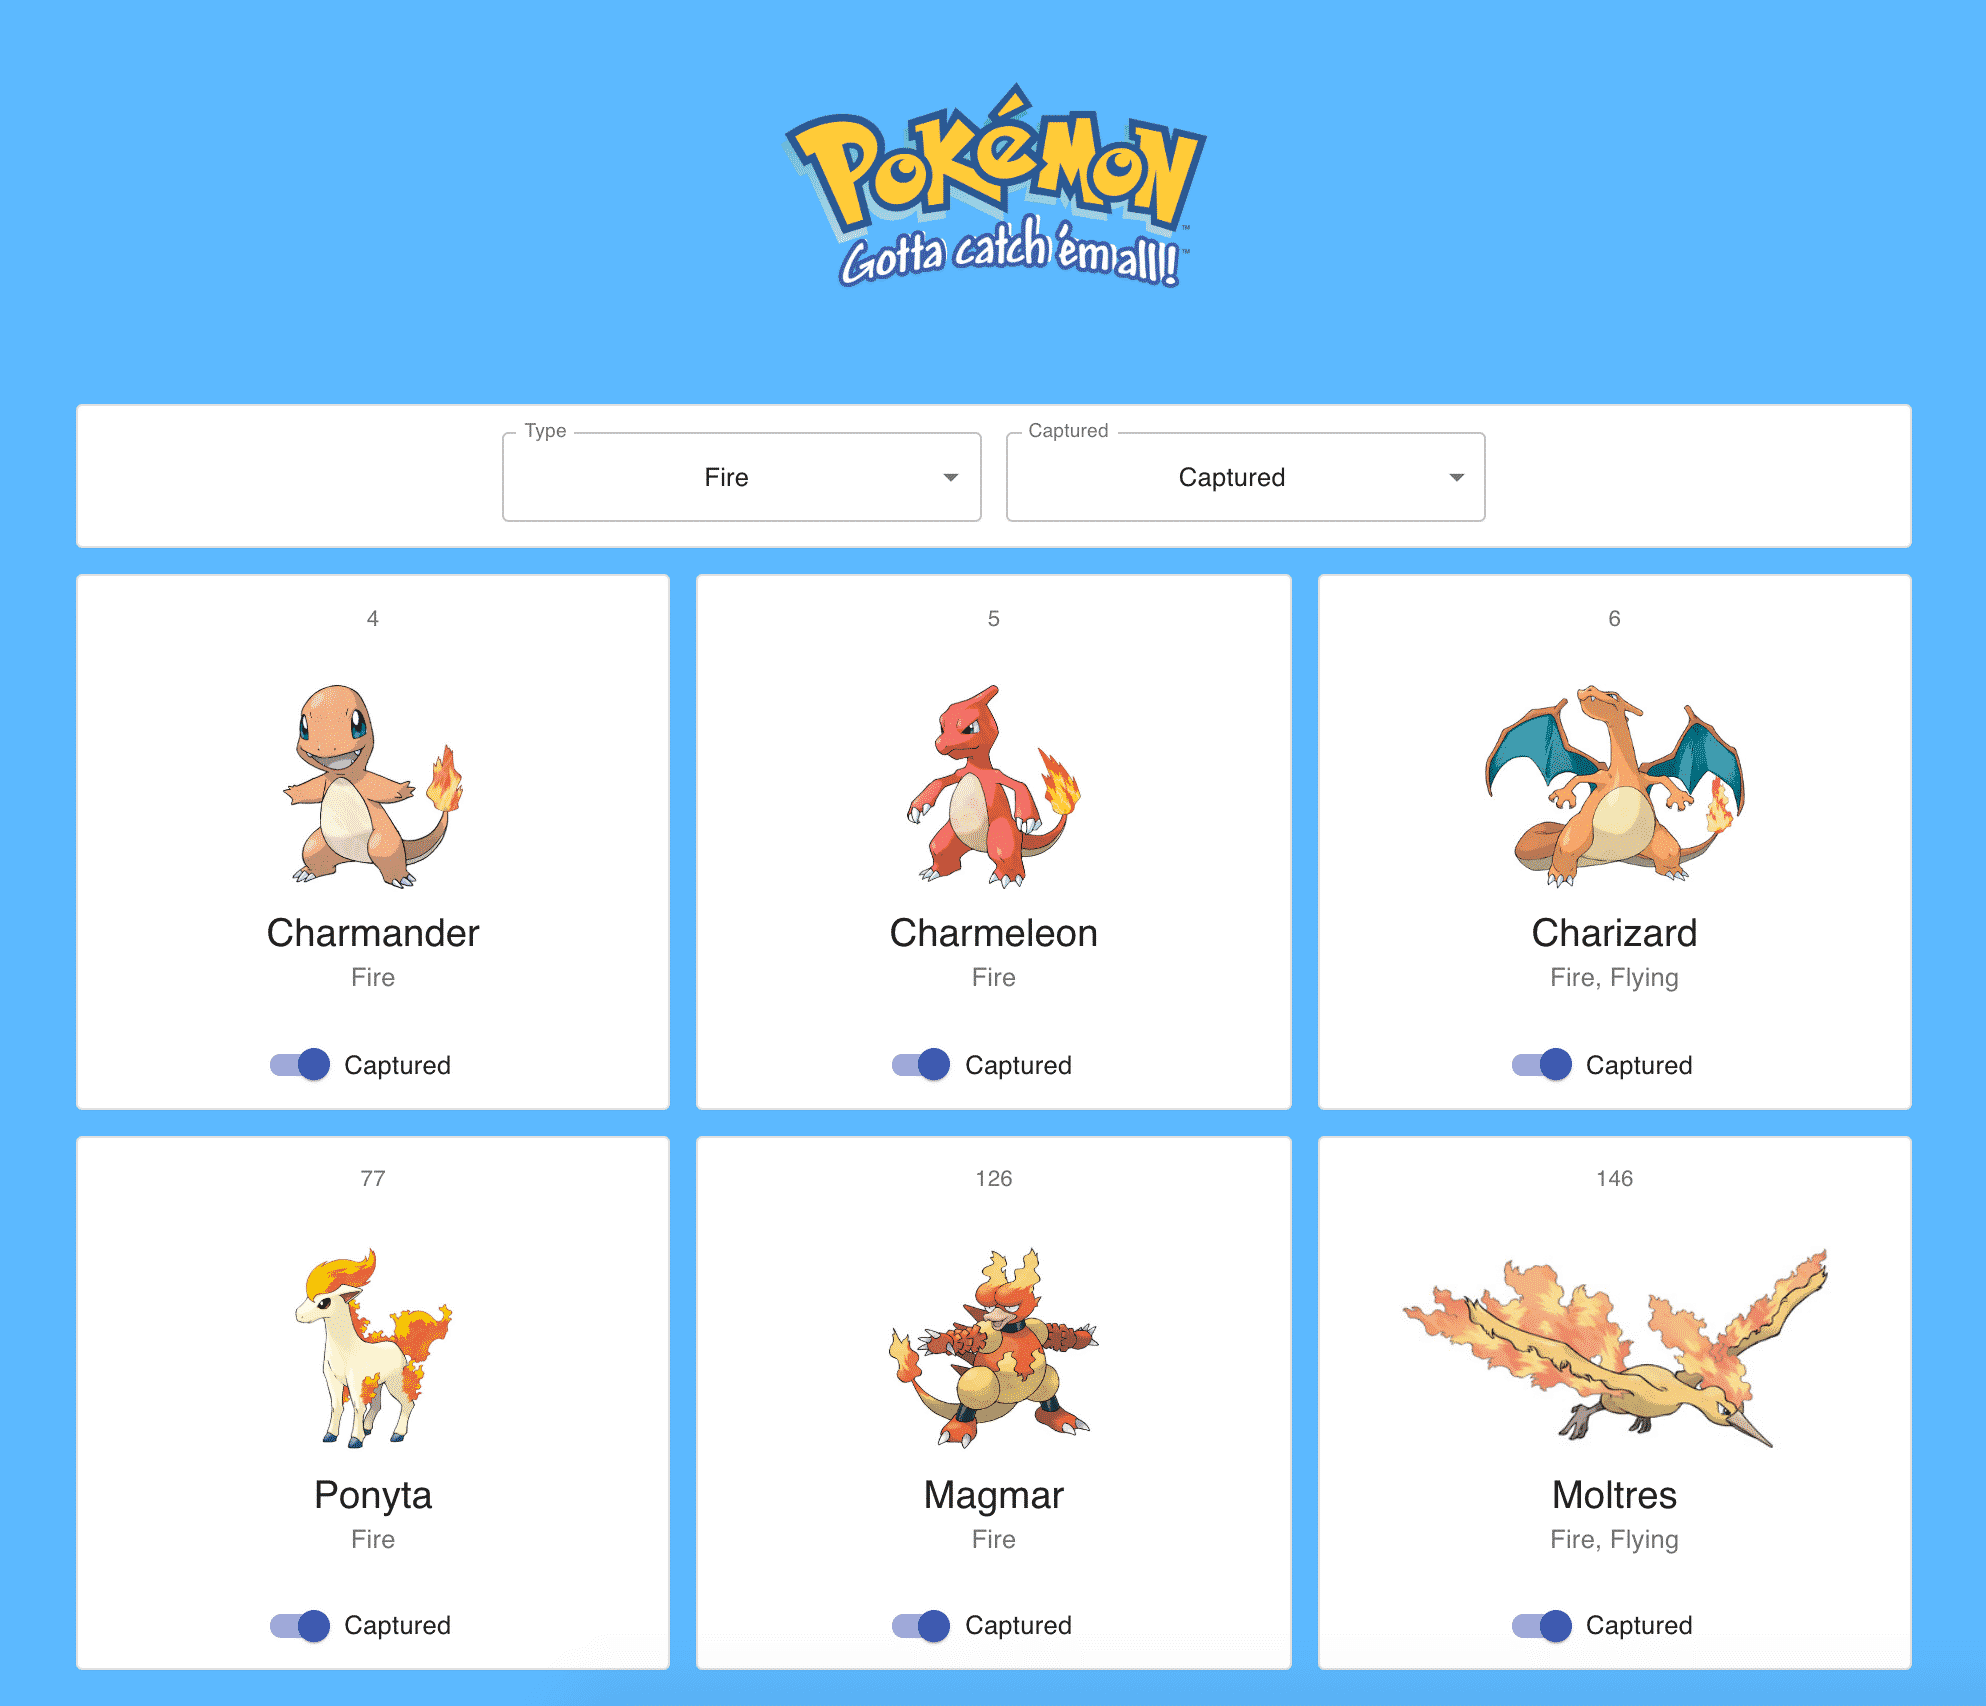
The filters at the top of the page are hooked up to our API as well. When the filter values change, a new API request kicks off, but this time with a narrower set of search results. For example, here are all the Fire type Pokémon that we've captured:
The JavaScript for making an API request for Pokémon filtered by type and captured status looks a little like this:
xxxxxxxxxx
const fetchPokemonOfCertainTypeAndByCapturedStatusOperationsDoc = ({
pokemonType,
isCaptured,
}) => `
query fetchPokemonOfCertainTypeAndByCapturedStatus {
queryPokemon(filter: { captured: ${isCaptured}, pokemonTypes: { eq: [${pokemonType}] } }) {
id
name
captured
imgUrl
pokemonTypes
}
}
`
function fetchPokemonOfCertainTypeAndByCapturedStatus({
pokemonType,
isCaptured,
}) {
return fetchGraphQL(
fetchPokemonOfCertainTypeAndByCapturedStatusOperationsDoc({
pokemonType,
isCaptured,
}),
'fetchPokemonOfCertainTypeAndByCapturedStatus',
{}
)
}
Updating Data in the App
At this point we've sufficiently covered creating Pokémon from the API Explorer and fetching Pokémon within our Pokédex app via JavaScript. But what about updating Pokémon? Each Pokémon has a toggle switch that controls the Pokémon's captured status. Clicking on the toggle updates the Pokémon's captured status in the database and then updates the UI accordingly.
Here is our JavaScript to update a Pokémon:
xxxxxxxxxx
// Update the Pokemon Captured Status - GraphQL
const updatePokemonCapturedStatusOperationsDoc = (
pokemonId,
newIsCapturedValue
) => `
mutation updatePokemonCapturedStatus {
updatePokemon(input: {filter: {id: {eq: ${pokemonId}}}, set: {captured: ${newIsCapturedValue}}}) {
pokemon {
id
name
captured
imgUrl
pokemonTypes
}
}
}
`
// Update the Pokemon Captured Status - Function
export function updatePokemonCapturedStatus(pokemonId, newIsCapturedValue) {
return fetchGraphQL(
updatePokemonCapturedStatusOperationsDoc(pokemonId, newIsCapturedValue),
'updatePokemonCapturedStatus',
{}
)
}
We then call the updatePokemonCapturedStatus function when the toggle value changes. This kicks off the API request to update the value in the database. Then, we can either optimistically update the UI without waiting for a response from the backend, or we can wait for a response and merge the result for the single Pokémon into our frontend's larger dataset of all Pokémon. We could also simply request all the Pokémon again and replace our frontend's stored Pokémon info with the new result, which is what I chose to do.
Deleting Data from the Database
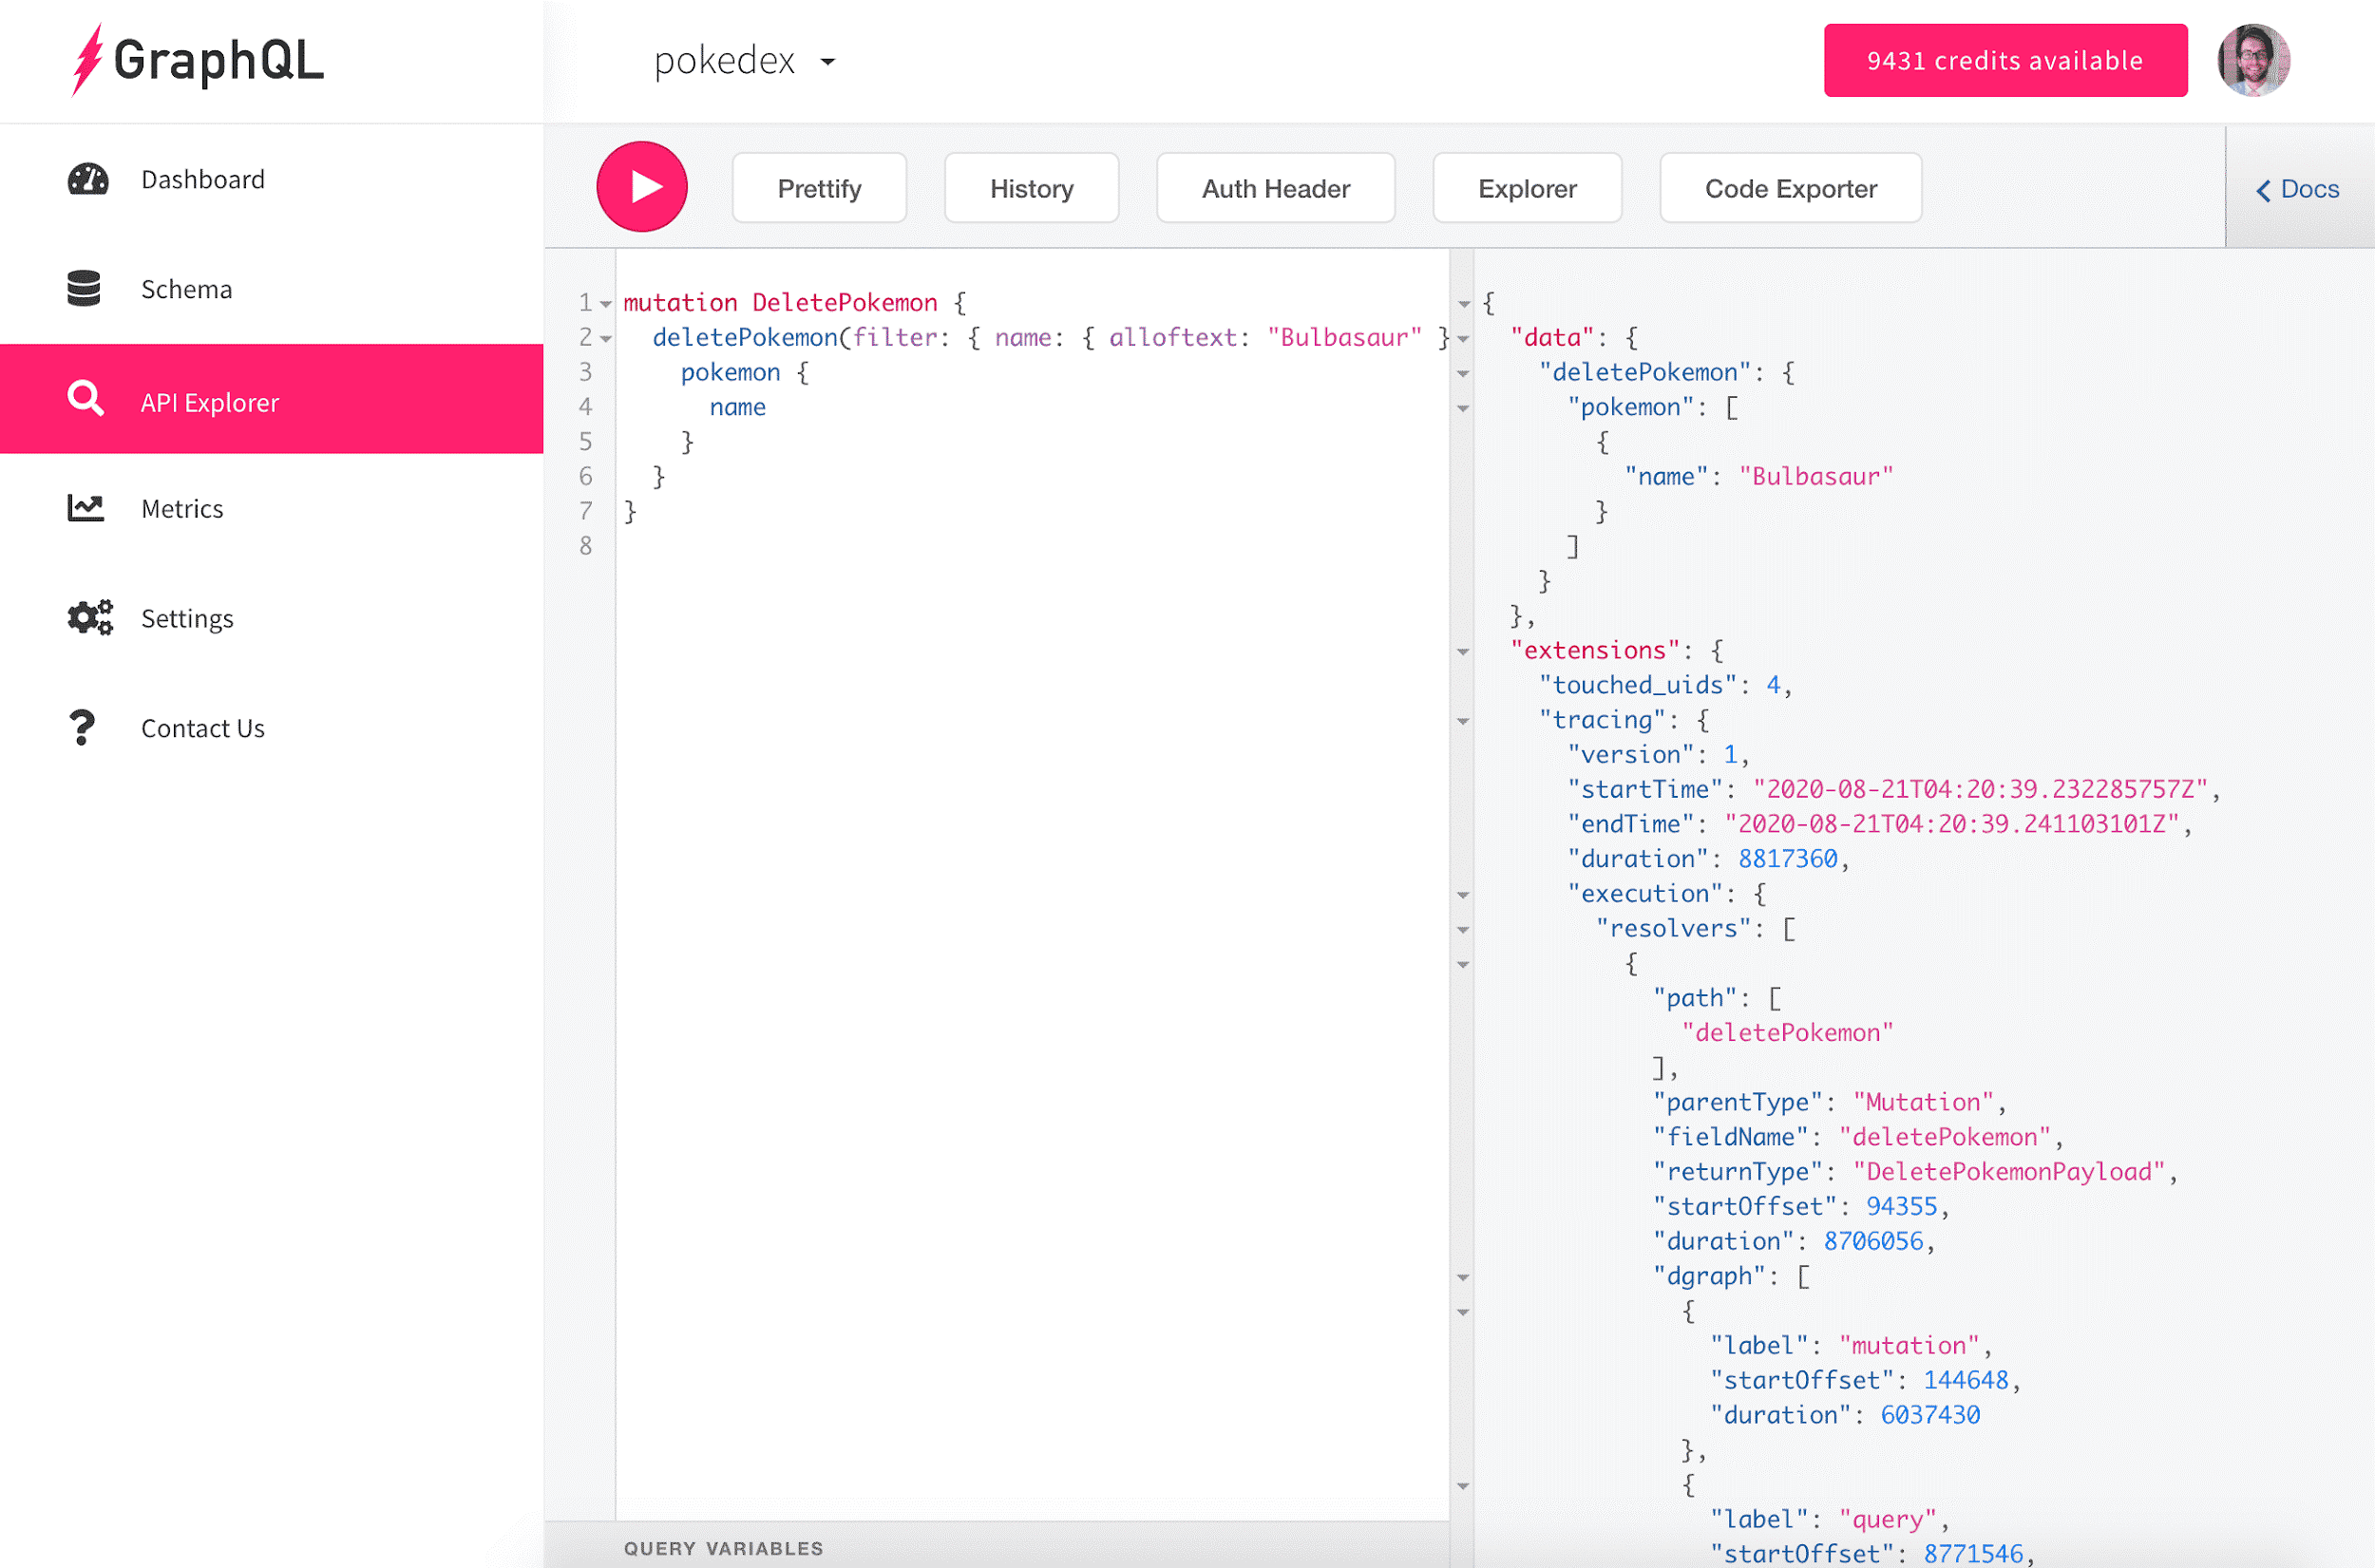
The last of the CRUD operations is "delete". We won't allow users to delete Pokémon from within the app's UI; however, as the app admin, we may need to delete any mistakes or unwanted data from our database. To do so, we can use the API Explorer again.
For example, if we found that we have an extra Bulbasaur in our Pokédex, we could delete all the Bulbasaurs:
xxxxxxxxxx
mutation DeletePokemon {
deletePokemon(filter: { name: { alloftext: "Bulbasaur" } }) {
pokemon {
name
}
}
}
Then, we could add one Bulbasaur back:
xxxxxxxxxx
mutation AddPokemon {
addPokemon(input: [
{ id: 1, name: "Bulbasaur", captured: false, imgUrl: "http://img.pokemondb.net/artwork/bulbasaur.jpg", pokemonTypes: [Grass, Poison] }
]) {
pokemon {
id
name
captured
imgUrl
pokemonTypes
}
}
}
Wrapping Up
So, what did we learn? By now we should understand how to work with Slash GraphQL in the context of a React app. We've covered all the CRUD operations to make a pretty sweet Pokédex app. We may have even caught a few Pokémon along the way.
Hopefully we didn't... hurt ourselves in confusion... [cue audible groans from the readers].
We haven't yet covered how to add authentication to secure our app or how to use the Apollo client when making our GraphQL requests, but those are important topics for another article!
As an experienced frontend developer but without much experience using GraphQL, working with Slash GraphQL was refreshingly easy. Getting set up was a breeze, and the API Explorer along with the documentation played a crucial role in helping me explore the various queries and mutations I could make with my data.
Slash GraphQL, I choose you! [more audible groans from the readers]
Opinions expressed by DZone contributors are their own.
Comments