How To Build a Task-Tracker Application in Minutes Using TiDB Cloud Data Service and Vercel
Focused on backend development, this blog guides you through building REST endpoints with TCDS while constructing a Task Tracker app.
Join the DZone community and get the full member experience.
Join For FreeIn our previous post, we introduced TiDB Cloud Data Service (TCDS), a fully managed, low-code backend-as-a-service solution. By seamlessly integrating your data with any application or service through HTTPS, TCDS enables developers to rapidly construct secure and scalable data-driven applications.
This blog guides you through building REST endpoints with TCDS while constructing a Task Tracker app. Focused on backend development, the tutorial covers creating clusters and tables, inserting data, and crafting APIs. It also provides steps for integrating the React frontend hosted on Vercel with the backend. By the end of this tutorial, you will gain a comprehensive understanding of TCDS and acquire a fully functional backend solution catering to both beginners and seasoned developers.
Set up a TiDB Serverless Cluster
Take the steps below to create a free TiDB Serverless cluster:
- Sign in to your TiDB Cloud. Register a TiDB Cloud account if you haven’t got one.
![follow the instructions]()
- Follow the on-screen instructions to create a free Serverless Tier cluster within seconds.

Create a Data Model
- Navigate to the overview page of your cluster and enter the Chat2Query interface on the left.
![Create a Data Model]()
- Execute the SQL script provided below to create both the
tasktrackerdatabase and thetodostable within it. The script includes the insertion of sample data into the todos table. The Task Tracker application relies on this table to store individual tasks along with their related information, including title, description, status, and timestamps.SQLCREATE DATABASE tasktracker; USE tasktracker; CREATE TABLE todos ( `id`INT AUTO_INCREMENT NOT NULL PRIMARY KEY, `task`VARCHAR(255) NOT NULL, `description` TEXT, `status`VARCHAR(50) NOT NULL, `created_at` timestamp NULL DEFAULT CURRENT_TIMESTAMP, `updated_at` timestamp NULL DEFAULT CURRENT_TIMESTAMP ON UPDATE CURRENT_TIMESTAMP )ENGINE=InnoDB AUTO_INCREMENT=1 DEFAULT CHARSET=utf8mb4; INSERT INTO todos (task, description, status) VALUES ('Grocery Shopping', 'Buy groceries for the week including fruits, vegetables, and dairy products', 'Incomplete'), ('Email Client', 'Send the revised project proposal to the client by EOD', 'Incomplete'), ('Gym Session', 'Attend the 6 PM cardio fitness class at the local gym', 'Completed'), ('Book Flight Tickets', 'Book tickets for the upcoming business trip to New York', 'Incomplete'), ('Annual Health Checkup', 'Schedule an annual health checkup appointment with Dr. Smith', 'Completed'); SELECT * FROM todos; - Select all the statements in the script and execute them by clicking on the Run button.

Create a Data App With GitHub Integration
A Data App is a container that consists of a collection of objects like Endpoints. Creating a Data App is the initial phase for generating REST Endpoints. To create a Data App:
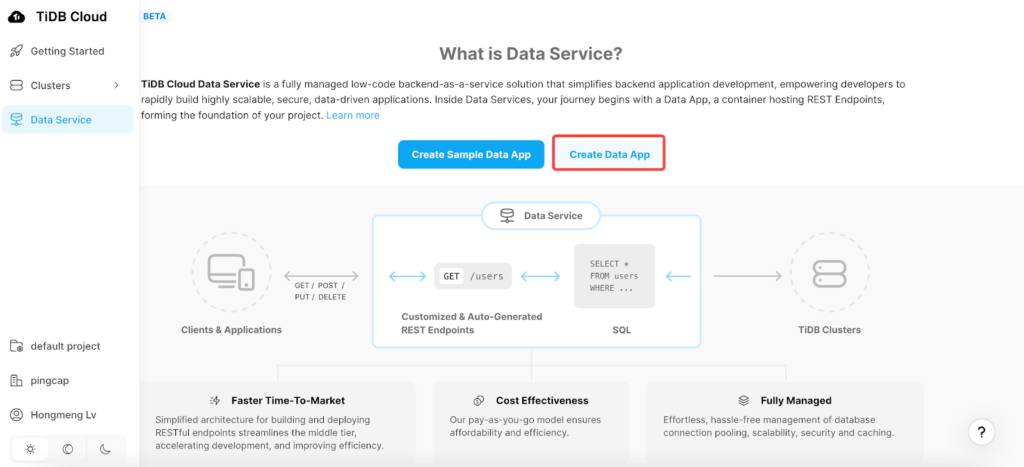
- Select Data Service from the left navigation menu, and click the Create Data App button.
![Create Data App]()
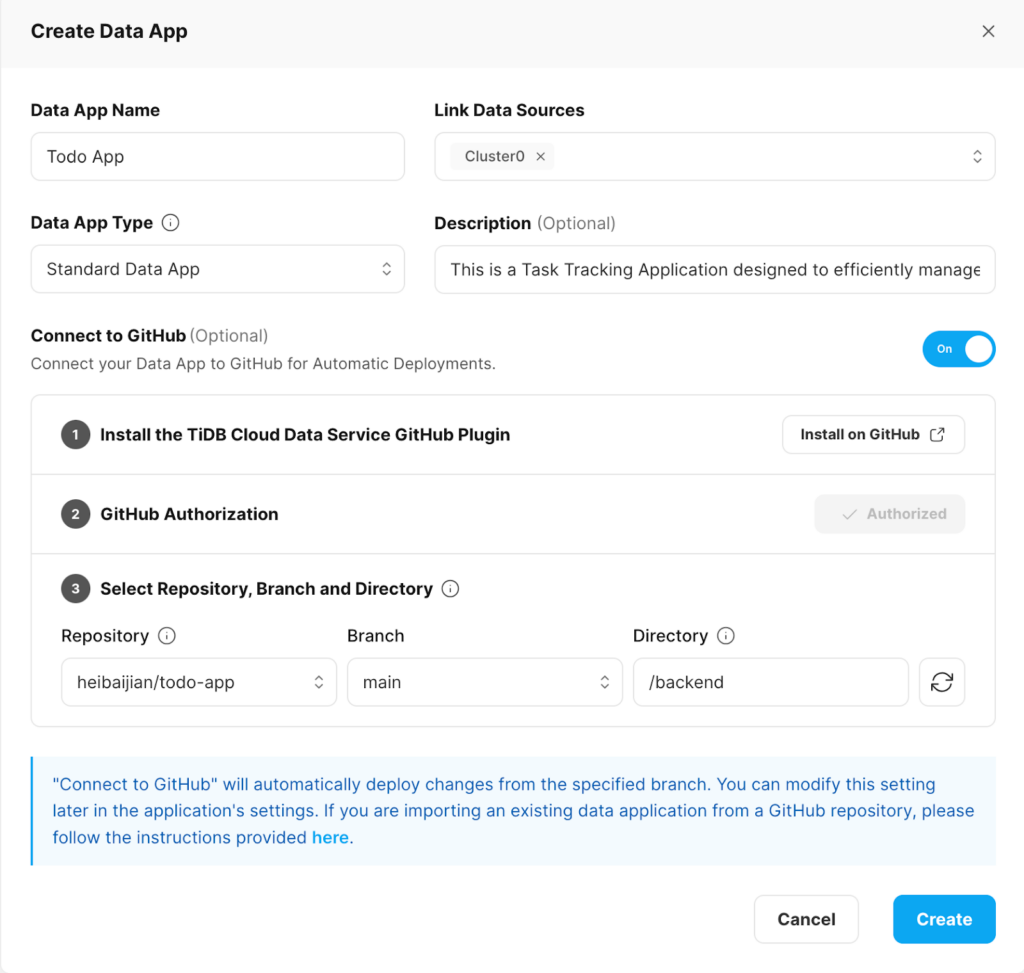
- Create and configure a standard data app as below:
- Name Your App: Enter “Todo App” in the Data App Name field.
- Link Data Sources: Select a cluster to associate with your app. For this example, choose “Cluster0”.
- Describe your App: In the ‘Description’ field, write “This is a Task Tracking Application designed to efficiently manage tasks.” This brief description outlines the app’s purpose.
- App Type: Leave the ‘Data App Type’ field at its default setting.
- Connect to GitHub (Optional):
By integrating with GitHub, you can link a GitHub repository and a specific branch to your TCDS project. This allows for the automatic deployment of your Data App’s metadata and endpoints directly to the connected project. Here:
![Connect to GitHub]()
- Log into your GitHub account and create a todo-app for the task tracker project.
- In the Create Data App screen, follow the on-screen instructions to install Data Service as an application in your target repository.
- Click Authorize to authorize access to the task tracker application on GitHub.
- Specify the todo-app repository, branch, and directory as shown in the screenshot for storing configuration files. This enables TCDS to complete the backend API creation process.
- Click the Create button to create your Data App.
After creating the Data App, you’ll land on the Data App Home page. For first-time users, a Getting Started with Data Service tutorial is available. For this tutorial, we’ll manually walk through each step of creating the endpoints.
Create Endpoints
This section guides you through the process of setting up four HTTPS endpoints (POST, GET, PUT, DELETE) that will enable Create, Read, Update, and Delete (CRUD) operations on the ‘todos’ table. For more detailed information, refer to our documentation on creating new endpoints.
POST /todos
The POST /todos endpoint allows you to create a new task for the todos table. Follow the steps below to create the endpoint:
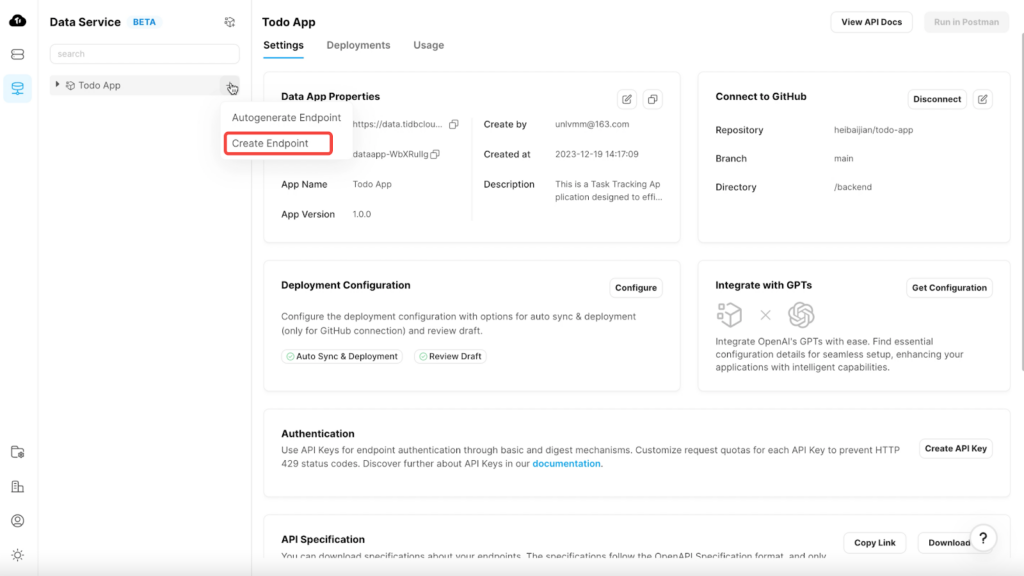
- Initiate the endpoint creation: On the left navigation bar of the Todo App, click the “+” symbol and select the Create Endpoint option.
![Initiate the endpoint creation]()
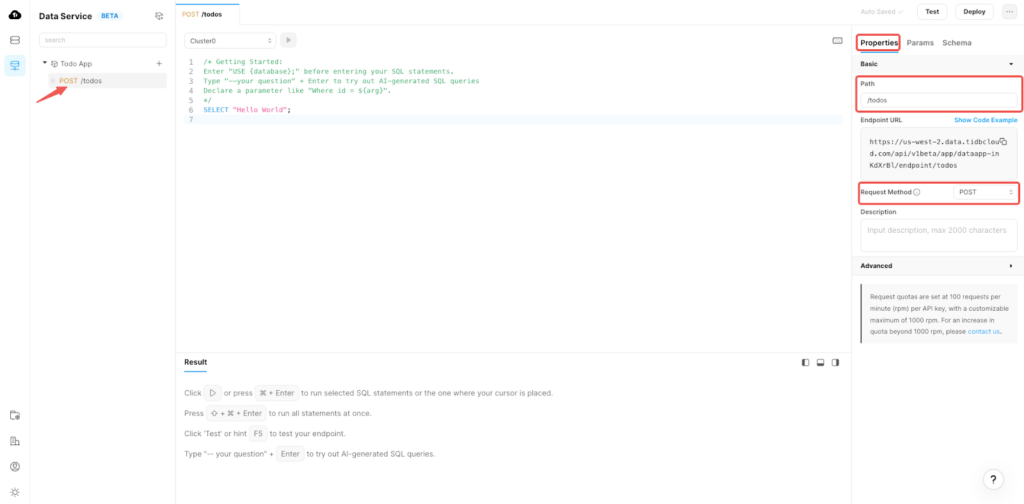
- Configure the endpoint properties. Navigate to the Properties tab:
- Enter the Path as “/todos“. Set the Request Method to POST.
- The endpoint name is automatically generated from the path value entered by default.
![Configure the endpoint properties.]()
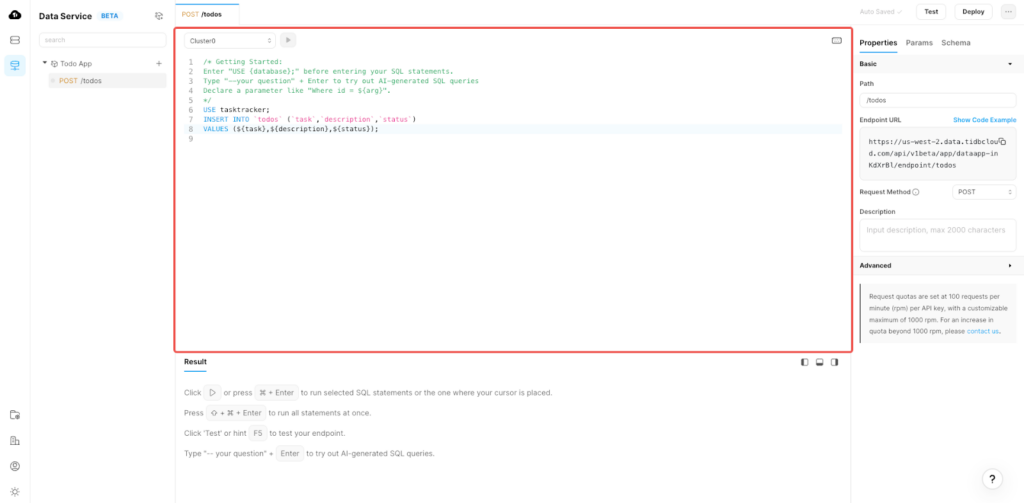
- Configure SQL: The SQL configuration defines the business logic for the endpoint. For this endpoint, use the following SQL script to insert a new task record:
SQL
USE tasktracker;
INSERT INTO `todos` (`task`,`description`,`status`)
VALUES (${task},${description},${status});
Copy the SQL script into the natively provided SQL Editor window:![Copy the SQL script into the natively provided SQL Editor window]()
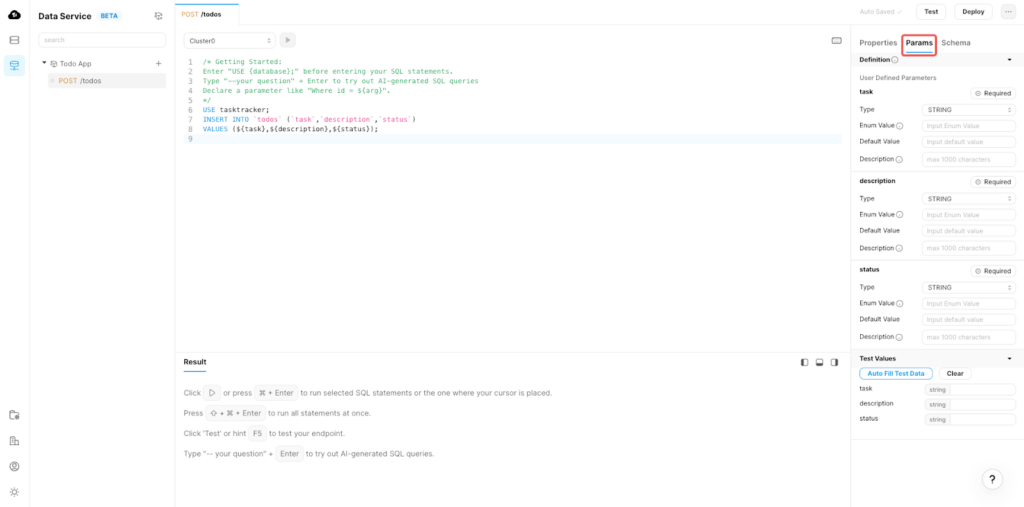
- Configure endpoint parameters: Parameters are variables that add flexibility to your endpoint. They are automatically generated. You can make adjustments to suit your specific needs.
Navigate to the Params tab to explore numerous configuration options:- Set Required to make a parameter mandatory. Align parameter types with your data model.
- Optional settings include enum value, default value, and description. For our todos endpoint, default parameter settings are typically adequate. Refer to our documentation for comprehensive details on configuring endpoint parameters.
![Congratulations on successfully creating your first POST /todos endpoint!]()
Congratulations on successfully creating your first POST /todos endpoint! Now, let’s create the remaining endpoints with a similar procedure.
GET /todos
The GET /todos endpoint retrieves all tasks stored in our todos table. Follow these steps to effectively create and configure this endpoint:
- Navigate to the Properties tab to configure the endpoint properties:
- Enter the Path as /todos.
- Set the Request Method to GET (default).
- Copy the following SQL script into the SQL Editor window:
SQL
 USE tasktracker;
 SELECT * FROM `todos` ;
Note: This endpoint does not have any parameters.
PUT /todos
The PUT /todos endpoint updates a task, especially when the task status changes. Follow these steps to effectively create and configure this endpoint:
- Navigate to the Properties tab to configure endpoint properties:
- Enter the Path as “/todos“.
- Set the Request Method to PUT.
- Copy the following SQL script into the SQL Editor window:
SQL
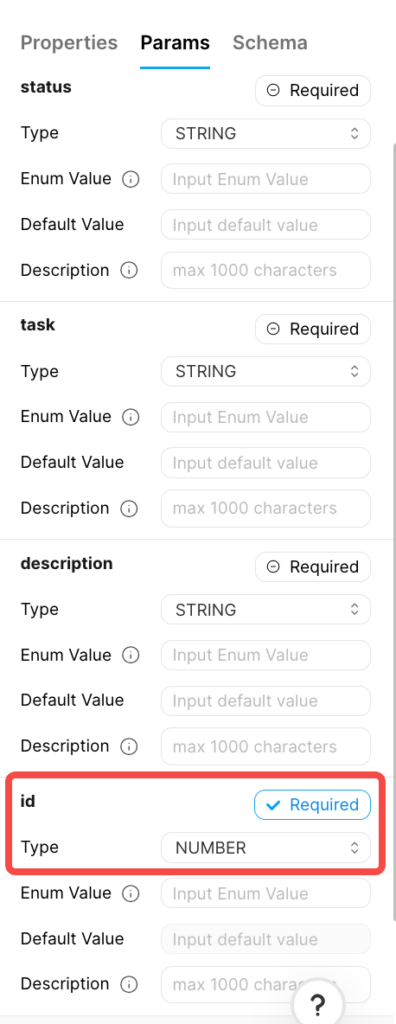
USE tasktracker; UPDATE `todos` SET `status` = IF(length(${status})>0,${status},`status`), `task` = IF(length(${task})>0,${task},`task`), `description` = IF(length(${description})>0,${description},`description`) WHERE `id` = ${id} ; - The above SQL script uses the id of each task for identification and updates. Therefore, it’s essential to correctly configure the ID parameters as below:
- Set the id parameter as Required.
- Change its type from the default string to Number. This aligns with the id field’s type in the todos table.
![Params]()
DEL /todos
The DELETE /todos endpoint deletes tasks. Follow these steps to effectively create and configure this endpoint:
- Navigate to the Properties tab to configure endpoint properties:
- Enter the Path as /todos.
- Set the Request Method to DELETE.
- Copy the following SQL script into the SQL Editor window:
SQL
USE tasktracker; DELETE FROM `todos` WHERE `id` = ${id} ; - Use the same setting as the PUT /todos endpoint to configure endpoint parameters:
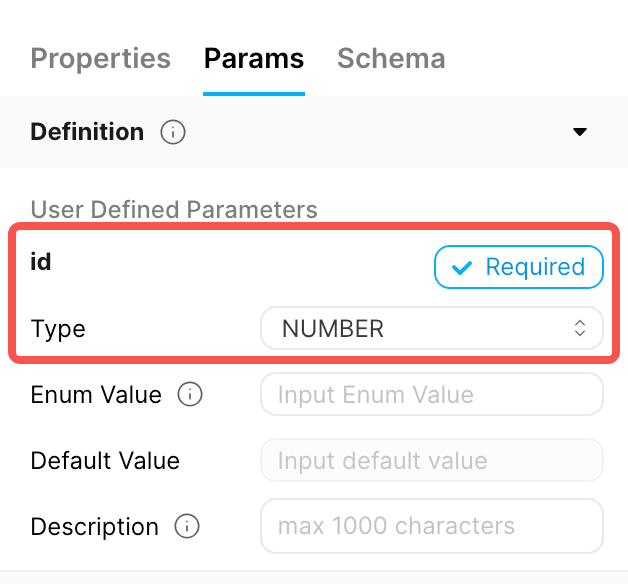
- Set the id parameter as Required.
- Change its type from the default string to Number. This aligns with the id field’s type in the todos table.
![id type]()
Testing the Endpoints
Before we integrate the new endpoints into the actual application, it’s important to test them locally to ensure that they function as expected. Let’s use the POST /todos endpoint as an example to guide you through the testing process:
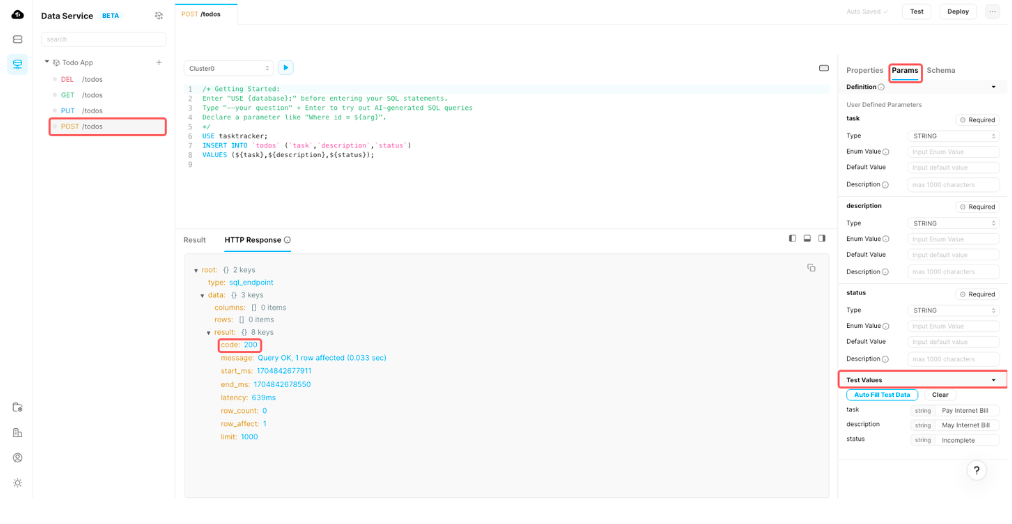
- In the Endpoints list, select POST /todos.
- Under the Params tab, navigate to the Test Values section and configure the test values as below:
- Enter “Pay Internet Bill” for the task.
- Input “May Internet Bill” for the description.
- Enter “Incomplete” for status.
- After configuring the test value, click the Test button on the upper right corner of the screen.
![test button]()
POST /todos endpoint. In the same way, validate the remaining endpoints to ensure the overall robustness and reliability of your application.
Deploy the Endpoints
After thorough testing, it’s time to deploy your endpoints to make them accessible to external clients. Here’s how you can deploy each endpoint:
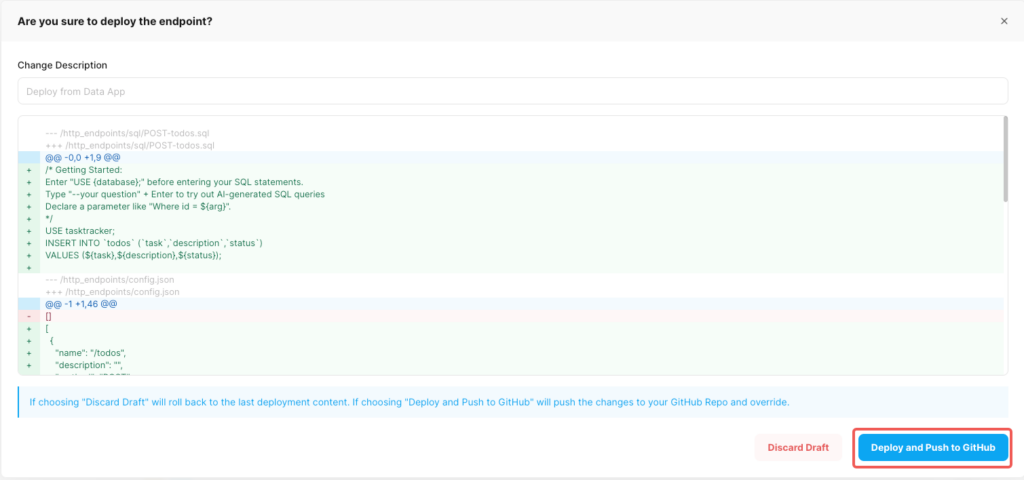
- On the top right corner, click the Deploy button. A Review Changes dialog will pop up.
- Perform a final verification of your edits to ensure everything is configured correctly.
- Click the Deploy and Push to GitHub button. This makes the endpoint publicly available and pushes the changes to your GitHub repository.
![Click the Deploy and Push to GitHub button. This makes the endpoint publicly available and pushes the changes to your GitHub repository.]()
- Repeat the same deployment process for the remaining endpoints.
- Navigate to GitHub to verify if the backend/http_endpoints folder, which you configured earlier, contains configuration files for the deployed endpoint.
Create an API Key
Before exploring your new endpoints, you’ll need to set up an API Key for secure authentication. Here’s how to create one:
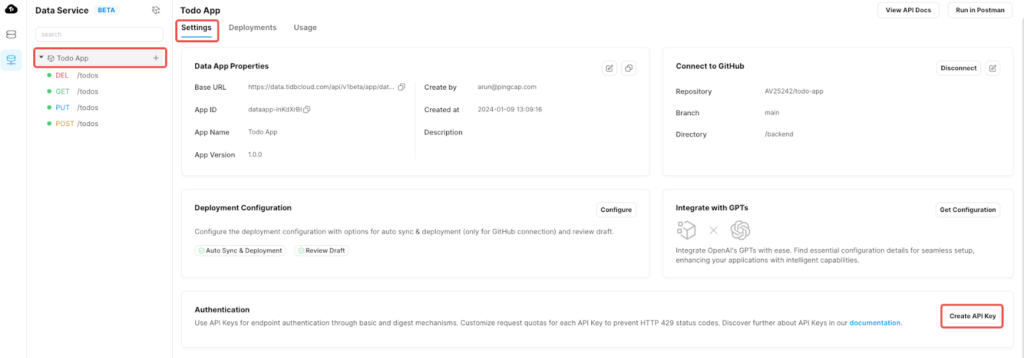
- Click on the Todo App to navigate to your Data App’s home page.
- Inside the Settings menu, find the authentication section and click the Create API Key button.
![Inside the Settings menu, find the authentication section and click the Create API Key button.]()
- In the Create API Key popup window, specify the following:
- Description: Input “TaskTrackerKey”.
- Role: Set the role to “ReadAndWrite”.
- Click Next to generate a Public Key and a Private Key. Copy and securely store both keys in a safe and easily accessible place.
- Click Done to return to the Data App home screen.
Your API Key is now successfully created and ready for use in authentication with your newly created endpoints.
Explore Your Endpoints
With your API Key in place, it’s time to explore the functionality of your newly created endpoints. There are two primary methods for this:
- API Docs: Utilize the built-in Swagger documentation in TCDS.
- Postman: Leverage the integrated Postman support within TCDS.
For this tutorial, we will use API Documentation via Swagger UI. For details on Postman integration, refer to our documentation.
- On the Data App home page, click View API Docs. The API Docs window pops up and presents the API documentation generated through Swagger UI.
- In the top right corner, click the Authorize button to authorize the endpoint access. You will be using the API keys you obtained from the previous step.
- Enter the Public Key as the username.
- Enter the Private Key as the password.
This concludes the process of creating our backend application.
You can now create, retrieve, update, and delete data in the todos table using the secure endpoints through the POST, GET, PUT, and DELETE methods.
Visualize Task Tracker With Vercel
Congratulations! You’re just a few steps away from completing your task tracker app. To finalize the frontend presentation, we’ll deploy using Vercel. Detailed deployment steps are available in the GitHub Readme and Vercel’s documentation.
- Integrate frontend code: Follow these steps to copy the frontend code to your own repository.
- Configure Vercel project: After you’ve integrated the frontend code, it’s time to configure your Vercel project.
- Deploy Vercel project. With all configurations in place, you are now ready to deploy your project on Vercel. This final step will bring your task tracker app to life, making it accessible online.
Conclusion
TCDS offers a user-friendly, scalable, and reliable platform for application building and management. As showcased in this guide, TCDS enables the swift creation of CRUD endpoints, facilitating rapid application development and deployment.
Published at DZone with permission of Arun Vijayraghavan. See the original article here.
Opinions expressed by DZone contributors are their own.
Comments