How to Configure an HTTPS Endpoint for Mule Applications With One-Way SSL
In this tutorial, we will explore the process of setting up an HTTPS endpoint in a Mule Application by configuring TLS with a Keystore.
Join the DZone community and get the full member experience.
Join For FreeIn this post, we will learn about the steps involved in the process of configuring an HTTPS endpoint with one-way SSL for a Mule Application. Securing communication between clients and servers is essential in today's digital world, and using HTTPS over HTTP ensures secure data transfer.
Before we start, let's understand how does CloudHub load balancer work.
When we deploy an app to CloudHub's shared load balancer, the app listens on host 0.0.0.0 and port 8081 for HTTP connection and on port 8082 for HTTPS connection.
For mule workers, the following ports are assigned:
- http.port is set to 8081
- https.port is set to 8082
For the CloudHub to dynamically allocate the correct port at the time of deployment, the ports in the application must be referenced using the reserved properties ${http.port} for HTTP connection and ${https.port} for HTTPS connection.
Any custom port can be used for local testing if the ports are referenced using either http.port or https.port because CloudHub will automatically assign either 8081 or 8082 based on the property used at the time of deployment.
For the load balancers to direct HTTPS traffic to the application, it is necessary to set up the HTTP listener with a certificate and a public-private key pair. It's important to note that the certificate configured within the application is not validated by the CloudHub load balancer. As a result, any self-signed certificate can be utilized, regardless of the host for which it was generated.
Setting up an HTTPS Endpoint
Step 1: Create a Keystore
Step 1.1: Create or open the project in which the HTTPS endpoint is needed to be configured. In this tutorial, I have taken a project which has an HTTP endpoint configured, and we will change it to HTTPS.

HTTP Listener Config:

In this example, the "/hello" endpoint is listening on port 8081 and hosted on localhost(0.0.0.0).

Step 1.2: Create a "cert" folder inside the "src/main/resources' folder. In this "certs" folder, we will store the Keystore.

Step 1.3: Navigate to the "certs" folder in system explorer and open the command prompt there.

Step 1.4: Execute the following command to create a Keystore.
keytool -genkeypair -keyalg <algorithm> -alias <alias> -keystore <keystoreName> -storetype <storeType> -keypass <keyPassword> -storepass <storePassword>
Note: Please be sure to replace the placeholders in the above command.
Example of the above command that is used in this tutorial:
keytool -genkeypair -keyalg RSA -alias mule-server -keystore demo-project.p12 -storetype pkcs12 -keypass mule1234 -storepass mule1234
The above command is a Java "keytool" command which is used to generate a new key pair and store it in a file. A Java KeyStore is a repository where cryptographic keys and their corresponding certificates can be stored securely.
Let's understand the above command and its parameters:
keytool: This is a Java key and certificate management tool which comes with Java Development Kit(JDK).genkeypair: This parameter indicates thekeytoolto generate a new Public key and a Private Key.keylag RSA: This parameter specifies the algorithm that should be used for generating the key pair. In this example, we have used the RSA algorithm.alias mule-server: The private key and the certificate are stored together in a Keystore. The alias is a unique name that can be used to refer to this key pair within the Keystore.keystore demo-project.p12: This specifies the name of the keystore where the generated key pair will be stored. In this case, the keystore file will be named "demo-project.p12".storetype pkcs12: This parameter sets the type of keystore. In this case, it's "pkcs12".keypass mule1234: This sets the password for the private key.storepass mule1234: This sets the password for the keystore. The whole keystore is encrypted with this password.

After the execution of the above command, we need to answer some questions to create the Keystore. Please answer them accordingly.

After answering the questions, the keystore will be automatically created in the "certs" folder.
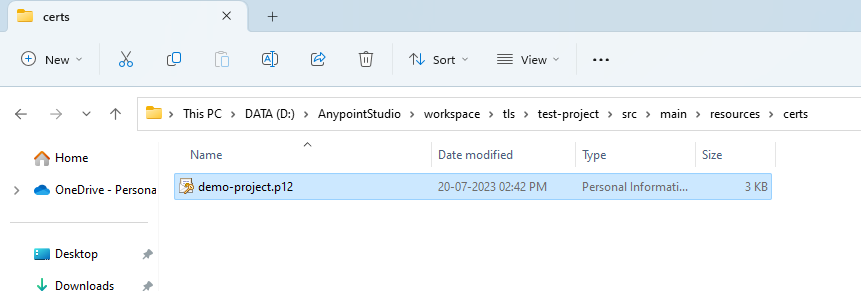
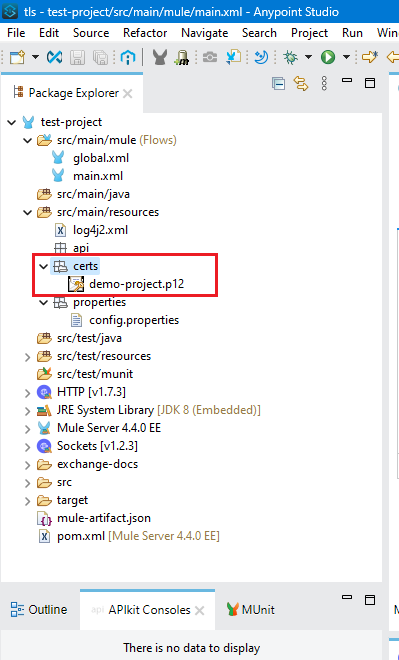
Step 1.5: Go to Anypoint Studio and refresh the project. The "certs" folder will get populated with the Keystore.
Step 2: Configure the Keystore
Step 2.1: Go to the properties file and add the "https.port" and "https.host" properties. In this tutorial, we are using localhost and port 8082.
Note: For local deployment/testing, any port can be used.

Step 2.2: Now, we need to create a configuration for TLS. In the "Global Elements" window search for "TLS Context" and add it.

Now add the details of the Keystore in the TLS Context and save it.

Step 2.3: Go to the HTTP listener Config and change the Protocol to "HTTPS," and replace the host and port properties with ${http.host} and ${https.port} respectively.

Step 2.4: Go to the "TLS" tab in the HTTP listener Config, and in the "TLS Configuration," select the "Global reference," and in the "Global reference," select the TLS configuration that we created in Step 2.2. Save it.
Now we are done with all the configurations. Save the project and run it.
When the project gets deployed locally, make a call to the endpoint with HTTPS protocol using Postman. Make sure to disable the SSL Certificate Validation in the Postman for local testing.
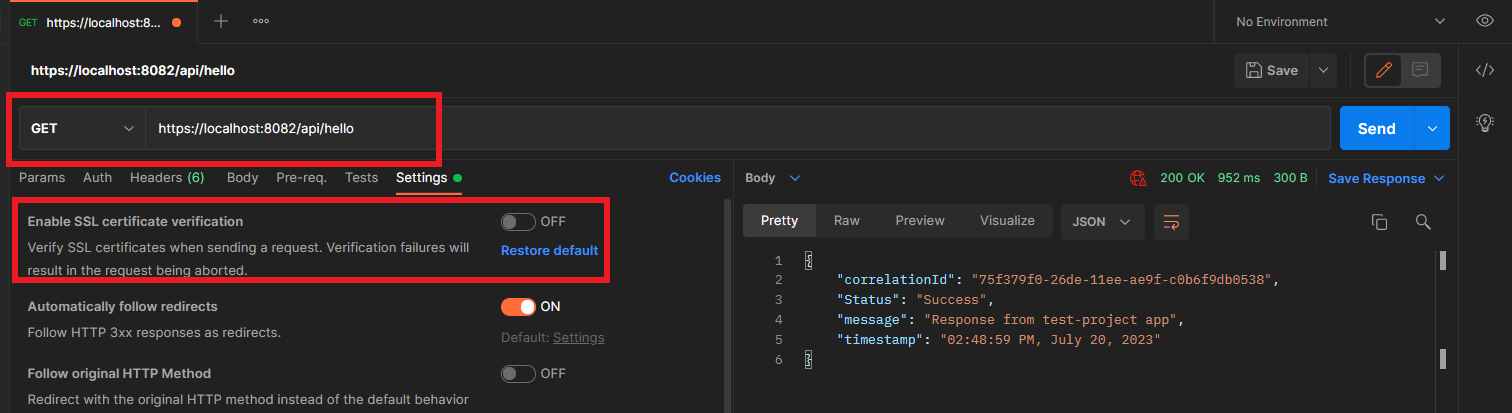
You should be able to get a 200 response back.
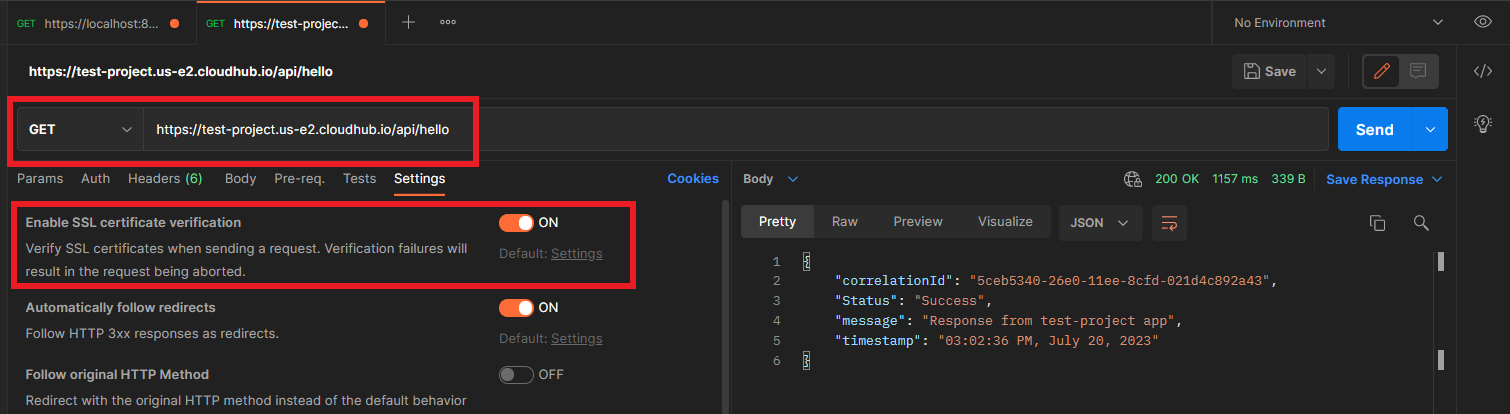
Now deploy the mule app to the CloudHub. 
Once the app gets deployed, make a call to the endpoint with HTTPS protocol, and we should get a successful response back.
Now we can make a call to this endpoint deployed in the CloudHub from the Postman even with SSL Certificate Validation enabled.
In this way, we can configure an HTTPS endpoint in a mule app using one-way SSL. I hope this tutorial will help you.
Opinions expressed by DZone contributors are their own.
Comments