How to Create an Onboarding UI With Xamarin Forms
This tutorial assumes you are comfortable with Xamarin.Forms and the Model-View-Model pattern.
Join the DZone community and get the full member experience.
Join For Freea user opens up your app for the first time, you got a chance to help him get familiar with it, how? you can show him a series of screens that explain what the app can do, that's onboarding in a nutshell.
in this tutorial, we are going to learn how to create an onboarding ui with xamarin.forms.
note:
this tutorial assumes you are comfortable with xamarin.forms and the model-view-model pattern.
getting started
in this tutorial, we are going to create an onboarding ui for an app called tabia , tabia helps his users create habits that last.
setting up the project
open visual studio and create a blank new xamarin.forms project, build and run the project, you should have the following screen:

detecting if the app is launched for the first time
onboarding screens are shown only if the app is launched for the first time, xamarin.essentials come with a class called versiontracking that can help with that. make sure xamarin.essentials package is installed in your nuget packages.

note:
at the time of writing this tutorial, xamarin.essentials are already installed with the default template solution.
open app.xaml.cs , override onstart method and add the following line of code.
versiontracking.track();
open mainpage.xaml.cs and add the following line of code in the constructor.
xxxxxxxxxx
if(versiontracking.isfirstlaunchever) { //todo : launch onboarding page }
now, we know when the app is launched for the first time, we will add the code to launch onboarding later on.
creating the onboarding ui
two nuget packages are necessary:
let's install the two packages.


ffimageloading needs to be initialize in each platform-specific project ( appdelegate.cs, mainactivity.cs ).
on ios:
xxxxxxxxxx
ffimageloading.forms.platform.cachedimagerenderer.init();
on android:
xxxxxxxxxx
ffimageloading.forms.platform.cachedimagerenderer.init(enablefastrenderer: [true]/[false]);
the ui will be created using the model-view-viewmodel pattern, let's create the model first.
create a folder called feature and add a new class called onboardingmodel . replace existing code with the following lines:
namespace onboarding.feature
{
public class onboardingmodel
{
public string title { get; set; }
public string content { get; set; }
public string imageurl { get; set; }
}
}
in the same folder, add a new class called onboardingviewmodel and add the following lines of code:
x
using system.collections.objectmodel;
using system.windows.input;
using xamarin.forms;
namespace onboarding.feature
{
public class onboardingviewmodel : mvvmhelpers.baseviewmodel
{
private observablecollection<onboardingmodel> items;
private int position;
private string skipbuttontext;
public onboardingviewmodel()
{
setskipbuttontext("skip");
initializeonboarding();
initializeskipcommand();
}
private void setskipbuttontext(string skipbuttontext) => skipbuttontext = skipbuttontext;
private void initializeonboarding()
{
items = new observablecollection<onboardingmodel> {
new onboardingmodel {
title = "welcome to \n tabia", content = "tabia helps you build habits that stick.", imageurl = "healthy_habits.svg"
},
new onboardingmodel {
title = "reminder", content = "reminder helps you execute your habits each day.", imageurl = "time.svg"
},
new onboardingmodel {
title = "track your progress", content = "charts help you visualize your efforts over time.", imageurl = "visual_data.svg"
}
};
}
private void initializeskipcommand()
{
skipcommand = new command(() =>
{
if (lastpositionreached())
{
exitonboarding();
}
else
{
movetonextposition();
}
});
}
private static void exitonboarding() => application.current.mainpage.navigation.popmodalasync();
private void movetonextposition()
{
var nextposition = ++position;
position = nextposition;
}
private bool lastpositionreached() => position == items.count - 1;
public observablecollection<onboardingmodel> items
{
get => items;
set => setproperty(ref items, value);
}
public string skipbuttontext
{
get => skipbuttontext;
set => setproperty(ref skipbuttontext, value);
}
public int position
{
get => position;
set
{
if (setproperty(ref position, value))
{
updateskipbuttontext();
}
}
}
private void updateskipbuttontext()
{
if (lastpositionreached())
{
setskipbuttontext("got it");
}
else
{
setskipbuttontext("skip");
}
}
public icommand skipcommand
{
get;
private set;
}
}
}
note :
the property items of type observablecollection<onboardingmodel> will be bound to a carrousel view.
the property imageurl let specify the location of an image.
on ios, the images are stored in the folder resource .

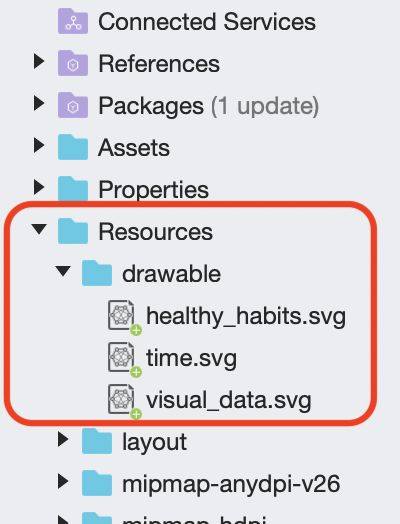
on android, images are stored in the folder resource -> drawable .
add a new content page named onboardingpage and open up the onboardingpage.xaml , delete all the code and replace by the following:
x
<contentpage xmlns="http://xamarin.com/schemas/2014/forms"
xmlns:x="http://schemas.microsoft.com/winfx/2009/xaml"
xmlns:ffimageloadingsvg="clr-namespace:ffimageloading.svg.forms;assembly=ffimageloading.svg.forms"
x:class="onboarding.feature.onboardingpage"
xmlns:ob="clr-namespace:onboarding.feature"
xmlns:ios="clr-namespace:xamarin.forms.platformconfiguration.iosspecific;assembly=xamarin.forms.core"
ios:page.usesafearea="true"
backgroundcolor="#ffffff">
<contentpage.bindingcontext>
<ob:onboardingviewmodel />
</contentpage.bindingcontext>
<contentpage.resources>
<resourcedictionary>
<color x:key="bluecolor">#071d92</color>
<style targettype="label">
<setter property="textcolor" value="{staticresource bluecolor}" />
<setter property="horizontaltextalignment" value="center" />
<setter property="horizontaloptions" value="center" />
</style>
</resourcedictionary>
</contentpage.resources>
<contentpage.content>
<grid>
<grid.rowdefinitions>
<rowdefinition height="auto" />
<rowdefinition height="*" />
<rowdefinition height="auto" />
</grid.rowdefinitions>
<button grid.row="0"
horizontaloptions="endandexpand"
margin="0,0,20,0"
fontsize="medium"
fontattributes="bold"
backgroundcolor="transparent"
textcolor="{staticresource bluecolor}"
text="{binding skipbuttontext,}"
command="{binding skipcommand}"/>
<carouselview x:name="onboardingcarousel"
grid.row="1"
itemssource="{binding items}"
verticaloptions="center"
position="{binding position}">
<carouselview.itemtemplate>
<datatemplate x:datatype="ob:onboardingmodel">
<contentview>
<flexlayout direction="column"
justifycontent="spaceevenly">
<label text="{binding title}"
fontattributes="bold"
fontsize="title" />
<ffimageloadingsvg:svgcachedimage
source="{binding imageurl}"
aspect="aspectfill"
widthrequest="300"
flexlayout.alignself="center"/>
<label text="{binding content}"
fontsize="body"/>
</flexlayout>
</contentview>
</datatemplate>
</carouselview.itemtemplate>
</carouselview>
<indicatorview
grid.row="2"
indicatorview.itemssourceby="onboardingcarousel"
indicatorsshape="circle"
indicatorcolor="{staticresource bluecolor}"
selectedindicatorcolor="darkgray"
horizontaloptions="center"/>
</grid>
</contentpage.content>
</contentpage>
note :
at the time of writing this tutorial, the indicatorview is still experimental, you should add the following line in platform-specific project ( appdelegate.cs, mainactivity.cs) : xamarin.forms.forms.setflags(new string[] { "indicatorview_experimental" });
at this point, the shared project should look like this:

showing onboarding
open up mainpage.xaml.cs , replace that todo comments with this line of code:
navigation.pushmodalasync(new onboardingpage()

build and run the project, you should see the following result:
note :
if you want to show the onboarding again, we need to uninstall the app from your device or simulator.
where to go from here?
you can learn more about the carrouselview here , and about the indicatorview here .
the project is available for download here . feel free to use it.
further reading
13 of the best app designs: they're so (not) basic
introduction to xamarin.forms for android developers (part 1)
Published at DZone with permission of Patrick Tshibanda. See the original article here.
Opinions expressed by DZone contributors are their own.
Comments