How to Implement Two-Factor Authentication in a Spring Boot OAuth Server? Part 1: Configuration
In this post, I demonstrate how to configure a two-factor authentication functionality for a Spring Boot 2.5 OAuth JWT server, that is a part of a larger Spring Cloud system.
Join the DZone community and get the full member experience.
Join For FreeWe build a distributed CRM system. The system has a dedicated Spring Boot-based authentication/authorization service and a number of secure and insecure micro-services. We choose the JWT security mechanism for the authorization server not to verify any request for every secure micro-service; it is the micro-services job to do this. Also, we want to enable a 2fa authentication for the authorization service for another level of protection before a valid JWT is issued by the authorization service.
The post is organized as follows. First, I describe the system and its parts. Second, I demonstrate the system's architecture and describe how to configure the authorization server to enable 2fa. The source code of the whole system is provided here. Part 2 of this post demonstrates how the authorization server works under the hood.
System
The component diagram of our system is depicted in Fig 1. The user interacts with the system via a Zuul gateway. The user can call individual micro-service REST APIs directly as well.
The Config server provides config files for the micro-services. The global config file contains information for all the micro-services. There are also config files specific for individual micro-services. For this to work automatically, all the services register themselves on a Eureka server. Some of the micro-services are connected with each other via a Kafka message broker. The Kafka's host, port, and topics are listed in the global config file.
This system is based on the starter code of Iskren Ivanov; see his post for the details of how this system works. I added a two-factor authorization and migrated the authorization server to Spring Boot 2.5 up from 1.5. Also, I analyzed how the authorization server works under the hood in Part 2.

Security workflow in this distributed system is more involved than in a monolithic one, where a user needs only to provide his/her username and password, and, maybe, a 2fa code. Our system uses an implicit authorization flow. To get a valid JWT, the user needs to provide a Client Id (client for brevity) and Client Secret (secret for brevity); these are micro-service "credentials". Also, he or she needs to provide a valid username and password - these are the regular credentials we are used to. Also, if the user has his/her 2fa enabled, the user needs to send an extra request with the same client:secret and provide the necessary 2fa code. Finally, to refresh a JWT, the user has to provide the client:secret and a valid refresh token.
The Client Id, Client Secret, username, and password are stored in a separate database, connected only to the authorization server. Also, the authorization server keeps a private key to sign JWTs; all secure services keep a copy of the corresponding public key to verify the signature. Let's see how to configure this authorization server.
Authorization Server Architecture
The actual workflow for the 3 scenarios, inspired by the post of Anar Sultanov, is as follows. If the user has his/her 2fa disabled, the user gets authorized in 1 step. The user makes the following call:
curl trusted-app:secret@localhost:9999/oauth/token -d grant_type=password -d username=user -d password=passwordHere trusted-app:secret is the client:secret in this system, localhost:9999 are the host:port where the authorization server is deployed, /oauth/token is the token endpoint. The grant_type=password is the grant type for the first step of 2fa authorization, username and password are usual user credentials. The system returns a valid JWT and a refresh token with the user's role encoded.
If the user has his/her 2fa enabled, the user makes 2 calls. The first call is identical to the above one; this time, however, the system returns a valid access token with a "pre_auth" role encoded. Then, the user makes another call:
curl trusted-app:secret@localhost:9999/oauth/token -d grant_type=tfa -d tfa_token=$token -d tfa_code=123456Where the $token is the "pre_auth" access token from the previous step, tfa_code is the necessary one-time code for the 2fa algorithm to work. The system returns a valid JWT and a refresh token with the user's role encoded.
Notice, that this intermediate step with an access token (rather than a JWT), prevents the user from being erroneously authenticated by a microservice, where JWTs are verified with the JWT's public key, but the service has an "all but <role>" filter. In such a case, a "pre_auth" role is also passable.
Finally, to refresh a JTW (not necessarily expired), the user calls:
curl trusted-app:secret@localhost:9999/oauth/token -d grant_type=refresh_token -d refresh_token=$tokenWhere we use grant_type=refresh_token and the actual refresh token, obtained in the previous steps.
Under the hood, our system looks as follows (Fig 2).
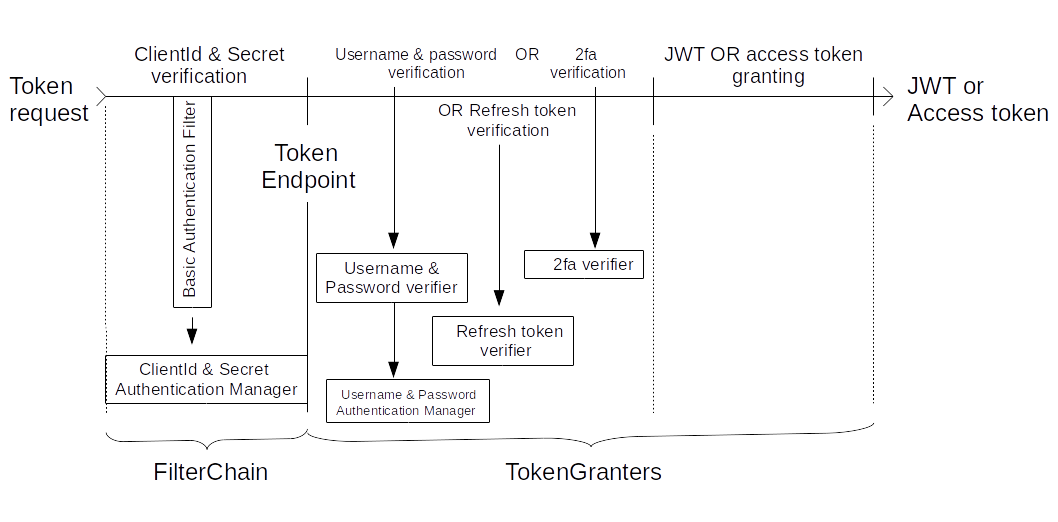
For an incoming token request, the system first verifies the client:secret pair in the system's Basic Authentication Filter, which in turn calls the Client and Secret Authentication manager. If positive, the request comes to the authorization endpoint
/oauth/token.Then the system calls either a Username and Password verifier, or a 2fa verifier, or a refresh token verifier depending on the request type; these verifiers are used in the appropriate token granters to actually issue the JWTs. In turn, the Username and Password verifier requires a Username and Password authentication manager to do its job. Let's see how to configure these managers.
The Authentication Managers
The Client and Secret Authentication manager is configured automatically by the Spring Authorization server. In Part 2 of this post, I demonstrate how this works in detail. For now, we only need to set a data source for client:secret pairs (see the full codefor details).
@Configuration
@EnableAuthorizationServer
public class AuthorizationConfig extends AuthorizationServerConfigurerAdapter {

    @Autowired
    @Qualifier("dataSource")
    private DataSource dataSource;
    {.....}
    @Override
    public void configure(ClientDetailsServiceConfigurer clients) throws Exception {
        clients.jdbc(dataSource);
    }
    {.....}
}
Next, the Username and Password Authentication Manager is created the following way:
@Configuration
@EnableWebSecurity(debug = true)
public class SecurityConfig extends WebSecurityConfigurerAdapter {

    @Autowired
    private PasswordEncoder passwordEncoder;

    @Bean("securityConfigAuthManager")
    @Override
    public AuthenticationManager authenticationManagerBean() throws Exception {
        return super.authenticationManagerBean();
    }

    @Override
    protected void configure(AuthenticationManagerBuilder auth) throws Exception {
                auth.userDetailsService(userDetailsService())
                .passwordEncoder(passwordEncoder);
    }

    @Bean("securityConfigUserService")
    @Primary
    @Qualifier("userDetail")
    public UserDetailsService userDetailsService() {
        return new AccountServiceImpl();
    }
}
Here, we first get userDetailsService() that verifies Username and Password by means of AccountServiceImpl(). Then we feed this userDetailsService() to configure(AuthenticationManagerBuilder auth) to make the service available for authenticationManagerBean(). It is this authentication manager, that gets autowired into AuthorizationConfig.
As I demonstrate in Part 2, @EnableWebSecurity produces a filter chain out of every descendant of the WebSecurityConfigurerAdapter in the authorization service and the SecurityConfig is no exception. However, we don't need this particular filter chain for our application. We only use the provided infrastructure to create the Username and Password authentication manager. Let's see how to program the token granters.
The Token Granters
We need to create necessary auxiliary classes for the token granters to function and then to provide the granters to the token endpoint:
@Configuration
@EnableAuthorizationServer
public class AuthorizationConfig extends AuthorizationServerConfigurerAdapter {

    @Autowired
    private AuthenticationManager authenticationManager;

    @Autowired
    private TfaService tfaService;
    {......}
    @Override
    public void configure(AuthorizationServerEndpointsConfigurer endpoints) throws Exception {
        endpoints.tokenGranter(tokenGranter(endpoints));
    }

    @Bean
    public TokenStore tokenStore() {
        return new JwtTokenStore(accessTokenConverter());
    }

    @Bean
    public JwtAccessTokenConverter accessTokenConverter() {
        JwtAccessTokenConverter converter = new JwtAccessTokenConverter();
        KeyStoreKeyFactory keyStoreKeyFactory =
                new KeyStoreKeyFactory(
                        new ClassPathResource("ms-auth.jks"),
                        "ms-auth-pass".toCharArray());
        converter.setKeyPair(keyStoreKeyFactory.getKeyPair("ms-auth"));
        return converter;
    }

    @Bean
    public DefaultTokenServices tokenServices() {
        DefaultTokenServices defaultTokenServices = new DefaultTokenServices();
        defaultTokenServices.setTokenStore(tokenStore());
        defaultTokenServices.setSupportRefreshToken(true);
        defaultTokenServices.setTokenEnhancer(accessTokenConverter());
        return defaultTokenServices;
    }

    public class RefreshTokenConverter extends JwtAccessTokenConverter{
        public MyAccessTokenConverter(){
            super();
            KeyStoreKeyFactory keyStoreKeyFactory =
                    new KeyStoreKeyFactory(
                            new ClassPathResource("ms-auth.jks"),
                            "ms-auth-pass".toCharArray());
            super.setKeyPair(keyStoreKeyFactory.getKeyPair("ms-auth"));
        }
        public Map<String, Object> decode(String token){return super.decode(token);}
    }

    private TokenGranter tokenGranter(final AuthorizationServerEndpointsConfigurer endpoints) {
        List<TokenGranter> granters =new ArrayList<>();
        granters.add(new PasswordTokenGranter(endpoints, authenticationManager, tfaService, tokenServices()));
        granters.add(new TfaTokenGranter(endpoints, authenticationManager, tfaService, tokenServices()));
        granters.add(new JWTRefreshTokenGranter(endpoints, authenticationManager, tfaService, tokenServices(), new RefreshTokenConverter()));
        return new CompositeTokenGranter(granters);
    }
}
Here, we set the private key to sign JWTs in RefreshTokenConverter ; this token converter is needed to decode refresh tokens. Next, we set another token converter accessTokenConverter() with the same private key for the TokenStore to sign JWTs. Then, we feed the TokenStore to the TokenGranter. Finally, the TokenGranter is fed to the endpoint configurer: configure(AuthorizationServerEndpointsConfigurer endpoints).
Every token granter must implement a grant(String grantType, TokenRequest tokenRequest) method. The Password Token Granter's grant(...) method is implemented as follows:
public OAuth2AccessToken grant(String grantType, TokenRequest tokenRequest) {
            Map<String, String> parameters = new LinkedHashMap<>(tokenRequest.getRequestParameters());
            String username = parameters.get("username");
            String password = parameters.get("password");
            parameters.remove("password");
            Authentication userAuth = new UsernamePasswordAuthenticationToken(username, password);
            ((AbstractAuthenticationToken) userAuth).setDetails(parameters);
            String clientId = tokenRequest.getClientId();
            ClientDetails client = this.clientDetailsService.loadClientByClientId(clientId);
            this.validateGrantType(grantType, client);
            try {
                userAuth = this.authenticationManager.authenticate(userAuth);
            } catch (AccountStatusException | BadCredentialsException e) {
                throw new InvalidGrantException(e.getMessage());
            }
            if (userAuth != null && userAuth.isAuthenticated()) {
                OAuth2Request storedOAuth2Request = this.getRequestFactory().createOAuth2Request(client, tokenRequest);
                if (tfaService.isEnabled(username)) {
                    userAuth = new UsernamePasswordAuthenticationToken(username, password, Collections.singleton(PRE_AUTH));
                    OAuth2AccessToken accessToken = this.endpointsConfigurer.getTokenServices().createAccessToken(new OAuth2Authentication(storedOAuth2Request, userAuth));
                    return accessToken;
                }
                OAuth2AccessToken jwtToken = this.jwtService.createAccessToken(new OAuth2Authentication(storedOAuth2Request, userAuth));
                return jwtToken;
            } else {
                throw new InvalidGrantException("Could not authenticate user: " + username);
            }
 }
Here, we first extract the username:password and client (called clientId here, from the client:secret pair) from the tokenRequest. Then, the system calls the clientDetailService to load the client details from this client and validates the grant type. Next, the authentication manager authenticates the username:password pair. Then the system calls the tfaService to check if 2fa is enabled for this username. If positive, the system calls the tokenService to create a OAuth2Access token with a "pre_auth" role encoded and returns the token. If negative, the system calls the jwtService (that is the tokenService from AuthorizationConfig) to create a JWT, and then returns the token.
The TFAToken Granter's grant() method is implemented as follows:
    @Override
    public OAuth2AccessToken grant(String grantType, TokenRequest tokenRequest){
           return super.grant(grantType, tokenRequest);
    }

    @Override
    protected OAuth2Authentication getOAuth2Authentication(ClientDetails client, TokenRequest tokenRequest) {
      {extracts "tfa_token" parameters}
            OAuth2Authentication authentication = loadAuthentication(tfaToken);
            if (parameters.containsKey("tfa_code")) {
                int code = parseCode(parameters.get("tfa_code"));
                if (tfaService.verifyCode(username, code)) {
                    return getAuthentication(tokenRequest, authentication);
                }
            }
      {elses and throw exceptions}
    }

    private OAuth2Authentication loadAuthentication(String accessTokenValue) {
        OAuth2AccessToken accessToken = this.tokenStore.readAccessToken(accessTokenValue);
        {checks if the accessToken is not null or expired}
            OAuth2Authentication result = this.tokenStore.readAuthentication(accessToken);
            return result;
        }
    }
    private OAuth2Authentication getAuthentication(TokenRequest tokenRequest, OAuth2Authentication authentication) {
       {authManager authenticates the user;
        clientDetailsService verifies clientId}
        return refreshAuthentication(authentication, tokenRequest);
    }

    private OAuth2Authentication refreshAuthentication(OAuth2Authentication authentication, TokenRequest request) {
       {verifies the request scope}
        return new OAuth2Authentication(clientAuth, authentication.getUserAuthentication());
    }
It's a long one, so the details are omitted for brevity (see the code). This token granter works differently from the previous one. Here we override the parent's methods to call the tfaService to verify the 2fa code. If positive, the system checks the user and the client credentials again to return a JWT.
The mentioned TfaService is:
 @Autowired
    private AccountRepository accountRepository;
    private GoogleAuthenticator googleAuthenticator = new GoogleAuthenticator();

    public boolean isEnabled(String username) {
        Optional<Account> account = accountRepository.findByUsername(username);
        if(account.isPresent()) {
            return accountRepository.findByUsername(username).get().isTwoFa();
        }
        else return false;
    }

    public boolean verifyCode(String username, int code) {
        Optional<Account> account = accountRepository.findByUsername(username);
        if(account.isPresent()) {
            System.out.println("TFA code is OK");
            return code == googleAuthenticator.getTotpPassword(account.get().getSecret());
        }
        else return false;
    }
The service checks if the user has his/her 2fa enabled, and if the provided code matches the one obtained from the user's secret by the Google Authenticator. Both 2fa enabled and the user's secret are retrieved from the accountRepository.
Finally, let's take a look at the Refresh Token Granter:
 public OAuth2AccessToken grant(String grantType, TokenRequest tokenRequest){
        String refrToken = tokenRequest.getRequestParameters().get("refresh_token");
        //decode(refrtoken) verifies the token as well
        Map<String,Object> map = this.jwtConverter.decode(refrToken);
        OAuth2Authentication auth = this.jwtConverter.extractAuthentication(map);
        OAuth2AccessToken result = this.jwtTokenService.createAccessToken(auth);
        return result;
    }
This one is straightforward. The system extracts the refresh token from the request. Then the RefreshConverter (the jwtConverter here) decodes the refresh token. Finally, the system extracts OAuth2Authentication auth and creates a JWT from the auth.
I would like to remark that this token granter is implemented differently from the granter in the original post. There, on the first 2fa step, the user (with 2fa enabled) sends a request with the client:secret, grant type "password", username:password. The system returns a "mfa" (multi-factor authorization) access token with a "pre_auth" role encoded. On the second 2fa step, the user sends back a request with the client:secret, grant type "mfa", the "mfa" access token, and the 2fa code. If verified, the system returns an access token with the user's role encoded.
Our system is modified to return a JWT instead of an access token. Also, on the first step of the 2fa process, our system returns an access token so that it would be impossible to erroneously authorize a "pre_auth" JWT as an "all but user's role" token. Finally, this system does 2fa authentication without a computationally expensive "2fa_required" exception on the first 2fa step.
Results
To test the 2fa functionality, we use 3 container tests, one for every request type. For brevity, I demonstrate how to test the second scenario when a user first provides his/her username:password, then the access token, and the necessary 2fa code.
MvcResult result = mockMvc.perform(post("/oauth/token")
				.header("Authorization","Basic dHJ1c3RlZC1hcHA6c2VjcmV0")
				.param("username","admin")
				.param("password","password")
				.param("grant_type","password")
				.contentType(MediaType.MULTIPART_FORM_DATA_VALUE)
		)
				.andExpect(status().isOk())
				.andReturn();

		String resp = result.getResponse().getContentAsString();
		String token = getTokenString("tfa_token",resp);

		result = mockMvc.perform(post("/oauth/token")
				.header("Authorization","Basic dHJ1c3RlZC1hcHA6c2VjcmV0")
				.param("tfa_code","123456")
				.param("tfa_token",token)
				.param("grant_type","tfa")
				.contentType(MediaType.MULTIPART_FORM_DATA_VALUE)
		)
				.andExpect(status().isOk())
				.andReturn();

		resp = result.getResponse().getContentAsString();
		String tokenBody = getTokenString("access_token",resp);
		String user = getUserName(tokenBody);
		String auth = getAuthorities(tokenBody);
		assertEquals(user, "admin");
		assertTrue(auth.contains("ROLE_USER"));
		assertTrue(auth.contains("ROLE_ADMIN"));
Here the curl call for the second scenario is emulated. The tfaService.verify(String username, int code) is stubbed to return true for every code, so that the test runs automatically. This test passes. See the code for the other two tests.
Conclusions
In this post, I demonstrated how to configure a Spring Authorization server to enable 2fa functionality. For this, we need to program 3 token granters and 2 authentication managers, where for 1 of the managers we need only to set a client details data source. Hope to see you in Part 2, where I demonstrate how the Spring Authorization server runs all these under the hood.
Acknowledgments
I would like to thank my mentor Sergey Suchok for his help on this paper.
Opinions expressed by DZone contributors are their own.
Comments