How to Implement Two-Factor Authentication in A Spring Boot OAuth Server? Part 2: Under the Hood
This post continues Part 1 and demonstrates how the Spring Boot OAuth authentication server processes a token request internally.
Join the DZone community and get the full member experience.
Join For FreeSpring Security OAuth server becomes deprecated. However, its replacement is still in development. So, I think it is worthwhile to inspect how the current OAuth server works under the hood. Firstly, this knowledge helps us to quickly figure out how the new server implements the same functionality. Secondly, it will be interesting to compare and contrast the current and the new OAuth servers.
We build the security component of a distributed Spring Cloud system. The service uses JWT mechanics. The tokens are signed with a private key kept on the server; all other services verify the tokens with the available public key.
In this post I, demonstrate how the authorization server, configured in Part 1, builds the filter chain and operates the token endpoint for the workflow of Part 1:
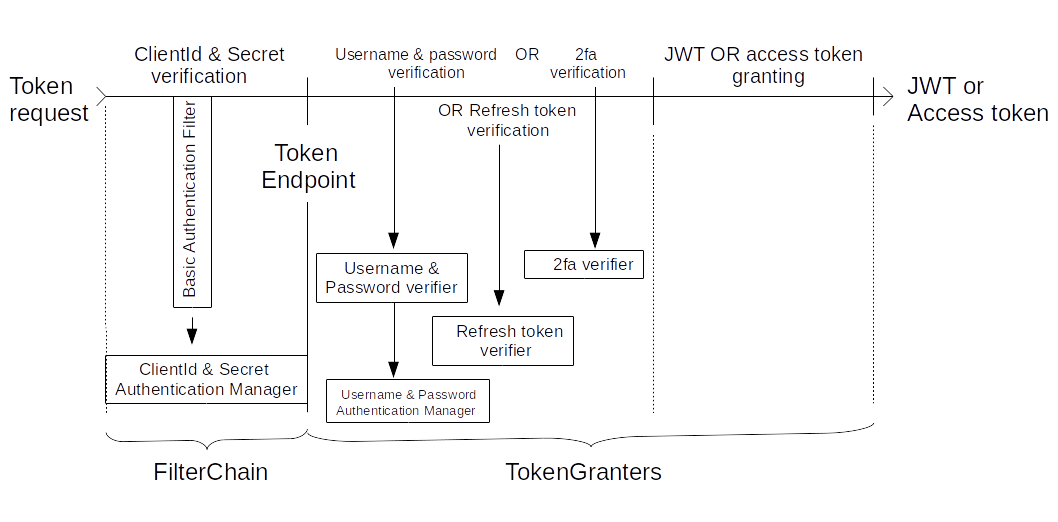
First, a token request passes the Filter Chain, where the request's client:secret pair is verified. Then the request comes to the Token Endpoint. Finally, the request is fed to the Token Granters, where the request's username:password or access token, or refresh token are verified, to produce either a JWT or an access token. Check the code for details. Before we dive into it, let's recall a Spring bean lifecycle.
Spring Bean Lifecycle
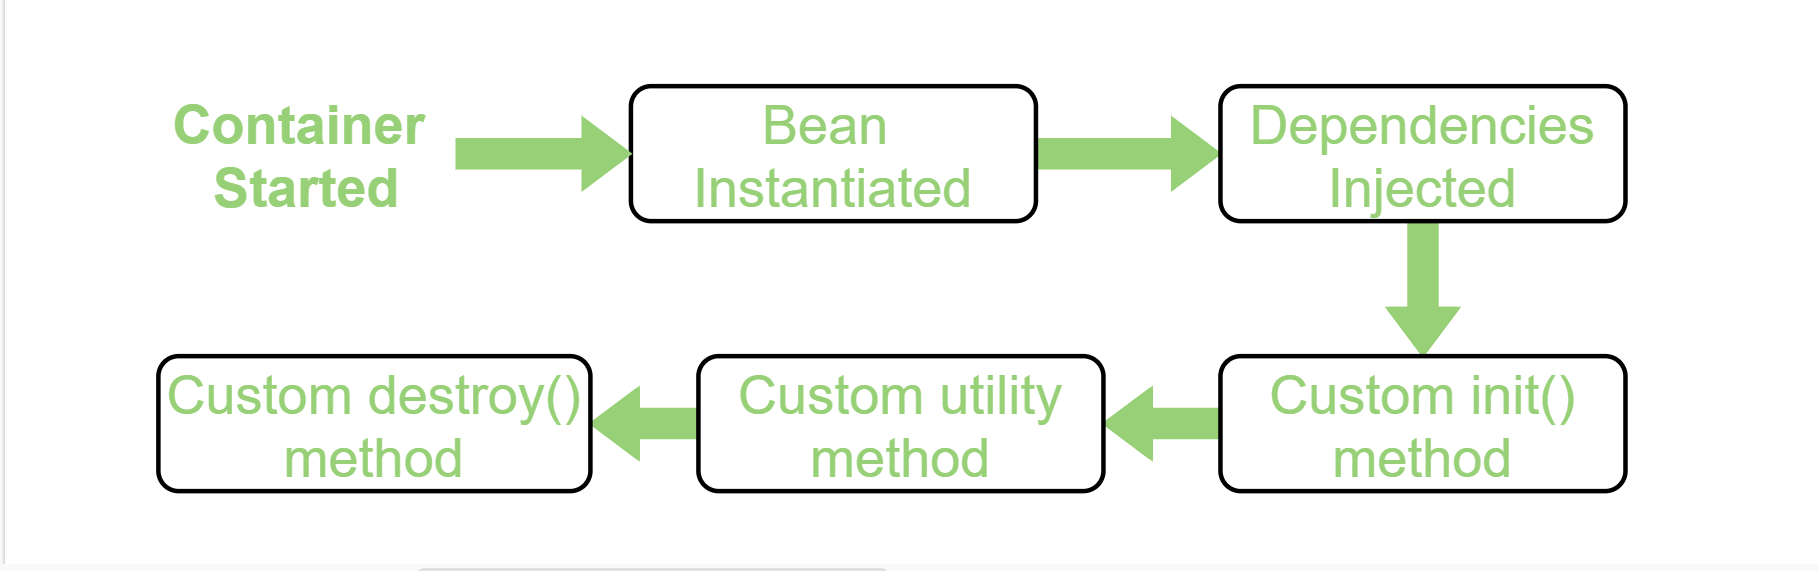
Spring Boot' SpringApplication.run(...), after a lot of work to configure the environment and to create bean definitions, instantiates Spring beans. Then, bean dependencies are injected (@Autowire). Next, custom init() methods (annotated with @PostConstruct) are called. After this, the bean's custom utility methods are called. For our system I split this process into "Init" - bean instantiation phase and "Main" - dependency injection and custom init() method calls.
This bean creation process seems straightforward. However, it is not so if beans circularly depend on each other. Later in this post, we will see such a situation. But before that, let me explain my notation.
Notation
In this post, I use somewhat non-standard notation.

Basically, it is the usual Collaboration diagram notation with some pseudo-code embedded. Other notation elements are clarified on their corresponding figures. Let's see the workflow under the hood.
Step 1. Beans Initialized
At first, our @Configuration - annotated beans are created:

Here the client detail service is configured. OAuth framework automatically associates the client:secret data source to the oauth_client_details table. We only need to feed the data source to the ClientDetailServiceConfiguration. That is what happens here: ClientDetailService bean is created (I.3), then the bean is injected into ClientDetailServiceConfiguration (I.4).
Notice that AuthorizationServerEndpointConfiguration @PostConstruct method is called so early. It is because there is a circular dependency here: AuthorizationServerEndpointConfiguration depends on its configurers (AuthorizationConfig). On the other hand, the configurer depends on the AuthorizationServerEndpointConfiguration to create a TokenGranter.
Step 2. Filter Chains Initiated
Next, the initialized beans are configured. WebSecurityConfiguration class, which comes with @EnableWebSecurity annotation, governs the process. The configurations are assembled into a single (per server) WebSecurity object.

WebSecurityConfiguration works. "M" stands for "dependency injection and custom init() method calls."
WebSecurityConfiguration collects all descendants of WebSecurityConfigurer class and feeds them to setFilterChainProxySecurityConfigurer to set the configurers to the WebSecurity object. Then, WebSecurityConfiguration calls springSecurityFilterChain() to build the WebSecurity object with the configurers already set. To build itself, WebSecurity calls various methods from its parents (Fig 3), most importantly, the init(...), configure(...), build(...) of WebSecurityConfigurerAdapter (a child of WebSecurityConfigurer).
WebSecurity.build() eventually creates a securityFilterChain for every descendant of WebSecurityConfigurerAdapter. There are 3 such adapters in our system: AuthorizationConfig, SecurityConfig, H2Config. For the second one, we don't use its corresponding filter chain in our system, we just need the adapter's infrastructure to build the client:secret authentication manager.
Step 3. Primary Filter Chain is Configured
In this step, the system builds a chain for AuthorizationConfig. To do this, AuthorizationServerSecurityConfiguration (a descendant of WebSecurityConfigurer and WebSecurityConfigurerAdapter) calls its init(...), configure(...), and build(...) methods:

AuthorizationServerSecurityConfiguration is configured. The dependencies on the previous steps are also shown.
Here, this WebSecurityConfigurerAdapter.init(WebSecurity web) method creates its HttpSecurity object; there is 1 such object per adapter. On step M.7 AuthorizationConfig.configure(AuthServerSecurityConfigurer security) is called. On step M.8 a securityFilterChain gets built for this descendant of WebSecurityConfigurerAdapter.
Notice that WebSecurity and HttpSecurity behave similarly. It is because they extend the same abstract class. These relations are summarized on Fig 5 (A). The way they work is shown on Fig 5 (B):

Let's take WebSecurity as an example. The pattern is:
WebSecuritycollects configurers and transfers them to theAbstractConfiguredSecurityBuilder.- The builder calls
doBuild()that in turn callsinit(). - The init iterates over all the configurers and calls each configurer's init method with the
WebSecurity webas the argument. - The same for the
configure()andperformBuild()methods.
Step 4. Username and Password Authorization Manager is Built
Next, the system uses SecurityConfig and its parent adapter to build a username:password authentication manager:

Here, everything interesting happens in the adapter's getHttp() method. The authenticationManager() method gets the userDetailsService from SecurityConfig. Then the userDetailsService is fed to a DaoAuthenticationProvider. Finally, we get a fully configured workable username:password authentication manager.
Step 5. Primary Filter Chain is Built
Finally, we need to finish building our primary filter chain where the /oauth/token endpoint is located.

Fig 7. How the client:secret BasicAuthenticationFilter is configured.
Here the M.4-M.5 steps are shown in detail. Then, AuthorizationServerSecurityConfigurer sets ClientDetailsService as the userDetailService and puts this service to the AuthenticationManagerBuilder. Next, the init(...) calls HttpBasicConfigurer that sets the manager to BasicAuthenticationFilter . So, our main security filter chain is built. Let's see how all these pieces work together in the token endpoint.
Token Endpoint
The code of this endpoint is stored here. Its key method is:
@RequestMapping(value = "/oauth/token", method=RequestMethod.POST)
	public ResponseEntity<OAuth2AccessToken> postAccessToken(
			Principal principal, @RequestParam Map<String, String> parameters)
			throws HttpRequestMethodNotSupportedException {

		if (!(principal instanceof Authentication)) {
			throw new InsufficientAuthenticationException(
					"There is no client authentication. Try adding an appropriate authentication filter.");
		}

		String clientId = getClientId(principal);
		ClientDetails authenticatedClient = getClientDetailsService().loadClientByClientId(clientId);

		TokenRequest tokenRequest = getOAuth2RequestFactory().createTokenRequest(parameters, authenticatedClient);

		// Only validate client details if a client is authenticated during this request.
		// Double check to make sure that the client ID is the same in the token request and authenticated client.
		if (StringUtils.hasText(clientId) && !clientId.equals(tokenRequest.getClientId())) {
			throw new InvalidClientException("Given client ID does not match authenticated client");
		}

		if (authenticatedClient != null) {
			oAuth2RequestValidator.validateScope(tokenRequest, authenticatedClient);
		}

		if (!StringUtils.hasText(tokenRequest.getGrantType())) {
			throw new InvalidRequestException("Missing grant type");
		}

		if (tokenRequest.getGrantType().equals("implicit")) {
			throw new InvalidGrantException("Implicit grant type not supported from token endpoint");
		}

		if (isAuthCodeRequest(parameters) && !tokenRequest.getScope().isEmpty()) {
			// The scope was requested or determined during the authorization step
			logger.debug("Clearing scope of incoming token request");
			tokenRequest.setScope(Collections.<String>emptySet());
		} else if (isRefreshTokenRequest(parameters)) {
			if (StringUtils.isEmpty(parameters.get("refresh_token"))) {
				throw new InvalidRequestException("refresh_token parameter not provided");
			}
			// A refresh token has its own default scopes, so we should ignore any added by the factory here.
			tokenRequest.setScope(OAuth2Utils.parseParameterList(parameters.get(OAuth2Utils.SCOPE)));
		}

		OAuth2AccessToken token = getTokenGranter().grant(tokenRequest.getGrantType(), tokenRequest);
		if (token == null) {
			throw new UnsupportedGrantTypeException("Unsupported grant type");
		}

		return getResponse(token);
	}
Despite looking long, it is an ordinary spring security-protected endpoint. There are a principal and request parameters as input arguments. Notice the principal has the information about the client:secret pair of a user, but not the user's username:password - this is because the BasicAuthenticationFilter is set to check only the client:secret pair. The method validates the client:secret pair, creates TokenRequest, and then calls TokenGranter.grant(tokenRequest.getGrantType(), tokenRequest) . In our case, this is a composite token granter described in Part 1. Finally, the response is created from the granted OAuth2AccessToken.
Conclusions
In this post, I demonstrated how the Spring OAuth server builds the primary filter chain in 5 steps. These steps are: beans initialized, filter chain initiated, the primary filter chain is configured, username & password authorization manager is built, the primary filter chain is built. Also, I showed how the token endpoint works.
Acknowledgments
I would like to thank my mentor Sergey Suchok for his help on this paper.
Opinions expressed by DZone contributors are their own.
Comments