How to Install and Configure Apache2
In this article, we will see how to install and configure Apache2 web server in Ubuntu 16.04.
Join the DZone community and get the full member experience.
Join For FreeIn this article, we will see how to install and configure Apache2 web server in Ubuntu 16.04.
Note: Throughout this article, we will be referring to domain name as website1-example.com. Replace this domain name with your actual domain name whenever required.
Step 1: Install Apache2 Web Server
We will begin with updating the local package to reflect the latest upstream changes. Afterwards we can install the Apache2 package.
$ sudo apt-get update
$ sudo apt-get install apache2
The status can be check by running the following commands
xxxxxxxxxx
$ sudo systemctl status apache2
You can access the default apache landing page to confirm that the software is running properly. You can access this through your server’s domain name or IP address.
Step 2: Check Web Server
Run below command to make sure the service running
xxxxxxxxxx
$ sudo systemctl status apache2
Now you can access the default apache landing page to confirm that the software is running properly. You can access it through your server’s domain name or IP address.
For example: http://www.website1-example.com
Step 3: Create Virtual Host
In Apache on Ubuntu, all the virtual host configuration files are stored under /etc/apache2/sites-available directory. With the new Apache installation, you can find a default virtual host file called 000-default.conf there. We will create a new virtual host configuration file by copying 000-default.conf file.
xxxxxxxxxx
$ sudo cp /etc/apache2/sites-available/000-default.conf /etc/apache2/sites-available/website1-example.com.conf
Open your virtual host file:
xxxxxxxxxx
$ sudo nano /etc/apache2/sites-available/website1-example.com.conf
The file should look like the following:
xxxxxxxxxx
<VirtualHost *:80>
ServerAdmin webmaster
DocumentRoot /var/www/html
ErrorLog ${APACHE_LOG_DIR}/error.log
CustomLog ${APACHE_LOG_DIR}/access.log combined
</VirtualHost>
Now edit this file as per your requirement. My configuration looks like below:
xxxxxxxxxx
<VirtualHost *:8090>
ServerAdmin webmaster-example.com
ServerName website1-example.com
ServerAlias www.website1-example.com
DocumentRoot /var/www/website1-example.com
<Directory /var/www/website1-example.com>
Options Indexes FollowSymLinks MultiViews
AllowOverride All
Require all granted
allow from all
</Directory>
ErrorLog /var/www/website1-example.com/error.log
CustomLog /var/www/website1-example.com/access.log combined
</VirtualHost>
- ServerAdmin: Server admin’s email address.
- ServerName: The domain that should match for this virtual host configuration. This should be your domain name. i.e. website1-example.com
- ServerAlias: It is an additional matching condition that needs to be processed. i.e. http://www.website1-example.com
- DocumentRoot: The directory from which Apache will serve the domain files.
- Options: This directive controls which server features are available in a specific directory.
- ErrorLog, CustomLog: Specifies the location of log files.
Step 4: Create Project Directory
By default, the document root directory is /var/www/html. We will create a website1-example.com directory in www directory as defined in the above virtual host configuration.
xxxxxxxxxx
$ sudo mkdir /var/www/website1-example.com
Now let’s create a test HTML file called index.html in a root directory we just created in a previous step.
xxxxxxxxxx
$ sudo nano /var/www/website1-example.com/index.html
Add the following code to the file and then save it.
xxxxxxxxxx
<html>
<head>
<title>website1-example.com</title>
</head>
<body>
<h2> Welcome to website1-example.com </h2>
</body>
</html>
Step 5: Enable the Virtual Host
Enable the virtual host using the a2ensite tool:
xxxxxxxxxx
$ sudo a2ensite website1-example.com.conf
Apply the changes to Apache
xxxxxxxxxx
$ sudo service apache2 reload
Next, open /etc/hosts file in editor and add your domain/IP address like below:
xxxxxxxxxx
$ sudo nano /etc/hosts
[...]
127.0.0.1 localhost
your-domain your-sever-name.com
For example:
xxxxxxxxxx
13.233.10.119 website1-example.com
[...]
Save and close the file.
Step 6: Enable CORS
Now we will enable CORS on Apache2 server. CORS is a process which tells browsers to access resources from different origin (domain, protocol, port) via HTTP headers
Enable headers by typing:
xxxxxxxxxx
$ sudo a2enmod headers
Open /etc/apache2/apache2.conf file by typing following command and add cross-origin headers in <Directory> section
xxxxxxxxxx
$ sudo nano /etc/apache2/apache2.conf
For example:
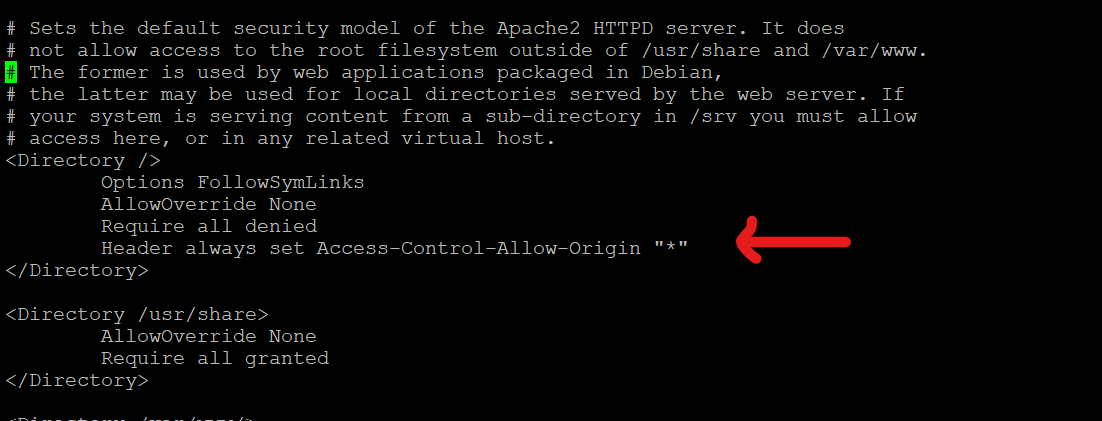
Figure: CORS Configuration
Step 7: Enable Ports
If you are using ports other than default port number 80 then we need to enable that port. In step 3 we have configured a virtual host on port 8090. Let’s enable port 8090 in Apache2.
Open /etc/Apache2/ports.conf file. In this file add your port number.
For example:
xxxxxxxxxx
$ sudo nano /etc/apache2/ports.conf
[...]
Listen 80
Listen 8090
[...]
Save and close the file.
Restart your apache2 service to reflect all changes.
xxxxxxxxxx
$ sudo service apache2 restart
Thanks for reading!
Opinions expressed by DZone contributors are their own.
Comments