

How to Make a REST API Call in Angular
An introduction to making a REST API call in the Angular framework using code snippets from Blog application use case to demonstrate its implementation.
 ·
·
Join the DZone community and get the full member experience.
Join For FreeIntroduction
This article elaborates on the main steps of making a REST API call in the Angular framework. To understand this article, the reader must have a basic understanding of HTTP, HTML, TypeScript, and Angular framework. Further, the reader must have knowledge about creating services and dependency injection in the Angular framework.
What Is Angular Service?
"A service in Angular acts as a reusable data access point and is written using a Typescript class." In real-world applications, data accessed from external sources is required in multiple components. We need a single, reusable data access point, and service serves this purpose. By defining such processing tasks in an injectable service class, we make those tasks available to any component.
What Is Dependency Injection?
"Dependency Injection (DI) is a design pattern to provide components with the services or other dependencies they need". Components delegate tasks to services, we can inject a service into a component, giving the component access to that service class. To make any service injectable into the component, use the @Injectable() decorator inside the service class and provide the metadata that allows Angular to inject it as a dependency in a component.
REST API Call in Angular
Assume that we have a REST API for managing different blog operations such as creating, updating, and deleting a blog. This article uses REST API for inserting the contents of a blog in the MongoDB database.
The first step to make a REST API call is to create a service in the existing Angular project using Angular CLI.
ng generate service RESTAPIServiceIt creates a TypeScript class RESTAPIService within the /src/app folder of the existing project. Modify the boilerplate to add the following TypeScript code.
import { Injectable } from '@angular/core';
import { HttpClient, HttpHeaders } from '@angular/common/http'

@Injectable({
  providedIn: 'root'
})
export class RESTAPIService {

  constructor(private http: HttpClient) { }

  httpOptions = {
    headers: new HttpHeaders({
      'Content-Type': 'application/json'
    })
  };

  postBlog(blog: any) {
    let url = "http://localhost:3000/blogs";
    return this.http.post(url, blog, this.httpOptions);
  }
}
The @Injectable() decorator makes the RESTAPIService eligible for DI within the Angular project. The metadata, providedIn: 'root', specifies that the RestAPIService is visible in all components. The provider object can be specified within the service's own metadata, or we can register it in any specific module or component. To register it inside any specific module or component, we use @NgModule() or @Component() decorators respectively.
The service injects a built-in dependency HttpClient to communicate with the server. The HttpClient service makes use of the observable and initiates an HTTP request to the server. We need to import the Angular HttpClientModule in the root AppModule before using the HttpClient.
The HttpHeader class represents header configuration options for the HTTP request. The blog insertion use case adds Content-Type header with the value of application/json. It designates blog content to be in the JSON format. The blog content received as a parameter in the postBlog() method is sent to the REST API URI http://localhost:3000/blogs using the HTTP POST method. The server-side handles the request and inserts JSON documents inside the MongoDB database.
The Angular form for collecting blog content may include fields for title, snippet, and body of the blog.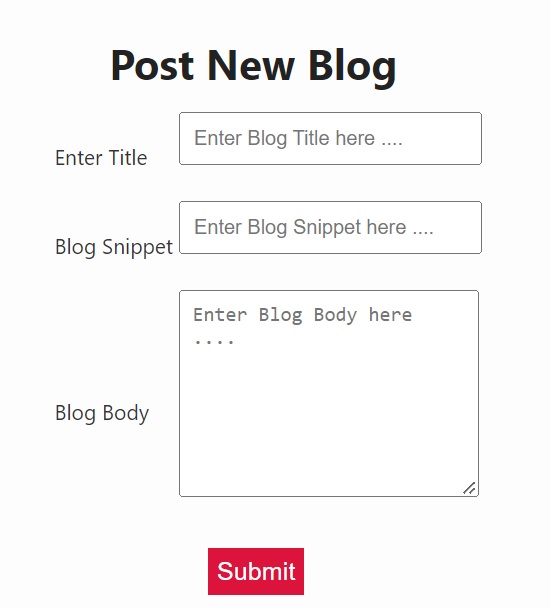
In Angular, two-way data binding is used to collect user input from Angular Forms. The attribute directive [(ngModel)] implements the two-way binding for reading and writing user input values in the template-driven Angular Forms.

[(ngModel)] attribute directive: Angular Docs
Event binding is used to bind event handlers to handle the events raised by user actions. For the blog insertion operation, the saveBlog() method is executed whenever the user clicks on the submit button.
<form name="blogForm" action="" method="POST">
  <table>
    <tr>
      <td colspan="2"><h1>Post New Blog</h1></td>
      <td></td></tr>
    <tr>
      <td><label>Enter Title</label></td>
      <td><input type="text" name="title" [(ngModel)]="title" placeholder="Enter Blog Title here ...."></td>
    </tr>
    <tr>
      <td><label>Blog Snippet</label></td>
      <td><input type="text" name="snippet" [(ngModel)]="snippet" placeholder="Enter Blog Snippet here ...."></td>
    </tr>
    <tr>
      <td><label>Blog Body</label></td>
      <td><textarea name="body" [(ngModel)]="body" placeholder="Enter Blog Body here ...."></textarea></td>
    </tr>
    <tr>
      <td align="center" colspan="4">
        <button type="submit" value="Submit" (click)="saveBlog()">Submit</button>
      </td>
    </tr>
  </table>
</form>
The TypeScript class uses the DI technique to inject RESTAPIService in the component. It imports the service from within the local project directory and instantiates it as a constructor parameter.
The saveBlog() method reads the user input data in the TypeScript variables (title, snippet, body) and constructs a JSON object, blog. It uses a method postBlog defined in the service and subscribes to an observable returned by Httpclient service for tracking the status of the HTTP Request. If it successfully completes the operation, the user is navigated to the ViewBlogs route to display the list of blogs. In case of an error, it displays an error message on the console.
import { Component, OnInit } from '@angular/core';
import { RESTAPIService } from '../restapidata.service';
import { Router } from "@angular/router"

@Component({
  selector: 'app-postblog',
  templateUrl: './postblog.component.html',
  styleUrls: ['./postblog.component.css']
})
export class PostblogComponent implements OnInit {

  title = ''  snippet = ''  body = ''

  constructor(private service: RESTAPIService, private router: Router) { }

  ngOnInit(): void {
  }

  saveBlog() {

    let blog = {      title: this.title,      snippet: this.snippet,      body: this.body    };

    this.service.postBlog(blog).subscribe({
      error: (err) => { console.error(err) },
      complete: () => { this.router.navigate(['viewblogs']) }
    });
  }
}
Conclusion
This article has given an overview of making a REST API call using the Angular framework. The web developers having prior knowledge of these technologies can utilize this article to enhance their understanding of using Angular for initiating REST API calls.
Opinions expressed by DZone contributors are their own.
Comments