How to Set up a Gatling Test's Implementation Environment
In this post we take a look at how to get an environment up and running to run a series of Gatling tests. Read on for the details!
Join the DZone community and get the full member experience.
Join For FreeGatling follows a tests implementation approach that prescribes creating all of your tests by using a programming language. Scripting the tests gives us lots of benefits, which we went through in our previous article “8 Reasons You Should Use Gatling for Your Load Testing”. One of these is that you can work with your favorite programming IDE (development environment) without having to switch between Gatling and other applications.
Whether you prefer working in Eclipse or IDEA, you can easily use both of them for tests creation. In fact, theoretically, nothing prevents you from creating Gatling tests even in a simple vim console redactor. True, it doesn’t not make any sense to create tests in a simple console redactor if you are developing tests on your local machine, but there might be a situation when it is handier to make a small fix for a certain script located on a server you might only have SSH console access to. That’s why the only one way to apply this fix will be to use a console redactor like vim. Of course, the probability of such a requirement is low, but it is always nice to know that you can.
In this article, we are not going to wage a “Holy War” discussion about which environment is better, because the best working environment is always the one which you are comfortable to work in. At the same time, the steps to establish a Gatling tests implementation environment are relatively the same for all environments. I will show you the example steps for my favorite IDE called IDEA. But with a little help from Google, you can easily perform similar steps on your favorite development environment.
Setting up the Gatling tests implementation environment is easy. However, there are three small requirements:
- You should have Maven installed
- Your favorite IDE should be installed
- IDE should be configured to use Scala
Most likely you already have Maven installed on your local machine, if you have ever worked with Scala, Kotlin or Java. If not, then no worries as its installation is very straightforward. You can check this link to find the detailed steps explanation. Regarding your favorite IDE, I’m sure you have already have one so no actions needed. But if you don’t, try IDEA. You will definitely love it.
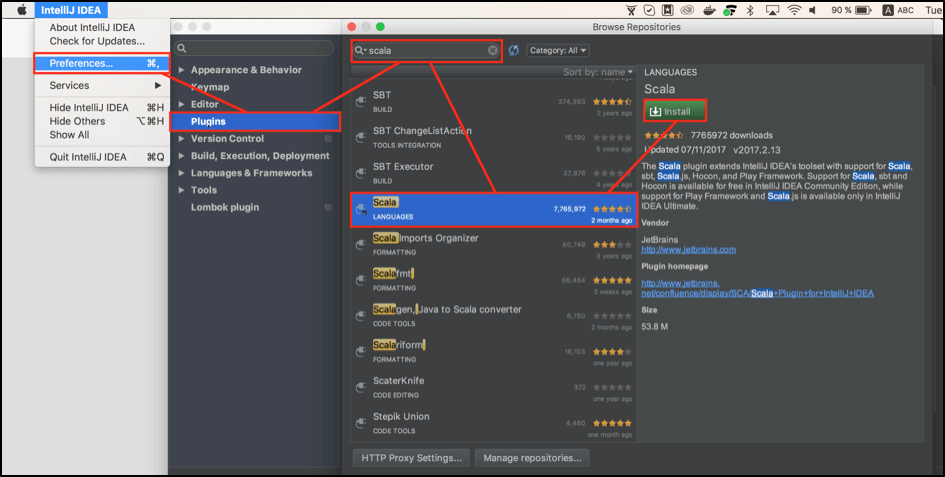
Finally, we need to make sure that your own development environment is configured to work with Scala. IDEA doesn’t provide an integration with Scala by default but it can be easily expanded to support it. All you need to do is to install the free Scala plugin. The easiest way to install is:
- Open the IDEA application
- Open ‘Preferences’ in the top left corner
- Choose ‘Plugins’ in the left menu
- Click ‘Browse repositories...’
- Search for ‘Scala’ from the ‘Languages’ subgroup
- Install and restart your IDE

After these specified steps, your IDE environment is ready and we can start with setting up our new test environment. During this process we will create a Maven project based on our existing Gatling template. I will show you how to correctly import your newly created project into your IDE, where to put newly created tests and how to run these tests right from the IDE.
Setting Up Your Test Framework with Maven
In order for your environment to work efficiently, it is highly recommended that you keep the same working environment for all tests, whether they are all created to test one solid application or if you are going to test lots of different microservices (assuming that they are the parts of one big application). This is important because you can save a lot of time by reusing different test components and helper functions that you will create during tests implementation.
Fortunately, there is nothing easier than the creation of a small personal tests automation framework with Gatling, from scratch. It is easy because Maven provides you with the toolkit to create a template for your framework, called an archetype. Using this toolkit you can setup the basic architecture for your Gatling tests automation framework in literally one console command.
This basic architecture will be automatically built by Maven using best practices (in almost all cases, Maven archetypes are based on best practices and can be used as a reference) so you don’t need to worry if you are not familiar with all guidelines before starting your framework from scratch. To generate this basic template you need to choose the location you want to create your new framework in and run the following command:

At this moment Maven will go over its sources to offer a list of available options that you can use for templates. After a while, you will be asked to choose a template. You can use these values:
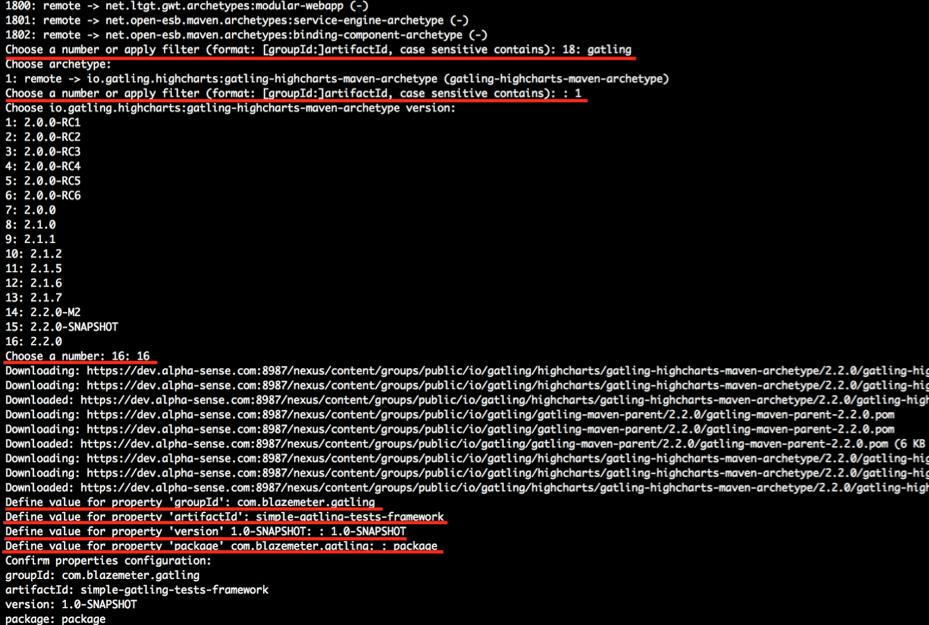
1. “Choose a number or apply filter”: “ gatling ”
Using the first input line you can specify some text that will filter all archetypes based on the naming pattern, or specify the exact archetype by the option (that you can see at the beginning of each line). You can also just type “gatling” and hit the enter button to filter all the archetypes that have the “gatling” string inside the name.
2. “Choose a number or apply filter” (again): “ 1 ”
As we filtered all the archetypes that have the “gatling” string inside their name in the previous step, now you will see only one archetype that makes it first in the list. That’s why you can use number 1 and hit the enter button, to choose the first and only available option, which represents the Gatling archetype.
3. “Choose a number”: “ 16 ”
At this step we need to choose Gatling version. Option number might be different when you try this out but you just need to choose the latest Gatling version to have the latest version of the Gatling distribution
4. “Define value for property ‘groupId’”: “ com.blazemeter.gatling ”
‘groupId’ can be custom but usually engineers put their company names or departures to make the framework dependencies unique)
5. “Define value for property ‘ artifactId ’”: “ simple-gatling-tests-framework ”
‘artifactId’ can be custom but mainly used for name specification of your project
6. “Define value for property ‘version’”: “ 1.0-SNAPSHOT ”
‘version’ can be custom and shows the version of your own framework which is usually set as ‘1.0-SNAPSHOT’ if you created the first version of the project
7. “Define value for property ‘package’”: “ package ”
‘ package ’ represents a type of pom module and you should choose “ package ” if you want to have the source code inside or “pom” of you are going to create the module containing some other modules without any source code on the same level
Right after you chose all the options it should take no more than a few seconds for Maven to create your initial project structure. Now you can open the project itself.
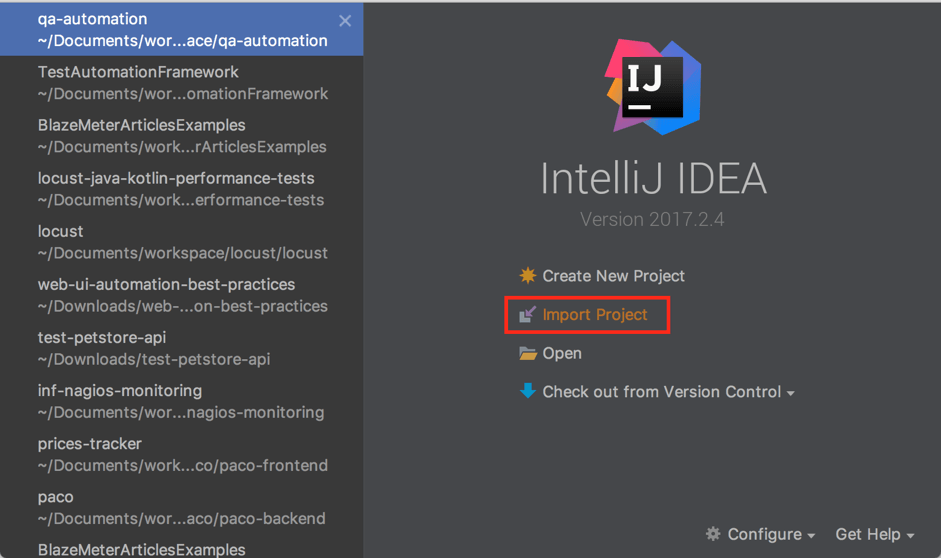
To open the project just run IDEA and click on “ Import Project ”:
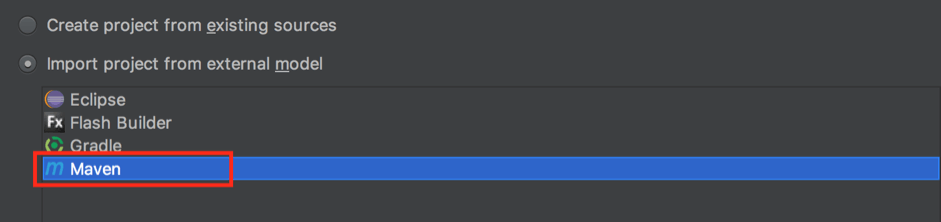
It is important that in the next step you choose “Import project from external model: Maven” to perform the IDEA framework integration smoothly without any additional actions afterwards:
All the rest of windows can be skipped and accepted as is.
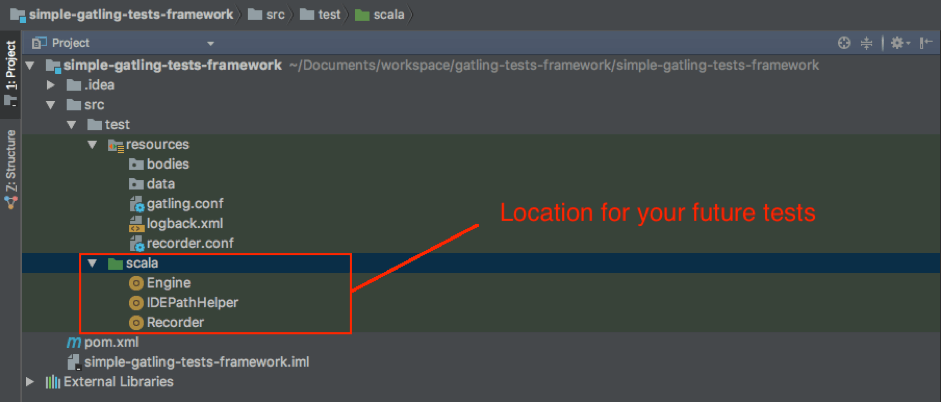
After you complete importing your project, you will see its final structure. All the new tests you can create are inside the src/test/scala folder:
Creating Your Gatling Test
Let’s create a test example. Tests implementation in Gatling is very easy due to clear DSL syntax. We will go over scripts creation in the next article but for now, you can use this code snippet as an example:
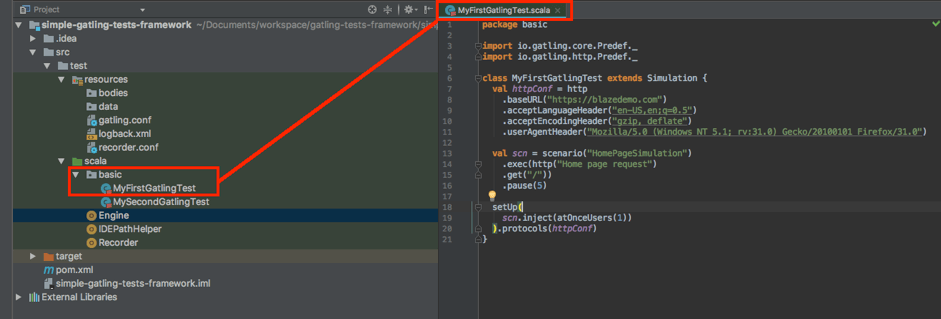
package basic

import io.gatling.core.Predef._
import io.gatling.http.Predef._

class MyFirstGatlingTest extends Simulation {
  val httpConf = http
    .baseURL("https://blazedemo.com")
    .acceptLanguageHeader("en-US,en;q=0.5")
    .acceptEncodingHeader("gzip, deflate")
    .userAgentHeader("Mozilla/5.0 (Windows NT 5.1; rv:31.0) Gecko/20100101 Firefox/31.0")

  val scn = scenario("HomePageSimulation")
    .exec(http("Home page request")
    .get("/"))
    .pause(5)

  setUp(
    scn.inject(atOnceUsers(1))
  ).protocols(httpConf)
}
A good thing about Gatling is that you can not only create your tests using your favorite IDE environment but you can even run your tests there. The Gatling setup already has the tests runner, which can be used to run any simulation created inside your project. The Gatling tests runner is smart enough to see that you only have one test inside the project, so it didn’t even provide a choice (in another case the runner would ask you which test exactly you want to run).
So to show you how you can specify the test you want to run, let’s create one more simulation by just copy pasting the existing test with another name (we can call it ‘MySecondGatlingTest’).
To execute a specific test you need to:
- Click the right mouse button on the “Engine” class, which is located inside the ‘scala’ folder inside your project
- Push “Run ‘Engine’” inside the context menu
- In the console that will appear after you run the engineer, you should choose the simulation that should be run by the class name and provide the related option id
- Provide the simulation id, which is a specific string to uniquely identify your execution that is going to be run
- Specify a run description if you want to add additional notes to the execution (however, this is optional)
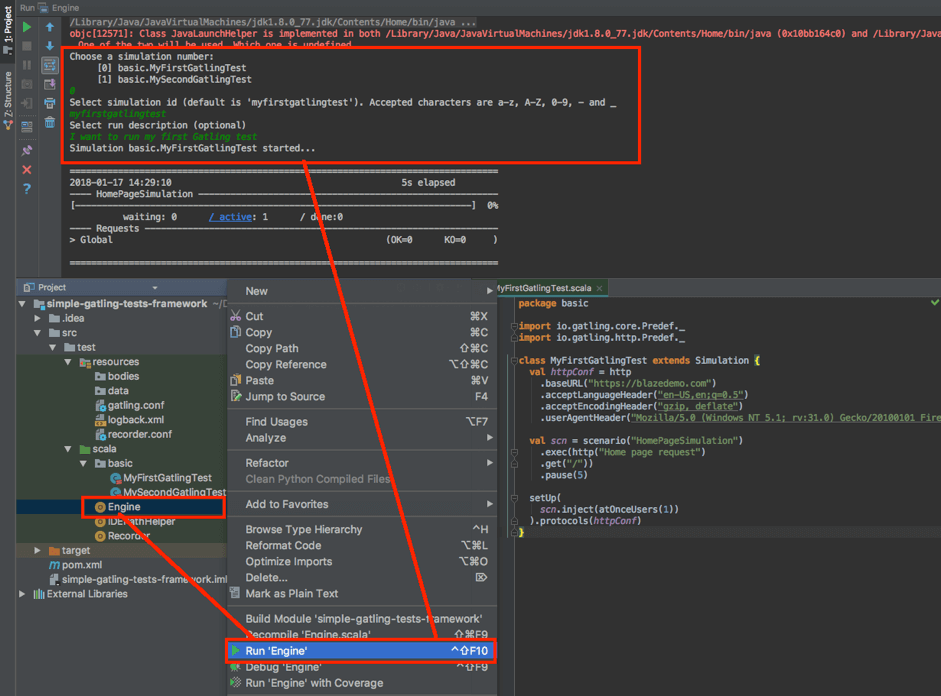
Congratulations! You have successfully run your test! From this moment on your Gatling tests implementation environment is ready and you can start your tests implementation!
To enjoy scalability, cloud performance testing and advanced reporting, run your Gatling tests with BlazeMeter. To try us out, request a demo or out your URL in the box below, and your test will start in minutes.
Published at DZone with permission of Yuri Bushnev. See the original article here.
Opinions expressed by DZone contributors are their own.
Comments