How to Setup MuleSoft Runtime Fabric on Self-Managed Kubernetes With AKS
This article will walk you through the step-by-step instructions of setting up the Runtime Fabric on self-managed Azure Kubernetes Service aka AKS.
Join the DZone community and get the full member experience.
Join For FreeIntroduction
MuleSoft announced the general availability of Anypoint Runtime Fabric on Azure Kubernetes Service (AKS) and Amazon Elastic Kubernetes Service (EKS) with the v1.8 release. Release 1.8 allows two flavors of Runtime Fabric as follows:
- Runtime Fabric with Mule Appliance.
- Runtime Fabric with BYOK (Bring your Own Kubernetes).
RTF with Mule appliance is shipped with mule appliance and is packaged with its own Kubernetes. Therefore, it allows enterprises and implementing partners to take advantage of cutting-edge technologies such as Kubernetes and docker without knowing much about them. However, these days, most enterprises are moving towards the cloud and have embraced these technologies.
Azure Kubernetes Service (AKS) and Amazon Elastic Kubernetes Service (EKS) are two dominant Kubernetes services adopted by most enterprises. These enterprises are happy to explore the idea of having the mule runtime managed on their own infrastructure with AKS or EKS if they see an advantage compared to RTF with mule appliances. This is what makes the proposition interesting.
Runtime fabric with mule appliance needs extra infrastructure to run the controllers. This increases your infrastructure bill by some margin. However, if you go for Runtime Fabric with AKS or EKS, you can leverage your own Kubernetes service and expertise to manage the mule runtimes with a lot more flexibility, and overall infrastructure expenses will be reduced significantly.
This article is your first step to get acquainted with Runtime Fabric setup on AKS.
Prerequisites
These are some of the prerequisites you will require before you begin with the Runtime Fabric Setup:
- Active Azure Subscription. You can your free Azure account here.
- Valid Anypoint Platform Account with RTF Entitlement. Talk to your MuleSoft PAM to enable RTF on your Anypoint Platform Org.
- Azure CLI version 2.0.64 or later. Run
az --versionto find the version. If you need to install or upgrade, see Install Azure CLI.
There are few more tools we may need, but we can get them while cruising through this article.
Step 1: Create the Kubernetes Cluster
- Log in with your Azure Credentials.
- Search for Kubernetes services and select Kubernetes services under the services section.
- Click on Add -> Add Kubernetes Cluster from the top menu of the Kubernetes Services page.
![Kubernetes Service screenshot.]()
- Select Valid Subscription.
- Select the existing Resource Group or provide the name of the new Resource Group.
- Provide the Kubernetes cluster name.
- Select the region in which you want to deploy your Kubernetes cluster.
- Select the availability zones for a given region. This will ensure the nodes of the cluster will spread across multiple physical locations to protect the application from azure datacentre failure. Learn more on availability zones for AKS here.
- Select the appropriate Kubernetes version. At the point when this article was written MuleSoft is supporting the Kubernetes version from 1.16.x to 1.18.x. Though we have tested RTF deployment with some higher versions, it is recommended to follow the guidelines provided by MuleSoft.
- Select the Node Size. Please note that once you select the size, all your nodes will be created with that size. Therefore, make sure you have done the sizing exercise before selecting the node size. The node size cannot be changed once the cluster is created.
- Select the number of nodes you require for your AKS cluster. You can resize the cluster by increasing nodes when needed.
![Basic Tab screenshot.]() Create Kubernetes Cluster: Basic Tab
Create Kubernetes Cluster: Basic Tab - Click on Next : Node pools > Button
- On Node Pool Tab, leave the default settings and click on the Authentication Button at the bottom of the page.
![]()
- On the Authentication Tab:
- Leave the Authentication method as *System-assigned managed identity*.
Note: You can choose Service Principle if you have the existing principal’s SPN ClientID and secret.
- Role-based access control (RBAC) = Enabled. This will ensure fine-grained control over cluster Resources.
- AKS-managed Azure Active Directory = Disabled. (You may want to enable this setting if you have Azure Active Directory. Once this feature is enabled, it cannot be disabled)
- Leave the Node Pool encryption as default.
- Click on the Networking button at the bottom.
![Creating the Cluster screenshot.]()
- Leave the Authentication method as *System-assigned managed identity*.
- Accept default values on the rest of the pages and click the Review + Create button at the bottom of the page. Once Validation is passed, click the Create Button. After few minutes, your Kubernetes cluster will be ready.
![Deployment Success screenshot.]() Kubernetes Cluster: Deployment Successful
Kubernetes Cluster: Deployment Successful
Step 2: Connecting to the Kubernetes Cluster
- Search for Kubernetes Service and click on the Kubernetes cluster name that you have created. On top of the page, you will see Connect button. Click on connect button, which will bring up the Kubernetes cluster connect commands on the right.
![Kubernetes Cluster Connection Details.]() Kubernetes Cluster Connection details
Kubernetes Cluster Connection details - Copy the first command and paste the same into your Azure CLI PowerShell window.
- Copy the second command and paste the same into the Azure CLI PowerShell window.
![Azure CLI connection screenshot.]() Azure CLI is connected to AKS Cluster Context
Azure CLI is connected to AKS Cluster Context - To validate the connection with the cluster, you can use the following command:
PowerShell
kubectl get nodes![Kubectl is using Current AKS Cluster screenshot.]()
Step 3: Create a Runtime Fabric
To install Runtime Fabric on Self-Managed Kubernetes, first, create a Runtime Fabric using Runtime Manager. You will see a runtime fabric option in your runtime manager if your Anypoint Platform has the appropriate entitlement.
- Check the Runtime fabric entitlement: Login to Anypoint Org and visit the following URL search for "runtimeFabric". It is true that if you found this entry, then your org does have RTF entitlement.
- Make sure you have * Manage Runtime Fabrics* permissions in your org.
- Go to the Runtime manager in Anypoint Platform and click on runtime Fabric.
![Runtime Manager screenshot.]()
- Click the Create Runtime Fabric Button.
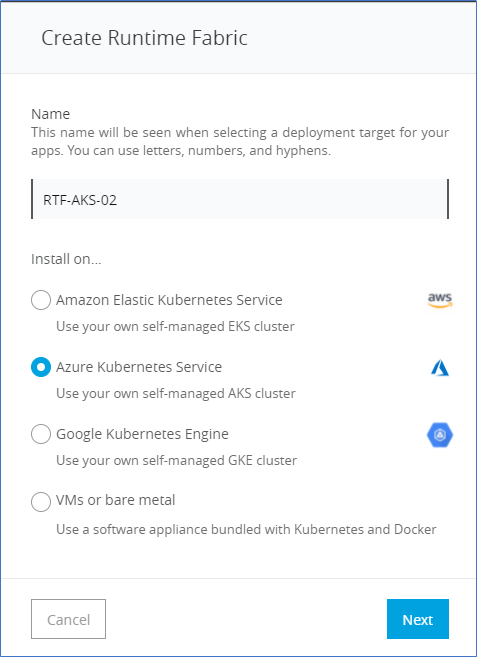
- Enter the Name of the Runtime Fabric and select Azure Kubernetes Service from the options and click next.
![Create Runtime Fabric screenshot.]()
- Read and understand support responsibility declaration, and then click on Accept.
- Make a note of the activation code; you will need this later. Your RTF Status should be *Ready for Activation*. Copy the activation code; we will use this later.
![Sandbox screenshot.]()
Step 4: Validate the Runtime Fabric
- Download the rtfctl utility. For windows, you can use the following command from the command prompt: curl -L.
- Validate Runtime Fabric into your Kubernetes service with the following command in the windows command prompt.
rtfctl validate <<Activation code copied from runtime manager>> - If your Kubernetes configuration is not located in the “/.kube/config” directory, set the KUBECONFIG environment variable before running
rtfctl. - The validate option
rtfctlverifies the following:- The Kubernetes environment is running.
- All required components exist.
- All required services are available.
Step 5: Install the Runtime Fabric into the AKS Cluster
Once validation is successful, Install Runtime Fabric with the following command on the Command Prompt: rtfctl install <activation_data>
<activation_data> is the activation data obtained after creating the Runtime Fabric using Runtime Manager. During installation, the rtfctl utility displays any errors encountered.
Step 6: Insert Mule License Key
Please go to this link to download your mule license key.
If you are working on a Windows machine, you will require a Linux bash shell terminal for the base64 encoding of the license key. You can download the bash terminal here.
- Go to your Linux bash shell terminal and Run the following command to Base64 encode the license key:
base64 -w0 license.lic - Make sure you have licence.lic available in the current directory or in the Cygwin installation folder. Ex :
C:\cygwin64\home\ranjeet_bhoyar - Go to command prompt and apply the mule license key with the following command:
rtfctl apply mule-license BASE64_ENCODED_LICENSE - Check the runtime fabric you create on your Anypoint platform, it should be in an active state.
![Runtime Manager screenshot.]()
- To Verify mule license key applied correctly, run the following command:
rtfctl get mule-license
Step 7: Create the Ingress Controller in the AKS Cluster
We will use Helm 3 to install the NGINX ingress controller on our Kubernetes cluster. Make sure that you are using the latest release of Helm and have access to the ingress-nginx Helm repository.
To create Ingress Controller, follow these steps:
- Go to your PowerShell command prompt and execute the following command to get the kubectl tool:
PowerShell
curl -LO https://storage.googleapis.com/kubernetes-release/release/v1.18.0/bin/windows/amd64/kubectl.exe - Make sure that you are connected to the AKS cluster from your PowerShell window. If not, then connect again by using
az account setandaz aks get-credentialscommands as mentioned in Step 2 of this article. - Create a namespace for the Ingress controller with the following command:
./kubectl create namespace ingress-basic - Add the ingress-nginx repository with the following command:
./helm repo add ingress-nginx01 https://kubernetes.github.io/ingress-nginx - Use Helm to deploy an NGINX ingress controller:
PowerShell
./helm install nginx-ingress01 ingress-nginx/ingress-nginx --namespace ingress-basic --set controller.replicaCount=2 --set controller.nodeSelector."beta\.kubernetes\.io/os"=linux --set defaultBackend.nodeSelector."beta\.kubernetes\.io/os"=linux --set controller.admissionWebhooks.patch.nodeSelector."beta\.kubernetes\.io/os"=linux - On a successful response, review the Ingress controller on the AKS cluster. Click on
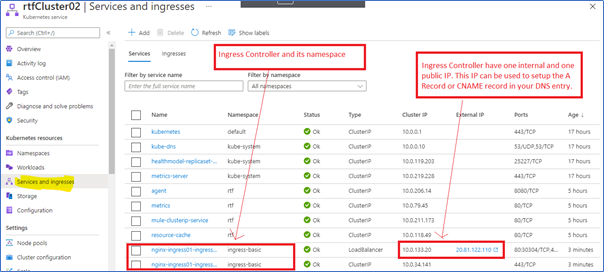
<<AKS clustern name>>under Kubernetes Service, and look for Services and Ingress Option. Notice that Ingress is created with the specified namespace. The Ingress controller will have an internal IP and external IP assigned. Have a look at the following screenshot:![Services and Ingress Option screenshot.]() Ingress Controller with internal and External IP
Ingress Controller with internal and External IP - Alternatively, use the following command to validate the ingress controller:
kubectl --namespace ingress-basic get services -o wide -w nginx-ingress01-ingress-nginx-controller![Code screenshot.]()
Step 8: Validate the Runtime Fabric and Deploy the Application
After completing the installation, your Runtime Fabric should be activated within your Anypoint organization. To validate your installation, go to Anypoint Runtime Manager and confirm that the status of the Runtime Fabric is Active.
Before deploying an application to your Runtime Fabric, do the following:
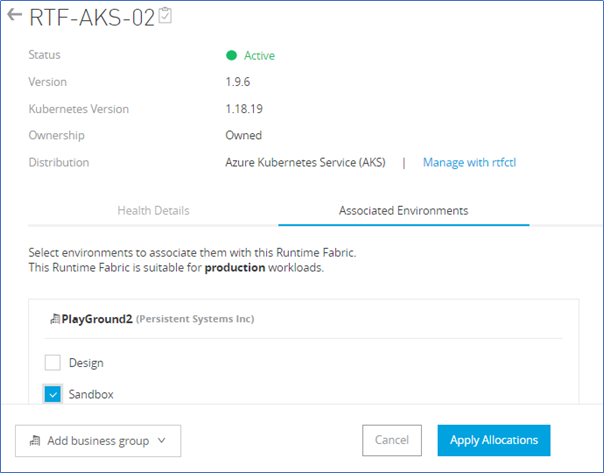
- Associate RTF with at least one Anypoint environment
![]() RTF with Business Group and Environment Association
RTF with Business Group and Environment Association - Add A Record into your Domain Provider and make sure you can
nslookupto the subdomain![Record Domain Entry screenshot.]() A Record Domain Entry For AKS Cluster
A Record Domain Entry For AKS Cluster![Nslookup screenshot.]() nslookup with you A Record on your Domain
nslookup with you A Record on your Domain - Configure Domains and Inbound Traffic:
- Navigate to Runtime Manager and select Runtime Fabric.
- Select the name of your Runtime Fabric (RTF02) to open the management page.
- Select Inbound Traffic, then click Add Endpoints.
- Add the following endpoint.
RTF02.yourdomainname.com(this depends on your domain name and A Record configuration). - Confirm your changes by clicking the Add button.
- Click the Save and deploy button, and add the new endpoint.
- Deploy the Application:
- Navigate to Runtime Manager -> Applications and Click on Deploy Application
- Provide the name of the application. Note that the name of the application must be lowercase. (in Cloudhub, we can use Capital case in application name)
- Select Deployment target as Runtime Fabric name you just created.
- Upload the application’s JAR file.
- Select the desired runtime version.
- Select the number of replicas
- Option *Run in Runtime Cluster-Mode* will be enabled only when you have more than one node and more than one in your AKS cluster and more than 1 replica selected.
- Option *Enforce deploying replicas across node* can be selected if your AKS cluster nodes are greater than or equal to your replicas.
- Use Persistent Storage: The Persistent gateway needs to be configured with RTF to use this option.
- Select Deployment Model as Rolling Update. This ensures availability by incrementally updating replicas. Requires one additional replica is worth of resources to succeed.
- Select Reserved CPU, CPU Limit, and Memory as per your sizing requirements.
- Click on the Deploy Application Button.
Step 9: Custom Ingress Controller Configurations
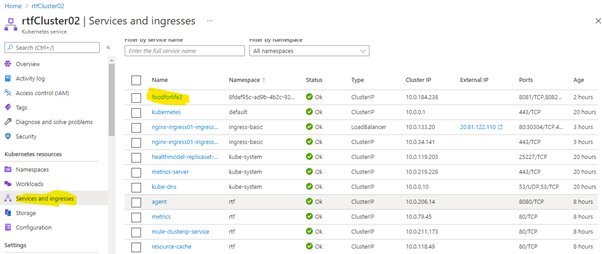
- Navigate to the AKS Cluster -> Service and Ingress. You will see your application deployed and the status as OK.
![Status OK screenshot.]() Mule Application Deployed with Status OK
Mule Application Deployed with Status OK - Notice the namespace of the application deployed. This namespace corresponds to the environment ID in Anypoint Platform. The Runtime Fabric agent generates a service and ingress resources under this namespace.
- Many times, generated ingress resources may not work, therefore, you may need to modify generated resources with a custom ingress template. Create a custom ingress template create a text file IngressConfig01.txt with the following text.
-
Plain Text
apiVersion: v1
kind: ConfigMap
metadata:
  name: ingress-config
  namespace: rtf
data:
  ingress.annotations: |
    kubernetes.io/ingress.class: nginx
    nginx.ingress.kubernetes.io/ssl-redirect: "false"
    nginx.ingress.kubernetes.io/force-ssl-redirect: "false"
    nginx.ingress.kubernetes.io/rewrite-target: /$2
    nginx.ingress.kubernetes.io/use-regex: "true"
  ingress.spec: |
    rules.http.paths.path: /${APP_PATH}(/|$)(.*)
Note: Do not edit anything above the Data section. Settings in the Data section can be changed in your AKS cluster configuration.
- In your Windows command prompt, run the following command:
rtfctl apply ingress-configmap <custom-template-file>
Running this command, rtfctl validates the template file you provided and performs the following:
- Creates the ConfigMap file in the
rtfnamespace. Any errors are written to stdout. - Schedules a job to validate the ingress resource generated from the ConfigMap in the template file.
- Waits until the job completes to output the status and relevant logs.
rtfctldisplays the status to stdout.
Step 10: Test Out the Application
Test your application with a valid endpoint.

Important Tip: By default, AKS clusters are case-sensitive for your endpoints. In the above example, if you provide positiveGrains or positivegrains, it will not work with the default configuration. The endpoint expects an exact match to what you have added to your application.
Opinions expressed by DZone contributors are their own.


Comments