Deploy an Application for Azure Container Registry
In this post, we'll provide an overview of the Docker container and Docker image. We'll also go through how to build and store images by using Azure Container Registry
Join the DZone community and get the full member experience.
Join For FreeOverview Docker Container and Image
Introduction to Docker Images
Docker Container and Docker Image
A Docker container is a virtualized runtime environment used in application development. As mentioned before in the definition of Docker, with Docker, we are able to create, run and deploy applications that are isolated from the underlying hardware. A Docker container can use just one machine, share its kernel and virtualize the OS to run more isolated processes. So, Docker containers are lightweight.
A Docker image is like a snapshot in other types of VM environments. It is a record of a Docker container at a specific point in time. Docker images are also immutable. While they can’t be changed, they can be duplicated, shared, or deleted. The feature is useful for testing new software or configurations because whatever happens, the image remains unchanged.
Containers require the existing runnable images to exist. They are dependent on images because they are used to construct runtime environments and are needed to run an application.
Containers Deployment
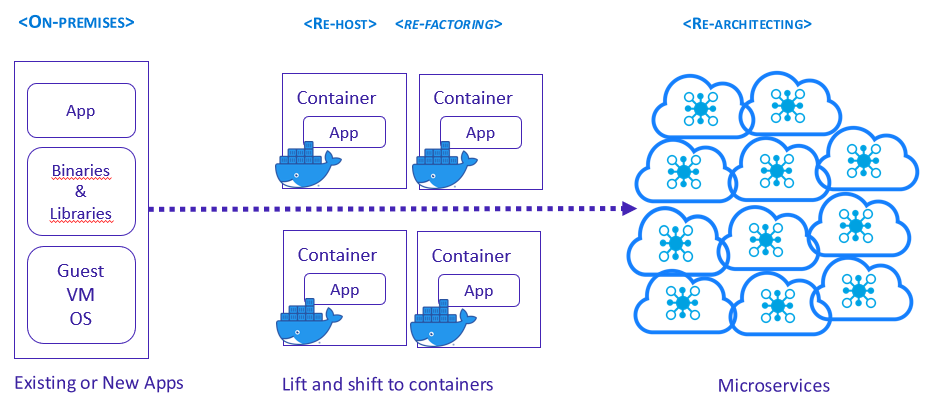
If we come back to our 5R strategy for cloud migration dedicated to containers, we can see how we can deploy if we want to rehost or refactor, use the microservice approach if we decide to rearchitect and for a new application we have to build patterns to adopt a cloud-native strategy in the future.

Prepare the Environment for Running Containers Locally
Let’s prepare our environment for running containers locally and for that we need to install Docker Desktop it is free.
This week, 8 November, Microsoft made generally available to users worldwide its latest versions of Visual Studio and .NET. Users can download Visual Studio 2022 and .NET 6. In this session, we'll be using the latest version of Visual Studio. We need an Azure account to be able to create an azure container registry.
Create a Docker Image
To create a docker image we use two methods:
Interactive Method
With this method, users will run a container from an existing Docker image and manually make any specific changes to the environment before saving the image. The method is the easiest and the simplest method to create docker images.
How? Follow these steps:
1- Launch Docker and open a terminal session.
2- use the Docker run command image_name:tag_name. This starts a shell session with the container that was launched from the image.
3- If the tag name is omitted, Docker uses the most recent version of the image.
4- The image should appear listed in the results.
Dockerfile Method
This approach requires making a plain text Dockerfile. The Dockerfile includes all the specifications to create an image. This process is more difficult and time-consuming, but it does well in continuous delivery environments. The method includes creating the Dockerfile and adding the commands needed for the image. Once the Dockerfile is started, the user sets up a .dockerignore file to exclude any files not needed for the final build. The .dockerignore file is in the root directory. Next, the Docker build command is used to create a Docker image, and an image name and tag are set. Lastly, the Docker images command is used to see the created image.
Create a Docker Image — YouTube
Build and Store Images By Using Azure Container Registry
What Is Container Registry?
- Azure service that you can use to create your own private Docker registries.
- Similar to Docker Hub but offers a few unique benefits: Container Registry runs in Azure, Container Registry is highly scalable, providing enhanced throughput for Docker pulls that can span many nodes concurrently.
Create ACR With Azure Portal
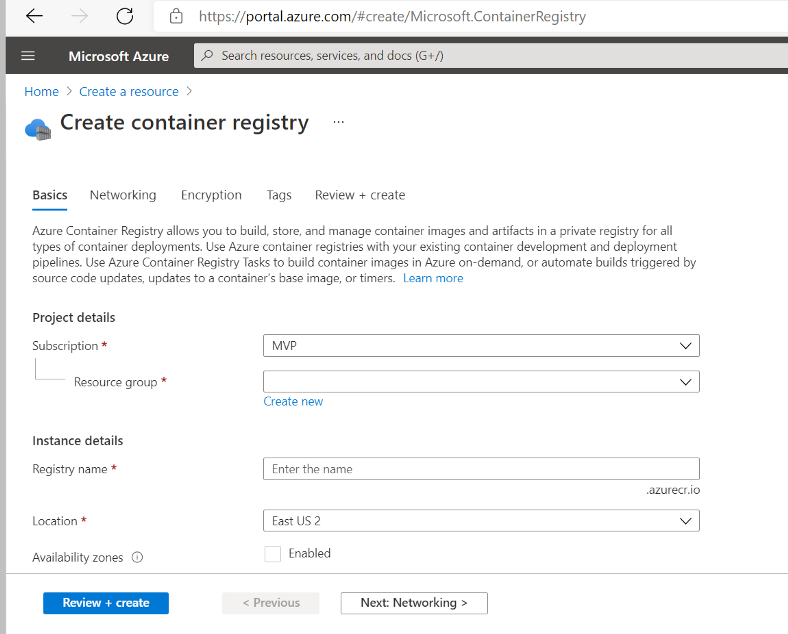
To get started, we will access the Azure portal, you need to click on “create new resource”:

We select Containers in the left of the window after we choose Container Registry. We click on Create to create a new container registry.

In the next screen, you need to configure your registry, you select the subscription, after, the name of the registry, next, the location, the SKU — for this article I choose the Basic SKU, we check Enabled for availability zones and we click on Review + create, and in the end, you click on “create’’ even the validation passed.
We have more than a tab, like the Networking tab, Encryption, and Tags.
Create an ACR with Azure Portal — YouTube

If you select Basic or Standard SKU, in the Networking tab, you will not be able to configure Connectivity to connect to this registry either publicly, via public IP addresses, or privately, using a private endpoint. Only Premium SKU allows it.
Even for the Encryption tab, Azure Container Registry service encryption protects the data by encrypting the images and other artifacts when they’re pushed to your registry and automatically decrypts when you pull them. But Customer-Managed Key is only available for Premium SKU.
Create ACR with Azure CLI
1. If you don’t have any resource group you need to create a resource group by using the az group create command.
az group create --name <resource-groupe-name> --location <location>
2. Next, we will create an Azure Container Registry instance in your resource group by using the az acr create command.
az acr create --resource-group <resource_group_name> --name <registry_name> --sku Basic --admin-enabled true
If we want to connect to login to the container registry we have to be administrators so we need to add -admin-enabled true that indicates whether the admin user is enabled,
3. Even we are administrators to the container registry, we will log in to ACR created earlier by using the az acr login command.
az acr login --name <registry_name>
The command returns this message: “Login Succeeded” once completed.
Now, To use your application container image with Azure Container Registry, you have to tag the image with the login server address of your registry, and to do that we need to follow these steps:
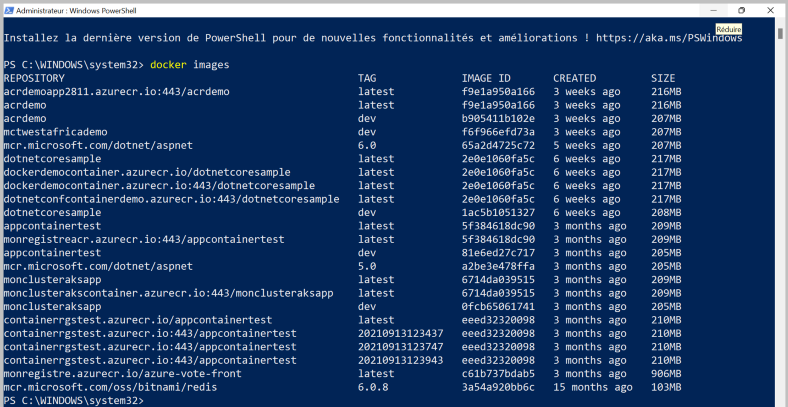
a- Use the docker images command to view the list of your local image.
$ docker images

b- Get the login server address for the Azure Container Registry by using the az acr list command.
az acr list --resource-group <resource_group_name> --query "[].{acrLoginServer:loginServer}" --output table
c- Now, we need to tag the application image with the login server address of your registry from the previous step. This will add an alias of the application image with a complete path to your registry.
docker tag yourtagtoadd<registry_login_server>/yourtagtoadd:01
d- You can use docker images to verify your tag.
4- And use the docker push command to push the application image to your container registry.
docker push <registry_login_server>/yourtagtoadd:01
5- Finally, you need to validate if the image is uploaded to your registry using this command line:
az acr repository list --name <registry_login_server> --output table
Opinions expressed by DZone contributors are their own.

Comments