How to Test React Component With Jest and Enzyme, Part 2
In Part 1 we covered a lot of the theory behind testing. Today, we code! Read on for a bunch of great testing code and examples.
Join the DZone community and get the full member experience.
Join For FreeWelcome back! If you missed Part 1, you can check it out here!
Examples of Testing
Let’s move to examples and cover components with tests described in the last article, step-by-step.
1. Testing of a Component From Forms/Inputs
Take one component from the forms/inputs directory; let it be DateInput.js, the component for a datepicker field.
Code listing for the tested component: DateInput.js
Looks like:
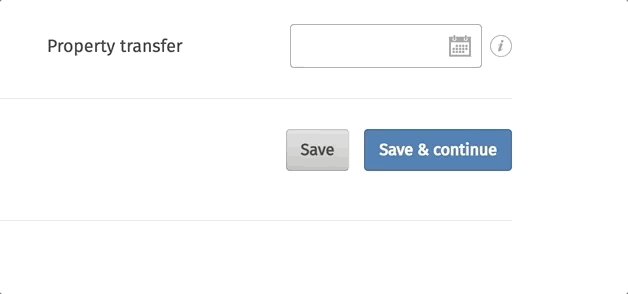
The DateInput component uses the react-datepicker with two utilities: valueToDate (converts value to date) and dateToValue is the opposite, it's moment package for manipulating date and PropTypes for checking React props.
According to the component code, we can see the list of default props — and, with the help of which the component should be rendered:
const defaultProps = {
    inputClassName: 'input-custom',
    monthsShown: 1,
    dateFormat: 'DD.MM.YYYY',
    showMonthYearsDropdowns: false,
    minDate: moment()
};
All props are appropriate for creating a snapshot, except one: minDate: moment() — moment() will give us the current date each time we run the test, and snapshot will fail because it stores an outdated date. A solution is to mock this value:
const defaultProps = {
    minDate: moment(0)
}
I need this minDate prop in each rendered component; to avoid props duplication, I create HOC which receives defaultProps and returns a pretty component:
import TestDateInput from '../DateInput';
const DateInput = (props) =>
    <TestDateInput
        {...defaultProps}
        {...props}
    />;
Don’t forget about moment-timezone, especially if your tests will be run by developers from another country in a different time zone. They will receive a mocked value, but with a time zone shift. The solution is to set a default time zone:
const moment = require.requireActual('moment-timezone').tz.setDefault('America/Los_Angeles') Now, the date input component is ready for testing.
1. Create a snapshot first:
it('render correctly date component', () => {
    const DateInputComponent = renderer.create(<DateInput />).toJSON();
    expect(DateInputComponent).toMatchSnapshot();
});
2. Testing props:
The first prop to test is showMonthYearsDropdowns and if it's set to true, the dropdown for month and years is shown:
it('check month and years dropdowns displayed', () => {
    const props = {
            showMonthYearsDropdowns: true
        },
        DateInputComponent = mount(<DateInput {...props} />).find('.datepicker');
    expect(DateInputComponent.hasClass('react-datepicker-hide-month')).toEqual(true);
});
Test the null prop value; this check is required to ensure the component is rendered without a defined value:
it('render date input correctly with null value', () => {
    const props = {
            value: null
        },
        DateInputComponent = mount(<DateInput {...props} />);
    expect((DateInputComponent).prop('value')).toEqual(null);
});
3. Test prototypes for value — the date expected to be a string:
it('check the type of value', () => {
    const props = {
            value: '10.03.2018'
        },
        DateInputComponent = mount(<DateInput {...props} />);
    expect(DateInputComponent.prop('value')).toBeString();
});
4. Test events:
4.1. Check the onChange event, for that mock onChange callback => render date input component => then simulate change event with new target value => and finally check that onChange event have been called with new value.
it('check the onChange callback', () => {
    const onChange = jest.fn(),
        props = {
            value: '20.01.2018',
            onChange
        },
        DateInputComponent = mount(<DateInput {...props} />).find('input');
    DateInputComponent.simulate('change', { target: {value: moment('2018-01-22')} });
    expect(onChange).toHaveBeenCalledWith('22.01.2018');
});
4.2. Ensure the datepicker popup opens after clicking on the date input. For that, find date input => simulate click event => and expect popup with the class .react-datepicker present.
it('check DatePicker popup open', () => {
    const DateComponent = mount(<DateInput />),
        dateInput = DateComponent.find("input[type='text']");
    dateInput.simulate('click');
    expect(DateComponent.find('.react-datepicker')).toHaveLength(1);
});
Full test code: DateInput.test.js
2. Utility Testing
Code for tested utility: valueToDate.js
The purpose of this utility is to transform the value to a date with a custom format. First of all, let’s analyze the given utility and define the main cases for testing:
1. According to the purpose of this utility, it transforms value, so we need to check this value:
- In case the value is not defined, we need to be sure that the utility will not return an exception (error).
- In case the value is defined, we need to check that the utility returns a moment date.
2. The returned value should belong to the moment class; that’s why it should be an instance of moment.
3. The second argument is dateFormat; set it as a constant before tests. That’s why it will be passed in each test and return a value according to the date format. Should we test dateFormat separately? I suppose not. This argument is optional; if we don’t set dateFormat, the utility won’t break, and it’ll just return a date in the default format; it is a moment job, we shouldn’t test third-party libraries. As I mentioned before, we shouldn’t forget about moment-timezone; it is a very important point, especially for developers from different time zones.
Let’s code:
1. Write a test for the first case; when we don’t have a value, it is empty.
const format = 'DD.MM.YYYY';

it('render valueToDate utility with empty value', () => {
    const value = valueToDate('', format);
    expect(value).toEqual(null);
});
2. Check if the value is defined.
const date = '21.11.2015',
      format = ‘DD.MM.YYYY’;

it('render valueToDate utility with defined value', () => {
    const value = valueToDate(date, format);
    expect(value).toEqual(moment(date, format));
});
3. Check that the value belongs to the moment class.
const date = '21.11.2015',
    format = 'DD.MM.YYYY';

it('check value is instanceof moment', () => {
    const value = valueToDate(date, format);
    expect(value instanceof moment).toBeTruthy();
});
Full test code: valueToDate.test.js
3. Widgets Testing
For widgets testing, I used the spinner component.
Code listing for tested widget: Spinner.js
Looks like:
The spinner does not require an explanation, as almost all web resources have this component.
So let's get to writing tests:
1. First step - create a snapshot:
it('render correctly Spinner component', () => {
   const SpinnerComponent = mount(<Spinner />);
   expect(SpinnerComponent).toMatchSnapshot();
});
2. Testing props:
2.1 Default prop title, check if it renders correctly.
it('check prop title by default', () => {
 const SpinnerComponent = mount(<Spinner />);
    expect(SpinnerComponent.find('p').text()).toEqual('Please wait');
});
2.2 Check custom prop title; I need to check that it returns a correctly defined prop. Take a look at the code, the title wrapped in the rawMarkup util, and outputs with the help of the dangerouslySetInnerHTML property.
Code listing for the rawMarkup util:
export default function rawMarkup(template) {
    return {__html: template};
}
Do we need to include the tests for rawMarkup in the spinner component? No, it is a separate utility and it should be tested apart from the spinner. We don’t care how it works; we just need to know that the title prop returns the correct result.
Clarification: The reason for using the dangerouslySetInnerHTML property is the following: our site is multilingual, for which a translations marketing team is responsible. They can translate it simply with the combination of words or even decorate it with the HTML tags, like <strong>, <i>, <s> or even slice text with the lists <ol>, <ul>; we don’t know for sure how they translate and decorate the text. We just need to correctly render all this stuff.
I combined the two main test cases into one test:
- return correct custom prop title
- render correctly prop title with HTML tags
it('check prop title with html tags', () => {
    const props = {
            title: '<b>Please wait</b>'
        },
        SpinnerComponent = mount(<Spinner {...props} />);
    expect(SpinnerComponent.find('p').text()).toEqual('Please wait');
});
Take the next prop, subTitle; it is optional and that’s why it doesn’t have a default prop, so skip this step with default props and test custom props:
- Check that the text in the
subTitleprop renders correctly:
const props = {
        subTitle: 'left 1 minute'
    },
    SpinnerComponent = mount(<Spinner {...props} />);

it('render correct text', () => {
    expect(SpinnerComponent.find('p').at(1).text()).toEqual(props.subTitle);
});
We know that subTitle is optional; that’s why we need to check whether it is not rendered with default props, according to the slicing markup. Just check the number of tags <p>:
it('check subTitle is not rendered', () => {
  const SpinnerComponent = mount(<Spinner />);
    expect(SpinnerComponent.find('p').length).toEqual(1);
});
3. Testing prop types:
- For title props, we expect it to be a string:
it('check prop type for title is string', () => {
    const props = {
            title: 'Wait'
        },
        SpinnerComponent = mount(<Spinner {...props} />);
    expect(SpinnerComponent.find('p').text()).toBeString();
});- For
subTitleprops, we also expected it to be a string:
const props = {
        subTitle: 'left 1 minute'
    },
    SpinnerComponent = mount(<Spinner {...props} />);

it('type for subTitle is string', () => {
    expect(SpinnerComponent.find('p').at(1).text()).toBeString();
});
Full tests listing: Spinner.test.js
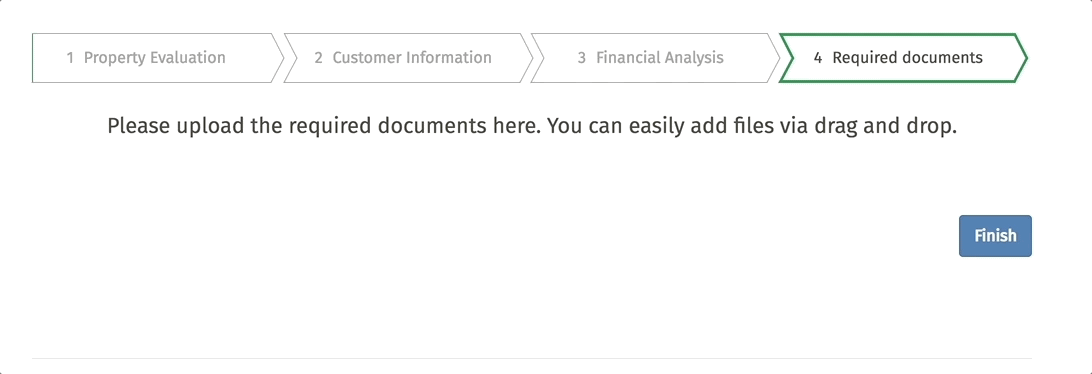
4. Modals testing (ModalWrapper.js and ModalTrigger.js)
Looks like:
How to test modals.
First of all, I want to explain how modals are organized on our project. We have two components: ModalWrapper.js and ModalTrigger.js.
ModalWrapper is responsible for popup layout. It contains modal container, button ‘close’, modal title, and body.
ModalTrigger is responsible for modal handling. It includes the ModalWrapper layout and contains events for modal’s layout control (open, close actions).
Let's go over each component separately:
1. Code listing for tested component:ModalWrapper.js
Let’s code:
1.1 ModalWrapper receives a component and renders it inside. First of all, check that ModalWrapper won’t fail without component. Create a snapshot with default props:
it('without component', () => {
    const ModalWrapperComponent = shallow(<ModalWrapper />);
    expect(ModalWrapperComponent).toMatchSnapshot();
});
1.2 The next step is to simulate its actual conditions with component rendering being passed through props:
it('with component', () => {
   const props = {
           component: () => {}
        },
        ModalWrapperComponent = shallow(<ModalWrapper {...props} />);
    expect(ModalWrapperComponent).toMatchSnapshot();
});
1.3 Testing props:
Receiving a custom class name prop:
it('render correct class name', () => {
    const props = {
            modalClassName: 'custom-class-name'
        },
        ModalWrapperComponent = shallow(<ModalWrapper {...props} />).find('Modal');
        expect(ModalWrapperComponent.hasClass('custom-class-name')).toEqual(true);
});
Receiving a custom title prop:
it('render correct title', () => {
    const props = {
           title: 'Modal Title'
       },
       ModalWrapperComponent = shallow(<ModalWrapper {...props} />).find('ModalTitle');
    expect(ModalWrapperComponent.props().children).toEqual('Modal Title');
});
Receiving a correct show prop:
 it('check prop value', () => {
        const props = {
               show: true
           },
           ModalWrapperComponent = shallow(<ModalWrapper {...props} />).find('Modal');
        expect(ModalWrapperComponent.props().show).toEqual(true);
    });
1.4 Testing prop types:
- for show prop
it('check prop type', () => {
    const props = {
           show: true
        },
        ModalWrapperComponent = shallow(<ModalWrapper {...props} />).find('Modal');
    expect(ModalWrapperComponent.props().show).toBeBoolean();
});- for onHide prop
it('render correct onHide prop type', () => {
    const props = {
            onHide: () => {}
        },
        ModalWrapperComponent = shallow(<ModalWrapper {...props} />).find('Modal');
    expect(ModalWrapperComponent.props().onHide).toBeFunction();
});- for component prop
it(‘render correct component prop type’, () => {
   const props = {
           component: () => {}
       },
       ModalWrapperComponent = mount(<ModalWrapper {...props} />);
   expect(ModalWrapperComponent.props().component).toBeFunction();
});
Full tests listing: ModalWrapper.test.js
2. Code listing for a tested component: ModalTrigger.js
The modal wrapper has been covered with a test; the second part is to cover the modal trigger component.
The component overview: it is based on the state of toggled that indicates the visibility of ModalWrapper. Iftoggled: false, the popup is hidden, otherwise it's visible. The function open() opens a popup on a child element; click the event and the function close() hides popup on button rendered in ModalWrapper.
2.1 Snapshot creation:
it('render ModalTrigger component correctly', () => {
    const ModalTriggerComponent = shallow(<ModalTrigger><div /></ModalTrigger>);
    expect(ModalTriggerComponent).toMatchSnapshot();
});
Should we test ModalTrigger with component prop rendering? No; because component will be rendered inside ModalWrapper component, it does not depend on the tested component. It was already covered with tests in the ModalWrapper tests.
2.2 Testing props. We have one prop children and we want to be sure that we have only one child.
it('ensure to have only one child (control element)', () => {
    expect(ModalTriggerComponent.findWhere(node => node.key() === 'modal-control').length).toEqual(1);
});
2.3 Testing prop types. Children props should be objects, check this in the next test:
const ModalTriggerComponent = mount(<ModalTrigger><div /></ModalTrigger>);

it('check children prop type', () => {
      expect(ModalTriggerComponent.props().children).toBeObject();
});
2.4 An important part of the ModalTrigger component is to check states.
We have two states:
Popup is opened. To know that the modal is opened, we need to check its state. For this, call the open function from the instance of the component and expect that toggled in state should be true.
it('check the modal is opened', () => {
    const event = {
        preventDefault: () => {},
        stopPropagation: () => {}
    };
    ModalTriggerComponent.instance().open(event);
    expect(ModalTriggerComponent.state().toggled).toBeTruthy();
});
The popup is closed and tested — toggled in the state should be false.
it('check the modal is closed', () => {
   ModalTriggerComponent.instance().close();
   expect(ModalTriggerComponent.state().toggled).toBeFalsy();
});
Full tests listing: ModalTrigger.test.js
Now the modals are fully tested. One piece of advice for testing the components that are dependent on each other: look through the components first and write a test plan, define what you need to test in each component, check test cases for each component, and be sure you don’t repeat the same test case in both components. Carefully analyze possible and optimal variants for test coverage.
5. HOC Testing (Higher-Order Component)
The last two parts (HOC and form’s fields testing) are interconnected. I would like to share with you how to test field layout with its HOC.
Explanation of BaseFieldLayout, why we need this component, and where we use it:
- BaseFieldLayout.js is the wrapper for form input components like TextInput, CheckboxInput, DateInput, SelectInput, etc. Their names end with the
-Inputbecause we use redux-form package and these components are the input components to redux-form logic. - We need BaseFieldLayout for creating a layout for form field components, that is rendering labels, tooltips, prefixes (currency, square meter abbreviations, etc.), icons, errors, etc.
- We use it in BaseFieldHOC.js for wrapping inputComponent in field layout and connect it with the redux-form with the help of
<Field/>component.
Code listing for tested component: BaseFieldHOC.js
HOC receives form input components and returns components, connected with redux-form.
Analyze HOC:
- This component receives only one prop,
component. First of all, I need to create this component and wrap it in the BaseFieldHOC. - Next, I need to decorate wrapped HOC with redux-form in order to get field connected with redux-form.
- Render this field inside React Redux
<Provider>component to make the store available to the tested component. To mock store, just do:
const store = createStore(() => ({})); Now, before each test, I need to do the next:
let BaseFieldHOCComponent;

beforeEach(() => {
    const TextInput = () => { return 'text input'; },
        BaseFieldHOCWrapper = BaseFieldHOC(TextInput),
        TextField = reduxForm({ form: 'testForm' })(BaseFieldHOCWrapper);
    BaseFieldHOCComponent = renderer.create(
        <Provider store={store}>
            <TextField name="text-input" />
        </Provider>
    ).toJSON();
});
After that, the component is ready for testing:
1. Create a snapshot:
it('render correctly component', () => {
    expect(BaseFieldHOCComponent).toMatchSnapshot();
});
2. Ensure that the input component is wrapped in BaseFieldLayout after rendering:
it('check input component is wrapped in BaseFieldLayout', () => {
    expect(BaseFieldHOCComponent.props.className).toEqual('form-group');
});
That’s all, the HOC is covered. The most complicated part in testing connected redux-form components is making preparations to the field (decorate with redux form and setup store); the rest is easy, just follow the instructions and nothing else.
Full tests listing: BaseFieldHOC.test.js
6. Forms/Fields Testing
The HOC field has been covered with tests and we can move to the BaseFieldLayout component.
Code listing for tested component: BaseFieldLayout.js
Let’s code BaseFieldLayout.js; write tests according to the instructions above.
1. First of all, create a snapshot.
This component will not be rendered without defaultProps:
- inputComponent
- The props provided by redux-form: input and meta objects. Input with property name and meta with properties error and touched:
const defaultProps = {
   meta: {
        touched: null,
        error: null
    },
    input: {
        name: 'field-name'
    },
    inputComponent: () => { return 'test case'; }
}
To use defaultProps in each tested wrapper, do the following:
import TestBaseFieldLayout from '../BaseFieldLayout';

const BaseFieldLayout = (props) => <TestBaseFieldLayout {...defaultProps} {...props} />;
Now we are ready to create a snapshot:
it('render correctly BaseFieldLayout component', () => {
    const BaseFieldLayoutComponent = renderer.create(<BaseFieldLayout />).toJSON();
    expect(BaseFieldLayoutComponent).toMatchSnapshot();
});
2. Testing props:
This component has many props. I will show examples of several ones; the rest are tested by analogy.
- Ensure the
iconprop is rendered correctly:
it('render correctly icon prop', () => {
    const props = {
            icon: <span className="icon-exclamation" />
        },
        BaseFieldLayoutComponent = mount(<BaseFieldLayout {...props} />);
        expect(BaseFieldLayoutComponent.find('span').hasClass('icon-exclamation')).toBeTruthy();
});- Ensure tooltip content renders next to the label
const props = {
        labelTooltipContent: 'tooltip for label'
    },
    BaseFieldLayoutComponent = mount(<BaseFieldLayout {...props} />);

it('check prop is rendered', () => {
   expect(BaseFieldLayoutComponent.find('span').hasClass('tooltip-icon')).toBeTruthy();
});- Testing
fieldLinkprop- Ensure
fieldLinkis null by default
- Ensure
it('check prop is null by default', () => {
    const BaseFieldLayoutComponent = shallow(<BaseFieldLayout />);
    expect(BaseFieldLayoutComponent.props().fieldLink).toBe(null);
});- Ensure fieldLink renders correctly with a custom value
3. Testing errors:
it('check if field has error', () => {
    const props = {
            meta: {
                touched: true,
                error: 'This field is required'
            }
        },
        BaseFieldLayoutComponent = mount(<BaseFieldLayout {...props} />);
    expect(BaseFieldLayoutComponent.find('.error')).toHaveLength(1);
});
Full tests listing: BaseFieldLayout.test.js
Bottom Line
Now you have full guidance on how to perform full coverage testing of components based on project structure. From my own experience, I tried to explain what is necessary to test, in which order, and what you can omit in test coverage. Also, I demonstrated examples of several testing components and spotted the sequence of codebase coverage. I hope that you will find this article useful and will share your response. Thank you for reading.
The article about testing react components is originally published on Django Stars blog.
If you enjoyed this article and want to learn more about React, check out this collection of tutorials and articles on all things React.
Published at DZone with permission of Alona Pysarenko. See the original article here.
Opinions expressed by DZone contributors are their own.
Comments