How to Use Kotlin to Create a Secure Ktor Application
In this article, see how to use a modern JVM stack to build your own Nano Blogging Service, or nabl, using Ktor.
Join the DZone community and get the full member experience.
Join For FreeToday I will be showing you how to use a modern JVM stack to build your own Nano Blogging Service, or nabl. You will be using the Ktor web framework, Kotlin programming language, and securing it with Okta. Your users will be able to sign up/login, as well as browse chronological feeds and post updates without the inclusion of ads.
Often Kotlin is described as a better alternative to Java due to its efficient Java interoperability. This is important as it then allows for you to employ the largest ecosystem of existing libraries written and designed for Java, as well as JVM frameworks in your Kotlin application, or vice-versa. Kotlin also is compatible with Spring Boot, Jersey, Dropwizard, and more. Any framework that is “Kotlin-native” provides high-level language support, additional type-safety, and other competitive advantages.
The most prominent “Kotlin-native” web framework officially supported by JetBrains is Ktor, which allows for a customizable modular framework, giving developers full control over the execution of the applications, all while providing practical defaults.
Prerequisites
- Computer with downloaded Java 8+, Git, bash-like command line
- Familiarity with Java or Kotlin
- Your favorite IDE, for instance, IntelliJ IDEA Community Edition
- A Free Okta Developer account
- 15 mins of your time
Build a Ktor Application With Kotlin
As with any web application framework, Ktor provides several libraries and imposes some conventions. Don’t worry—it doesn’t tell you how to write your code. The conventions are mostly for the HTTP layer and you’re free to write other lower layers the way you want. A few of the most notable things include:
- The web application is a pipeline processing incoming requests through features and route handlers.
- Request handling is non-blocking; it relies on Kotlin coroutines.
- The configuration file format is HOCON.
- Framework is employing DSL for the top-level declarations, e.g., modules setup, routing, etc.
- Pluggable features are configured using
install(FeatureObject) { config }. - Most of the functions and properties you use are extension functions.
Ktor Project Structure
The application in this example depends on several libraries:
- Kotlin programming language you use for this project
- Ktor server with Ktor server CIO - server implementation and coroutine-based HTTP engine core
- Ktor client with Ktor client CIO - client used to communicate to OAuth2 server
- Ktor Auth module to handle authorization flow
- kotlinx.html set of classes allowing to write type-safe HTML generators
- Okta JWT Verifier library helps to parse and verify access and id tokens
You can bootstrap this tutorial by cloning our Git repository and starting with the initial branch:
git clone -b initial https://github.com/oktadeveloper/okta-kotlin-ktor-example.git
cd okta-kotlin-ktor-example
NOTE: If you want to see the completed app, with Okta already integrated, you can check out the main branch. See the project’s README for instructions on how to configure it to work with your Okta account.
Start your Ktor Application
Use IntelliJ runner or type ./gradlew run in the command line to start your application, point your web browser to http://localhost:8080.
All the messages displayed are from the in-memory database. Note that at this stage, the user can’t log in; hence they can’t post messages.
Secure Your Ktor Application With Okta
Real-world applications often require users to log in to perform some actions or access information. User management and security are much more complicated than they might seem and it can be tough to make them right. If you have done it previously, you know what I’m talking about.
User management shouldn’t take much of your time because that problem is solved already, right? In this tutorial, you’ll be using Okta’s OAuth 2.0 authorization service along with OpenID Connect (OIDC). Okta provides many features for both enterprise and personal project needs - MFA, SAML, groups, policies, social media logins, and many more. We offer solutions for different size companies - from pet projects just for yourself to big enterprises such as FedEx, Box, HubSpot, Experian, and many others. Okta helps developers implement secure authentication, handles authorization, and can act as an identity provider with a minimum effort and lines of code.
If you haven’t created an Okta account yet, sign up first. It’s free, no credit card required.
Login to the Okta admin console. On the top menu select Applications → Add Application:
Then, configure your Okta application. Don’t worry, if you want to change anything it’s always possible to return to this screen. At the very least, you need to set the following settings:
- Name - give it a meaningful name, for instance,
My Ktor nano Blogging Service - Base URIs - put
http://localhost:8080/there. Multiple URI can be provided; you can add more URIs if needed. - Login redirect URIs - set it to
http://localhost:8080/login/authorization-callback. Upon successful login, the user will be redirected to URI provided with tokens in the query. - Logout redirect URIs - value
http://localhost:8080allows you to provide a redirect URL on successful logout.
Click Done to finish the initial setup.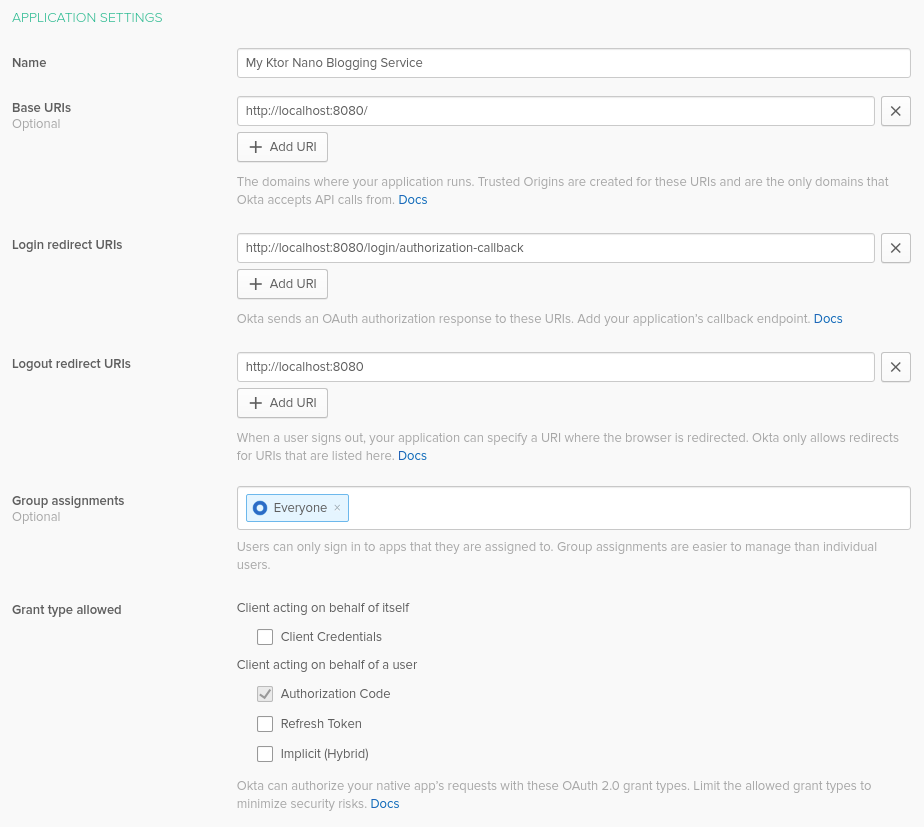
Take note of the following three values. You’ll use them in your Ktor application:
Org URL: Hover over API on the top menu bar, and select Authorization Servers menu item, copy the value from Issuer URI
Client ID and Client Secret as below:

Configure Ktor’s OAuth 2.0 Module
Ktor has an implementation of OAuth Client—it just needs to be configured. It’s always good practice to never insert any keys, tokens, or credentials directly into the code. Even for a demo project. To inject Okta parameters from environment variables, append a new block in resources/application.conf:
xxxxxxxxxx
...
okta {
orgUrl = ${OKTA_ORGURL}
clientId = ${OKTA_CLIENT_ID}
clientSecret = ${OKTA_CLIENT_SECRET}
}
To start your application from IntelliJ IDEA or any other IDE, these environment variables must be provided. In the Run/Debug Configuration dialog, click on the Environment variables and specify them as I have below.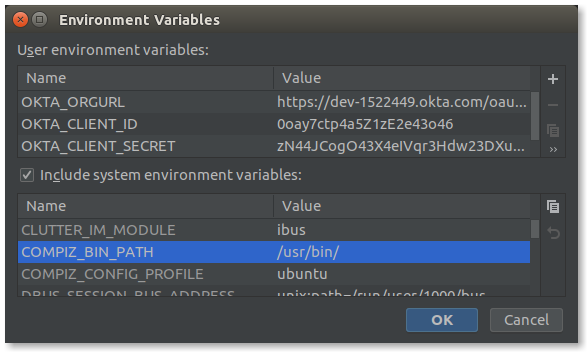
Then, create a src/auth-settings.kt file to contain all Okta-configuration related functions.
You could also create an okta.env file with the following code:
xxxxxxxxxx
export OKTA_ORGURL=https://{yourOktaDomain}/oauth2/default
export OKTA_CLIENT_ID={yourClientId}
export OKTA_CLIENT_SECRET={yourClientSecret}
Next, run source okta.env before running your app.
If you’re on Windows, name the file okta.bat and use SET instead of export.
Add a generic configuration class for Okta services in src/auth-settings.kt.
xxxxxxxxxx
data class OktaConfig(
val orgUrl: String,
val clientId: String,
val clientSecret: String,
val audience: String
) {
val accessTokenUrl = "$orgUrl/v1/token"
val authorizeUrl = "$orgUrl/v1/authorize"
val logoutUrl = "$orgUrl/v1/logout"
}
Create a configuration reader in src/auth-settings.kt. This takes a Config object, reads from it, and creates an OktaConfig object.
xxxxxxxxxx
fun oktaConfigReader(config: Config): OktaConfig = OktaConfig(
orgUrl = config.getString("okta.orgUrl"),
clientId = config.getString("okta.clientId"),
clientSecret = config.getString("okta.clientSecret"),
audience = config.tryGetString("okta.audience") ?: "api://default"
)
Finally, the Ktor Auth module is expecting configuration to be passed as OAuthServerSettings.OAuth2ServerSettings. For that, you need a mapping function in src/auth-settings.kt:
xxxxxxxxxx
fun OktaConfig.asOAuth2Config(): OAuthServerSettings.OAuth2ServerSettings =
OAuthServerSettings.OAuth2ServerSettings(
name = "okta",
authorizeUrl = authorizeUrl,
accessTokenUrl = accessTokenUrl,
clientId = clientId,
clientSecret = clientSecret,
defaultScopes = listOf("openid", "profile"),
requestMethod = Post
)
Setup a Ktor Authentication Module
All authentication configuration and handling happen inside the setupAuth() function of src/auth.kt file. Start filling it with configuration. Use oktaConfigReader() to read configuration from the application file. Then, install the Authentication feature and configure it to use OAuth, provide it a redirect callback, the Okta OAuth2 configuration, and a default HttpClient for the Ktor OAuth client features.
xxxxxxxxxx
package com.okta.demo.ktor
import com.typesafe.config.ConfigFactory
import com.okta.jwt.JwtVerifiers
import io.ktor.application.*
import io.ktor.auth.*
import io.ktor.client.*
fun Application.setupAuth() {
val oktaConfig = oktaConfigReader(ConfigFactory.load() ?: throw Exception("Could not load config"))
install(Authentication) {
oauth {
urlProvider = { "http://localhost:8080/login/authorization-callback" }
providerLookup = { oktaConfig.asOAuth2Config() }
client = HttpClient()
}
}
}
To ensure that tokens provided are valid, they need to be verified. This can be done using theOkta JWT Verifier library. Construct access token and ID token verifiers as follows:
xxxxxxxxxx
val accessTokenVerifier = JwtVerifiers.accessTokenVerifierBuilder()
.setAudience(oktaConfig.audience)
.setIssuer(oktaConfig.orgUrl)
.build()
val idVerifier = JwtVerifiers.idTokenVerifierBuilder()
.setClientId(oktaConfig.clientId)
.setIssuer(oktaConfig.orgUrl)
.build()
Next, configure three login-specific endpoints. Ktor DSL assumes the following structure:
xxxxxxxxxx
fun Application.setupAuth() {
...
routing {
authenticate {
// Okta calls this endpoint providing accessToken along with requested idToken
get("/login/authorization-callback") {
// ⚫ handle authorization
}
// When guest accessing /login it automatically redirects to okta login page
get("/login") {
// ⚫ perform login
}
}
// Perform logout by cleaning cookies
get("/logout") {
// ⚫ perform logout
}
}
}
Sign in with the /login endpoint
It’s the easiest one. Ktor will require user authentication for all endpoints located within the authenticate block. If a user is not authenticated, they will be redirected to the authorization URL. Its value is taken from the authorizeUrl property from OktaConfig.
Since the Ktor Auth module is handling this itself, the implementation is a single line. The condition checks if a visitor has a session and, if so, redirects it to the root of the website:
xxxxxxxxxx
// When guest accessing /login it automatically redirects to okta login page
get("/login") {
call.respondRedirect("/")
}
Authorization endpoint /login/authorization-callback
Upon successful authorization, the user is redirected to this URL. The Okta authorization service provides access and ID tokens as part of the login flow. If unsure, read our Illustrated Guide to OAuth and OIDC.
To extract information (aka, parse the JWT) about the user, you can use Okta’s JWT Verifier. In the code below, the user’s name is taken from the token’s claims and “slugified”, to create a URL-safe alphanumeric username. Finally, a new session is created and the user redirected to the /.
xxxxxxxxxx
// Okta calls this endpoint providing accessToken along with requested idToken
get("/login/authorization-callback") {
// Get a principal from from OAuth2 token
val principal = call.authentication.principal<OAuthAccessTokenResponse.OAuth2>()
?: throw Exception("No principal was given")
// Parse and verify access token with OktaJwtVerifier
val accessToken = accessTokenVerifier.decode(principal.accessToken)
// Get idTokenString, parse and verify id token
val idTokenString = principal.extraParameters["id_token"]
?: throw Exception("id_token wasn't returned")
val idToken = idVerifier.decode(idTokenString, null)
// Try to get handle from the id token, of failback to subject field in access token
val fullName = (idToken.claims["name"] ?: accessToken.claims["sub"] ?: "UNKNOWN_NAME").toString()
println("User $fullName logged in successfully")
// Create a session object with "slugified" username
val session = UserSession(
username = fullName.replace("[^a-zA-Z0-9]".toRegex(), ""),
idToken = idTokenString
)
call.sessions.set(session)
call.respondRedirect("/")
}
Logout endpoint /logout
Users might have reasons to log out from the website—they might even simply erase cookies! Some people may consider that a little bit too technical. You can help them to do so by resetting the session on the server-side:
xxxxxxxxxx
// Perform logout by cleaning session
get("/logout") {
call.sessions.clear<UserSession>()
call.respondRedirect("/")
}
Start Your Kotlin + Ktor Application
Run your application, open your browser to http://localhost:8080, and click Login from the top menu bar. You will see an Okta login screen. After you type your credentials you’ll be redirected back to the app but as a user this time. Try to send some messages!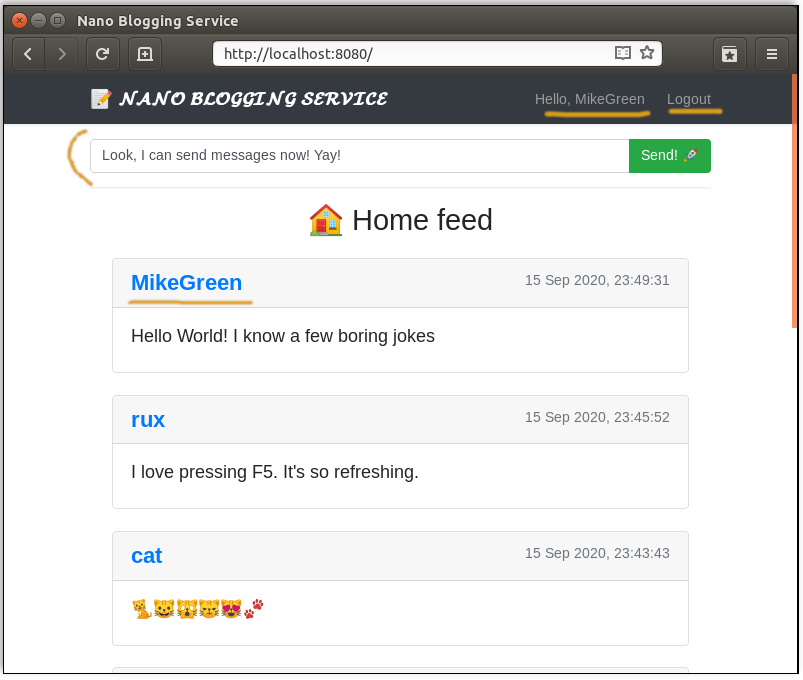
Congratulations, you just added authorization to your service!
Logout with Okta
Did you try to t̶u̶r̶n̶ ̶i̶t̶ ̶o̶f̶f̶,̶ ̶t̶h̶e̶n̶ ̶o̶n̶ ̶a̶g̶a̶i̶n̶ logout and login again? You might observe an unexpected behavior. If you checked “remember me” box in the Okta screen, you virtually can’t log out—or at least it looks like that.
From the user’s point of view, they expect to see a login screen inviting to put login/password——not to automatically be logged in:
You might ask yourself: why is it done this way? Why doesn’t the Authorization server purge sessions?
What if you’re using Facebook instead of Okta as an Authorization and Identity Provider service? And you want to logout from some website and that website also destroys your session in Facebook. It doesn’t sound nice, does it?
If you intend to logout users from Okta, as well, you’ll need to use something called RP-Initiated Logout. You can read more about it in this blog post. The basic idea is straightforward - after you remove a session inside your app, the user needs to visit a specially formed logoutUrl with idToken provided as a GET parameter. Update your logout handler in src/auth.kt:
xxxxxxxxxx
// Perform logout by cleaning cookies and start RP-initiated logout
get("/logout") {
val idToken = call.session?.idToken
call.sessions.clear<UserSession>()
val redirectLogout = when (idToken) {
null -> "/"
else -> URLBuilder(oktaConfig.logoutUrl).run {
parameters.append("post_logout_redirect_uri", "http://localhost:8080")
parameters.append("id_token_hint", idToken)
buildString()
}
}
call.respondRedirect(redirectLogout)
}
Restart your application and try to logout. Now the application behaves as you’d expect: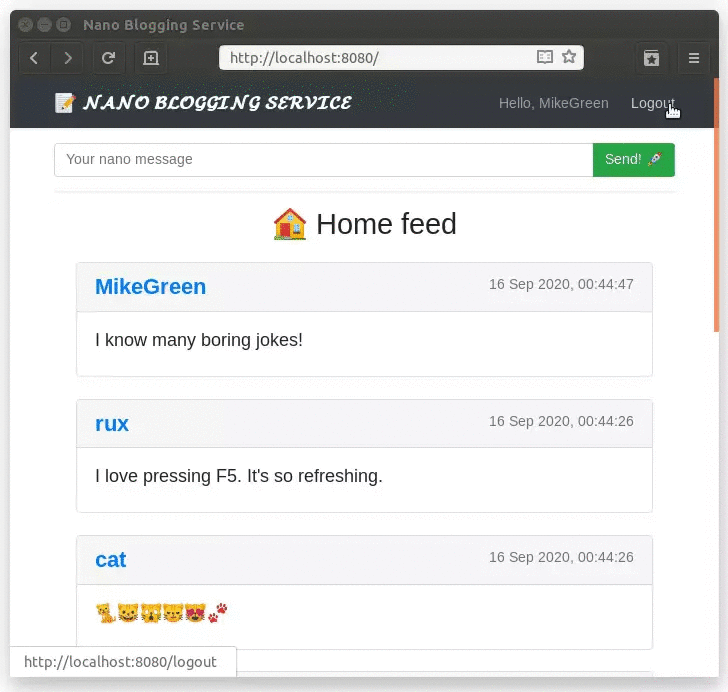
Manage Users With Okta
The Nano Blogging Service is more fun when different people can log in! You can create additional users from the Okta Developer Console. From the top menu bar, click on Users, then Add Person. You’ll be presented with a dialog to add a new user: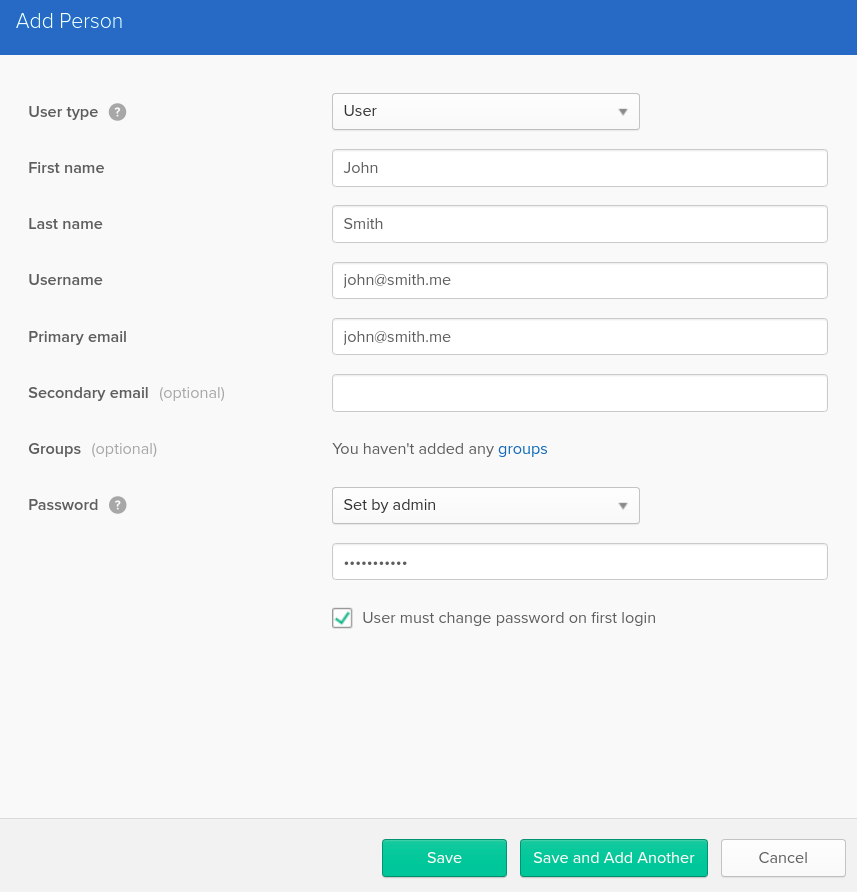
Enable User Registration
Okta also provides a self-sign up service. You can enable it by heading to the Okta Developer Console, hovering over the Users top menu item, and selecting Registration from the sub-menu. Okta will show a single button you need to click to activate the feature: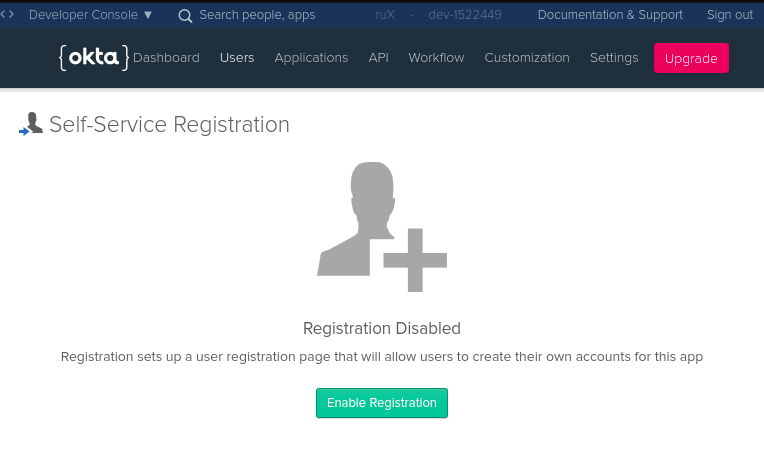
If desired, tune the default options and save.
Then, when you try to sign in to your service, you’ll see a “Sign up” link: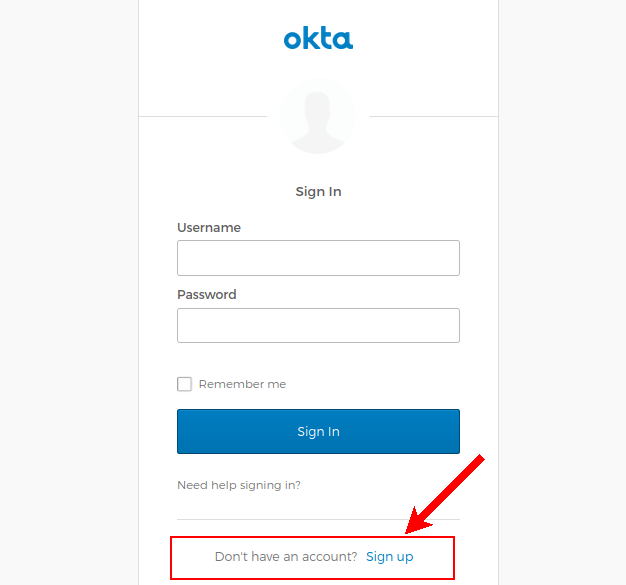
Ktor Secure App Code Review
Now that you have everything working, let’s take a look at the Kotlin code that makes it all possible.
Ktor Data Layer
Look at the basic data models of your application in the src/entities.kt file:
xxxxxxxxxx
package com.okta.demo.ktor
import java.time.LocalDateTime
data class BlogRecord(
val userHandle: String,
val text: String,
val createdAt: LocalDateTime = LocalDateTime.now()
)
data class UserSession(
val username: String,
val idToken: String
)
The BlogRecord class contains information about the userHandle, posted text and createdAt timestamp. UserSession is an object which contains information about a currently signed in user; see the authentication section for more details.
The BlogRecordRepository class is responsible for data manipulation. For demo purposes, data is stored in memory and initialized with some dummy records at startup time.
Your data repository is in the src/BlogRecordRepository.kt file:
xxxxxxxxxx
package com.okta.demo.ktor
class BlogRecordRepository {
private val records = mutableListOf<BlogRecord>()
val all: List<BlogRecord>
get() = records
fun insert(userHandle: String, text: String) {
records += BlogRecord(userHandle, text)
}
fun byUser(userHandle: String) = records.filter { it.userHandle == userHandle }
}
val blogRecords = BlogRecordRepository().apply {
insert("kack", "Hello world!")
insert("kack", "Keep messages short and sweet!")
insert("ann", "OMG it's a future unikorn!")
insert("rux", "Chronological feed! It's just like the good old days! ")
insert("kotlin", "Wise language selection")
insert("whitestone", "We'd like to invest")
insert("cat", "")
}
Ktor Main Application Configuration
Before you get into the route handling and login flow, the web service itself needs to be configured. As per convention, Ktor services are configured by creating an Application.module() extension function. Look at the configuration sections in src/application.kt:
xxxxxxxxxx
package com.okta.demo.ktor
import io.ktor.application.*
import io.ktor.features.*
import io.ktor.request.*
import io.ktor.sessions.*
import io.ktor.util.*
import org.slf4j.event.Level
import kotlin.collections.set
fun main(args: Array<String>): Unit = io.ktor.server.cio.EngineMain.main(args)
("unused") // Referenced in application.conf
.jvm.JvmOverloads
fun Application.module(testing: Boolean = false) {
// Sessions are stored in encrypted cookies
install(Sessions) {
cookie<UserSession>("MY_SESSION") {
val secretEncryptKey = hex("00112233445566778899aabbccddeeff")
val secretAuthKey = hex("02030405060708090a0b0c")
cookie.extensions["SameSite"] = "lax"
cookie.httpOnly = true
transform(SessionTransportTransformerEncrypt(secretEncryptKey, secretAuthKey))
}
}
// Respond for HEAD verb
install(AutoHeadResponse)
// Load each request
install(CallLogging) {
level = Level.INFO
filter { call -> call.request.path().startsWith("/") }
}
// Configure ktor to use OAuth and register relevant routes
setupAuth()
// Register application routes
setupRoutes()
}
// Shortcut for the current session
val ApplicationCall.session: UserSession?
get() = sessions.get<UserSession>()
Your application module configures the session handler to keep data in encrypted cookies and enable logging, which is very useful for debugging. Two of the functions - setupAuth() and setupRoutes()- configure OAuth 2.0 and setup web service routes.
Ktor Service Routes
This application registers two routes with Ktor DSL making it very expressive:
POST /takes atextparameter from the body and currentactor(user handle) from the session and creates a new nano blog record. Bothactorandtextmust be valid to create a new record; otherwise, an error is thrown. Upon a successful insertion, the user gets redirected to the/.GET /{username?}effectively handles allGETrequests and attempts to extract theusernameURL parameter if present. Then, it renders the main template with either global or requested user’s feed using thefeedPage()method.
See src/routes.kt:
xxxxxxxxxx
package com.okta.demo.ktor
import io.ktor.application.*
import io.ktor.html.*
import io.ktor.request.*
import io.ktor.response.*
import io.ktor.routing.*
fun Application.setupRoutes() = routing {
post("/") { root ->
val actor = call.session?.username
?: throw Exception("User must be logged in first")
val text = call.receiveParameters()["text"]?.takeIf(String::isNotBlank)
?: throw Exception("Invalid request - text must be provided")
blogRecords.insert(actor, text)
call.respondRedirect("/")
}
get("/{username?}") {
val username = call.parameters["username"]
call.respondHtmlTemplate(MainTemplate(call.session?.username)) {
content {
val canSendMessage = call.session != null
if (username == null) feedPage(" Home feed", blogRecords.all, canSendMessage)
else feedPage(" ${username}'s blog", blogRecords.byUser(username), canSendMessage)
}
}
}
}
The page-rendering function, feedPage(), takes three parameters: page title, list of the nano blog posts to render, and a boolean flag canSendMessage (if it’s true, the text submission form will be visible). The variable canSendMessage is set to true only when the current user has an active session, that is possible only after login.
Type-Safe Views With Kotlin
Kotlin syntax empowers developers to create type-safe DSL. This Nano Blogging Service is using the kotlinx.html library, which provides HTML-like syntax for HTML-rendering. All the views are in the src/views.kt file.
The primary and only template MainTemplate includes Bootstrap CSS library, renders the top navbar menu, and provides a basic layout for the frontend:
x
/**
* Generic web page template, contains content placeholder where
* content should be placed
*/
class MainTemplate(private val currentUsername: String? = null) : Template<HTML> {
val content = Placeholder<HtmlBlockTag>()
override fun HTML.apply() {
head {
title { +"Nano Blogging Service" }
styleLink("https://stackpath.bootstrapcdn.com/bootstrap/4.5.2/css/bootstrap.min.css")
meta(name = "viewport", content = "width=device-width, initial-scale=1, shrink-to-fit=no")
meta(charset = "utf-8")
}
body("d-flex flex-column h-100") {
header {
div("navbar navbar-dark bg-dark shadow-sm") {
div("container") {
a(href = "/", classes = "font-weight-bold navbar-brand") {
+" NANO BLOGGING SERVICE"
}
div("navbar-nav flex-row") {
if (currentUsername != null) {
a(href = "/${currentUsername}", classes = "nav-link mr-4") {
+"Hello, $currentUsername"
}
a(href = "/logout", classes = "nav-link") {
+"Logout"
}
} else {
div("navbar-text mr-4") {
+"Hello, Guest"
}
div("navbar-item") {
a(href = "/login", classes = "nav-link") {
+"Login"
}
}
}
}
}
}
}
main("flex-shrink-0 mt-3") {
div("container col-xs-12 col-lg-8") {
insert(content)
}
}
}
}
}
Confused about plus(+) sign in front of the string inside HTML elements? Don’t worry. It’s just a shortcut for the text() function which sets current tag content.
View blocks such as feedBlock(), sendMessageForm() and feedPage() are extension functions (I know, there’s a lot of them!) on FlowContent. That prevents global scope pollution with enormous HTML DSL elements and provides better encapsulation.
Learn More About Ktor and Kotlin
Congratulations on finishing this tutorial! You built a Kotlin and Ktor-based Nano Blogging Service secured with Auth 2.0.
The source code for this tutorial is available on GitHub in the oktadeveloper/okta-kotlin-ktor-example repository.
If you liked this post, you might like these others too:
- What the Heck is OAuth?
- A Quick Guide to OAuth 2.0 with Spring Security
- Deploy a Secure Spring Boot App to Heroku
Make sure to follow us on Twitter and subscribe to our YouTube Channel so that you never miss any of our developer content!
Published at DZone with permission of Ruslan Zaharov. See the original article here.
Opinions expressed by DZone contributors are their own.
Comments