How to Use Retrieval-Augmented Generation (RAG) Locally
This article explores how to use Retrieval-Augmented Generation (RAG) for building more effective and engaging conversational AI applications.
Join the DZone community and get the full member experience.
Join For FreeIn this blog post, we'll explore how to use Retrieval-Augmented Generation (RAG) for building more effective and engaging conversational AI applications. We'll cover the basics of RAG, its benefits, and provide step-by-step instructions on how to develop your own RAG mechanism for local use.
What Is RAG?
RAG (Reinforcement-based Generation) combines the strengths of two prominent approaches in natural language processing (NLP): retrieval-based models and generation-based models. In traditional generation-based methods, AI systems generate text from scratch using pre-trained patterns and rules. However, this approach often leads to limited creativity, a lack of context-specific knowledge, and poor coherence.
In contrast, retrieval-based models leverage pre-trained language models to retrieve relevant information from large corpora, custom datasets, or databases. While these models excel at providing accurate responses based on existing text, they can struggle with novel or ambiguous contexts.
RAG vs. Fine-Tuning LLM Models
Fine-tuning an LLM (Large Language Model) involves adjusting its pre-training for a specific task. Initially, an LLM is trained on a massive dataset to learn general language patterns. This process is followed by further training on a narrower dataset tailored to a particular application, such as customer service or code generation [1].
In contrast, RAG (Reinforcement-based Generation) is useful when you need your LLM to generate responses based on large amounts of updated and context-specific data. For instance, enriching the response of an LLM model with datasets from your datalake or archive documents.
RAG offers a cost-efficient alternative to fine-tuning due to its minimal resource and technical knowledge requirements. With just 10 lines of Python code, you can ensure that your model has access to the most relevant and up-to-date data.
Many Web and Desktop client applications, such as Open WebUI or AnythingLLM, already incorporate RAG features. However, for private companies, building a custom RAG system is necessary to upload and embed data for use by their LLM models.
In this blog post, I will provide a step-by-step guide on how to implement RAG in Python using the Llama3 model.
The RAG mechanism can be summarized as follows:
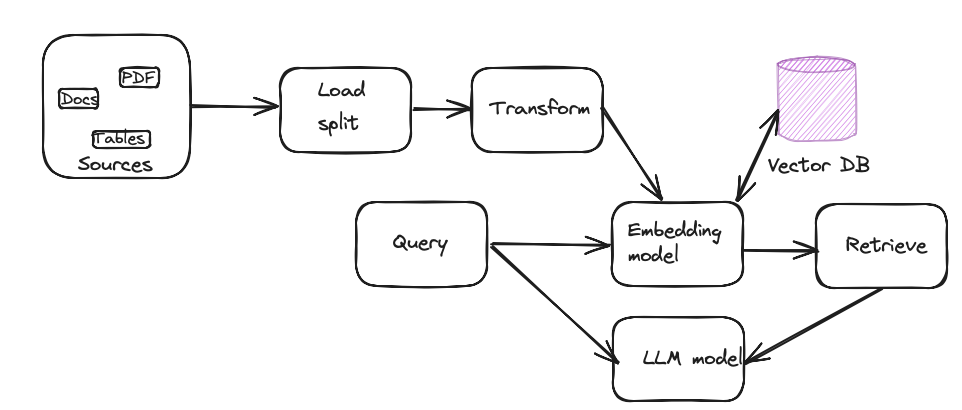
To build a local RAG system, you'll need the following components.
- Sources: Source documents; might be .doc, txt, or pdf files located on your network
- Load: A loader which will load and split the documents into chunks
- Transform: Transform the chunk for embedding.
- Embedding model: The embedding model takes the input as a chunk and outputs an embedding as a vector representation.
- Vector DB: Vector database for storing embedding
- LLM model: Pre-trained model that will use the embedding to answer the user query
To get started, let me summarize the key components that I will be using next.
- LLM server: Ollama local server
- LLM model: LLama 3 8b
- Embedding model: all-MiniLM-L6-v2
- Vector database: SQLiteVSS (sqlite3)
- Framework: LangChain
- OS: macOS
- Programming language: Python 3.11.3
The instructions and examples I'll be using are available in the resource section [2]. To run the author's example, you should have good expertise in Python. Here, I'll walk you through each necessary step to save time and effort.
Step-by-Step Guide
If you're comfortable with Python, feel free to skip steps prior to 7.
Step 1: Download and Install Python
Don't use your system Python to run the application. Install Python 3 with homebrew.
homebrew install pythonStep 2: Install pip
python -m ensurepip or python3 -m ensurepipStep 3: Install Jupyter Notebook and Lab
python3 -m pip install jupyterlab
python3 -m pip install notebook
Step 4: Run the Jupyter Lab or Notebook
python3 -m jupyterlabThe preceding command will launch a web-based interface that enables you to build, run, and manage your Python applications at the specified URL http://localhost:8888/lab.
Step 5: Install SQLite3
brew install sqlite3After installing the SQLite3 database, add the following lines in your .bashprofile or .zshrc file:
export PATH="/usr/local/opt/sqlite/bin:$PATH"
export LDFLAGS="-L/usr/local/opt/sqlite/lib"
export CPPFLAGS="-I/usr/local/opt/sqlite/include"
export PYTHON_CONFIGURE_OPTS="--enable-loadable-sqlite-extensions"
Reopen the terminal.
Step 6: Add a New Notebook
Add a new launcher or notebook in your local Jupyter lab. Add the first cell with the following code which will install all the necessary packages.
#install necessary package
pip install --upgrade langchain
pip install -U langchain-community
pip install -U langchain-huggingface
pip install sentence-transformers
pip install --upgrade --quiet  sqlite-vss
Step 7: Import All the Necessary Packages
from langchain.embeddings.sentence_transformer import SentenceTransformerEmbeddings
from langchain_huggingface import HuggingFaceEmbeddings
from langchain.text_splitter import CharacterTextSplitter
from langchain.vectorstores import SQLiteVSS
from langchain.document_loaders import TextLoader
Download the document from the link and place it somewhere in your workspace.
Step 8: Load the Source Document From the Directory
# Load the document using a LangChain text loader
loader = TextLoader("PATH_TO_THE_FILE/stateoftheunion2023.txt")
documents = loader.load()
Step 9: Split the Documents Into Chunks
# Split the document into chunks
text_splitter = CharacterTextSplitter (chunk_size=1000, chunk_overlap=0)
docs = text_splitter.split_documents(documents)
texts = [doc.page_content for doc in docs]
Here, you can print the chunks into the console to be sure of parsing the document.
print (texts)Step 10: Embedding the Chunks
# Use the sentence transformer package with the all-MiniLM-L6-v2 embedding model embedding_function = SentenceTransformerEmbeddings(model_name="all-MiniLM-L6-v2") Step 11: Load the Embeddings Into the SQLite3 Database
# Load the text embeddings in SQLiteVSS in a table named state_union
db = SQLiteVSS.from_texts(
texts = texts,
embedding = embedding_function,
table = "state_union",
db_file = "/tmp/vss.db"
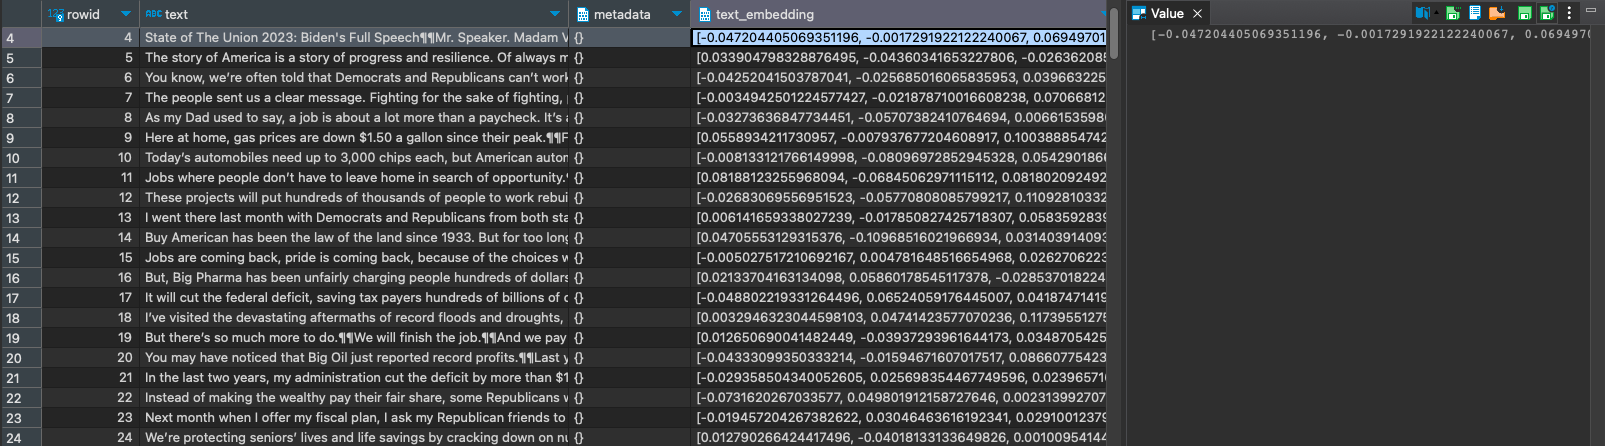
)Step 12 (Optional): Query the Database and Study the Embeddings
Use DBeaver or Visual Studio Code to query the local SQLite3 database. The database file of the local db is "/tmp/vss.db".
Step 13: Query a Semantic (Similarity) Search
# First, we will do a simple retrieval using similarity search
# Query
question = "What did the president say about Nancy Pelosi?"
data = db.similarity_search(question)
# print results
print(data[0].page_content)
The result should be something similar to the following:
State of The Union 2023: Biden's Full Speech

Mr. Speaker. Madam Vice President. Our First Lady and Second Gentleman.

Members of Congress and the Cabinet. Leaders of our military.

Mr. Chief Justice, Associate Justices, and retired Justices of the Supreme Court.

And you, my fellow Americans.

I start tonight by congratulating the members of the 118th Congress and the new Speaker of the House, Kevin McCarthy.

Mr. Speaker, I look forward to working together.

I also want to congratulate the new leader of the House Democrats and the first Black House Minority Leader in history, Hakeem Jeffries.

Congratulations to the longest serving Senate Leader in history, Mitch McConnell.

And congratulations to Chuck Schumer for another term as Senate Majority Leader, this time with an even bigger majority.

And I want to give special recognition to someone who I think will be considered the greatest Speaker in the history of this country, Nancy Pelosi.
Step 14: Run the Local Ollama Server
ollama run llama3Step 15: Import the LangChain LLM Package and Connect to the Local Server
# LLM
from langchain.llms import Ollama
from langchain.callbacks.manager import CallbackManager
from langchain.callbacks.streaming_stdout import StreamingStdOutCallbackHandler
llm = Ollama(
    model = "llama3",
    verbose = True,
    callback_manager = CallbackManager([StreamingStdOutCallbackHandler()]),
)
Step 16: Use the LangChain Prompt to Ask a Question
# QA chain
from langchain.chains import RetrievalQA
from langchain import hub
# LangChain Hub is a repository of LangChain prompts shared by the community
QA_CHAIN_PROMPT = hub.pull("rlm/rag-prompt-llama")
qa_chain = RetrievalQA.from_chain_type(
    llm,
    # we create a retriever to interact with the db using an augmented context
    retriever = db.as_retriever(),
    chain_type_kwargs = {"prompt": QA_CHAIN_PROMPT},
)
Step 17: Print the Result
result = qa_chain({"query": question})This prints the query result. The query result should be something as follows:
The president referred to Nancy Pelosi as "someone who I think will be considered the greatest Speaker in the history of this country."Note that it may take a few minutes to respond, depending on your local computer resources.
In this case, the LLM generates a concise answer for the query based on the embeddings. During semantic similarity search, we issue a query to the vector database, which returns a similarity score for the answer.
Resources
Portions of this article were taken from the book, "Getting Started With Generative AI."
Published at DZone with permission of Shamim Bhuiyan. See the original article here.
Opinions expressed by DZone contributors are their own.
Comments