How to Use the Jira API
In this post, we will explore the Jira Rest API and explain how to use the Jira API in order to generate a user-based time report.
Join the DZone community and get the full member experience.
Join For FreeIn this post, we will explore the Jira Rest API. We will explain how you can use the Jira API in order to generate a user-based time report. Besides that, it is a good excuse to do some Python coding.
Introduction
A lot of companies are using Jira nowadays in order to support their Scrum or Kanban process. Add-ons can be installed for extending the functionality of Jira. Some of them are free, other ones need to be purchased. Jira is available in two versions, a Cloud version and a Server (on-premise) version. The number of add-ons for Jira Cloud is very limited and aims at smaller teams, Jira Server has many more add-ons and aims at larger organizations.
The number of add-ons and whether you want to be responsible for maintenance yourself can be decisive factors on which version to use. However, both versions also support an API. It is quite an extended API and gives you the opportunity to write your own scripts extending the Jira functionality. For example, you can create an interface between your Service Management system and Jira for passing tickets from 1st line support (working with the Service Management system) to 2nd line support (working with Jira).
Enough for this introduction, let’s start using the API! We will develop a Python script that will generate a user-based time report for a specific Jira project. We are using Python 3.7.5 and version 2 of the Jira API. The sources can be found at GitHub.
Create a Jira Cloud Account
First things first, we will need a running instance of Jira in order to execute some integration tests. Go to the Jira website and navigate to the bottom of the page. We choose the free Jira Cloud plan.

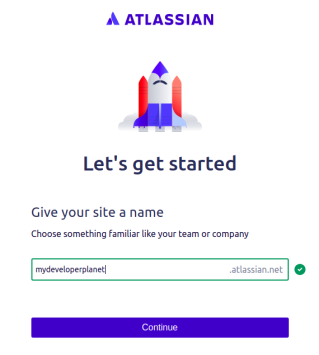
In the next step, you need to create an account and choose a site name. We choose the mydeveloperplanet.atlassian.net site name.
The last thing to do is to create a Scrum board and then we are all set to go. It took us less than 5 minutes to get started with Jira Cloud.
Create some user stories with sub-tasks, start a sprint, and log some work to the sub-tasks. We can also use the Jira API to do so, but that is maybe something for another post.
The Jira API
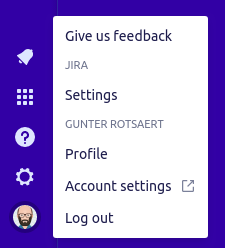
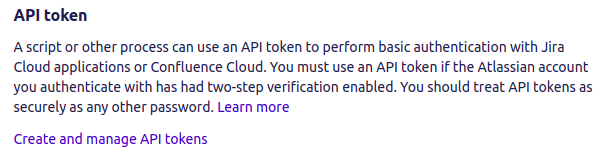
Since we are using Jira Cloud, we need to create an API token first. Click on your avatar in the left bottom corner and choose ‘Account settings’.
Go to the Security tab and create the API token.
Now, let’s take a look at the Jira Rest API documentation: https://developer.atlassian.com/cloud/jira/platform/rest/v2/
The API is well documented and contains examples how to call the API with curl, Node.js, Java, Python and PHP. The expected response of the request is also provided. So, all of the documentation is available, the main challenge is to find out which requests you need for your application.
Beware that there is also documentation available for the Jira Server API. It contains less clear information than the Cloud version. Before writing a script which should support both versions, check whether the API call is identical and use the Cloud documentation if possible.
Note that it is also possible to use the Python Jira library, but we preferred to talk to the Jira API directly. This way, we are independent of a third party library.
The Jira Time Report
The requirements for the Jira time report we want to create, are the following:
- The report must contain all the logged worked per user within a specified time period for a specific Jira project
- The report must be sorted by user, day and issue
For retrieving the work logs of a Jira issue, we need to call the Get issue worklogs request. This request requires an issue Id or key. Therefore, we first need to retrieve the issues which contain work logs within the specified time period. We can use the Search for issues using JQL request for that. This will give us the possibility to use the Jira Query Language (JQL), just like we can use it for searching issues in Jira itself. We are using the following query:
xxxxxxxxxx
query = {
'jql': 'project = "' + args.project + '" and timeSpent is not null and worklogDate >= "' + args.from_date +
'"' + ' and worklogDate < "' + convert_to_date(args).strftime("%Y-%m-%d") + '"',
'fields': 'id,key',
'startAt': str(start_at)
}
The jql checks the Jira project, whether there is any time spent on this issue, and at the end, it checks whether work logs exists within the specified time period. The Jira project and date where to search from are given as arguments when starting the application. The from_date will have a time of 00:00:00. The convert_to_date will add one day to the to_date argument at time 00:00:00. When no to_date is given, it will be defaulted to tomorrow at time 00:00:00.
The fields indicate which fields we want to receive. If not provided, all fields are returned, but we are only interested in the id and the key. The start_at parameter will indicate from which record on we want to receive the results. The results are paginated (max 50 results currently), so we will need to do something in order to request the other pages.
We invoke the Jira request with the above query and load the JSON part in response_json. Remember that pagination is used, so we add the plain JSON issue results to the list which will hold all issues in line 3. We deliberately did not transform the JSON output into objects because we only need the id and key. We can always do so later on if we want to.
xxxxxxxxxx
response = get_request(args, "/rest/api/2/search", query)
response_json = json.loads(response.text)
issues_json.extend(response_json['issues'])
Support for pagination is done in the next part. The JSON response holds the total number of issues that are returned from the query and the maximum results that are returned from the request. We read those fields from the response and then check whether the request must be invoked again with a new start_at parameter. This code and the code above are part of an endless while-loop. We break out of the loop when we processed all of the search results in line 7.
xxxxxxxxxx
total_number_of_issues = int(response_json['total'])
max_results = int(response_json['maxResults'])
max_number_of_issues_processed = start_at + max_results
if max_number_of_issues_processed < total_number_of_issues:
start_at = max_number_of_issues_processed
else:
break
Retrieving the work logs works pretty much the same way. We retrieve the work logs of an issue and then process only the work logs, which fall within the given time period. The work logs are converted to WorkLog objects.
xxxxxxxxxx
class WorkLog:
def __init__(self, issue_key, started, time_spent, author):
self.issue_key = issue_key
self.started = started
self.time_spent = time_spent
self.author = author
The only thing left to do is to sort the list of work logs. We use sorted for this and by means of the attrgetter, we get the desired sorting.
xxxxxxxxxx
sorted_on_issue = sorted(work_logs, key=attrgetter('author', 'started', 'issue_key'))
Last but not least, the sorted_on_issue list is used to format the work logs into the chosen output format, either console output, CSV file or Excel file. For the latter, we used the xlsxwriter Python library.
xxxxxxxxxx
def output_to_excel(work_logs):
try:
workbook = xlsxwriter.Workbook(EXCEL_FILE_NAME)
worksheet = workbook.add_worksheet()
row = 0
for work_log in work_logs:
worksheet.write(row, 0, work_log.author)
worksheet.write(row, 1, work_log.started.strftime('%Y-%m-%d'))
worksheet.write(row, 2, work_log.issue_key)
worksheet.write(row, 3, str(timedelta(seconds=work_log.time_spent)))
row += 1
finally:
workbook.close()
Conclusion
We explored the Jira API in order to generate a time report per user in a given time period for a specific Jira project. The API is well-documented and quite easy to use. When searching for information about the Jira Rest API, you will be guided to the version 3 of the API. Beware that this version is currently in beta. Feel free to use the Jira time report generator and to request for any new features.
Published at DZone with permission of Gunter Rotsaert. See the original article here.
Opinions expressed by DZone contributors are their own.
Comments