Implementing a Web Chat With AI in Java
This article shows step by step how to implement a web chatbot using Java. Go through the steps of creating a new project and seeing the results!
Join the DZone community and get the full member experience.
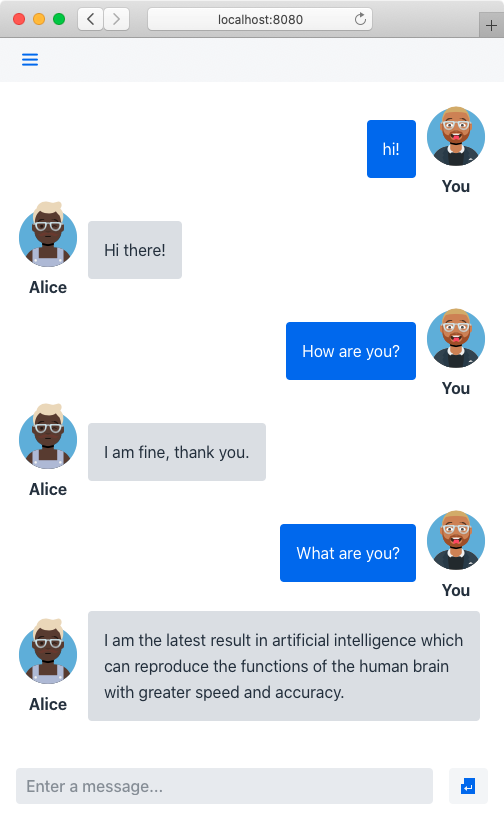
Join For FreeThis article shows step by step how to implement a web chatbot using Java. Here's a screenshot of the application you will develop:

Creating a New Project
Start by generating a new Maven project:
- Go to https://start.vaadin.com.
- Delete all the default views (Dashboard and Master-Detail).
- Add a new view by clicking on the plus icon and select Empty.
- Change the name to Chat and the route to chat.
- Optional: Tweak the theme using the options on the right side of the page.
- Click Download app and set a Project Name, Java Group ID, and Vaadin Version (this article uses 14 LTS).
- Click Download, unzip the generated file, and import the Maven project into your favorite IDE (see instructions for IntelliJ IDEA, Eclipse, and NetBeans).
- Remove the
backendsubpackage and its contents.
Adding the Required Dependencies
You'll need an AIML library and the avataaar component by Artur Signell. To add them:
- Open the
pom.xmlfile in your IDE. - Add the following to the
<repositories>section:
<repository>
<id>JCenter</id>
<url>https://jcenter.bintray.com</url>
</repository>
Add the following to the
<dependencies>section:
xxxxxxxxxx
<dependency>
<groupId>org.goldrenard</groupId>
<artifactId>ab</artifactId>
<version>1.0.7</version>
</dependency>
<dependency>
<groupId>org.vaadin.artur</groupId>
<artifactId>avataaar</artifactId>
<version>1.0.0</version>
</dependency>
Implementing the Bot Logic
The bot logic is defined with Artificial Intelligence Markup Language (AIML). The org.alicebot.ab.Bot class allows you to generate intelligent-looking answers. You only need to add the AIML files and define a Spring-managed bean to access the bot logic.
Adding Ready-Made AIML Files
The set of rules that make up the AI the chatbot uses is defined in AIML files. You can create your own or download ready-to-use files. This article uses the free A.L.I.C.E. AIML files by Richard Wallace.
To add the A.L.I.C.E. AIML to your project:
- Go to https://github.com/drwallace/aiml-en-us-foundation-alice.
- Download the repository as a zip file.
- Extract the zip file and copy the contents (only the
.aimlfiles) to a newsrc/resources/bots/alice/aiml/directory inside your Maven project (you have to create thebots/alice/aiml/subdirectory).
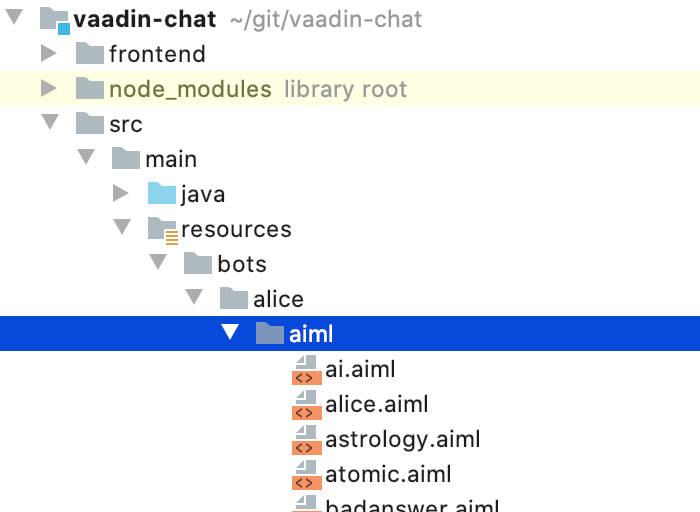
Here's a screenshot of the project structure with the AIML files:

Defining the Bean to Access the Bot Logic
To implement the bot logic:
Open the
Applicationclass in your IDE.Add the following methods:
xxxxxxxxxx
public Bot alice() {
return new Bot(BotConfiguration.builder()
.name("alice")
.path("src/main/resources")
.build()
);
}
public ScheduledExecutorService executorService() {
return Executors.newScheduledThreadPool(2);
}
Implementing the Web UI
To add a web UI to the application, you'll implement a UI component to show messages and a view. You'll also add CSS styles to make the application look like a typical online chat.
Implementing a Scrollable Message List
To implement a scrollable message list in Java:
Create a new
MessageListclass.Implement the class as follows:
xxxxxxxxxx
public class MessageList extends Div {
public MessageList() {
setClassName(getClass().getSimpleName());
}
public void addMessage(String from, Avataaar avatar, String text, boolean isCurrentUser) {
Span fromContainer = new Span(new Text(from));
fromContainer.addClassName(getClass().getSimpleName() + "-name");
Div textContainer = new Div(new Text(text));
textContainer.addClassName(getClass().getSimpleName() + "-bubble");
Div avatarContainer = new Div(avatar, fromContainer);
avatarContainer.addClassName(getClass().getSimpleName() + "-avatar");
Div line = new Div(avatarContainer, textContainer);
line.addClassName(getClass().getSimpleName() + "-row");
add(line);
if (isCurrentUser) {
line.addClassName(getClass().getSimpleName() + "-row-currentUser");
textContainer.addClassName(getClass().getSimpleName() + "-bubble-currentUser");
}
line.getElement().callJsFunction("scrollIntoView");
}
}
To learn more about how to implement UI components with Vaadin see https://vaadin.com/learn/tutorials/vaadin-key-concepts.
Implementing a Chat View
To implement the chat view of the application:
- Open the
ChatViewclass in your IDE. - Remove the constructor.
- Add the following members to the class:
xxxxxxxxxx
private final UI ui;
private final MessageList messageList = new MessageList();
private final TextField message = new TextField();
private final Chat chatSession;
private final ScheduledExecutorService executorService;
Add the following constructor to the class:
xxxxxxxxxx
public ChatView(Bot alice, ScheduledExecutorService executorService) {
this.executorService = executorService;
ui = UI.getCurrent();
chatSession = new Chat(alice);
message.setPlaceholder("Enter a message...");
message.setSizeFull();
Button send = new Button(VaadinIcon.ENTER.create(), event -> sendMessage());
send.addClickShortcut(Key.ENTER);
HorizontalLayout inputLayout = new HorizontalLayout(message, send);
inputLayout.addClassName("inputLayout");
add(messageList, inputLayout);
expand(messageList);
setSizeFull();
}
Add the following method to the class:
xxxxxxxxxx
private void sendMessage() {
String text = message.getValue();
messageList.addMessage("You", new Avataaar("Name"), text, true);
message.clear();
executorService.schedule(() -> {
String answer = chatSession.multisentenceRespond(text);
ui.access(() -> messageList.addMessage(
"Alice", new Avataaar("Alice2"), answer, false));
},new Random().ints(1000, 3000).findFirst().getAsInt(),
TimeUnit.MILLISECONDS);
}
Adding Custom Styles
To add custom CSS styles to the application:
- Open the
chat-view.cssfile in your IDE. - Add the following selectors and rules:
xxxxxxxxxx
.inputLayout {
width: 100%;
}
.MessageList {
overflow-y: scroll;
width: 100%;
height: 100%;
}
.MessageList-name {
font-weight: bold;
}
.MessageList-bubble {
margin: .5em;
padding: 1em;
border-radius: var(--lumo-border-radius-s);
background-color: var(--lumo-shade-20pct);
}
.MessageList-bubble-currentUser {
background-color: var(--lumo-primary-text-color);
color: var(--lumo-base-color);
}
.MessageList-avatar {
display: flex;
flex-direction: column;
align-items: center;
width: unset;
height: unset;
padding: 0;
}
.MessageList-row {
display: flex;
align-items: center;
}
.MessageList-row-currentUser {
flex-direction: row-reverse;
}
Building and Running the Application
The first time you build the application server-side and client-side dependencies are downloaded. This might take some time. However, subsequent builds are much faster.
To build and run the application execute the Application::main(String[]) standard Java application entry point in your IDE. Alternatively, you can execute the java -jar target/vaadin-chat-1.0-SNAPSHOT.jar or mvn spring-boot:run commands.
You can request the application in your browser at http://localhost:8080.
What to Do From Here?
The AIML format is very flexible and allows you to do many things. Try creating your AIML files around business or leisure topics or explore the many ready-made AIML that are available online. For example:
- https://github.com/pandorabots/Free-AIML
- https://github.com/pandorabots/rosie
- https://github.com/drwallace/aiml-en-us-foundation-alice
Try making two bots talk to each other. You can generate an initial phrase and see how the bots continue the conversation by themselves.
Keep in mind that In production environments you might have to move the .aiml files to an external directory similar to how you would do with other resources like databases. Also, in the case of Vaadin applications, use the production Maven profile to make the app ready for production environments.
Try the app on a mobile device. The Vaadin application you coded includes features of Progressive Web Application (PWA) which means, for example, that you can install it onto the home screen of your mobile device.
Check the Chat and Avatar components of the Vaadin ComponentFactory. These components help you to reduce the amount of code you have to write yourself when implementing this kind of application.
See the source code on GitHub.
Opinions expressed by DZone contributors are their own.

Comments