

How to Integrate Playwright With Azure DevOps for Automated UI Testing
Read an overview of how to set up a Playwright Test automation pipeline with Azure DevOps, self-hosted agents, and HTML/JUnit reports.
 ·
·
Join the DZone community and get the full member experience.
Join For FreeIntroduction
Modern web applications require consistent, dependable cross-browser testing to ensure quality. Playwright has quickly emerged as a leading tool for end-to-end automation, offering speed, flexibility, and out-of-the-box support for today’s browsers and frameworks. On the other hand, Azure DevOps provides a robust cloud-based CI/CD solution from Microsoft. When combined, they create a powerful foundation for building reliable, scalable pipelines for automated UI testing.
This article shows you how to integrate Playwright with Azure DevOps step by step to:
- Run tests automatically on every push.
- Use a self-hosted agent for full browser support.
- Generate and publish Playwright’s HTML & JUnit test reports.
- Scale your pipelines to run tests in parallel.
By the end, you’ll be familiar with a fully working Playwright pipeline that runs headless or headed and stores results.
Pre-requisites
- A Microsoft Account (Hotmail or Outlook works fine)
- VS Code installed locally
- Basic Node.js & npm knowledge
- Access to Azure DevOps
High-level Steps
- Create an Azure DevOps org and project
- Set up a Git repo and clone it
- Install Playwright and verify locally
- Push tests to Azure DevOps repo
- Configure a self-hosted agent
- Create & run a YAML pipeline
- Publish Playwright HTML/JUnit reports
- Enable CI triggers for automatic execution
Step 1: Create Azure DevOps Organization and Project
- Go to Azure DevOps.
- Log in with your Microsoft account. If you don't have a Microsoft account, create one.
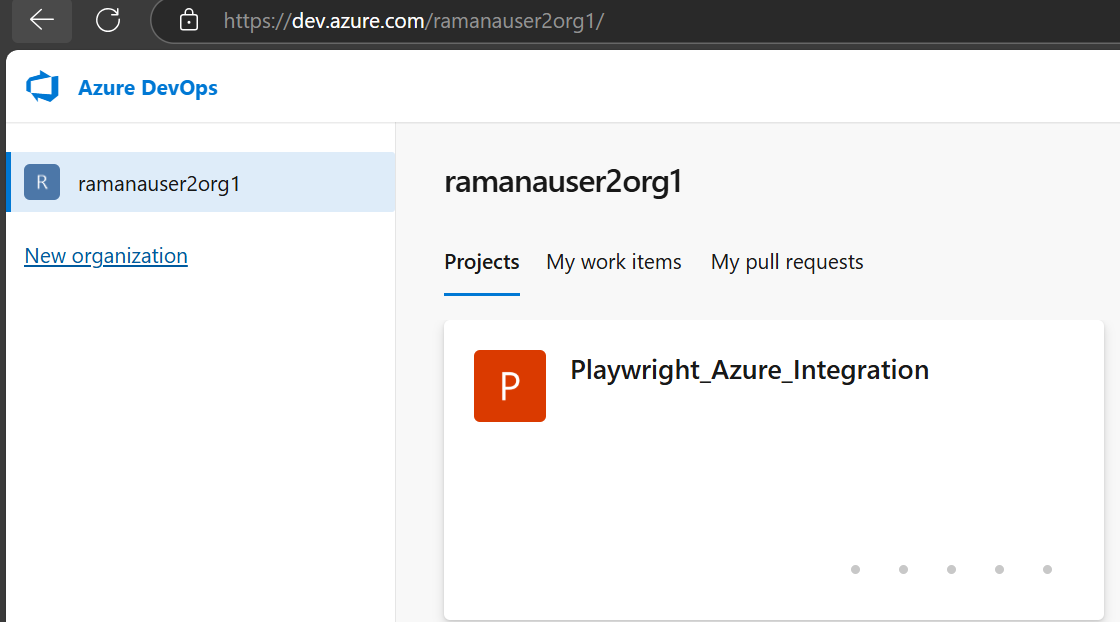
- Click New Organization, then set a unique name.
- Inside the organization, click New Project (for example: Playwright-Azure_Integration).
Step 2: Create a Git Repository
- Navigate to Repos > Files.
- Click New Repository if one doesn’t exist yet.
- Copy the repo clone URL. We need this in the VS Code.
Step 3: Clone Repo Locally in VS Code
- Open VS Code.
- Install Azure Repos extension for easier commits and pushes.
- Open the Command Palette (Ctrl+Shift+P), type Git: Clone, and paste the repo URL.
- Choose a local folder where your tests will live.
Step 4: Install Playwright and Verify
Run in VS Code terminal:
npm init playwright@latest
- Choose JavaScript.
- Choose No for GitHub Actions since we’re using Azure DevOps.
- After installation, the project should have the following artifacts:
- node_modules/
- tests/
- package.json
- playwright.config.js
- playwright-report/
- test-results/
Step 5: Write a Sample Test
Inside the tests folder, create sample.spec.js for a simple UI automation.
import { test, expect } from '@playwright/test';
test('Open Google', async ({ page }) => {

  await page.goto('https://www.google.com/');

  expect(await page.title()).toContain('Google');

});

test('Open Playwright', async ({ page }) => {

  await page.goto('https://playwright.dev/');

  expect(await page.title()).toContain('Playwright');

});
Note:
Playwright tests run headless by default. Add (--headed) if you want to see the browser during runs:
npx playwright test --headed --project=chromium --workers=2
Step 6: Add HTML & JUnit Reporters
In playwright.config.js, configure the reporter to have both HTML and Junit reports.:
reporter: [
['html'],
['junit', { outputFile: 'test-results/TEST-junitreport.xml' }]
],
Step 7: Push to Azure DevOps Repo
- Stage changes in VS Code Source Control.
- Commit with a clear message, e.g., Initial Playwright Setup.
- Click Push.
- Confirm your files appear in Azure DevOps under Repos > Files.
Step 8: Set Up Self-hosted Agent
Playwright needs real browsers, so it’s best to run tests on a self-hosted agent instead of Microsoft’s default agent.
Why?
- Playwright may not have browser dependencies installed on Microsoft-hosted agents.
- You get full control and fewer queue delays.
How to Install:
- Go to Project Settings > Agent Pools > Default > New Agent.
- Choose your OS: Windows, Linux, or macOS.
- Download the agent zip file.
- Extract it to a location (Example: C:\agent)
- In Command Prompt:
cd C:\agent
config.cmd
Provide the information as follows:
- DevOps org URL (https://dev.azure.com/<org>)
- Personal Access Token (PAT) (create under User Settings > Personal Access Tokens)
- An agent name (Example: MyPlaywrightAgent)
- To start, run the command: run.cmd
- Verify in Agent Pools that the agent must be Online.
Note: If your agent goes offline, re-run run.cmd to bring it back online.
Step 9: Create a YAML Pipeline
Go to Pipelines > New Pipeline, select YAML, select the repo, and paste the below content to configure the pipeline:
trigger:
  - none
pool:
  name: Default  # Uses the self-hosted agent
steps:
  - script: npm ci
    displayName: 'Install Dependencies'
  - script: npx playwright install --with-deps
    displayName: 'Install Playwright Browsers'
  - script: npx playwright test --headed --project=chromium --workers=2
    displayName: 'Run Playwright Tests'
    env:
      CI: 'true'
  - task: PublishPipelineArtifact@1
    inputs:
      targetPath: 'playwright-report'
      artifact: 'playwright-report'
      publishLocation: 'pipeline'
    condition: succeededOrFailed()
  - task: PublishTestResults@2
    inputs:
       testResultsFormat: 'JUnit'
       testResultsFiles: '**/TEST-*.xml'
condition: succeededOrFailed() 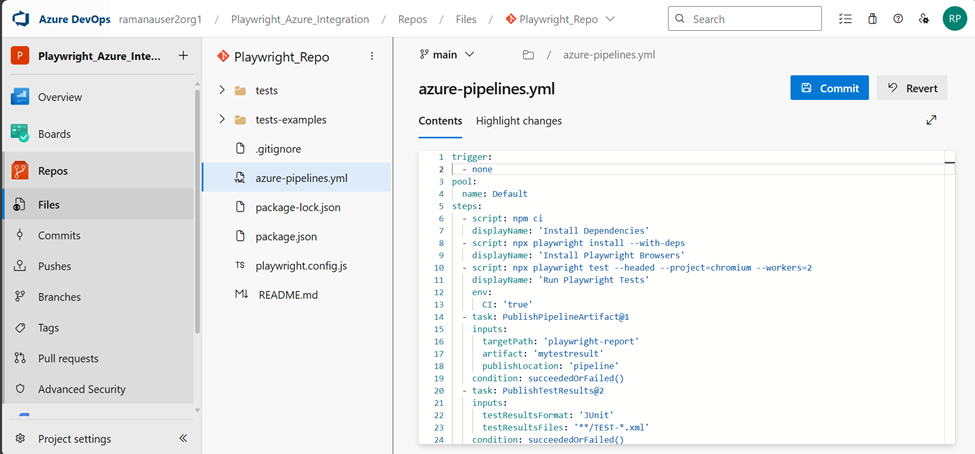
Step 10: Run and Inspect
- Save the YAML pipeline.
- Click Run Pipeline.
- Follow logs for:
- Installing dependencies
- Installing browsers
- Running Playwright tests
- Uploading HTML and JUnit reports
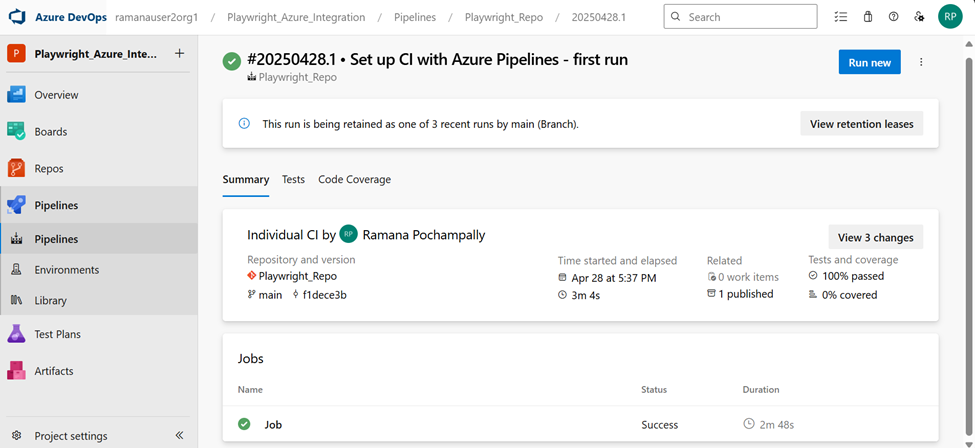
Go to the Artifacts tab → download the playwright-report → open index.html to view your test results!

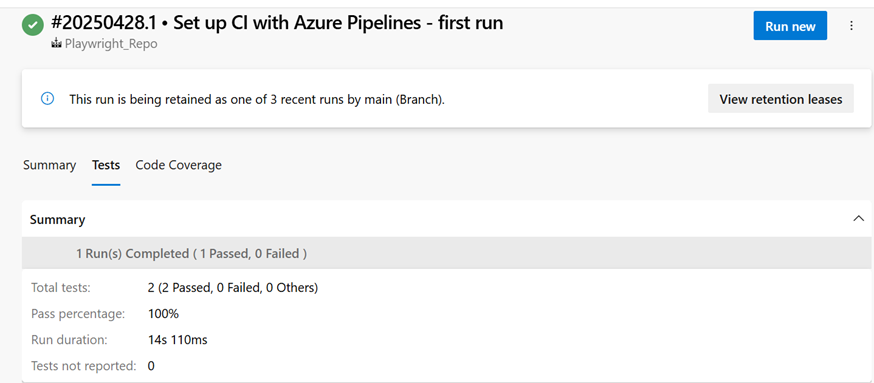
In the Tests tab, check the JUnit results.
Note:
Change the command from --headed to --headless to run the pipeline faster:
npx playwright test --project=chromium --workers=2
Step 11: Enable CI Trigger
We can automate the tests on every commit. Change trigger as below:
trigger:
- main
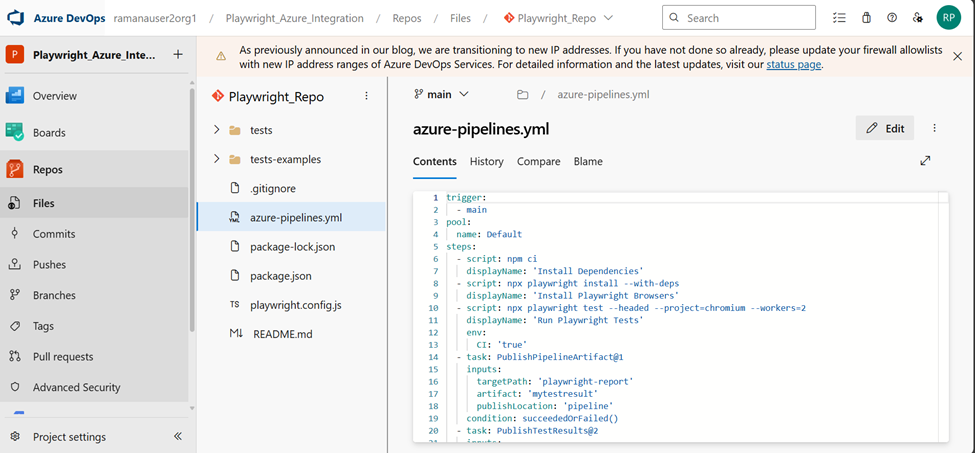 Now, every push to the main branch automatically kicks off the Playwright pipeline.
Troubleshooting
|
Issue: Agent stuck offline Solution: Make sure run.cmd is still running.
Issue: Tests fail on Microsoft agent Solution: Use your self-hosted agent with the required browsers installed.
Issue: playwright install step fails Solution: Add (--with-deps) to ensure Playwright downloads all necessary browser binaries |
Result
- Parallel execution
- Rich HTML and JUnit reports
- Self-hosted agent for control
- Automatic runs on every commit
- This integration helps teams to get fast feedback on UI changes, catch regressions early, and maintain a robust test automation pipeline that works across modern browsers within Azure DevOps.
Further Steps?
- Add more Playwright projects for cross-browser runs.
- Store test artifacts in Azure Artifacts or external storage.
- Combine with deployment pipelines to enable end-to-end CI/CD.
Social Profile
- Have you tried Playwright with other CI tools? If you have any suggestions, please leave a comment.
- If you like my post, please connect with me on LinkedIn www.linkedin.com/in/ramana-pochampally-b2423a172
Opinions expressed by DZone contributors are their own.
Comments