An Introduction to BDD Test Automation with Serenity and JUnit
Join the DZone community and get the full member experience.
Join For Freeserenity bdd (previously known as thucydides ) is an open source reporting library that helps you write better structured, more maintainable automated acceptance criteria, and also produces rich meaningful test reports (or "living documentation") that not only report on the test results, but also what features have been tested. and for when your automated acceptance tests exercise a web interface, serenity comes with a host of features that make writing your automated web tests easier and faster.
1. bdd fundamentals
but before we get into the nitty-gritty details, let’s talk about behaviour driven development, which is a core concept underlying many of serenity’s features. behaviour driven development, or bdd, is an approach where teams use conversations around concrete examples to build up a shared understanding of the features they are supposed to build.
for example, suppose you are building a site where artists and craftspeople can sell their good online. one important feature for such a site would be the search feature. you might express this feature using a story-card format commonly used in agile projects like this:
  in order for buyers to find what they are looking for more efficiently
  as a seller
  i want buyers to be able to search for articles by keywords
to build up a shared understanding of this requirement, you could talk through a few concrete examples. the converstaion might go something like this:
-
"so give me an example of how a search might work."
-
"well, if i search for wool , then i should see only woolen products."
-
"sound’s simple enough. are there any other variations on the search feature that would produce different outcomes?"
-
"well, i could also filter the search results; for example, i could look for only handmade woolen products."
and so on. in practice, many of the examples that get discussed become "acceptance criteria" for the features. and many of these acceptance criteria become automated acceptance tests. automating acceptence tests provides valuable feedback to the whole team, as these tests, unlike unit and integrationt tests, are typically expressed in business terms, and can be easily understood by non-developers. and, as we will se later on in this article, the reports that are produced when these teste are executed give a clear picture of the state of the application.
2. serenity bdd and junit
in this article, we will learn how to use serenity bdd using nothing more than junit, serenity bdd, and a little selenium webdriver. automated acceptance tests can use more specialized bdd tools such as cucumber or jbehave, but many teams like to keep it simple, and use more conventional unit testing tools like junit. this is fine: the essence of the bdd approach lies in the conversations that the teams have to discuss the requirements and discover the acceptance criteria.
2.1. writing the acceptance test
let’s start off with a simple example. the first example that was discussed was searching for wool . the corresponding automated acceptance test for this example in junit looks like this:
@runwith(serenityrunner.class)
public class whensearchingbykeyword {

    @managed(driver="chrome", uniquesession = true)
    webdriver driver;

    @steps
    buyersteps buyer;

    @test
    public void should_see_a_list_of_items_related_to_the_specified_keyword() {
        // given
        buyer.opens_etsy_home_page();
        // when
        buyer.searches_for_items_containing("wool");
        // then.
        buyer.should_see_items_related_to("wool");
    }
}
| the serenity test runner sets up the test and records the test results |
| this is a web test, and serenity will manage the webdriver driver for us |
| we hide implementation details about how the test will be executed in a "step library" |
| our test itself is reduced to the bare essential business logic that we want to demonstrate |
there are several things to point out here. when you use serenity with junit, you need to use the
serenityrunner
test runner. this instruments the junit class and instantiates the webdriver driver (if it is a web test), as well as any step libraries and page objects that you use in your test (more on these later).
the
@managed
annotation tells serenity that this is a web test. serenity takes care of instantiating the webdriver instance, opening the browser, and shutting it down at the end of the test. you can also use this annotation to specify what browser you want to use, or if you want to keep the browser open during all of the tests in this test case.
the
@steps
annotation tells serenity that this variable is a step library. in serenity, we use step libraries to add a layer of abstraction between the "what" and the "how" of our acceptance tests. at the top level, the step methods document "what" the acceptance test is doing, in fairly implementation-neutral, business-friendly terms. so we say "searches for items containing
wool
", not "enters
wool
into the search field and clicks on the search button". this layered approach makes the tests both easier to understand and to maintain, and helps build up a great library of reusable business-level steps that we can use in other tests.
2.2. the step library
the step library class is just an ordinary java class, with methods annotated with the
@step
annotation:
public class buyersteps {

    homepage homepage;
    searchresultspage searchresultspage;

    @step
    public void opens_etsy_home_page() {
        homepage.open();
    }

    @step
    public void searches_for_items_containing(string keywords) {
        homepage.searchfor(keywords);
    }

    @step
    public void should_see_items_related_to(string keywords) {
        list<string> resulttitles = searchresultspage.getresulttitles();
        resulttitles.stream().foreach(title -> assertthat(title.contains(keywords)));
    }
}
//end:tail
| step libraries often use page objects, which are automatically instantiated |
the
@step
annotation indicates a method that will appear as a step in the test reports
|
for automated web tests, the step library methods do not call webdriver directly, but rather they typically interact with page objects .
2.3. the page objects
page objects encapsulate how a test interacts with a particular web page. they hide the webdriver implementation details about how elements on a page are accessed and manipulated behind more business-friendly methods. like steps, page objects are reusable components that make the tests easier to understand and to maintain.
serenity automatically instantiates page objects for you, and injects the current webdriver instance. all you need to worry about is the webdriver code that interacts with the page. and serenity provides a few shortcuts to make this easier as well. for example, here is the page object for the home page:
@defaulturl("http://www.etsy.com")
public class homepage extends pageobject {

    @findby(css = "button[value='search']")
    webelement searchbutton;

    public void searchfor(string keywords) {
        $("#search-query").sendkeys(keywords);
        searchbutton.click();
    }
}
what url should be used by default when we call the
open()
method
|
a serenity page object must extend the
pageobject
class
|
you can use the
$
method to access elements directly using css or xpath expressions
|
or you may use a member variable annotated with the
@findby
annotation
|
and here is the second page object we use:
public class searchresultspage extends pageobject {

    @findby(css=".listing-card")
    list<webelement> listingcards;

    public list<string> getresulttitles() {
        return listingcards.stream()
                .map(element -> element.gettext())
                .collect(collectors.tolist());
    }
}
in both cases, we are hiding the webdriver implementation of how we access the page elements inside the page object methods. this makes the code both easier to read and reduces the places you need to change if a page is modified.
this approach encourages a very high degree of reuse. for example, the second example mentioned at the start of this article involved filtering results by type. the corresponding automated acceptance criteria might look like this:
    @test
    public void should_be_able_to_filter_by_item_type() {
        // given
        buyer.opens_etsy_home_page();
        // when
        buyer.searches_for_items_containing("wool");
        int unfiltereditemcount = buyer.get_matching_item_count();
        // and
        buyer.filters_results_by_type("handmade");
        // then
        buyer.should_see_items_related_to("wool");
        // and
        buyer.should_see_item_count(lessthan(unfiltereditemcount));
    }

    @test
    public void should_be_able_to_view_details_about_a_searched_item() {
        // given
        buyer.opens_etsy_home_page();
        // when
        buyer.searches_for_items_containing("wool");
        buyer.selects_item_number(5);
        // then
        buyer.should_see_matching_details();
    }
notice how most of the methods here are reused from the previous steps: in fact, only two new methods are required.
3. reporting and living documentation
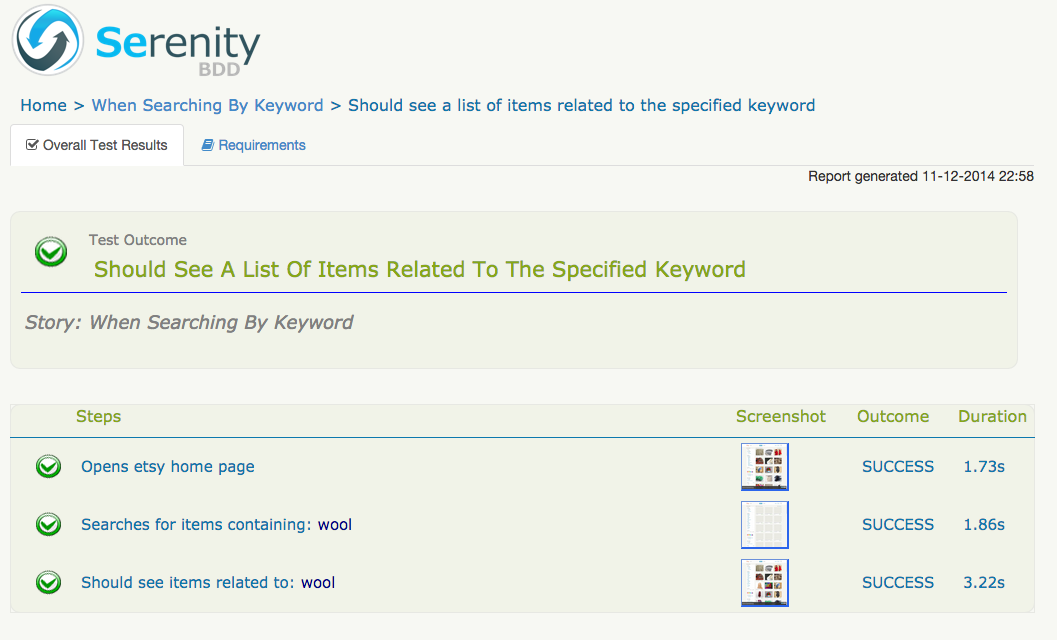
reporting is one of serenity’s fortes. serenity not only reports on whether a test passes or fails, but documents what it did, in a step-by-step narrative format that inculdes test data and screenshots for web tests. for example, the following page illustrates the test results for our first acceptance criteria:

figure 1. test results reported in serenity
but test outcomes are only part of the picture. it is also important to know what work has been done, and what is work in progress. serenity provides the
@pending
annotation, that lets you indicate that a scenario is not yet completed, but has been scheduled for work, as illustrated here:
@runwith(serenityrunner.class)
public class whenputtingitemsintheshoppingcart {

    @pending @test
    public void shouldupdateshippingpricefordifferentdestinationcountries() {
    }
}
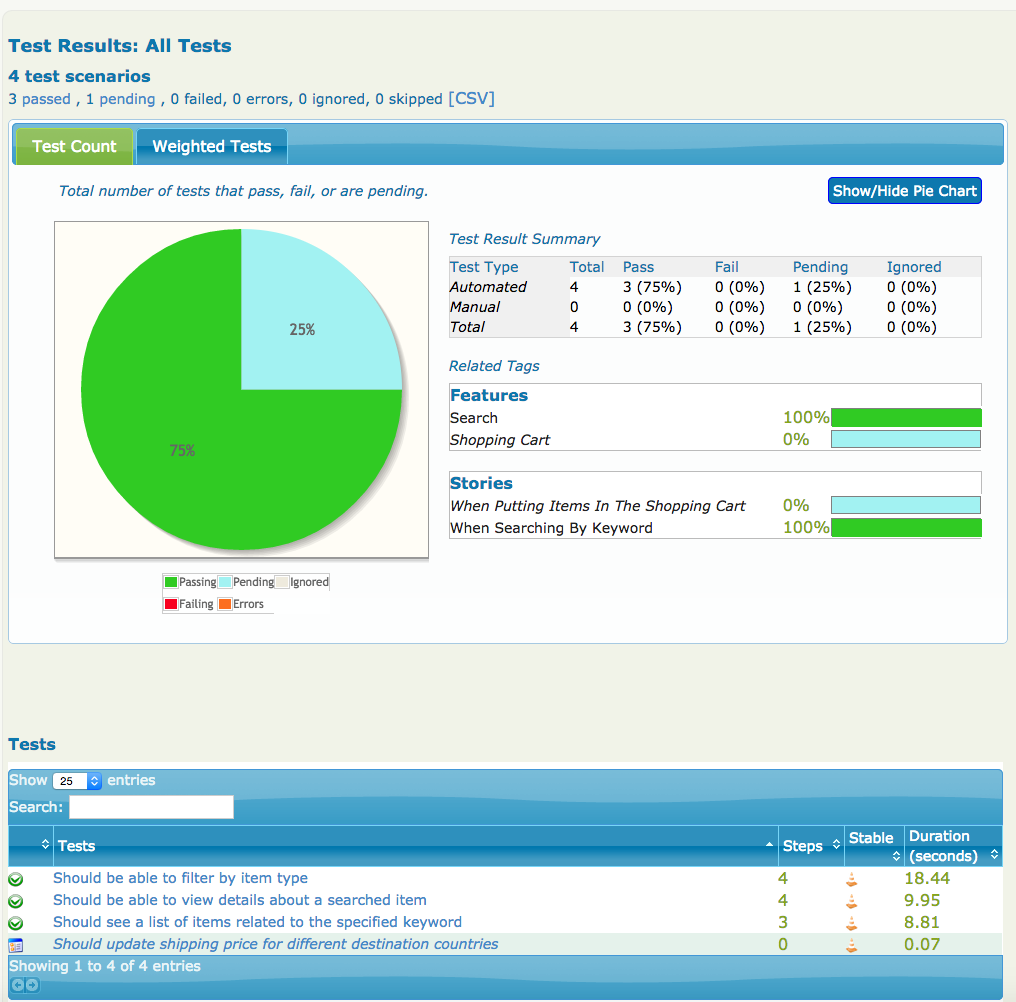
this test will appear in the reports as pending (blue in the graphs):

figure 2. test result overview
we can also organize our acceptance tests in terms of the features or requirements they are testing. one simple approach is to organize your requirements in suitably-named packages:
|----net
| |----serenity_bdd
| | |----samples
| | | |----etsy
| | | | |----features
| | | | | |----search
| | | | | | |----whensearchingbykeyword.java
| | | | | | |----whenviewingitemdetails.java
| | | | | |----shopping_cart
| | | | | | |----whenputtingitemsintheshoppingcart.java
| | | | |----pages
| | | | | |----homepage.java
| | | | | |----itemdetailspage.java
| | | | | |----registerpage.java
| | | | | |----searchresultspage.java
| | | | | |----shoppingcartpage.java
| | | | |----steps
| | | | | |----buyersteps.java
all the test cases are organized under the
features
directory.
|
| test cass related to the search feature |
| test cases related to the ‘shopping cart’ feature |
serenity can use this package structure to group and aggregate the test results for each feature. you need to tell serenity the root package that you are using, and what terms you use for your requirements. you do this in a special file called (for historical reasons)
thucydides.properties
, which lives in the root directory of your project:
thucydides.test.root=net.serenity_bdd.samples.etsy.features
thucydides.requirement.types=feature,story
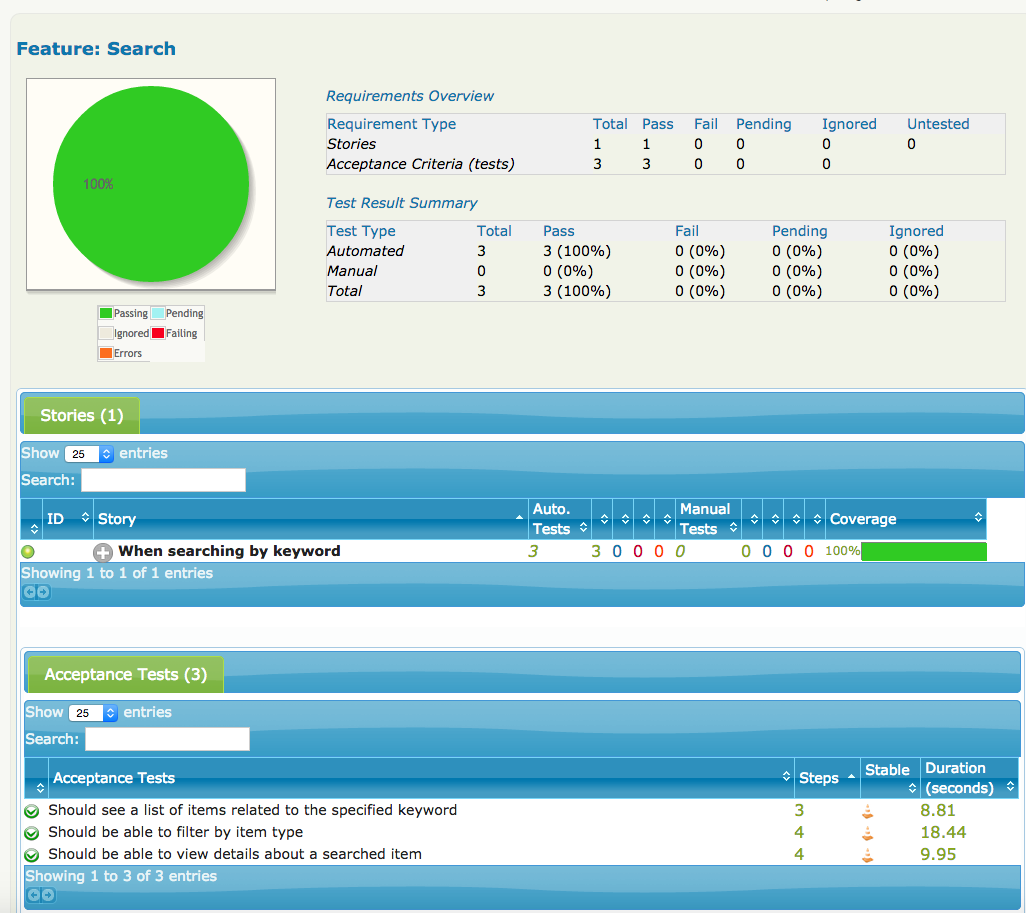
with this configured, serenity will report about how well each requirement has been tested, and will also tell you about the requirements that have not been tested:

figure 3. serenity reports on requirements as well as tests
4. conclusion
hopefully this will be enough to get you started with serenity.
that said, we have barely scratched the surface of what serenity can do for your automated acceptance tests. you can read more about serenity, and the principles behind it, by reading the users manual , or by reading bdd in action , which devotes several chapters to these practices. and be sure to check out the online courses at parleys .
you can get the source code for the project discussed in this article on github .
Opinions expressed by DZone contributors are their own.

Comments