Introduction To Mule API Security: Simple Authentication
This lesson in API security goes over the basics of securing communication between your local runtime and Anypoint Platform.
Join the DZone community and get the full member experience.
Join For FreeThis post covers the basic procedures to set up simple Mule API security. I assume that the audience has little knowledge of applying API security to the Mule Anypoint Platform. Here are the key takeaways:
- Write a simple RAML in the Design Center of the Anypoint Platform
- Publish the API (RAML) to the Exchange
- Using API Manager to apply simple security
- Explain the details of how it works
Design and Publish the API
In the new version of Anypoint Platform, API management contains three separate areas:
- Design Center
- Exchange
- API Manager
There are many editors we can use to design our API (RAML). I find Design Center and ATOM are the two most powerful tools. Both are easy to use. For demo purposes, I use Anypoint Platform's Design Center. First, create a new project as shown in the snapshot below:
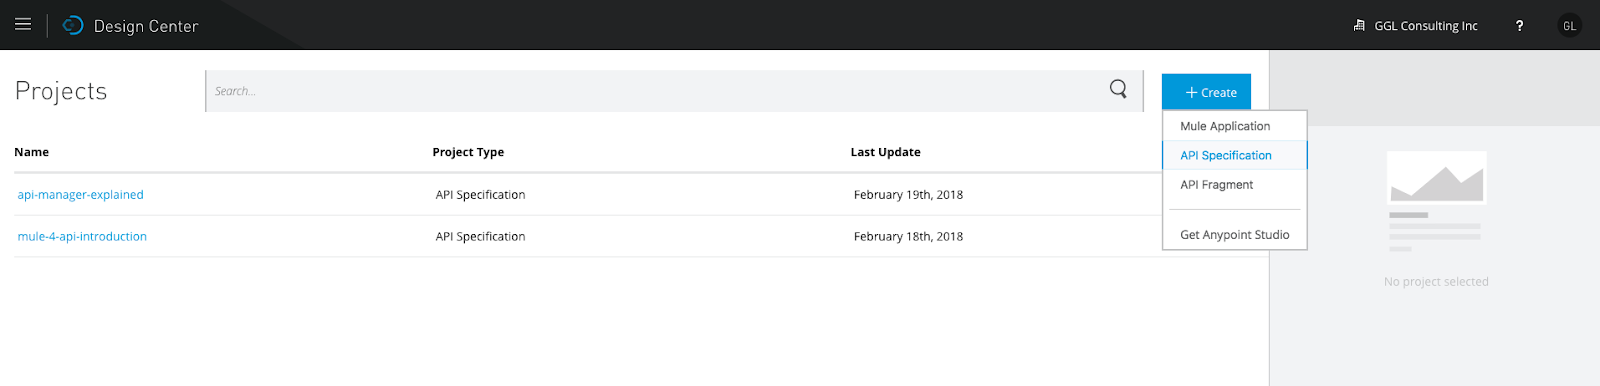
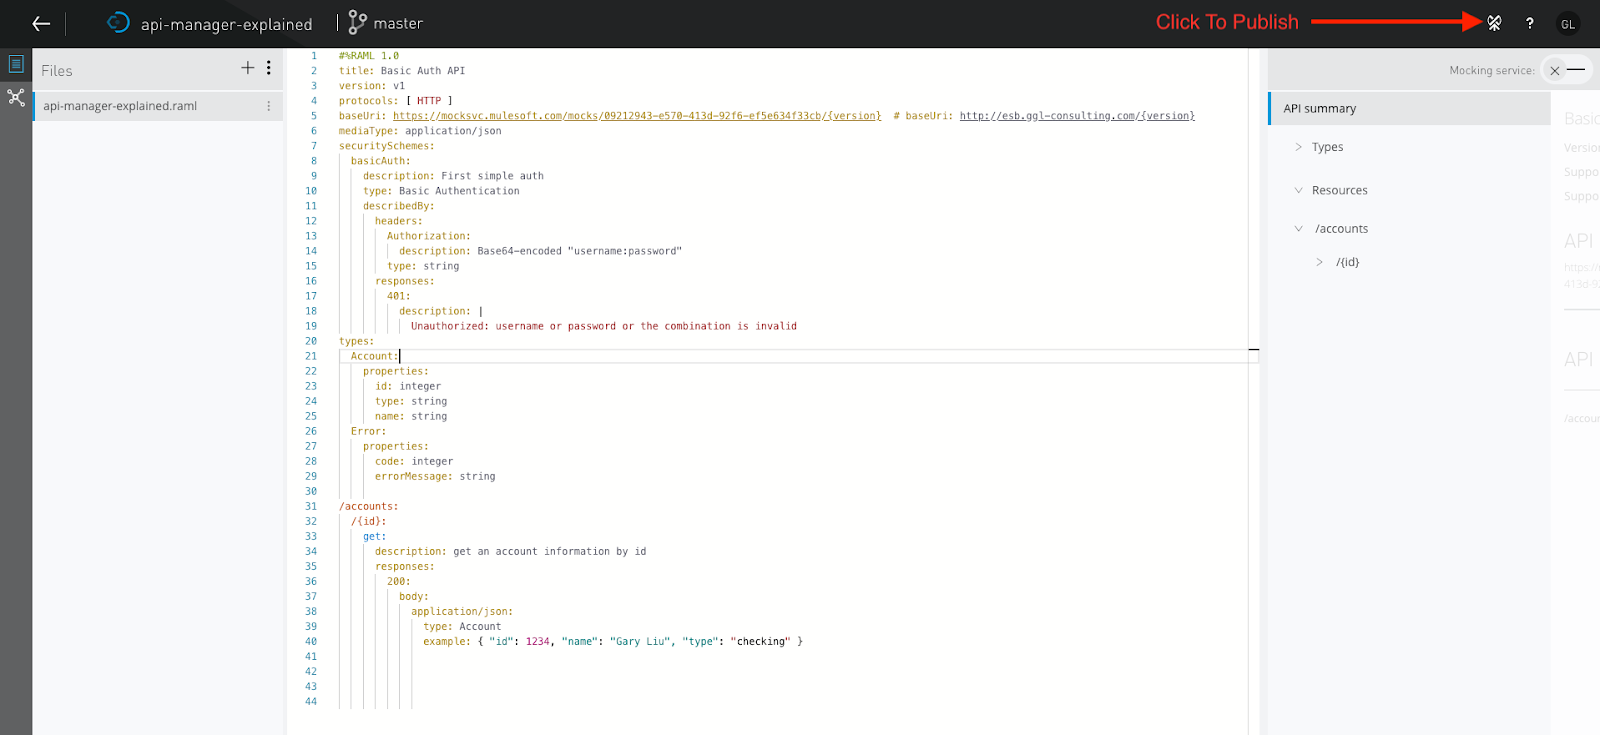
Choose "API Specification," enter the project name, then you can write your API in RAML. The details can be found in many documents. The code below is the simplest RAML file for the purpose of demonstrating API security:
#%RAML 1.0
title: Basic Auth API
version: v1
protocols: [ HTTP ]
baseUri: https://mocksvc.mulesoft.com/mocks/09212943-e570-413d-92f6-ef5e634f33cb/{version}  # baseUri: http://esb.ggl-consulting.com/{version}
mediaType: application/json
securitySchemes:
  basicAuth:
    description: First simple auth
    type: Basic Authentication
    describedBy:
      headers:
        Authorization:
          description: Base64-encoded "username:password"
        type: string
      responses:
        401:
          description: |
            Unauthorized: username or password or the combination is invalid
types:
  Account:
    properties:
      id: integer
      type: string
      name: string
  Error:
    properties:
      code: integer
      errorMessage: string

/accounts:
  /{id}:
    get:
      description: get an account information by id
      responses:
        200:
          body:
            application/json:
              type: Account
              example: { "id": 1234, "name": "Gary Liu", "type": "checking" }
Once the API is completed, we need to publish the API to the Exchange. To publish the API to the Exchange, refer to the snapshot below:
Now, we can view our API in the Exchange as shown in the following snapshot:

Once the API is published to the Exchange, we can go to API Manager to import the API as shown in the following snapshot:
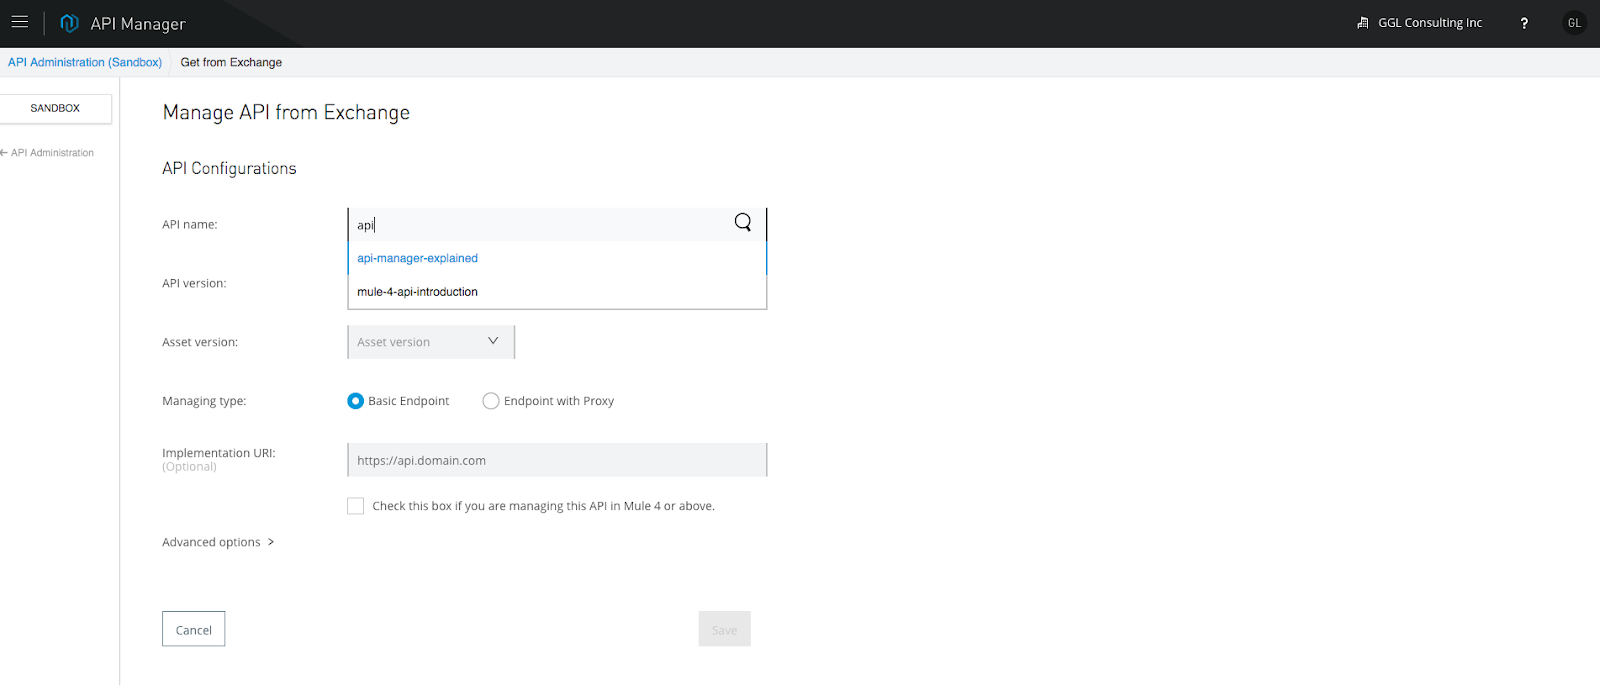
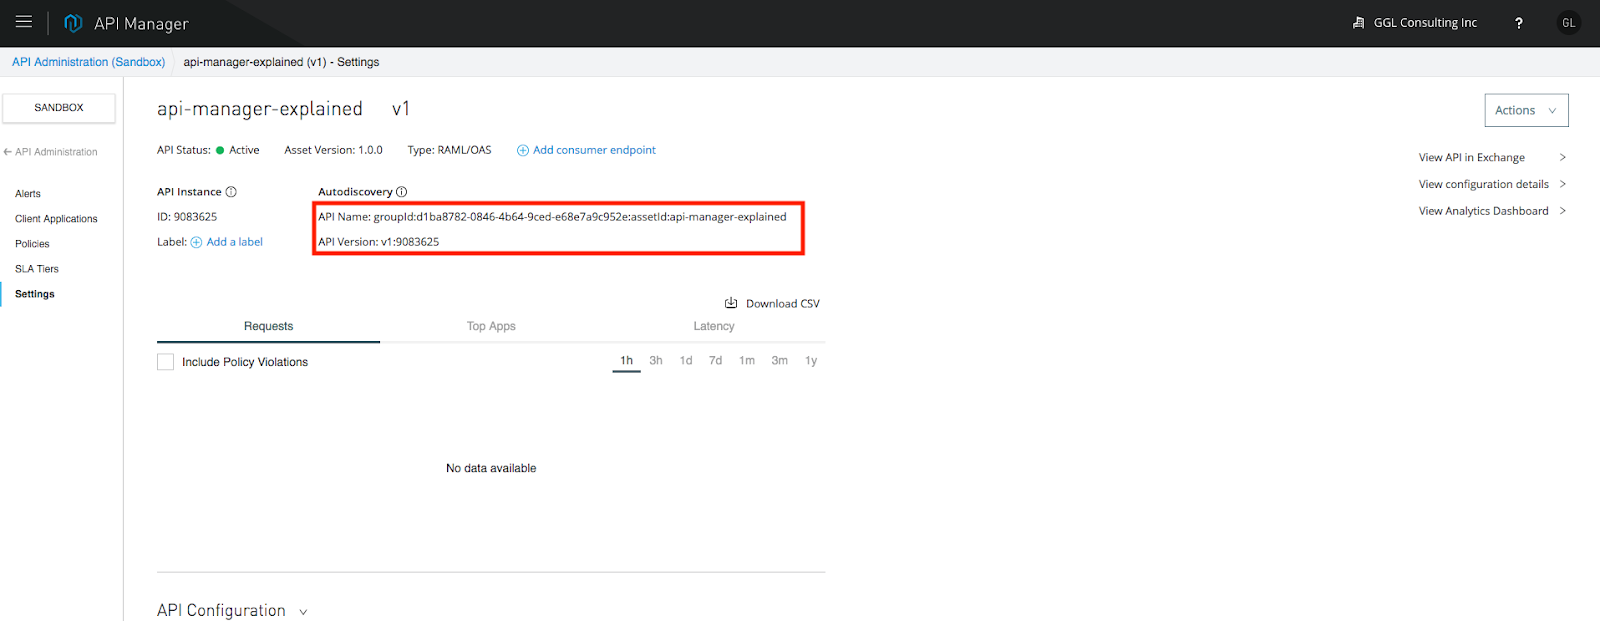
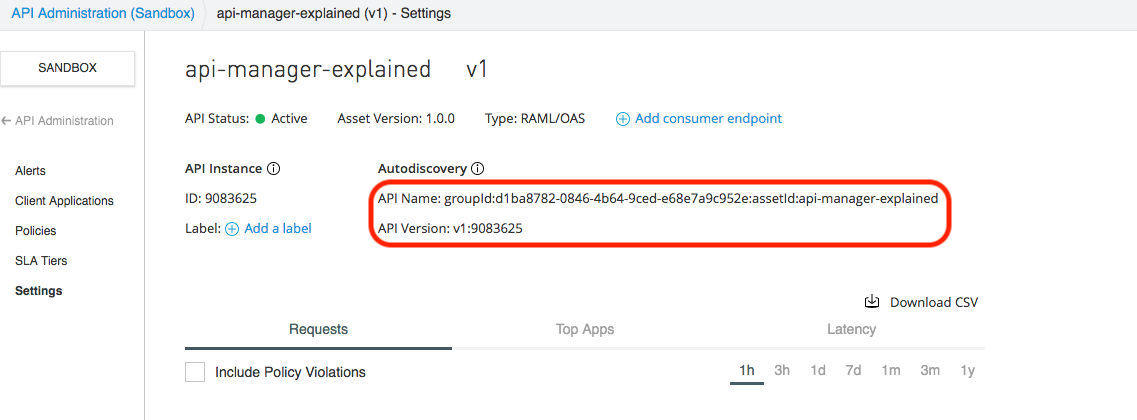
We can view the API as shown in the following snapshots:
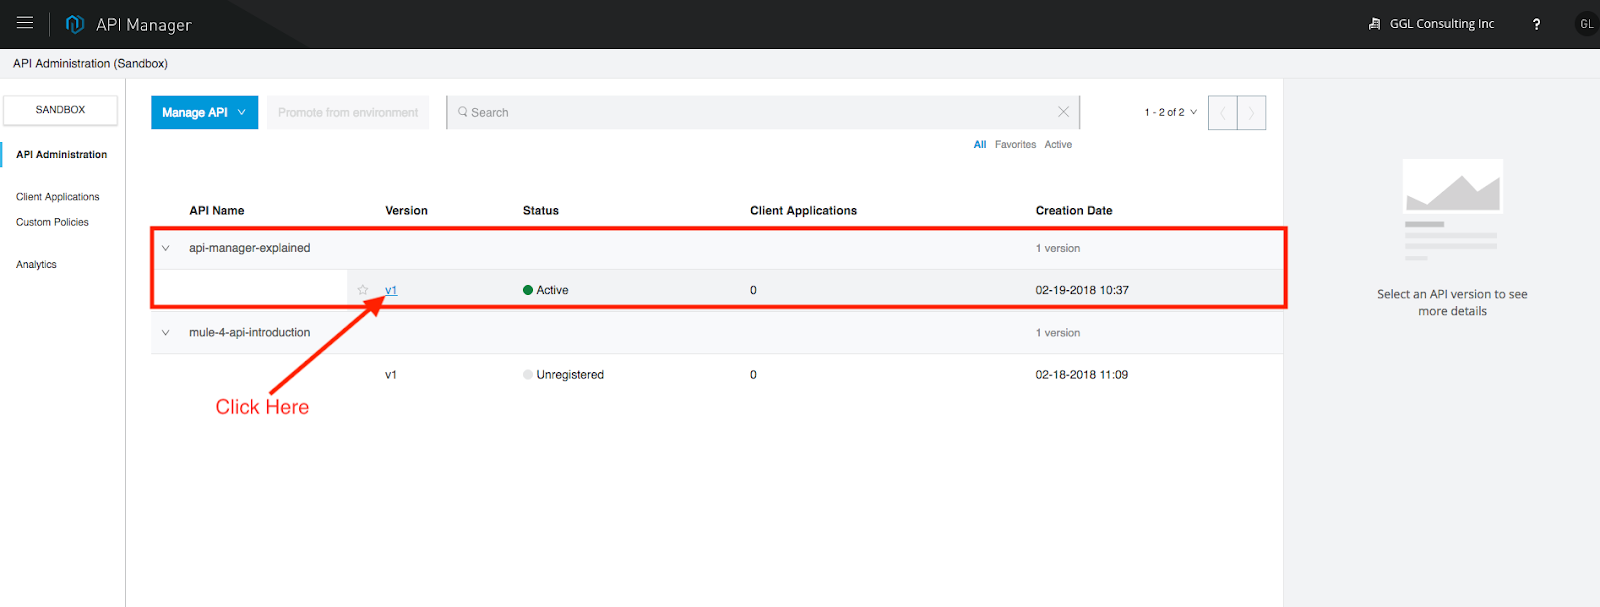
By viewing the API, we need a few important pieces of information for the purpose of auto-discovery. For Mule 3, we need the "API Name" and "API Version," respectively. For Mule 4, we need the API ID.
Setup The Anypoint Studio
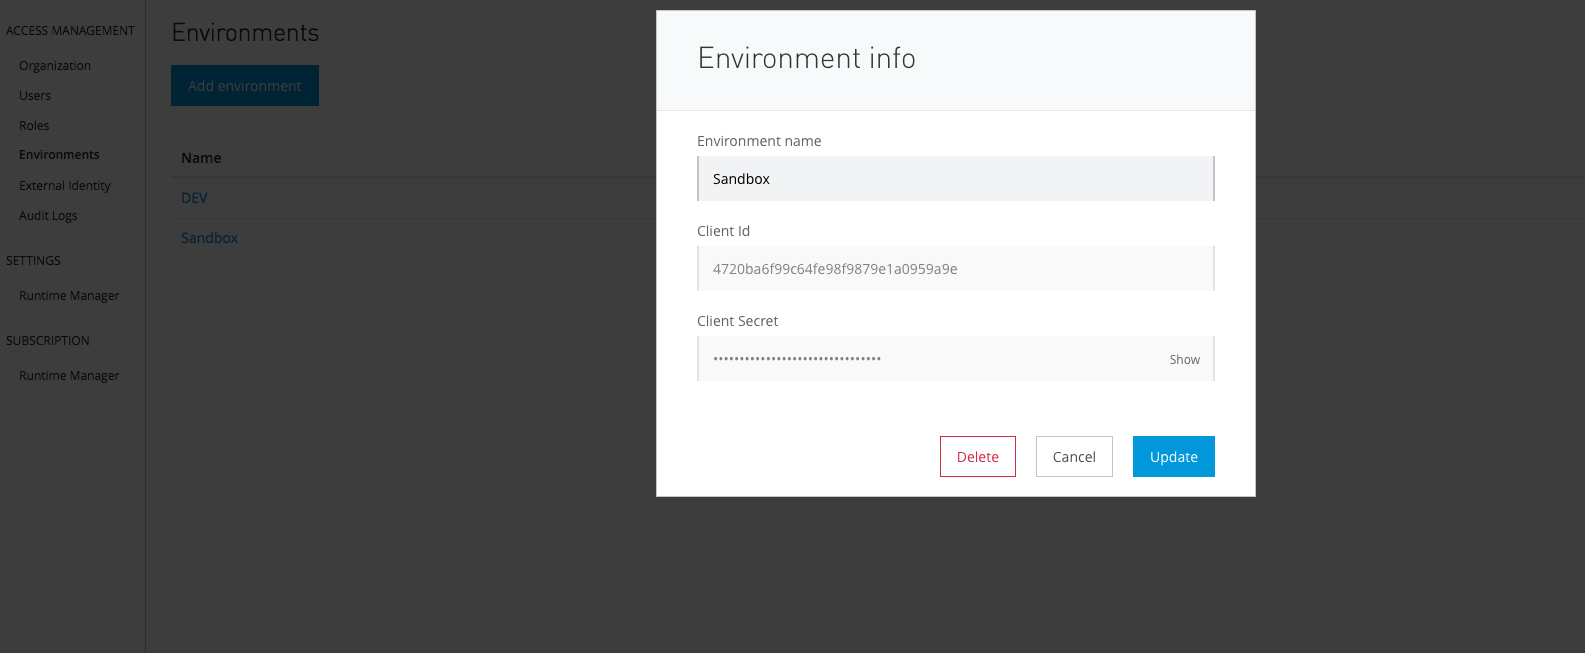
In order to apply the security policy to our local running applications, we need to connect our local runtime with Anypoint Platform. To do so, we need to apply the client ID and client secret of our environment to the Anypoint Studio. Firstly, we need to get the client ID and client secret: Access Management --> Environment (left panel) --> Environment (Sandbox):
Now, go to Anypoint Studio, Preference --> Anypoint Platform For Apis --> fill the client ID and client secret --> Validate:
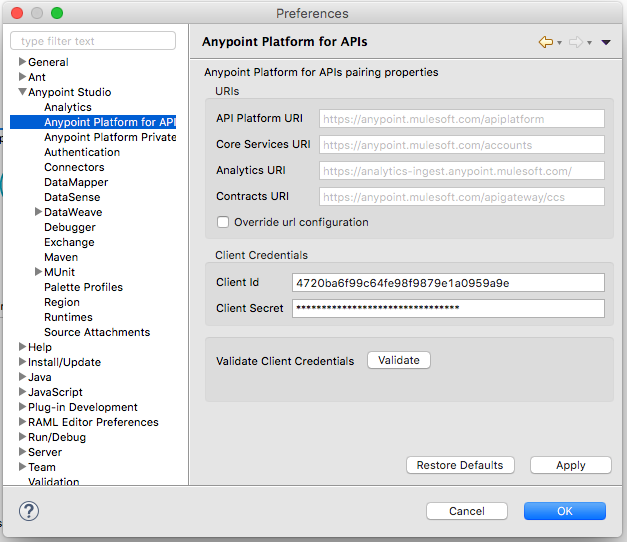
Once you validate the client ID and client secret, that means our Anypoint Studio or the embedded runtime can communicate with the Anypoint Platform.
Apply Security Policy In API Manager
Once the API is imported to API Manager, we can apply the security policies, SLA tier, alert, etc. The main purpose of this post is to demo how to apply security policies. I will cover the other area in later posts. In this case, I plan to apply simple security and basic HTTP authentication as shown in the following snapshot:
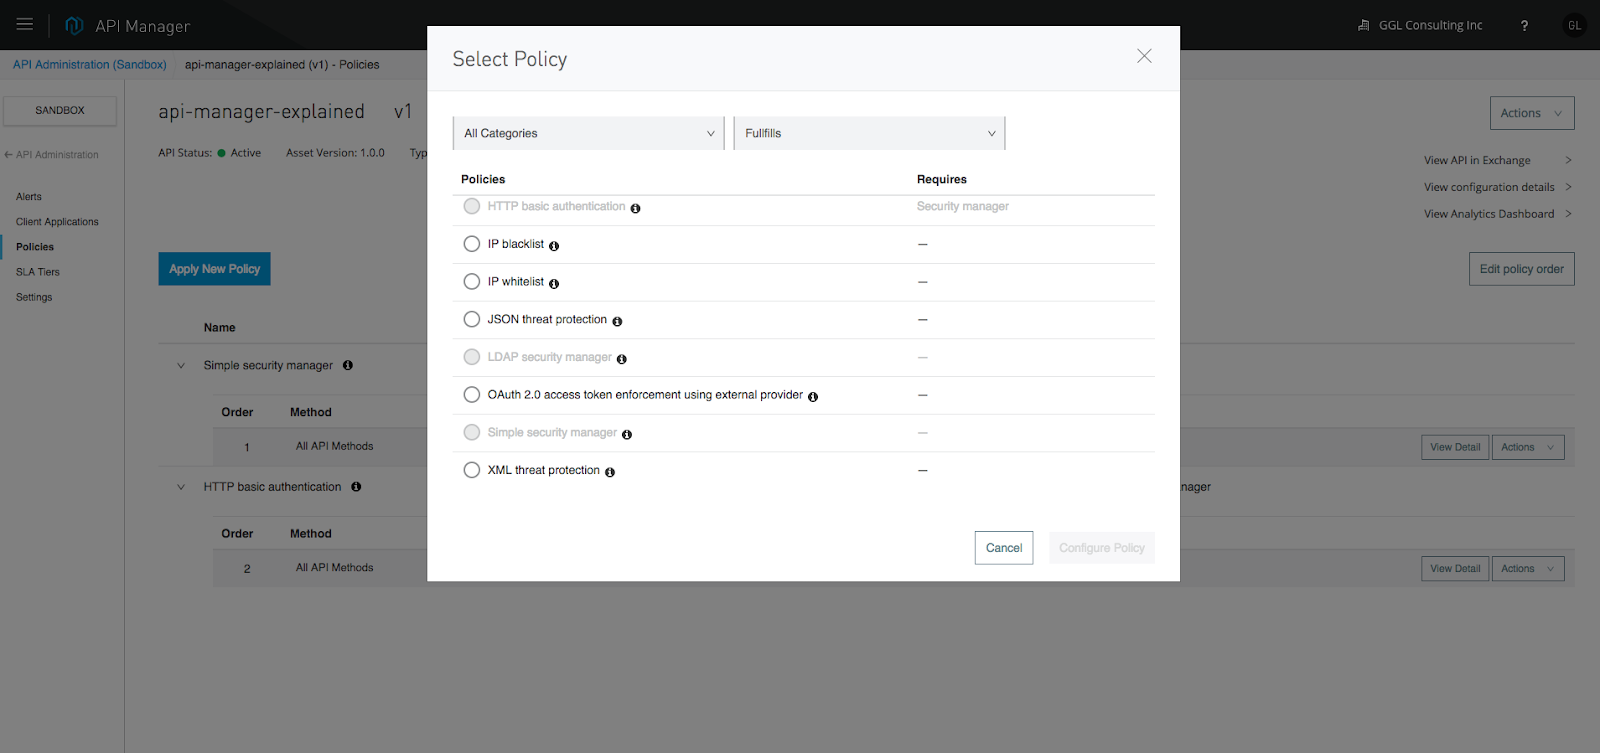
When you apply this simple security, the platform will ask for the user name and password. Note down these credentials, we will need them when we perform the HTTP request.
At this point, we have set up the security for the API from the administrative side. Now, we need to apply the security policy (user name and password) to our application. I will cover these in the next section.
Apply Security Policy To Mule Application Using Auto-Discovery
The key to controlling application API access is auto-discovery and communication between API Manager and the application. To achieve auto-discovery, or to let API Manager control application access, we need to create an auto-discovery component as shown in the following snapshots.
<api-platform-gw:api apiname="${api.name}" version="${api.version}" flowref="simple-security-main-Flow" create="false" apikitref="Router" doc:name="API Autodiscovery">
</api-platform-gw:api>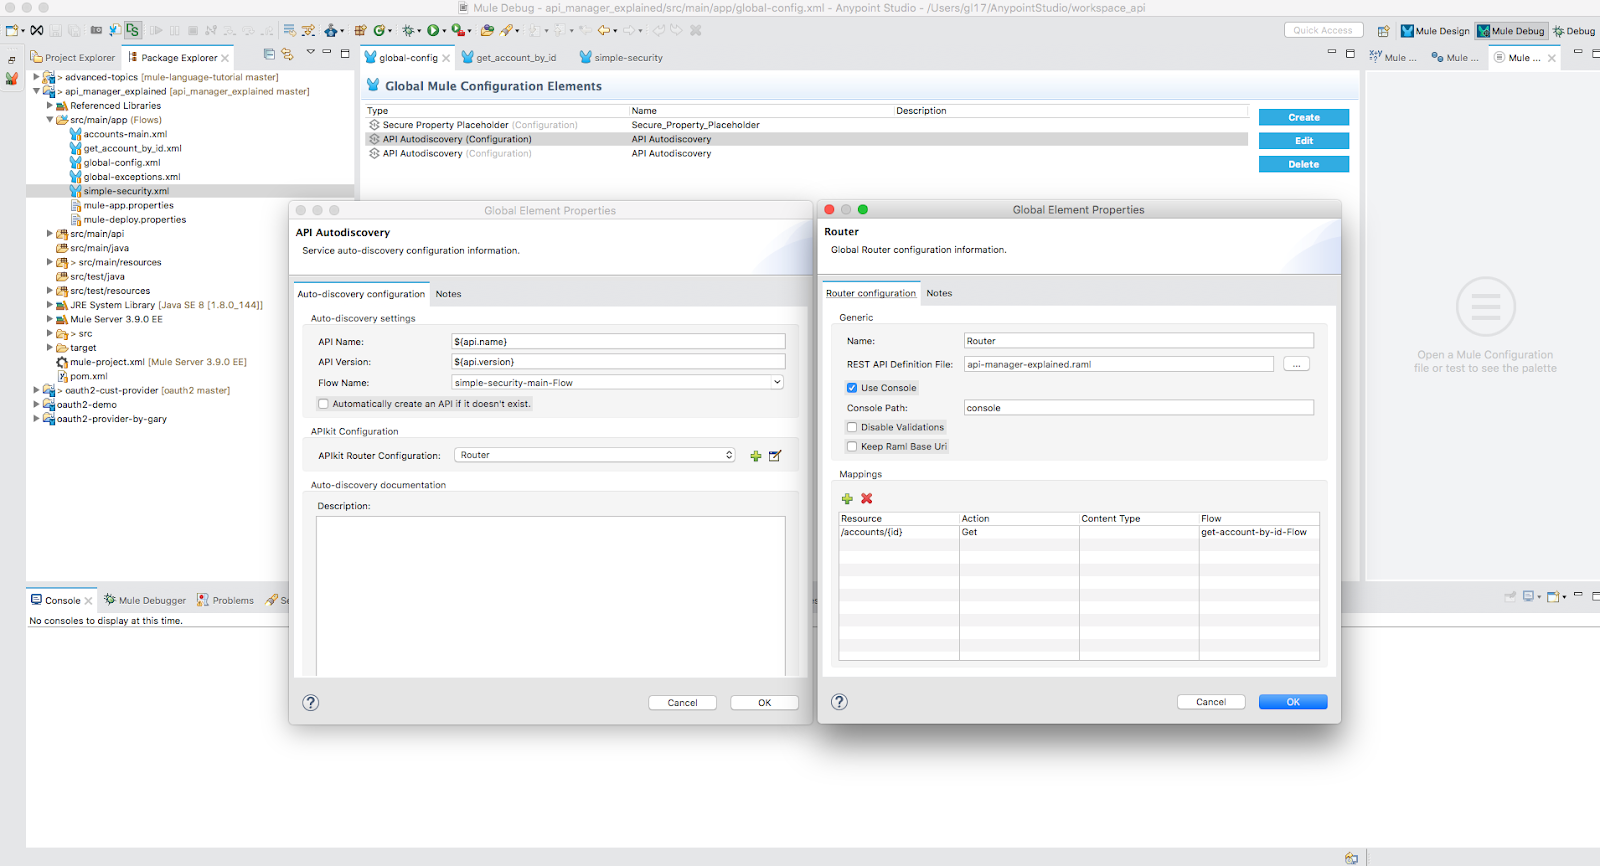 The apiName and version are from API Manager as shown in the following snapshot:
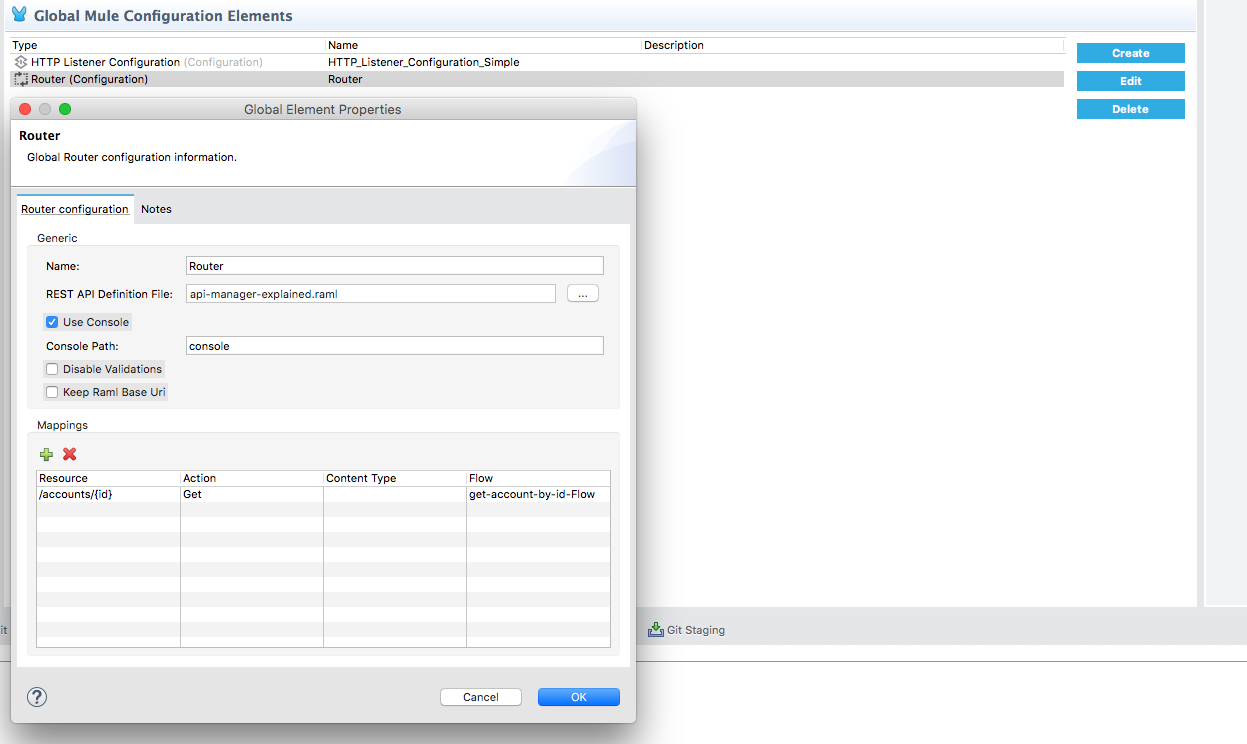
The apikitRef is our definition of API Router as shown in the following snapshot:
Run the Application
To test the security policy applying to our application, we can use PostMan as shown in the following snapshots:
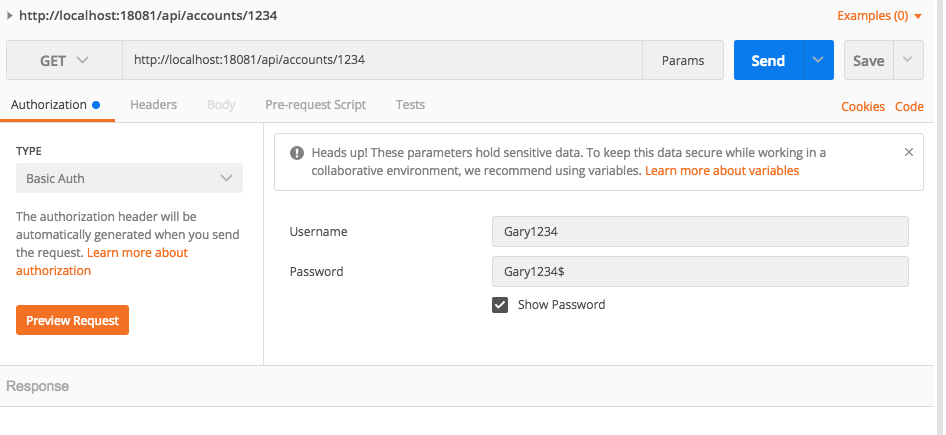
The Authorization is "Basic Auth" — the user name and password are shown. PostMan will automatically generate the token, which is base64. And PostMan will send authorization:[{"key":"Authorization","type":"text","name":"Authorization","value":"Basic R2FyeTEyMzQ6R2FyeTEyMzQk"...] to the server.
We can also perform the same thing using curl. First, we need to generate the basic token as follows:
gl17@garyliu17smbp:~$ echo "Gary1234:Gary1234$" | base64
R2FyeTEyMzQ6R2FyeTEyMzQkCg==
gl17@garyliu17smbp:~$
Then, we can send the request as follows:
curl -X GET -H "Authorization: Basic R2FyeTEyMzQ6R2FyeTEyMzQk" http://localhost:18081/api/accounts/1234That is it. Even though it seems pretty complicated, this is actually the simplest mechanism.
What Is Under the Hood?
At this point, we may ask how policy enforcement works.
First of all, we noticed that when we ran the application in our local, there are the following lines in our console:
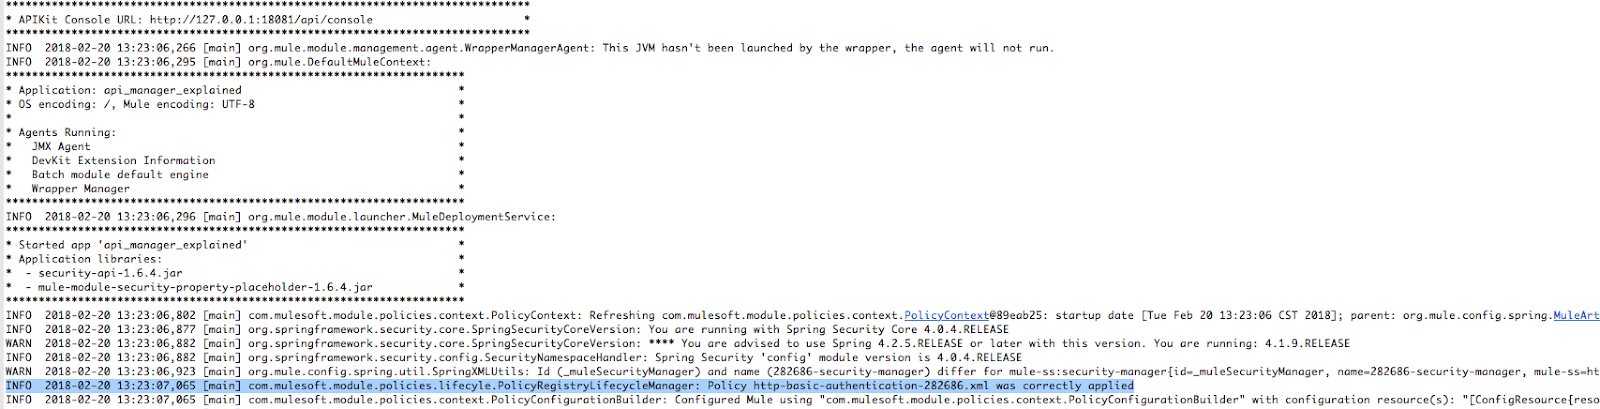
The highlighted line shows that the policy has been applied successfully.
In the meantime, there is a file written in our workspace/.mule/http-basic-authentication-282686.xml as shown in the following snapshot:
 And the contents of the file are the following:
<!--xml version="1.0" encoding="UTF-8"?-->
<policy xmlns="http://www.mulesoft.org/schema/mule/policy" xmlns:xsi="http://www.w3.org/2001/XMLSchema-instance" xmlns:mule-ss="http://www.mulesoft.org/schema/mule/spring-security" xmlns:api-platform-gw="http://www.mulesoft.org/schema/mule/api-platform-gw" xmlns:spring="http://www.springframework.org/schema/beans" xmlns:ss="http://www.springframework.org/schema/security" xsi:schemalocation="http://www.mulesoft.org/schema/mule/policy http://www.mulesoft.org/schema/mule/policy/current/mule-policy.xsd http://www.mulesoft.org/schema/mule/spring-security http://www.mulesoft.org/schema/mule/spring-security/3.3/mule-spring-security.xsd http://www.mulesoft.org/schema/mule/api-platform-gw http://www.mulesoft.org/schema/mule/api-platform-gw/current/mule-api-platform-gw.xsd http://www.springframework.org/schema/beans http://www.springframework.org/schema/beans/spring-beans-3.1.xsd http://www.springframework.org/schema/security http://www.springframework.org/schema/security/spring-security-3.1.xsd" online="true" id="282686" policyname="HTTP Basic Authentication" order="2">
    <spring:beans xmlns:spring="http://www.springframework.org/schema/beans" xmlns:ss="http://www.springframework.org/schema/security">
        <ss:authentication-manager alias="282686-authentication-manager">
            <ss:authentication-provider>
                <ss:user-service id="userService">
                    <ss:user name="Gary1234" password="Gary1234$" authorities="ROLE_ADMIN"></ss:user>
                </ss:user-service>
            </ss:authentication-provider>
        </ss:authentication-manager>
    </spring:beans>
    <mule-ss:security-manager xmlns:mule-ss="http://www.mulesoft.org/schema/mule/spring-security" name="282686-security-manager">
        <mule-ss:delegate-security-provider name="282686-security-provider" delegate-ref="282686-authentication-manager"></mule-ss:delegate-security-provider>
    </mule-ss:security-manager>
    <before>
        <mule-ss:http-security-filter xmlns:mule-ss="http://www.mulesoft.org/schema/mule/spring-security" realm="mule-realm" securitymanager-ref="282686-security-manager"></mule-ss:http-security-filter>
    </before>
    <pointcut>
        <api-platform-gw:api-pointcut xmlns:api-platform-gw="http://www.mulesoft.org/schema/mule/api-platform-gw" apiname="groupId:d1ba8782-0846-4b64-9ced-e68e7a9c952e:assetId:api-manager-explained" apiversion="v1:9083625"></api-platform-gw:api-pointcut>
    </pointcut>
</policy>
As you can see, Mule is using Spring Security. Actually, we can do the exact same thing in our Mule configuration. Of course, I am not recommending that you do so.
Another interesting point is the network connection. Here is what I can see from my local environment by using the command lsof:
AnypointS  987 gl17   98u  IPv6 0x3c5bcba541fe6469      0t0  TCP localhost:50687->localhost:6666 (ESTABLISHED)
AnypointS  987 gl17  223u  IPv6 0x3c5bcba541fe9269      0t0  TCP localhost:50681->localhost:50683 (ESTABLISHED)
java      1107 gl17    4u  IPv4 0x3c5bcba53fdc68b1      0t0  TCP localhost:50683->localhost:50681 (ESTABLISHED)
java      1107 gl17  498u  IPv4 0x3c5bcba5417148b1      0t0  TCP localhost:6666->localhost:50687 (ESTABLISHED)
java      1107 gl17  526u  IPv4 0x3c5bcba544131211      0t0  TCP garyliu17smbp.frontierlocal.net:50927->ec2-34-231-107-145.compute-1.amazonaws.com:https (ESTABLISHED)
The last line shows the TCP connection between Anypoint Platform and my local runtime.
Summary
In this post, I have shown the details of setting up and applying API security to Mule applications. I covered the communication between local runtime and Anypoint Platform. In the following post, I will cover client ID enforcement, another simple security mechanism. At the end of this series, the reader should be able to master API security related to the Mule platform.
Published at DZone with permission of Gary Liu. See the original article here.
Opinions expressed by DZone contributors are their own.
Comments