How To Do Unit Testing Using JUnit4 on Netbeans IDE
Developers and testers can learn how to use the JUnit testing framework for unit testing with the NetBeans IDE to improve code quality in this tutorial.
Join the DZone community and get the full member experience.
Join For FreeWhy "Hello World" for JUnit?
This article is intended for Java developers with basic knowledge of core Java and Object Oriented Principles. You need not be familiar with the JUnit framework or NetBeans IDE to follow this article.
This article provides an introduction to the test-first or test-driven development (TDD) philosophy which recommends that unit testing and coding should go hand-in-hand to ensure the stability of your code.
This is an actionable article that guides a user to write a very simple unit test while developing a simple application. It would hardly take 10 minutes for a beginner-level Java developer to try out the code in this article.
Generally, it takes a couple of years for a Java developer working on professional projects to appreciate the benefits of writing unit tests for his/her code. Even the NetBeans documentation on creating Unit tests requires familiarity with Java Collections classes. This article demonstrates the benefit of Unit testing with very less effort and would immediately encourage developers in getting into the habit of writing unit tests simultaneously with production code.
What Is JUnit?
JUnit is a simple, free and open-source framework to write repeatable unit tests using Java. Erick Gamma and Kert Beck originally wrote it. It is a regression-testing framework, which allows the developer to write code faster with high quality. JUnit tests increase the stability of the software.
The main philosophy behind this testing framework is to make coding and testing move hand in hand.
What Is Netbeans IDE?
In this article, we will apply this philosophy of testing and coding side by side to an object-oriented version of the Hello World program by creating a test case for it in NetBeans IDE. NetBeans IDE is the official IDE for Java 8 for the development of desktop, mobile, and web applications, as well as HTML5 (including Oracle JET) applications with HTML, JavaScript, and CSS.
Let us apply this philosophy of testing and coding side by side to the object-oriented version of the Hello World program by creating a test case for it in NetBeans IDE v8.2. It is available for free download here.
How To Write Java Test Classes Using Netbeans IDE
Please follow the steps below:
1. Launch NetBeans IDE. In Windows 10, it can be started using > NetBeans > NetBeans 8.2 IDE.
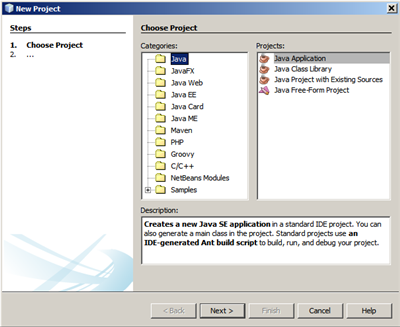
2. In the IDE, choose File > New Project, as shown in the figure below.

3. In the New Project wizard, expand the Java category and select Java Application as shown in the figure below. Then click Next.
4. In the Name and Location page of the wizard, do the following (as shown in the figure below):
- In the Project Name field, type HelloWorld.
- Check the Use Dedicated Folder for Storing Libraries checkbox.
- In the Create Main Class field, type com.dzone.example.HelloWorld
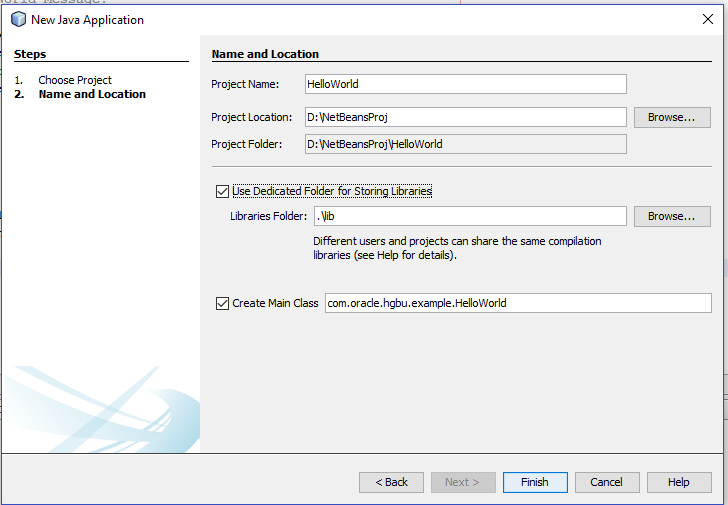
5. Click Finish to create the project.
6. Now go to the Context menu of the project and Select New > Java Class to create a new Java class.

7. Type in the following code for the class.
package com.oracle.hgbu.example;

/**
 * An Object Oriented Hello World Program.
 * @version 1.0
**/
public class HelloWorld {
  private String hello;
  private String world;

  /**
  * Constructor
  */
  HelloWorld(){
    hello = “Hello”;
    world = “World”;
  }

  /**
  * forms the Hello World Message.
  */
  public String formMessage(){
 String message;
    message = hello + ” ” +  world;
    return message;
  }

  public static void main(String[] args) {
    HelloWorld helloWorld = new HelloWorld();
    System.out.println(helloWorld.formMessage());
  }
}
8. Now select New File from the context menu of the project and choose Test for Existing Class.

9. Enter the following details and click Next.

See below the project structure for your reference.

10. Now select the HelloWorld.java from Browse… as shown in the figure below, and click Finish.

11. Write the following code for the HelloWorldTest class.
package com.oracle.hgbu.example;

import org.junit.After;
import org.junit.Assert;
import org.junit.Before;
import org.junit.Test;

/**
 * Test class for HelloWorld
 * @version 1.0
 */
public class HelloWorldTest {

    HelloWorld helloWorldInstance;

    @Before
    public void setUp() {
        System.out.println("* HelloWorldTest: Before method setUp()");
        helloWorldInstance = new HelloWorld();
    }

    @After
    public void tearDown() {
        System.out.println("* HelloWorldTest: After method tearDown()");
        helloWorldInstance = null;
    }
    /**
    * unit test for formMessage method.
    */
    @Test
    public void testFormMessage() {
        //Asserts that two Strings are equal
        String expResult = "Hello World!";
        String result = helloWorldInstance.formMessage();
        System.out.println("* HelloWorldTest: test method 1 testFormMessage()");
         Assert.assertEquals(expResult, result);
    }
}
12. Select Test from the context menu of the project or press (Alt + F6).
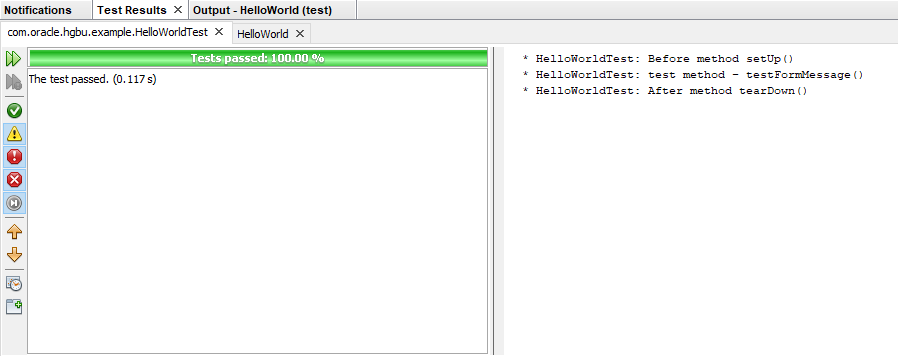
Congrats! The green bar indicates that the test is successful. If the test case fails, a red bar and error message are displayed.
13. Now select Run from the context menu of the project to Run the Hello World Program.

The string “Hello World” is printed to the console. This finishes the Hello World program with Unit Test in NetBeans IDE.
What Are JUnit Best Practices?
Below are some of the best practices I would recommend while using JUnit in production:
- Run all the tests in the system at least once per day (or night).
- If you find yourself debugging using System.out.println(), better write a test to automatically check the result instead.
- When a bug is reported, write a test to expose the bug.
- Write unit tests before writing the code and only write new code when a test is failing.
In the next article, I would be writing about more tips and tricks for improving your code quality.
Opinions expressed by DZone contributors are their own.
Comments