DZone
Thanks for visiting DZone today,
Edit Profile
  • Manage Email Subscriptions
  • How to Post to DZone
  • Article Submission Guidelines
Sign Out View Profile
  • Post an Article
  • Manage My Drafts
Over 2 million developers have joined DZone.
Log In / Join
Please enter at least three characters to search
Refcards Trend Reports
Events Video Library
Refcards
Trend Reports

Events

View Events Video Library

Zones

Culture and Methodologies Agile Career Development Methodologies Team Management
Data Engineering AI/ML Big Data Data Databases IoT
Software Design and Architecture Cloud Architecture Containers Integration Microservices Performance Security
Coding Frameworks Java JavaScript Languages Tools
Testing, Deployment, and Maintenance Deployment DevOps and CI/CD Maintenance Monitoring and Observability Testing, Tools, and Frameworks
Culture and Methodologies
Agile Career Development Methodologies Team Management
Data Engineering
AI/ML Big Data Data Databases IoT
Software Design and Architecture
Cloud Architecture Containers Integration Microservices Performance Security
Coding
Frameworks Java JavaScript Languages Tools
Testing, Deployment, and Maintenance
Deployment DevOps and CI/CD Maintenance Monitoring and Observability Testing, Tools, and Frameworks

Last call! Secure your stack and shape the future! Help dev teams across the globe navigate their software supply chain security challenges.

Modernize your data layer. Learn how to design cloud-native database architectures to meet the evolving demands of AI and GenAI workloads.

Releasing software shouldn't be stressful or risky. Learn how to leverage progressive delivery techniques to ensure safer deployments.

Avoid machine learning mistakes and boost model performance! Discover key ML patterns, anti-patterns, data strategies, and more.

Related

  • Introduction to Spring Boot and JDBCTemplate: JDBC Template
  • How to Build a Chat App With Spring Boot and DynamoDB
  • JobRunr and Spring Data
  • A Practical Guide to Creating a Spring Modulith Project

Trending

  • The Modern Data Stack Is Overrated — Here’s What Works
  • What Is Plagiarism? How to Avoid It and Cite Sources
  • How AI Agents Are Transforming Enterprise Automation Architecture
  • Understanding IEEE 802.11(Wi-Fi) Encryption and Authentication: Write Your Own Custom Packet Sniffer
  1. DZone
  2. Coding
  3. Frameworks
  4. Getting Started With Thymeleaf In Spring Boot

Getting Started With Thymeleaf In Spring Boot

Tutorial on how to run an HTML template using Thymeleaf starting from Spring Boot Application setup.

By 
Bhagyashree Nigade user avatar
Bhagyashree Nigade
DZone Core CORE ·
Oct. 22, 20 · Tutorial
Likes (6)
Comment
Save
Tweet
Share
33.1K Views

Join the DZone community and get the full member experience.

Join For Free

Thymeleaf is a Java Template Engine which enables creation of web applications. It enables interaction between Java Classes and HTML/XML templates.

Thymeleaf Provides below Template Modes:

  • HTML
  • XML
  • TEXT
  • JAVASCRIPT
  • CSS
  • RAW

In this article we are going to get familiar with Thymeleaf and the set up starting from basic configurations.

If you already have a Spring Boot application ready, Skip to Step 2.

Step 1:

Create a Spring Boot Project. Using STS or Spring Initializr. While creating Spring Boot Project add dependency for Thymeleaf and Spring Web.

For Gradle:

Plain Text


xxxxxxxxxx
1


1
implementation 'org.springframework.boot:spring-boot-starter-thymeleaf'
2
implementation 'org.springframework.boot:spring-boot-starter-web'


For Maven:

XML


xxxxxxxxxx
1


1
<dependency>
2
   <groupId>org.springframework.boot</groupId>
3
   <artifactId>spring-boot-starter-thymeleaf</artifactId>
4
</dependency>
5
<dependency>
6
   <groupId>org.springframework.boot</groupId>
7
   <artifactId>spring-boot-starter-web</artifactId>
8
</dependency>


If you have used the Spring Initializr, unzip and Import Project in IDE.

For Gradle: Import -> Gradle -> Existing Gradle Project

For Maven: Import -> Maven -> Existing Maven Projects

Once Project is Set up we can get started with Implementing Thymeleaf. 

Step 2: 

Create a Controller Class in package. Either add a new package or use the default package containing main application class.

DemoController.java :

Java


xxxxxxxxxx
1
14


1
import org.springframework.stereotype.Controller;
2
import org.springframework.ui.Model;
3
import org.springframework.web.bind.annotation.GetMapping;
4
import org.springframework.web.bind.annotation.RequestParam;
5

          
6

          
7
@Controller
8
public class DemoController {
9
    
10
    @GetMapping(value = "/thymeleafTemplate")
11
    public String getTemplate(@RequestParam(name="name", required=false, defaultValue="World") String name, Model model) {
12
        model.addAttribute("name", name);
13
        return "thymeleafTemplate";
14
    }
15
}


In the above class, we have created a Controller, and notified Spring Boot using @Controller. 

It is not recommended to use @RestController in this scenario as it contains @ResponseBody which binds method return value to response body. Hence its responses are interpreted differently than @Controller.

Create a Get method using @GetMapping and name the value as 'thymeleafTemplate', which is also going to be the name of the HTML template. The method getTemplate accepts the name and model. Name will be passed to the template using the model. If no name is passed by the user, we are setting the default value 'World'.

Step 3:

Add a HTML template.

thymeleafTemplate.html

Add template in the resources folder. src/main/resources/templates/thymeleafTemplate.html

HTML


xxxxxxxxxx
1
11


1
<!DOCTYPE html>
2
<html  xmlns:th="http://www.thymeleaf.org">
3
    <head>
4
        <meta http-equiv="Content-Type" content="text/html; charset=UTF-8" />
5
        <title> Thymeleaf Spring Boot Demo </title>
6
    </head>
7
    <body>
8
        <p th:text="'Hello, ' + ${name} + '!'" />
9
        <h4>Welcome to Thymeleaf Demo In Spring Boot</h4>
10
    </body>
11
</html>


We are mapping the value received in GET request, in the template using ${name}.
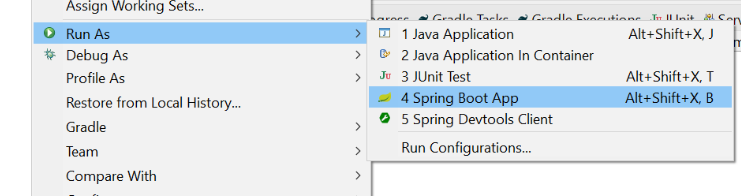
Step 4: 

Build code.

Run the application using IDE: Run as -> Spring Boot App

running application using IDE

Or to run the code externally:

Create Jar files in the target directory using the below commands:

For Maven:

Plain Text


xxxxxxxxxx
1


1
mvn clean install


For Gradle:

Plain Text


xxxxxxxxxx
1


1
gradle clean build


Once Code compiles and Jar file is created, start the application:

Plain Text


xxxxxxxxxx
1


1
java –jar <JARFILE> 


Server will run on default port 8080:


server running on default port 8080

Once your application has started, hit the URL from the browser:

choosing URL from browser screenshot


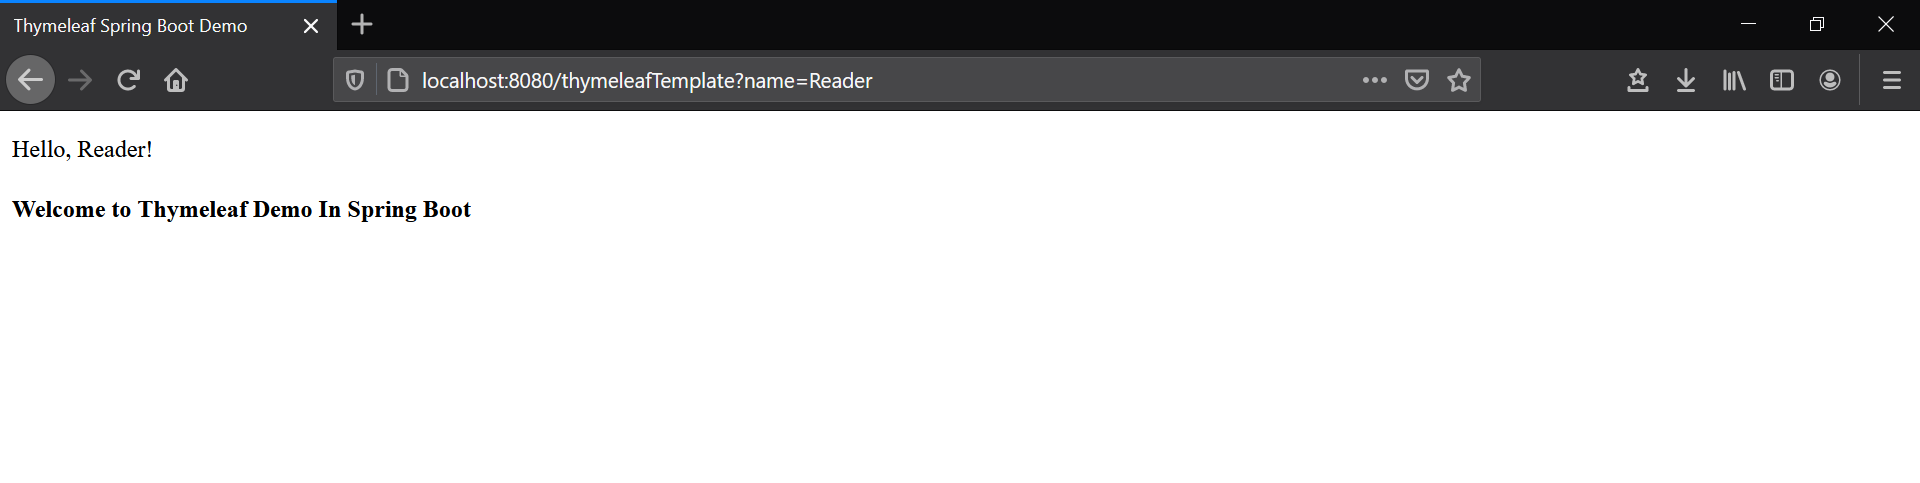
Now you can start building on this code and create your own web application. 

To create an index.html include it in the static folder - src/main/resources/static. It will be the default html to run if we hit the brower with out specifying path: http://localhost:8080

Project Directory:

project directory

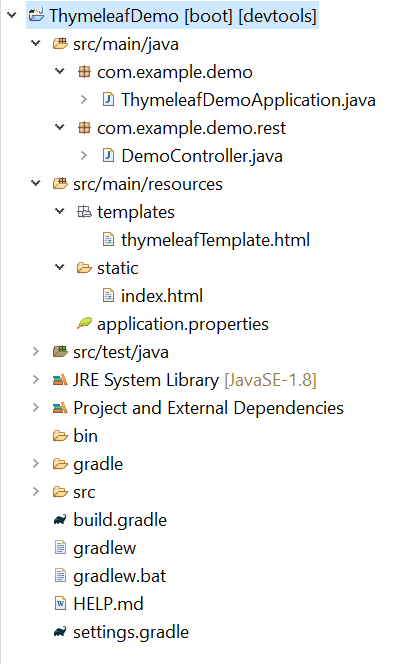
To get started you can get the above project directly from ThymeLeaf Demo Project

Clone Directly: 

Plain Text


xxxxxxxxxx
1


1
https://github.com/bhagyashreenigade/thymeLeafDemo.git


IDE used for Development: STS 4

Spring Framework Spring Boot Thymeleaf Plain text application Template

Opinions expressed by DZone contributors are their own.

Related

  • Introduction to Spring Boot and JDBCTemplate: JDBC Template
  • How to Build a Chat App With Spring Boot and DynamoDB
  • JobRunr and Spring Data
  • A Practical Guide to Creating a Spring Modulith Project

Partner Resources

×

Comments
Oops! Something Went Wrong

The likes didn't load as expected. Please refresh the page and try again.

ABOUT US

  • About DZone
  • Support and feedback
  • Community research
  • Sitemap

ADVERTISE

  • Advertise with DZone

CONTRIBUTE ON DZONE

  • Article Submission Guidelines
  • Become a Contributor
  • Core Program
  • Visit the Writers' Zone

LEGAL

  • Terms of Service
  • Privacy Policy

CONTACT US

  • 3343 Perimeter Hill Drive
  • Suite 100
  • Nashville, TN 37211
  • support@dzone.com

Let's be friends:

Likes
There are no likes...yet! 👀
Be the first to like this post!
It looks like you're not logged in.
Sign in to see who liked this post!