iOS Spring Boot Code Generation in One Minute With Clowiz
To increase software developers' productivity and to reduce the cost of software development, the Clowiz platform has been created.
Join the DZone community and get the full member experience.
Join For FreeWith the current trends in the software development field, agility and faster delivery of software applications have become an essential part of the IT industry. In fact, this has been one of the main reasons for the evolution of many of the modern technologies and trends, such as single-page applications, lightweight frameworks, and microservices architecture.
Even with the massive improvements in the technologies, IDEs, and tools, developers still write much code to get the job done. To increase software developers' productivity and to reduce the cost of software development, the Clowiz platform has been created.
Clowiz is a cloud-based platform that enables developers to generate software artifacts (using CodeGen), end-to-end features (using FeatureGen), and full end-to-end apps (using AppGen) without writing a single line of code.
In this article, we are going to:
- Create and set up the following projects:
- iOS Swift App
- Spring Boot Rest API
- Generate app artifacts using Clowiz:
- Generate and use the following artifacts in the iOS App:
- List ViewController
- Add/Edit ViewController
- List View
- Add/Edit View
- Model
- Alamofire Sevice
- Generate and use the following artifacts in the Spring Boot App:
- JPA Repository
- Entity
- Rest API Controller
- Generate and use the following artifacts in the iOS App:
- Run and test the project
Create iOS Swift App
Using XCode:
- Create a new iOS Storyboard project with a Single View App.
- Add Alamofire POD to the project. (How to add Alamofire to xCode, Alamofire latest version)
- Delete the "Main.storyboard" file and its references from the "Info.plist" file. (Create project without storyboard)
- Rename the file "ViewController.swift" to "TabBarVC.swift".
- Change the class name to TabBarVC.
- Change the rootViewCntroller to a to our TabBarVC by replacing the scene function in the SceneDelegate.swift file with the following:
xxxxxxxxxx
func scene(_ scene: UIScene, willConnectTo session: UISceneSession, options connectionOptions: UIScene.ConnectionOptions) {
guard let windowScene = (scene as? UIWindowScene) else { return }
window = UIWindow(frame: windowScene.coordinateSpace.bounds)
window?.windowScene = windowScene
window?.rootViewController = TabBarVC()
window?.makeKeyAndVisible()
}
- Create a new subclass of UIViewController and call it "HomeVC.swift" with the following content:
xxxxxxxxxx
import UIKit
class HomeVC: UIViewController {
override func viewDidLoad() {
super.viewDidLoad()
view.backgroundColor = .white
navigationItem.title = "Home"
}
}
- Add UINavigationController to your tabs in the TabBarVC class.
xxxxxxxxxx
import UIKit
class TabBarVC: UITabBarController {
override func viewDidLoad() {
super.viewDidLoad()
view.backgroundColor = .white
setupTabBar()
}
func setupTabBar() {
let homeVC = UINavigationController(rootViewController: HomeVC())
homeVC.tabBarItem.title = "Home"
viewControllers = [homeVC]
}
}
Running the app displays the TabBar and an empty Home navigation page, now we can extend the app and add more functionalities to it.
Generate iOS Artifacts
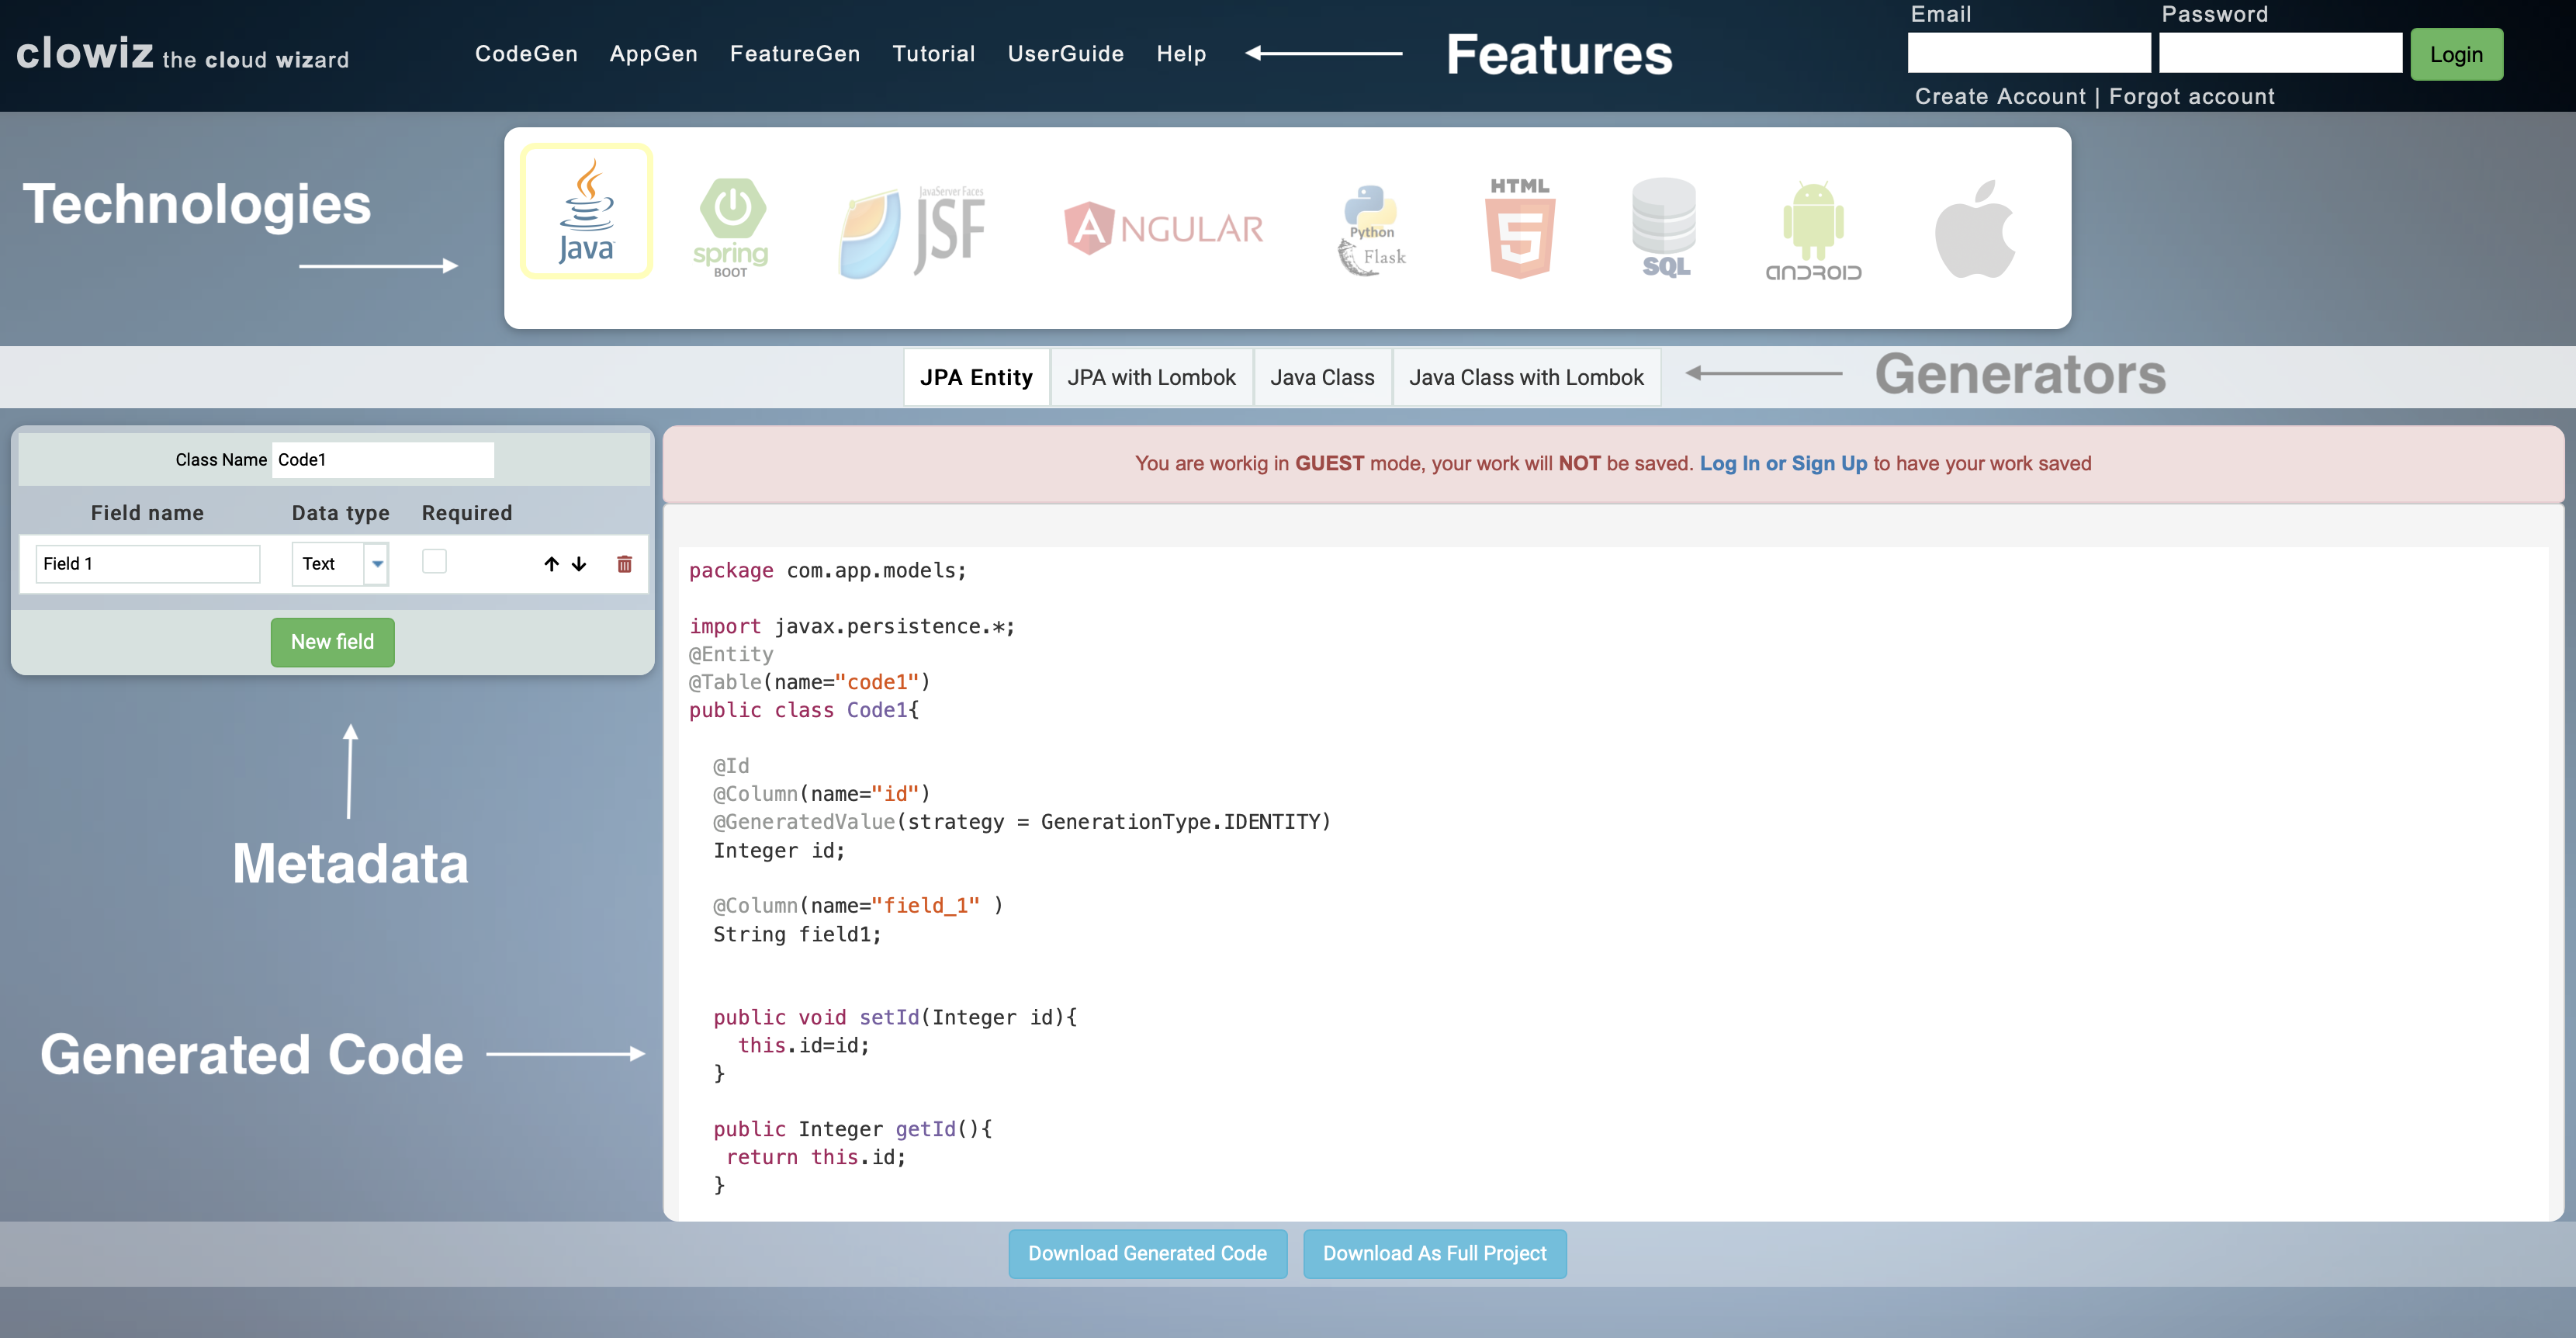
To boost the development process, use the CodeGen feature from Clowiz to generate the project artifacts source code in one minute for both applications.

- Go to Clowiz, then navigate to CodeGen https://www.clowiz.com/
- From the technologies, choose iOS.
- In the metadata section, name your artifacts, e.g., Employee.
- For the first field, in the field name, type Name and keep is as Text.
- Create two more fields, e.g., Email and Salary, with data types of email and double.
- Check all fields as required.
CodeGen has generated the following artifacts for the project:
Model.
xxxxxxxxxx
import UIKit
class Employee: NSObject, Codable {
var id: Int?
var name: String?
var email: String?
var salary: Double?
override init() {
super.init()
}
}
Cell View: represents the data in each table row:
x
import UIKit
class EmployeeCell: UITableViewCell {
var idLabel = UILabel()
var id = UILabel()
var nameLabel = UILabel()
var name = UILabel()
var emailLabel = UILabel()
var email = UILabel()
var salaryLabel = UILabel()
var salary = UILabel()
override init(style: UITableViewCell.CellStyle, reuseIdentifier: String?) {
super.init(style: style, reuseIdentifier: reuseIdentifier)
addSubViews()
}
required init?(coder: NSCoder) {
super.init(coder: coder)
}
func addSubViews() {
idLabel.text = "Id:"
self.addSubview(idLabel)
self.addSubview(id)
nameLabel.text = "Name:"
self.addSubview(nameLabel)
self.addSubview(name)
emailLabel.text = "Email:"
self.addSubview(emailLabel)
self.addSubview(email)
salaryLabel.text = "Salary:"
self.addSubview(salaryLabel)
self.addSubview(salary)
setupFields()
}
func setupFields() {
id.anchor(top: self.topAnchor, bottom: nil, left: idLabel.rightAnchor, right: nil)
idLabel.anchor(top: self.topAnchor, bottom: nil, left: self.leftAnchor, right: nil)
name.anchor(top: id.bottomAnchor, bottom: nil, left: nameLabel.rightAnchor, right: nil)
nameLabel.anchor(top: idLabel.bottomAnchor, bottom: nil, left: self.leftAnchor, right: nil)
email.anchor(top: name.bottomAnchor, bottom: nil, left: emailLabel.rightAnchor, right: nil)
emailLabel.anchor(top: nameLabel.bottomAnchor, bottom: nil, left: self.leftAnchor, right: nil)
salary.anchor(top: email.bottomAnchor, bottom: self.bottomAnchor, left: salaryLabel.rightAnchor, right: nil)
salaryLabel.anchor(top: emailLabel.bottomAnchor, bottom: self.bottomAnchor, left: self.leftAnchor, right: nil)
}
func setEmployee(employee: Employee) {
id.text = String(employee.id ?? 0)
name.text = (employee.name?.elementsEqual(""))! ? "-" : employee.name
email.text = (employee.email?.elementsEqual(""))! ? "-" : employee.email
salary.text = String(employee.salary ?? 0.0)
}
}
Add Edit View: holds the input fields(name, email, salary input fields) and their labels.
x
import UIKit
class AddEmployeeView: UIView, UITextFieldDelegate {
var nameLabel = UILabel()
var name = UITextField()
var emailLabel = UILabel()
var email = UITextField()
var salaryLabel = UILabel()
var salary = UITextField()
var scrollView = UIScrollView()
var textFields: [UITextField] {
return [name,email,salary]
}
override init(frame: CGRect) {
super.init(frame: frame)
let tap: UITapGestureRecognizer = UITapGestureRecognizer(target: self, action: #selector(dismissKeyboard))
self.addGestureRecognizer(tap)
setupScrollView()
setupFields()
}
required init?(coder: NSCoder) {
super.init(coder: coder)
}
func setupFields() {
textFields.forEach { $0.delegate = self }
nameLabel.text = "Name: *"
name.placeholder = "Name"
emailLabel.text = "Email: *"
email.keyboardType = .emailAddress
email.placeholder = "Email"
salaryLabel.text = "Salary: *"
salary.keyboardType = .decimalPad
salary.placeholder = "Salary"
setFieldConstraints()
}
func setFieldConstraints() {
nameLabel.anchor(top: scrollView.topAnchor, bottom: nil, left: scrollView.leftAnchor, right: nil)
name.anchor(top: scrollView.topAnchor, bottom: nil, left: nameLabel.rightAnchor, right: nil)
emailLabel.anchor(top: nameLabel.bottomAnchor, bottom: nil, left: scrollView.leftAnchor, right: nil)
email.anchor(top: name.bottomAnchor, bottom: nil, left: emailLabel.rightAnchor, right: nil)
salaryLabel.anchor(top: emailLabel.bottomAnchor, bottom: scrollView.bottomAnchor, left: scrollView.leftAnchor, right: nil)
salary.anchor(top: email.bottomAnchor, bottom: scrollView.bottomAnchor, left: salaryLabel.rightAnchor, right: nil)
}
func setupScrollView() {
self.addSubview(scrollView)
scrollView.addSubview(nameLabel)
scrollView.addSubview(name)
scrollView.addSubview(emailLabel)
scrollView.addSubview(email)
scrollView.addSubview(salaryLabel)
scrollView.addSubview(salary)
scrollView.contentSize.height = 2000
scrollView.anchor(top: self.topAnchor, bottom: self.bottomAnchor, left: self.leftAnchor, right: self.rightAnchor)
}
@objc func dismissKeyboard() {
self.endEditing(true)
}
func textFieldShouldReturn(_ textField: UITextField) -> Bool {
if let selectedTextFieldIndex = textFields.firstIndex(of: textField), selectedTextFieldIndex < textFields.count - 1 {
textFields[selectedTextFieldIndex + 1].becomeFirstResponder()
} else {
textField.resignFirstResponder()
}
return true
}
}
extension UIView {
func anchor(top: NSLayoutYAxisAnchor?, bottom: NSLayoutYAxisAnchor?, left: NSLayoutXAxisAnchor?, right: NSLayoutXAxisAnchor?) {
translatesAutoresizingMaskIntoConstraints = false
if let top = top {
topAnchor.constraint(equalTo: top, constant: 15).isActive = true
}
if let left = left {
leftAnchor.constraint(equalTo: left, constant: 15).isActive = true
}
if let right = right {
rightAnchor.constraint(equalTo: right, constant: -15).isActive = true
}
if let bottom = bottom {
bottomAnchor.constraint(equalTo: bottom, constant: -15).isActive = true
}
}
}
Add Edit VC: used to add and edit data.
x
import UIKit
class AddEmployeeVC: UIViewController {
var addEmployeeView = AddEmployeeView()
var employeeService = EmployeeService()
var employee = Employee()
override func loadView() {
view = addEmployeeView
}
override func viewDidLoad() {
super.viewDidLoad()
view.backgroundColor = .white
isEditMode()
}
func isEditMode() {
if(employee.id != nil) {
addEmployeeView.name.text = employee.name
addEmployeeView.email.text = employee.email
addEmployeeView.salary.text = String(employee.salary ?? 0.0)
navigationItem.rightBarButtonItem = UIBarButtonItem(title: "Save", style: .plain, target: self, action: #selector(updateEmployee))
} else {
navigationItem.rightBarButtonItem = UIBarButtonItem(title: "Save", style: .plain, target: self, action: #selector(createEmployee))
}
}
@objc func createEmployee() {
if(validate()) {
employeeService.createEmployee(employee: employee){ (res) in
switch res {
case .success(_):
NotificationCenter.default.post(name: Notification.Name("reloadNotification"), object: nil)
self.navigationController?.popViewController(animated: true)
case .failure(_):
self.showAlert(withTitle: "Network Error",
withMessage: "Failed to create Employee",
parentController: self,
okBlock: {},
cancelBlock: nil)
}
}
}
}
@objc func updateEmployee() {
if(validate()) {
employeeService.updateEmployee(id: employee.id!, employee: employee){ (res) in
switch res {
case .success(_):
NotificationCenter.default.post(name: Notification.Name("reloadNotification"), object: nil)
self.navigationController?.popViewController(animated: true)
case .failure(_):
self.showAlert(withTitle: "Network Error",
withMessage: "Failed to update Employee",
parentController: self,
okBlock: {},
cancelBlock: nil)
}
}
}
}
func validate() -> Bool {
if(addEmployeeView.name.text!.isEmpty) {
showAlert(withTitle: "Failed to add Employee",
withMessage: "Name is required.",
parentController: self,
okBlock: {},
cancelBlock: nil)
return false
}
employee.name = addEmployeeView.name.text
if(addEmployeeView.email.text!.isEmpty) {
showAlert(withTitle: "Failed to add Employee",
withMessage: "Email is required.",
parentController: self,
okBlock: {},
cancelBlock: nil)
return false
}
employee.email = addEmployeeView.email.text
if(addEmployeeView.salary.text!.isEmpty) {
showAlert(withTitle: "Failed to add Employee",
withMessage: "Salary is required.",
parentController: self,
okBlock: {},
cancelBlock: nil)
return false
}
employee.salary = Double(addEmployeeView.salary.text ?? "0.0")
return true
}
}
extension UIViewController {
func showAlert(withTitle title : String, withMessage message: String?, parentController parent : UIViewController, okBlock : @escaping () -> (), cancelBlock : (() -> ())?) {
let alert : UIAlertController = UIAlertController(title: title, message: message, preferredStyle: UIAlertController.Style.alert)
let okAction : UIAlertAction = UIAlertAction(title: "OK", style: UIAlertAction.Style.default) { (alert : UIAlertAction) in
okBlock()
}
if (cancelBlock != nil) {
let cancelAction : UIAlertAction = UIAlertAction(title: "Cancel", style: UIAlertAction.Style.default) { (alert : UIAlertAction) in
cancelBlock!()
}
alert.addAction(cancelAction)
}
alert.addAction(okAction)
parent.present(alert, animated: true) {
}
}
}
List VC: used to list and delete data.
x
import UIKit
class EmployeeListVC: UIViewController {
var employeeTable = UITableView()
var employeeService = EmployeeService()
var employees: [Employee] = []
var searchBar = UISearchBar()
var isSearching: Bool = false
var searchResults: [Employee] = []
let refreshControl = UIRefreshControl()
override func viewDidLoad() {
super.viewDidLoad()
navigationItem.title = "Employee"
navigationItem.rightBarButtonItem = UIBarButtonItem(title: "Add", style: .plain, target: self, action: #selector(create))
NotificationCenter.default.addObserver(self, selector: #selector(reload), name: Notification.Name("reloadNotification"), object: nil)
self.setupSearchBar()
self.setupEmployeeTable()
self.getAllEmployees()
}
@objc func refresh(sender: UIRefreshControl){
self.getAllEmployees()
sender.endRefreshing()
}
@objc func reload(notification: NSNotification){
self.getAllEmployees()
}
@objc func create() {
let addEmployeeVC = AddEmployeeVC()
addEmployeeVC.title = "Add Employee"
self.navigationController?.pushViewController(addEmployeeVC, animated: true)
}
func getAllEmployees() {
employeeService.getAllEmployees() { (res) in
switch res {
case .success(let employees):
self.employees = employees
self.employeeTable.reloadData()
case .failure(_):
self.showAlert(withTitle: "Network Error",
withMessage: "Failed to get Employee:",
parentController: self,
okBlock: {},
cancelBlock: nil)
}
}
}
func deleteEmployee(id: Int) {
employeeService.deleteEmployee(id: id) { (res) in
switch res {
case .success(_):
self.getAllEmployees()
case .failure(_):
self.showAlert(withTitle: "Network Error",
withMessage: "Failed to delete Employee:",
parentController: self,
okBlock: {},
cancelBlock: nil)
}
}
}
func setupSearchBar() {
view.addSubview(searchBar)
searchBar.delegate = self
searchBar.anchor(top: view.safeAreaLayoutGuide.topAnchor, bottom: nil, left: view.leftAnchor, right: view.rightAnchor)
searchBar.placeholder = " Search..."
searchBar.delegate = self
}
func setupEmployeeTable() {
view.addSubview(employeeTable)
setEmployeeTableDelegates()
employeeTable.frame = self.view.frame
employeeTable.rowHeight = UITableView.automaticDimension
employeeTable.register(EmployeeCell.self, forCellReuseIdentifier: "EmployeeCell")
employeeTable.refreshControl = refreshControl
refreshControl.addTarget(self, action: #selector(refresh), for: .valueChanged)
employeeTable.anchor(top: searchBar.bottomAnchor, bottom: view.bottomAnchor, left: view.leftAnchor, right: view.rightAnchor)
}
func setEmployeeTableDelegates() {
employeeTable.delegate = self
employeeTable.dataSource = self
}
func dismissKeyboard() {
self.view.endEditing(true)
}
}
extension EmployeeListVC: UITableViewDataSource, UITableViewDelegate, UISearchBarDelegate {
func tableView(_ tableView: UITableView, numberOfRowsInSection section: Int) -> Int {
if(isSearching){
return searchResults.count
}
return employees.count
}
func tableView(_ tableView: UITableView, cellForRowAt indexPath: IndexPath) -> UITableViewCell {
let cell = employeeTable.dequeueReusableCell(withIdentifier: "EmployeeCell") as! EmployeeCell
let employee = employees[indexPath.row]
if(isSearching){
cell.setEmployee(employee: searchResults[indexPath.row])
} else {
cell.setEmployee(employee: employee)
}
return cell
}
func tableView(_ tableView: UITableView, trailingSwipeActionsConfigurationForRowAt indexPath: IndexPath) -> UISwipeActionsConfiguration? {
let delete = UIContextualAction(style: .destructive, title: "Delete", handler: { (action, view, success) in
let employeeId = self.employees[indexPath.row].id
self.deleteEmployee(id: employeeId ?? 0)
})
return UISwipeActionsConfiguration(actions: [delete])
}
func tableView(_ tableView: UITableView, didSelectRowAt indexPath: IndexPath) {
let addEmployeeVC = AddEmployeeVC()
addEmployeeVC.employee = self.employees[indexPath.row]
addEmployeeVC.title = "Edit Employee"
self.navigationController?.pushViewController(addEmployeeVC, animated: true)
}
func searchBar(_ searchBar: UISearchBar, textDidChange textSearched: String) {
if(textSearched == "") {
dismissKeyboard()
isSearching = false
employeeTable.reloadData()
} else {
isSearching = true
searchResults = employees.filter {
$0.name!.range(of: textSearched, options: .caseInsensitive) != nil
}
employeeTable.reloadData()
}
}
}
Service: service layer that uses Alamofire to handle the API requests.
x
import UIKit
import Alamofire
class EmployeeService {
var url = "http://localhost:8080/employee/"
func getAllEmployees(completion: @escaping (Result<[Employee], Error>) -> ()) {
var request = URLRequest(url: URL(string: url)!)
request.httpMethod = HTTPMethod.get.rawValue
request.setValue("application/json", forHTTPHeaderField: "Content-Type")
AF.request(request).validate(statusCode: 200..<300).responseJSON { response in
if let err = response.error {
completion(.failure(err))
return
}
do {
let employees = try JSONDecoder().decode([Employee].self, from: response.data!)
completion(.success(employees))
} catch let jsonError {
completion(.failure(jsonError))
}
}.resume()
}
func createEmployee(employee: Employee, completion: @escaping (Result<Int, Error>) -> ()) {
let encoder = JSONEncoder()
let data = try! encoder.encode(employee)
var request = URLRequest(url: URL(string: url)!)
request.httpMethod = HTTPMethod.post.rawValue
request.setValue("application/json", forHTTPHeaderField: "Content-Type")
request.httpBody = data
AF.request(request).validate(statusCode: 200..<300).responseJSON { response in
if let err = response.error {
completion(.failure(err))
return
}
completion(.success(1))
}.resume()
}
func updateEmployee(id: Int, employee: Employee, completion: @escaping (Result<Int, Error>) -> ()) {
let encoder = JSONEncoder()
let data = try! encoder.encode(employee)
var request = URLRequest(url: URL(string: url + String(id))!)
request.httpMethod = HTTPMethod.put.rawValue
request.setValue("application/json", forHTTPHeaderField: "Content-Type")
request.httpBody = data
AF.request(request).validate(statusCode: 200..<300).responseJSON { response in
if let err = response.error {
completion(.failure(err))
return
}
completion(.success(1))
}.resume()
}
func deleteEmployee(id: Int, completion: @escaping (Result<Int, Error>) -> ()) {
var request = URLRequest(url: URL(string: url + String(id))!)
request.httpMethod = HTTPMethod.delete.rawValue
AF.request(request).validate(statusCode: 200..<300).responseJSON { response in
if let err = response.error {
completion(.failure(err))
return
}
completion(.success(1))
}.resume()
}
}
Now let's add the generated code to the project, you can press on Download Generated Code under the generated code section in CodeGen, then add the downloaded files to the project app folder, or you can copy-paste the generated code to the project. (Please note the file name should match the class name with .swift extension)
Add the EmployeeListViewController to a navigation bar in the TabBar class.
x
let employeeVC = UINavigationController(rootViewController: EmployeeListVC())
employeeVC.tabBarItem.title = "Employee"
viewControllers = [homeVC, employeeVC]
To keep the project simple and easy to maintain, divide it into groups (AddView, AddViewController, CellView, ListViewController, Model, Service).
To run the app, use one of the simulators provided, and press run.

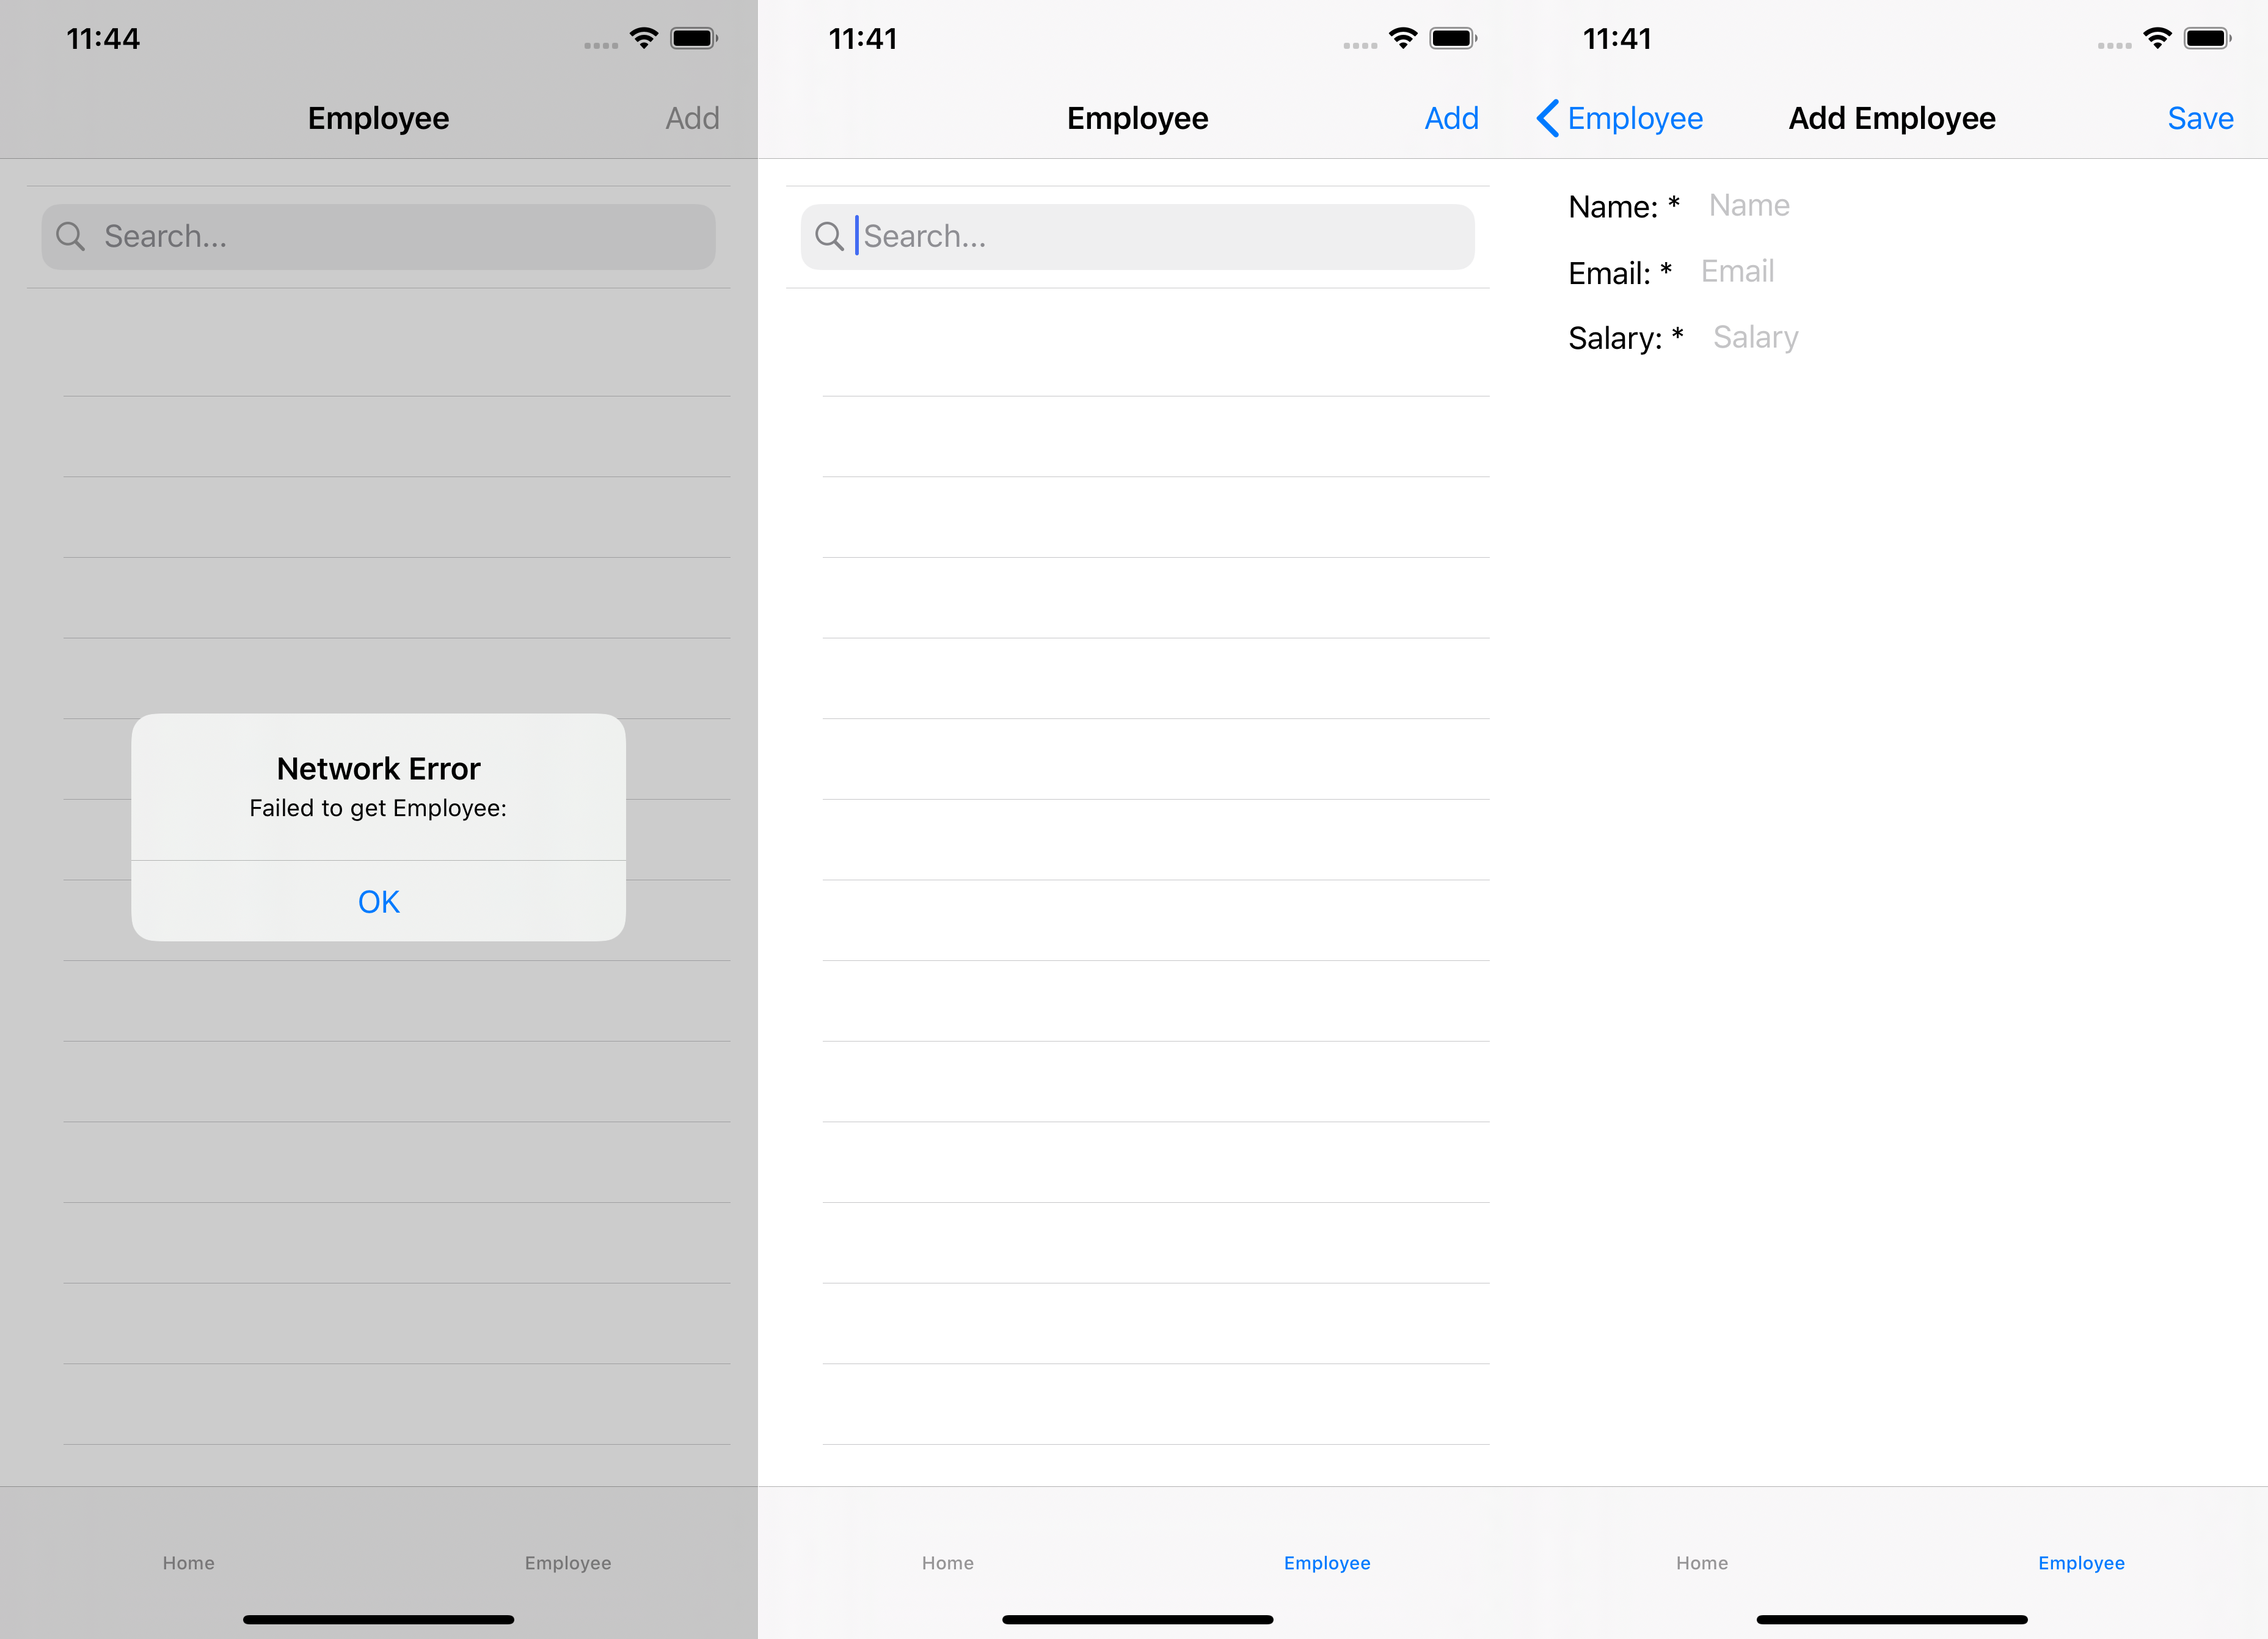
Running the application displays the two tab items Home and Employee. The Employee tab contains a table to list all the employees, search bar, and a button to add a new employee.
As soon as you access the Employee tab, you get a Network error because we still don't have an API to handle the requests.

Create Spring Boot Rest API
Spring Boot reduces lots of development time and increases productivity. It avoids writing lots of boilerplate Codes, Annotations, and XML Configuration, however, just to get started, a lot of code is needed, but don't worry, Clowiz supports Spring Boot, and can generate the code for our API in a minute.
Prerequisite:
Create a new Spring Boot project using Spring Initializr:
- Leave the default settings as Maven Project, Java, and the version.
- In the Group field type: com.app
- In the Artifact field type: iosBackend
- From the Options, change the package name to com.app
- Search and add the following dependencies:
- Spring web
- Spring Data JPA
- MySQL Driver
- Press on Generate to download the project.
Using any eclipse based IDE:
- Import the downloaded project. (File -> Import -> Existing Maven Project)
- Add the following to the "application.properties" file in the "src/main/resources package".
x
# Local IP Address
server.address=127.0.0.1
spring.jpa.hibernate.ddl-auto=update
# MySQL Config
spring.datasource.url=jdbc:mysql://localhost:3306/employee?createDatabaseIfNotExist=true
spring.datasource.username=mysqlUserName
spring.datasource.password=mysqlPassword
We don't have to create a database manually; Spring JPA does that automatically, note the parameter createDatabaseIfNotExist = true in the database URL.
Generate Spring Boot Artifacts
Back to Clowiz, press on the Spring Boot icon in the technologies section to generate the needed source code for the API.
For this tutorial, use the following generated artifacts:

Hibernate JPA Entity (The model).
xxxxxxxxxx
package com.app.models;
import javax.persistence.*;
(name="employee")
public class Employee{
(name="id")
(strategy = GenerationType.IDENTITY)
Integer id;
(name="name" , nullable=false)
String name;
(name="email" , nullable=false)
String email;
(name="salary" , nullable=false)
Double salary;
public void setId(Integer id){
this.id=id;
}
public Integer getId(){
return this.id;
}
public void setName(String name){
this.name=name;
}
public String getName(){
return this.name;
}
public void setEmail(String email){
this.email=email;
}
public String getEmail(){
return this.email;
}
public void setSalary(Double salary){
this.salary=salary;
}
public Double getSalary(){
return this.salary;
}
public String toString(){
StringBuffer buf=new StringBuffer();
buf.append(this.name).append(" ");
return buf.toString();
}
public boolean equals(Object obj) {
if (obj == null) {
return false;
}
return this.getId() == ((Employee) obj).getId();
}
}
SpringData Service.
xxxxxxxxxx
package com.app.repositories;
import java.util.List;
import org.springframework.data.jpa.repository.JpaRepository;
import org.springframework.stereotype.Service;
import com.app.models.Employee;
public interface EmployeeService extends JpaRepository<Employee, Integer> {
public List<Employee> findByName(String name);
public List<Employee> findByEmail(String email);
public List<Employee> findBySalary(String salary);
}
Mature Spring RestController.
xxxxxxxxxx
package com.app.controllers;
import java.util.*;
import org.springframework.beans.factory.annotation.Autowired;
import org.springframework.http.*;
import org.springframework.web.bind.annotation.*;
import com.app.models.Employee;
import com.app.repositories.EmployeeService;
("/employee")
public class EmployeeController {
EmployeeService employeeService;
(method = RequestMethod.OPTIONS)
ResponseEntity<?> options() {
// @formatter:off
return ResponseEntity.ok().allow(
HttpMethod.GET,
HttpMethod.POST,
HttpMethod.HEAD,
HttpMethod.OPTIONS,
HttpMethod.PUT,
HttpMethod.DELETE).
build();
// @formatter:on
}
public ResponseEntity<List<Employee>> getAll() {
return ResponseEntity.ok(this.employeeService.findAll());
}
public ResponseEntity<Employee> insert( Employee employee) {
Employee save = this.employeeService.save(employee);
return ResponseEntity.ok(save);
}
(value = "/{id}")
public ResponseEntity<Employee> find(("id") int id) {
Optional<Employee> object = this.employeeService.findById(id);
if (object.isPresent()) {
return ResponseEntity.ok(object.get());
}
return ResponseEntity.status(HttpStatus.NOT_FOUND).build();
}
(value="/{id}")
public ResponseEntity<Employee> delete( int id){
Optional<Employee> object = this.employeeService.findById(id);
if(object.isPresent()) {
this.employeeService.deleteById(id);
return ResponseEntity.noContent().build();
}
return ResponseEntity.status(HttpStatus.NOT_FOUND).build();
}
(value="/{id}")
public ResponseEntity<Employee> save( int id, Employee employee){
Optional<Employee> object = this.employeeService.findById(id);
if(object.isPresent()) {
employee.setId(id);
this.employeeService.save(employee);
return ResponseEntity.noContent().build();
}
return ResponseEntity.status(HttpStatus.NOT_FOUND).build();
}
}
As we did in the iOS project, copy-paste the generated code to the right packages with the correct classes names, or you can download it by pressing Download Generated Code.
To keep the project simple and easy to maintain, divide it into packages (controllers, models, repositories).
Check that the URL in the iOS Service class matches with the Spring Boot properties file server IP.
To run the project, open the IosBackendApplication.java class, right-click and Run As Java Application.
You can test it using any tool like Postman, or using any browser, visit: http://127.0.0.1/employee this should return an empty list [] as we don't have any data in the database.
Running the App
After running the Spring Boot API, rerun the iOS project.
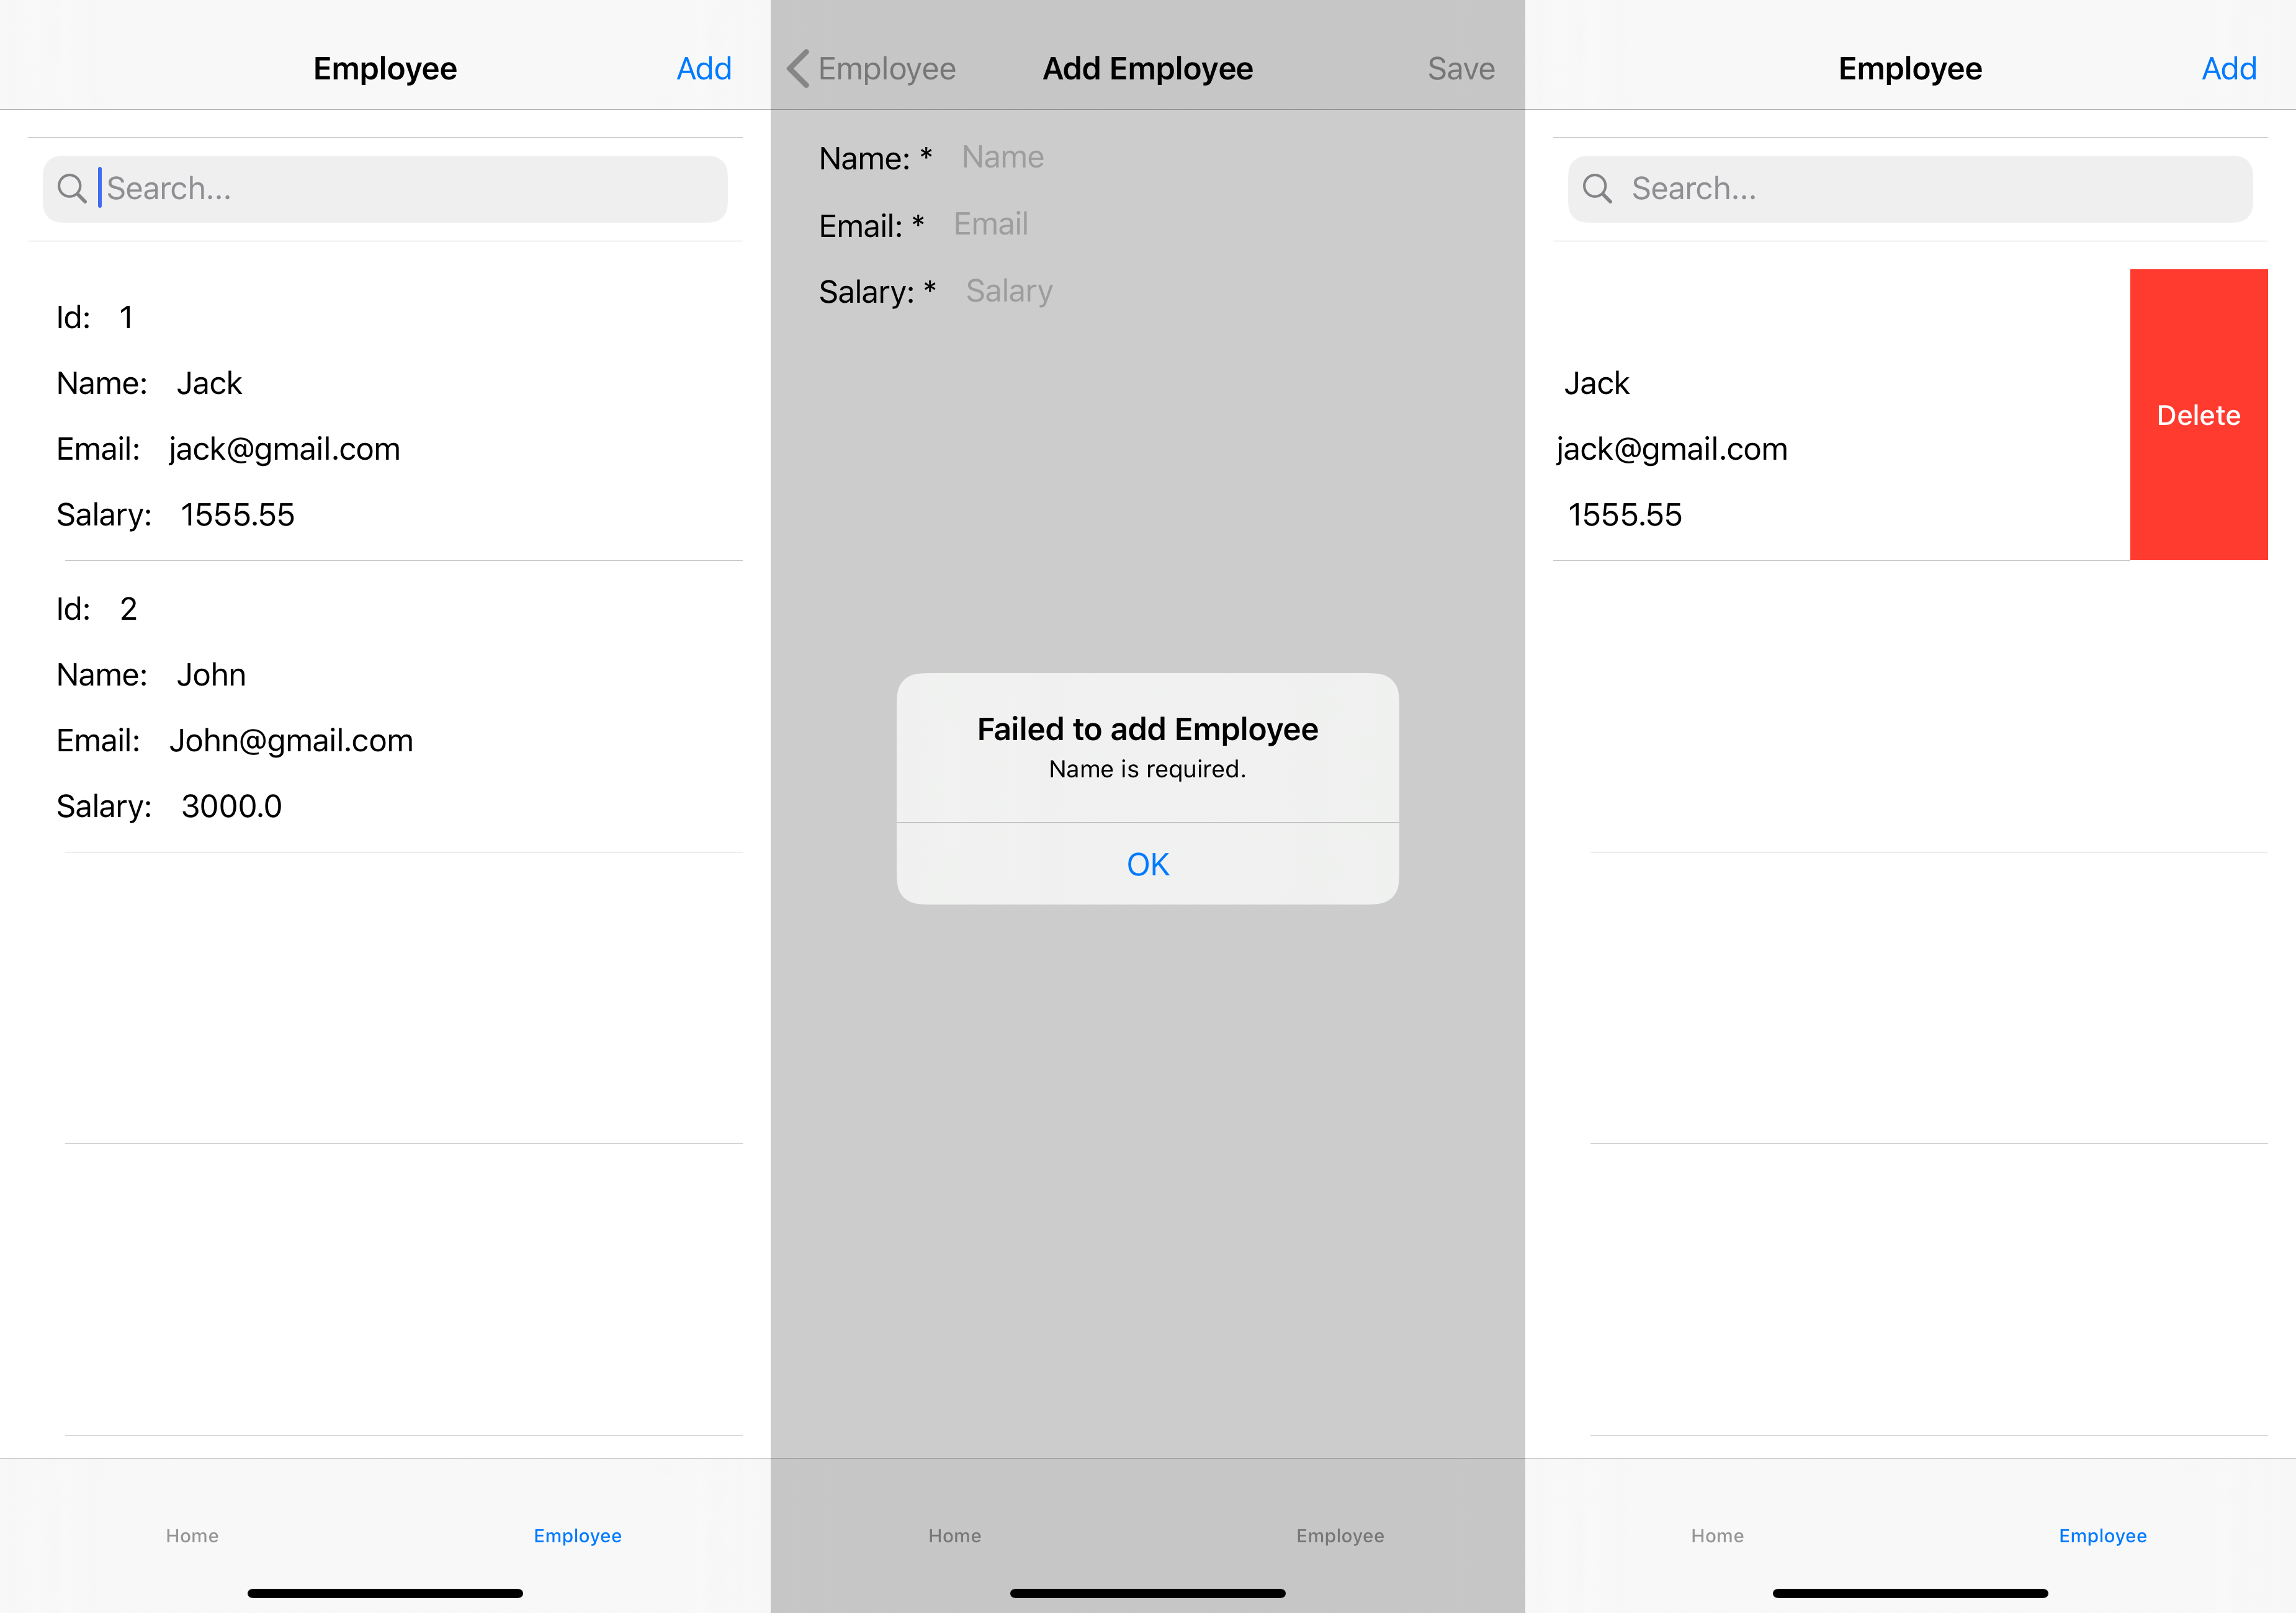
- Go to the Employee tab
- Press on the Add button
- Fill in Employee data
- Press on save
- Tap on a row to edit it
- Swipe a row to delete it

Opinions expressed by DZone contributors are their own.

Comments