Prototype for a Java Database Application With REST and Security
Prototype for a Java database application with REST and security using Spring Boot and containers for testing, using Keycloak for security and PostgreSQL for persistence.
Join the DZone community and get the full member experience.
Join For FreeMany times, while developing at work, I needed a template for a simple application from which to start adding specific code for the project at hand.
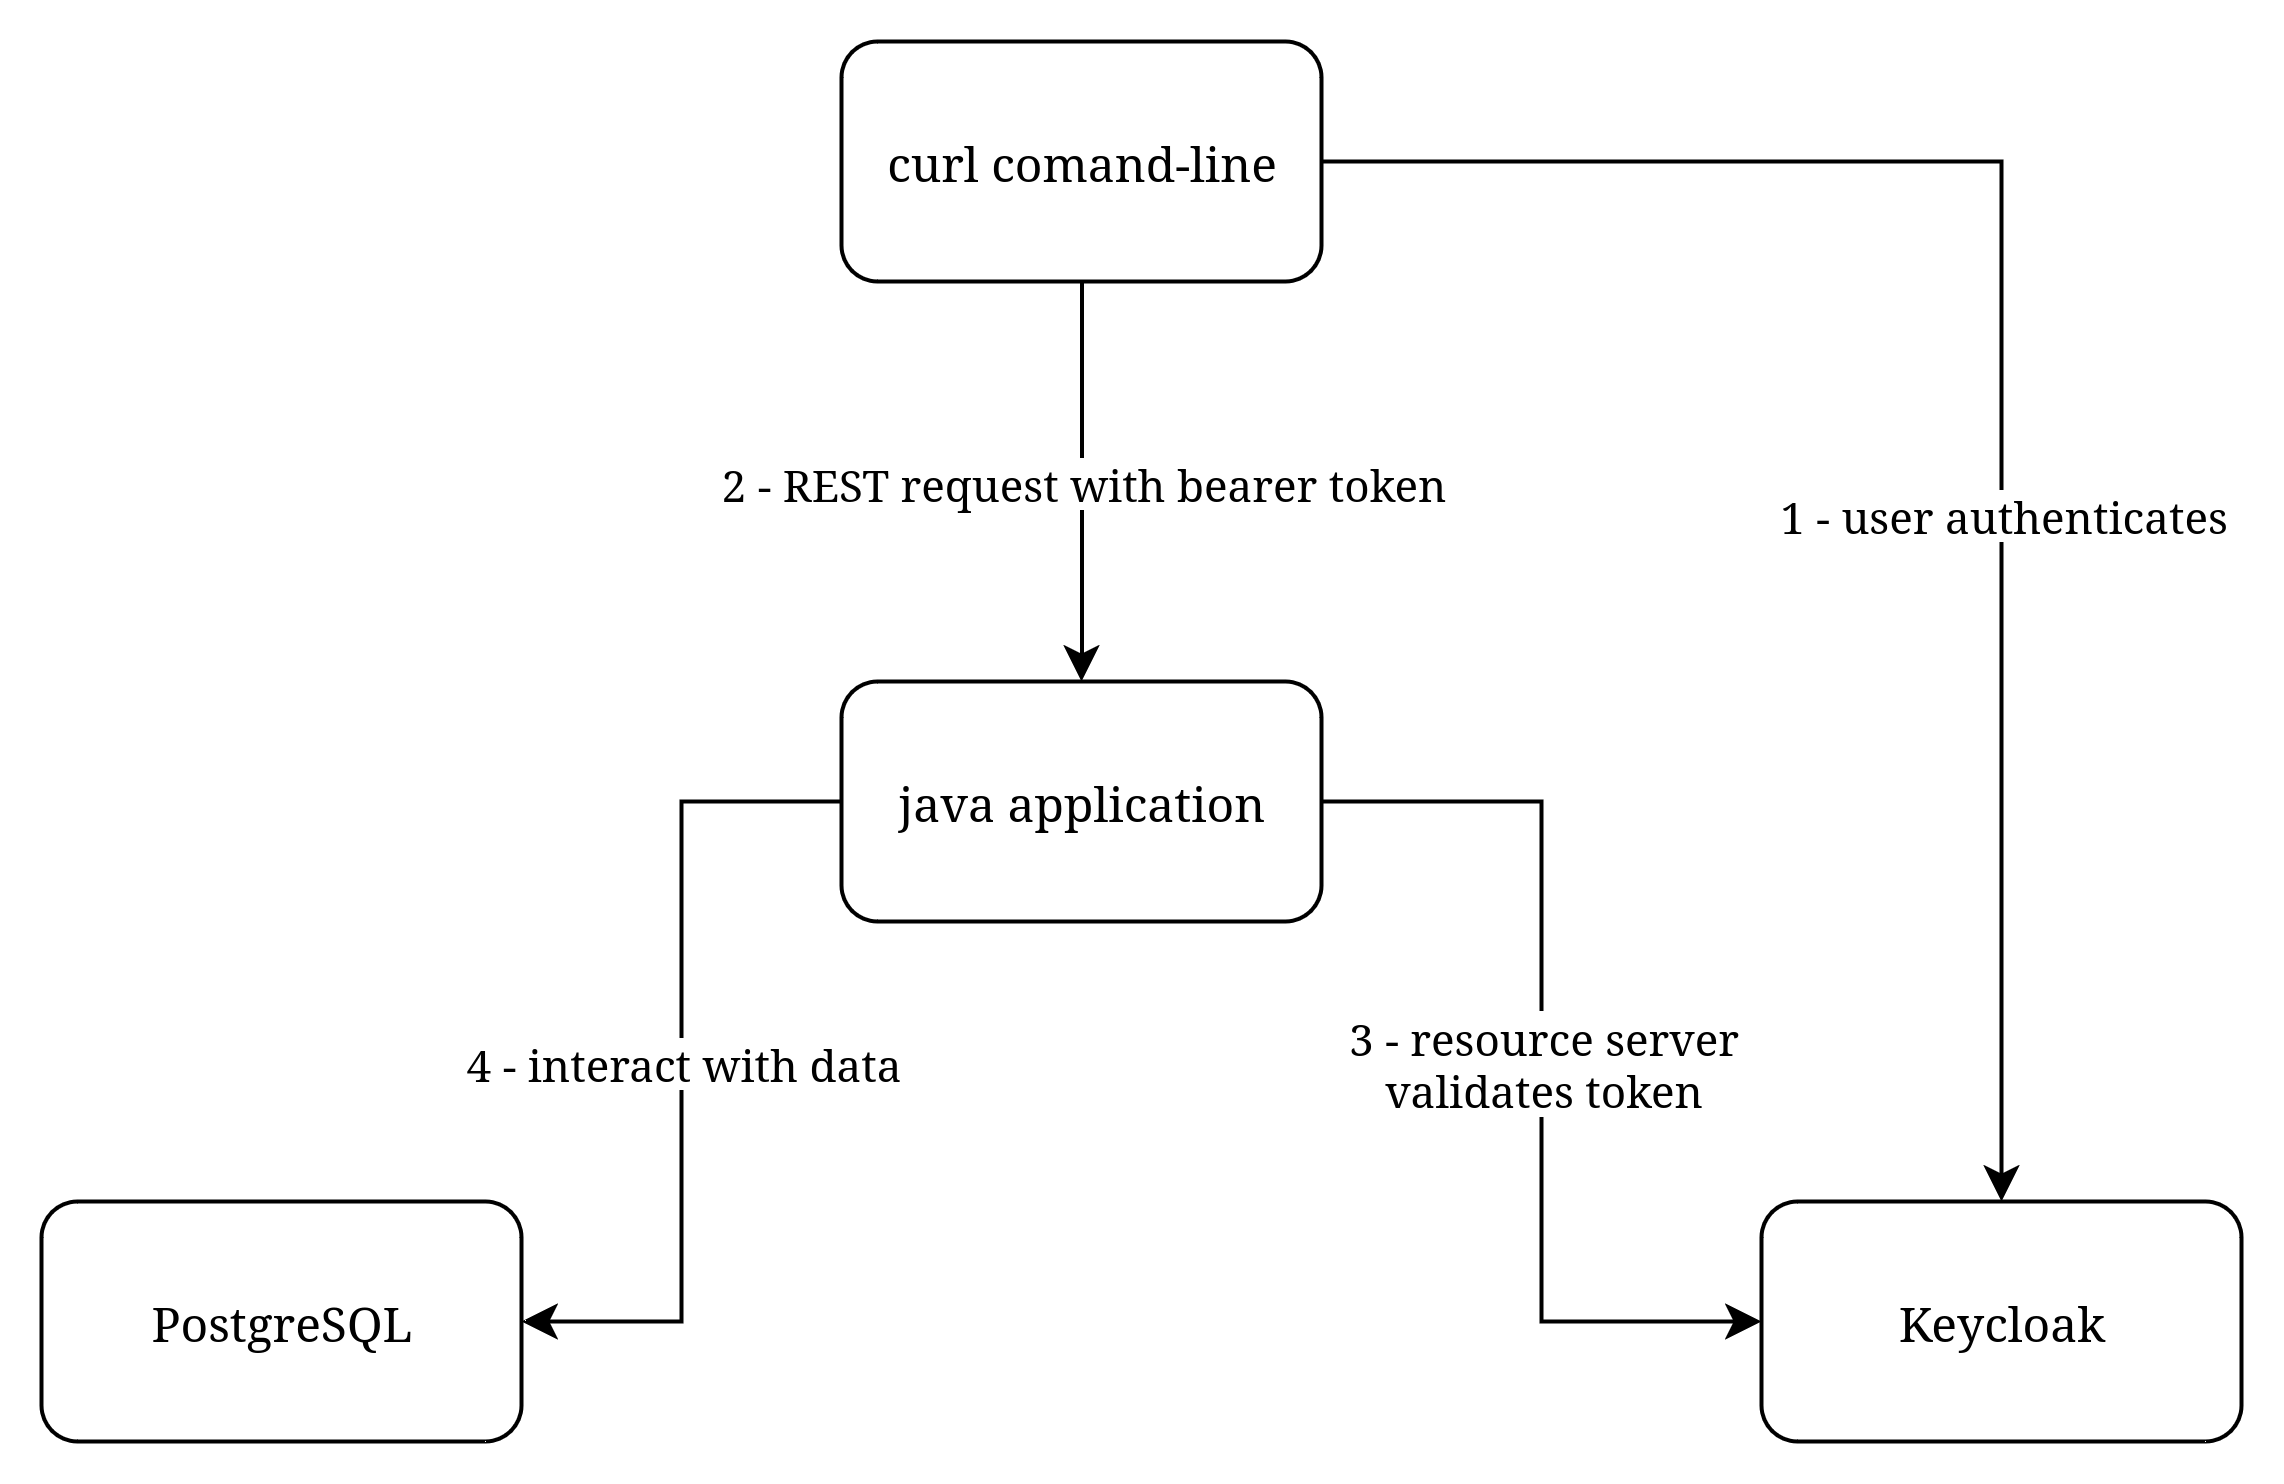
In this article, I will create a simple Java application that connects to a database, exposes a few rest endpoints and secures those endpoints with role based access.
The purpose is to have a minimal and fully working application that can then be customized for a particular task.
For the databases, we will use PostgreSQL and for security, we will go with Keycloak, both deployed in containers. During development, I used podman to test that the containers are created correctly (an alternative to docker—they are interchangeable for the most part) as a learning experience.
The application itself is developed using the Spring Boot framework with Flyway for database versioning.
All of these technologies are industry standards in the Java EE world with a high chance to be used in a project.
The requirement around which to build our prototype is a library application that exposes REST endpoints allowing the creation of authors, books, and the relationships between them. This will allow us to implement a many-to-many relationship that can then be expanded for any purpose imaginable.
The fully working application can be found at https://github.com/ghalldev/db_proto
The code snippets in this article are taken from that repository.
Before creating the containers be sure to define the following environment variables with your preferred values (they are ommitted on purpose in the tutorial to avoid propagating default values used by multiple users):
DOCKER_POSTGRES_PASSWORD
DOCKER_KEYCLOAK_ADMIN_PASSWORD
DOCKER_GH_USER1_PASSWORD
Configure PostgreSQL:
docker container create --name gh_postgres --env POSTGRES_PASSWORD=$DOCKER_POSTGRES_PASSWORD --env POSTGRES_USER=gh_pguser --env POSTGRES_INITDB_ARGS=--auth=scram-sha-256 --publish 5432:5432 postgres:17.5-alpine3.22
docker container start gh_postgres
Configure Keycloak:
- first is the container creation and start:
docker container create --name gh_keycloak --env DOCKER_GH_USER1_PASSWORD=$DOCKER_GH_USER1_PASSWORD --env KC_BOOTSTRAP_ADMIN_USERNAME=gh_admin --env KC_BOOTSTRAP_ADMIN_PASSWORD=$DOCKER_KEYCLOAK_ADMIN_PASSWORD --publish 8080:8080 --publish 8443:8443 --publish 9000:9000 keycloak/keycloak:26.3 start-dev
docker container start gh_keycloak- after the container is up and running, we can go ahead and create the realm, user and roles (these command must to be run inside the running container):
cd $HOME/bin
./kcadm.sh config credentials --server http://localhost:8080 --realm master --user gh_admin --password $KC_BOOTSTRAP_ADMIN_PASSWORD
./kcadm.sh create realms -s realm=gh_realm -s enabled=true
./kcadm.sh create users -s username=gh_user1 -s email="[email protected]" -s firstName="gh_user1firstName" -s lastName="gh_user1lastName" -s emailVerified=true -s enabled=true -r gh_realm
./kcadm.sh set-password -r gh_realm --username gh_user1 --new-password $DOCKER_GH_USER1_PASSWORD
./kcadm.sh create roles -r gh_realm -s name=viewer -s 'description=Realm role to be used for read-only features'
./kcadm.sh add-roles --uusername gh_user1 --rolename viewer -r gh_realm
./kcadm.sh create roles -r gh_realm -s name=creator -s 'description=Realm role to be used for create/update features'
./kcadm.sh add-roles --uusername gh_user1 --rolename creator -r gh_realm
ID_ACCOUNT_CONSOLE=$(./kcadm.sh get clients -r gh_realm --fields id,clientId | grep -B 1 '"clientId" : "account-console"' | grep -oP '[0-9a-f]{8}-([0-9a-f]{4}-){3}[0-9a-f]{12}')
./kcadm.sh update clients/$ID_ACCOUNT_CONSOLE -r gh_realm -s 'fullScopeAllowed=true' -s 'directAccessGrantsEnabled=true'
The user gh_user1 is created in the realm gh_realm with the roles viewer and creator.
You may have noticed that instead of creating a new client we are using one of the default clients that come with Keycloak: account-console. This is for convenience reasons, in a real scenario you would create a specific client which would then be updated to have fullScopeAllowed(causes the realm roles to be added to the token - not added by default) and directAccessGrantsEnabled(allows token to be generated by using the openid-connect/token endpoint, from Keycloak, in our case with curl).
The created roles can then be used inside the Java application to restrict access to certain functionality according to our agreed contract—the viewer can only access read-only operations while creator can do create, update and delete. Of course, in the same style all kinds of roles can be created for whatever reasons, as long as the agreed contract is well-defined and understood by everyone.
The roles can be further added to groups, but that is not included in this tutorial.
But before being able to actually use the roles, we have to tell the Java application how to extract the roles—this is needed since the way Keycloak adds the roles to the JWT is particular to it so we have to write a piece of custom code to translate them in something Spring Security can use:
@Bean
    public JwtAuthenticationConverter jwtAuthenticationConverter() {
        //follow the same pattern as org.springframework.security.oauth2.server.resource.authentication.JwtGrantedAuthoritiesConverter
        Converter<Jwt, Collection<GrantedAuthority>> keycloakRolesConverter = new Converter<>() {
            private static final String DEFAULT_AUTHORITY_PREFIX = "ROLE_";
            //https://github.com/keycloak/keycloak/blob/main/services/src/main/java/org/keycloak/protocol/oidc/TokenManager.java#L901
            private static final String KEYCLOAK_REALM_ACCESS_CLAIM_NAME = "realm_access";
            private static final String KEYCLOAK_REALM_ACCESS_ROLES = "roles";

            @Override
            public Collection<GrantedAuthority> convert(Jwt source) {
                Collection<GrantedAuthority> grantedAuthorities = new ArrayList<>();
                Map<String, List<String>> realmAccess = source.getClaim(KEYCLOAK_REALM_ACCESS_CLAIM_NAME);
                if (realmAccess == null) {
                    logger.warn("No " + KEYCLOAK_REALM_ACCESS_CLAIM_NAME + " present in the JWT");
                    return grantedAuthorities;
                }
                List<String> roles = realmAccess.get(KEYCLOAK_REALM_ACCESS_ROLES);
                if (roles == null) {
                    logger.warn("No " + KEYCLOAK_REALM_ACCESS_ROLES + " present in the JWT");
                    return grantedAuthorities;
                }
                roles.forEach(
                        role -> grantedAuthorities.add(new SimpleGrantedAuthority(DEFAULT_AUTHORITY_PREFIX + role)));

                return grantedAuthorities;
            }

        };
        JwtAuthenticationConverter jwtAuthenticationConverter = new JwtAuthenticationConverter();
        jwtAuthenticationConverter.setJwtGrantedAuthoritiesConverter(keycloakRolesConverter);

        return jwtAuthenticationConverter;
    }
There are other important configurations done in the AppConfiguration class, like enabling method security and disabling csrf.
Now we can use the annotation org.springframework.security.access.prepost.PreAuthorize in the REST controller to restrict access:
@PostMapping("/author")
@PreAuthorize("hasRole('creator')")
public void addAuthor(@RequestParam String name, @RequestParam String address) {
  authorService.add(new AuthorDto(name, address));
}

@GetMapping("/author")
@PreAuthorize("hasRole('viewer')")
public String getAuthors() {
  return authorService.allInfo();
}
In this way, only users that are authenticated successfully and have the roles list in hasRole can call the endpoints, otherwise they will get an HTTP 403 Forbidden error.
After the containers have started and are configured, the Java application can start but not before adding the database password—this can be done with an env variable (below is a linux shell example):
export SPRING_DATASOURCE_PASSWORD=$DOCKER_POSTGRES_PASSWORDAnd now, if all is up and running corectly, we can use curl to test out application(all the commands below are linux shell).
Logging in with the previously created user gh_user1 and extracting the authentication token:
KEYCLOAK_ACCESS_TOKEN=$(curl -d 'client_id=account-console' -d 'username=gh_user1' -d "password=$DOCKER_GH_USER1_PASSWORD" -d 'grant_type=password' 'http://localhost:8080/realms/gh_realm/protocol/openid-connect/token' | grep -oP '"access_token":"\K[^"]*')Creating a new author (this will test that the creator role works):
curl -X POST --data-raw 'name="GH_name1"&address="GH_address1"' -H "Authorization: Bearer $KEYCLOAK_ACCESS_TOKEN" 'localhost:8090/library/author'Retrieving all the authors in the library (this will test that the viewer role works):
curl -X GET -H "Authorization: Bearer $KEYCLOAK_ACCESS_TOKEN" 'localhost:8090/library/author'And with this you should have all that is needed to create your own Java application, expanding and configuring it as needed.
Opinions expressed by DZone contributors are their own.
Comments