K8s KnowHow: Running Your First Pod
For those new to Kubernetes, an ideal place to start is by understanding and exploring the smallest unit of deployment, the pod.
Join the DZone community and get the full member experience.
Join For FreeIn K8S, a pod is the smallest deployment unit. It’s the collection of one or more containers (preferably one container). All the containers packed in the pod share the same storage, network, and specifications of how to run the container. Let me make it simpler: running a pod represents a process and that's it.
For Java world developers, let me give you the other perspective of a pod. In simple terms, a pod is nothing but an execution environment consisting of JVM running the base container and other services to work with the K8S ecosystem. A pod is just a wrapper on the top of JVM. In the pre-container world, imagine you have virtual hosts on the physical node and different JVMs running on those virtual hosts. Now with K8S, a pod provides similar kind of isolation and abstraction in a quite elegant way with lightweight containers.
Having said this, let me elaborate on what a pod can do. In the example, I have used a simple Hello World Spring Boot application. Let's see how to run it inside K8S.
In order to so, we need a Kubernetes cluster and we will be using minikube for the same. In order to install minikube, refer to my article.
Let's start with the Spring Boot – Hello World application.
Navigate to https://start.spring.io/ and generate a web project.
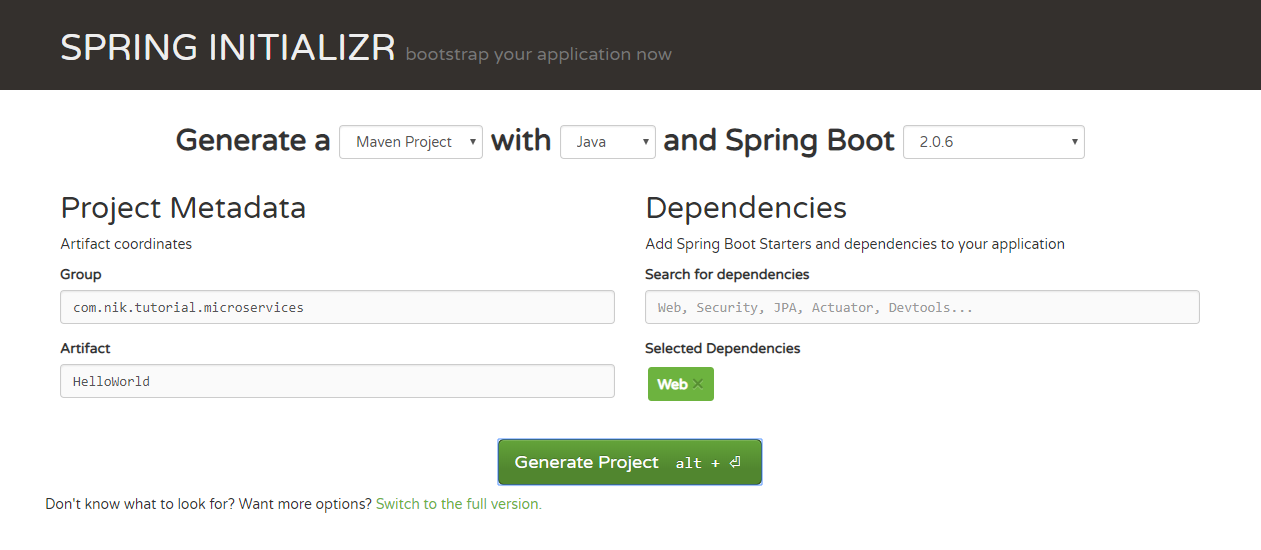
Import the project into IDE and add a simple REST controller.
Now Dockerize it and verify whether it’s running successfully. Optionally, you can upload this image to your Dockerhub. Otherwise, use the one from my Dockerhub.

Now comes the main part of the article. Here is the pod definition file.
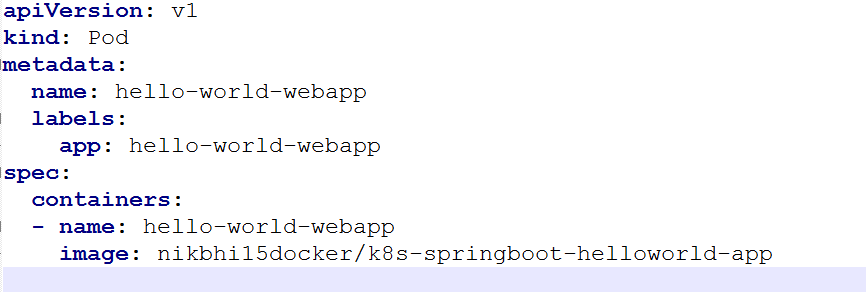
Now, you may find above DSL alien. Don’t worry. The purpose of this article is to explain it.
Tag |
Type |
Description |
apiVersion |
String |
Versioned schema of represented objects |
kind |
String |
REST resource that the object represents – ReplicaSet in this example |
metadata |
ObjectMeta |
Details about metadata of the object |
name |
metadata |
It’s a unique name within the namespace |
spec |
ReplicaSetSpec |
Spec defines the specification of the desired behavior of the ReplicaSet |
selector |
spec |
It's a |
matchLabels |
spec: selector |
|
app |
spec: selector: matchLabels |
It’s a key and value is hello-world-webapp |
replicas |
spec |
Replicas is the number of desired replica |
template |
spec: containers |
Object of PodTemplateSpec Template is the object that describes the pod that will be created if insufficient replicas are detected |
metadata |
spec: template |
It’s a key value pair |
labels |
spec: template: metadata |
Standard list metadata |
containers |
spec: template |
List of containers belonging to the pod. It’s the array of containers |
name |
spec: template: spec |
It’s the unique name of image. Name of the container specified as a DNS_LABEL |
image |
spec: template: spec:containers |
The image that the container is running |
To get more details about pod definition, navigate to Kubernetes official document link.
Now comes the fascinating part. Running replica set. Let's see how to do so.
I assume you have minikube running. Check the same using minikube status command.

Now apply this configuration in order to run the container.
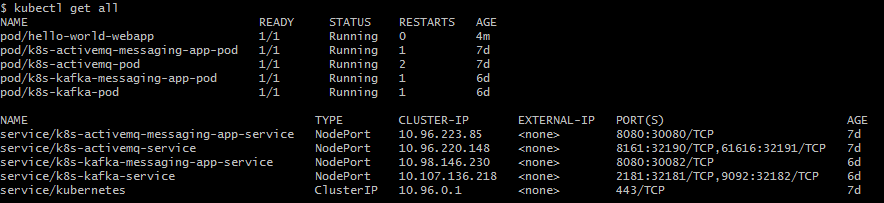
Check the status of the container and logs to ensure that everything went smoothly.

Congratulations! Now you have your first working. I know that you are eager to see that pod working.
So let’s try to access the welcome page. What happened? Our favorite 404 isn’t it?
Wait a moment! Have you tried with K8S cluster IP address? Yes, K8S cluster has a different IP address. Get the IP address with a command “ minikube ip ”. What is the result? Isn’t it 404 again?
In order to access the welcome page, we will need to use the service or deployment. Otherwise, it’s not possible to access service running on port 8080 of the container from outside as pods are not visible outside the cluster.

Now obviously there is a way to check the web application running on port 8080 of Hello World container. However, before we do so, have you observed one thing?
Check the name of the pod. Remember in our pod definition file, we used attribute name under metadata. Yes, you are absolutely right! The name of the pod, "pod/hello-world-webapp" comes from that spec only.
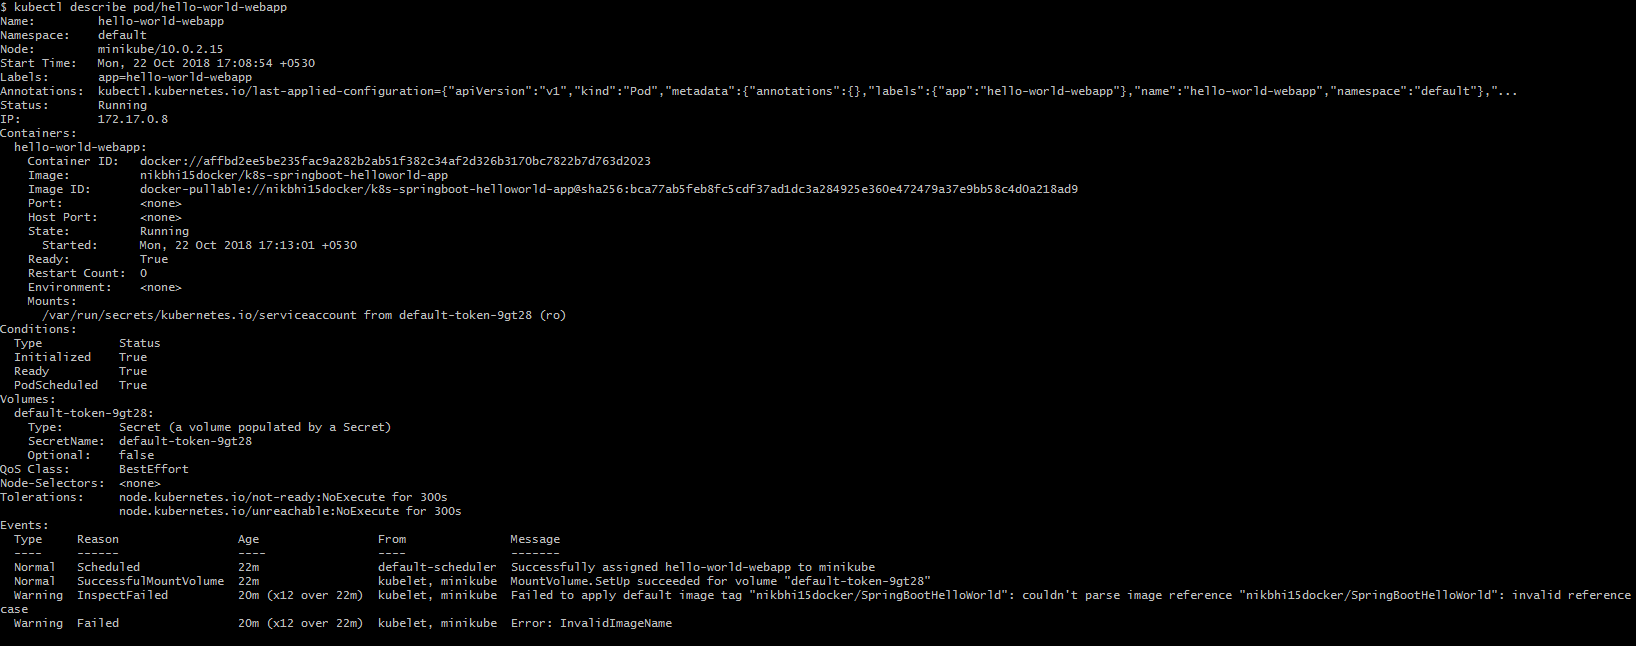
Even though it’s not possible to access web app running on port 8080 from outside, it’s possible to play around with the pod. Use the command kubectl describe pod/hello-world-webapp .
We can do one last thing with the pod. We can connect to the pod using exec command. Format of this command is – kubectl exec pod_name command_name . For example, ls command.

And we can use curl command to check whether web container that we have hosted is responding. We should get an HTML file as an output.
You can see that we have got an interactive shell prompt. Now let’s use wget to check the response from web container.

Our first pod is up and running now. In the next article, we will see how to expose this pod to the outside world so that welcome page can be accessed from outside.
The entire project is available on my GitHub.
Opinions expressed by DZone contributors are their own.
Comments