How to Implement Kill Switch Feature Flags in a Spring Boot Application
Kill switches are a type of feature flag that allows you to shut off features in your application quickly. Learn to use them in a Spring Boot app.
Join the DZone community and get the full member experience.
Join For FreeKill switches are a type of feature flag that allows you to shut off features in your application quickly. They are useful for:
- Emergency shutoffs of external APIs and services.
- Responding to unexpected spam or traffic spikes.
- Other operational incidents where you need to quickly put the brakes on without causing additional disruption.
In this tutorial, you will learn to add a kill switch to a Spring Boot application, using the LaunchDarkly Java SDK. This example will utilize the Motivational Messages API as a data source here since it’s free, doesn’t require authentication, and gives us the message we might need to read today.
Prerequisites
- Java Development Kit (JDK) version 11
- Maven 3.3 or newer
- IntelliJ IDEA Community Edition for convenient and fast Java project development. Scroll down to find the free Community Edition, which is sufficient for this tutorial.
Implementation
Create and Import a Spring Boot Project
This project utilizes a resource called Spring Initializr. This tool generates the basic structure of a Spring Boot project for developers to get started quickly.
Go to the Spring Initializr site. Under Project, choose "Maven" and then "Java" as the language. Note that this tutorial is built with Spring Boot version 3.4.3, so select the same version in Spring Initializr.
For the Project Metadata, change the name of the project listed in the Artifact section. Name this application artifact "springbootflags." Give the Name section the same name, as this is the display title that creates the entry point for the project.
Feel free to add a description for the project to help you organize better.
Choose "Jar" as the Packaging type, as the application will run in the embedded Tomcat server provided by Spring Boot, as well as Java version 17.
Refer to the image below to ensure your Spring project matches up.
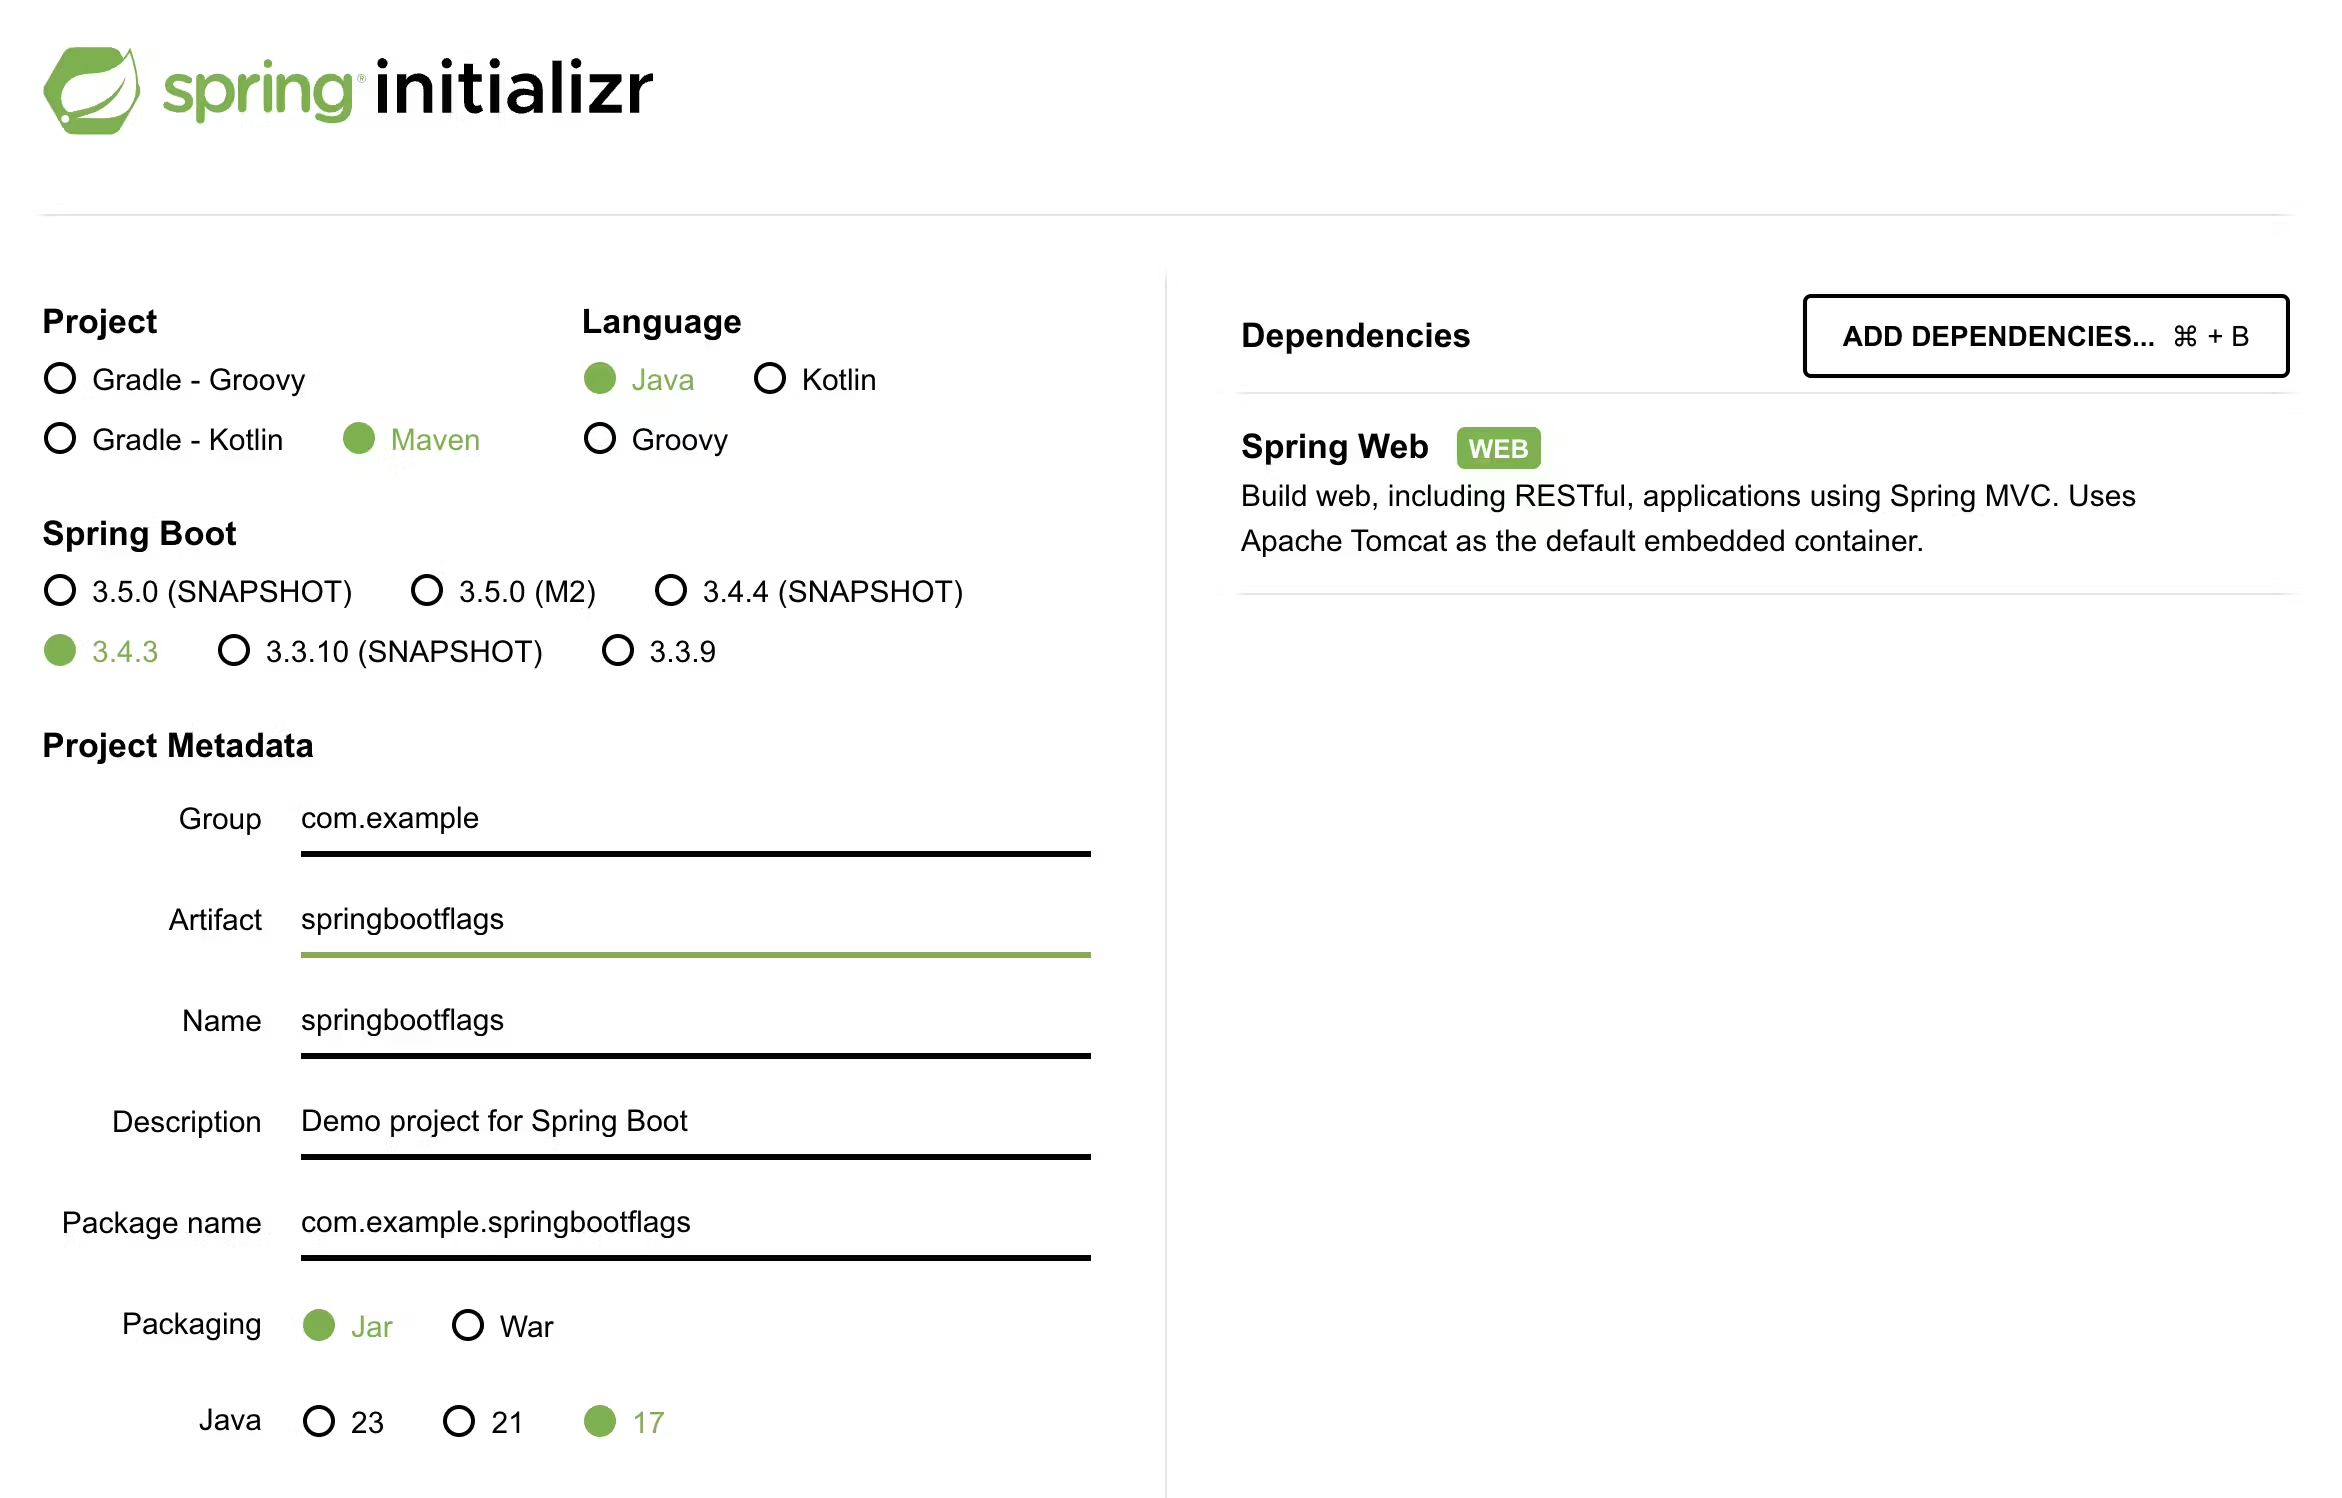
On the right-hand side, click on the "Add Dependencies" button and search for "Spring Web" under the Dependencies section.
Click on the "Generate" button at the bottom of the page, and the browser will download a .zip file containing the boilerplate code for the project. Extract the .zip file.
Open IntelliJ IDEA and open the root folder of the extracted contents from the springbootapp.zip folder. Click on Finish to import your project into your IDE.
Expand the com.example.springbootapp package to reveal a class file named SpringbootflagsApplication.java. This class exists to compile and execute the code later on in the article.
Notice that the pom.xml folder was also generated for your convenience with the information regarding the "Spring Web" dependency. The pom.xml file stands for Project Object Model, which is essential for Maven projects as it consists of metadata used to build the project. If you added more dependencies, they would be listed in this file as well.
Install the LaunchDarkly Java SDK
The Spring Boot application will utilize the Java SDK. Open the pom.xml page and scroll down to the list of dependencies. Add this within the dependencies bracket:
<dependency>
  <groupId>com.launchdarkly</groupId>
  <artifactId>launchdarkly-java-server-sdk</artifactId>
  <version>7.0.0</version>
</dependency>
Look at the top-right corner of the IntelliJ IDEA window and find the little icon with an "M" shape with a little blue recycle logo on top. Click it to load Maven changes.
Your terminal should say "Sync Finished," and the text color should match the rest of the pom.xml file if the changes were loaded successfully.
Create a Kill Switch Feature Flag
In the LaunchDarkly app, create a feature flag with the following configuration:
- Flag name: "springboot-msg"
- Configuration: Kill Switch
- Flag type: Boolean
Click the "Create Flag" at the bottom of this dialog.
On the following screen, click the drop-down menu next to the "Test" environment. Copy the SDK key by selecting it from the dropdown menu, as you will need it in the web controller in the next section.
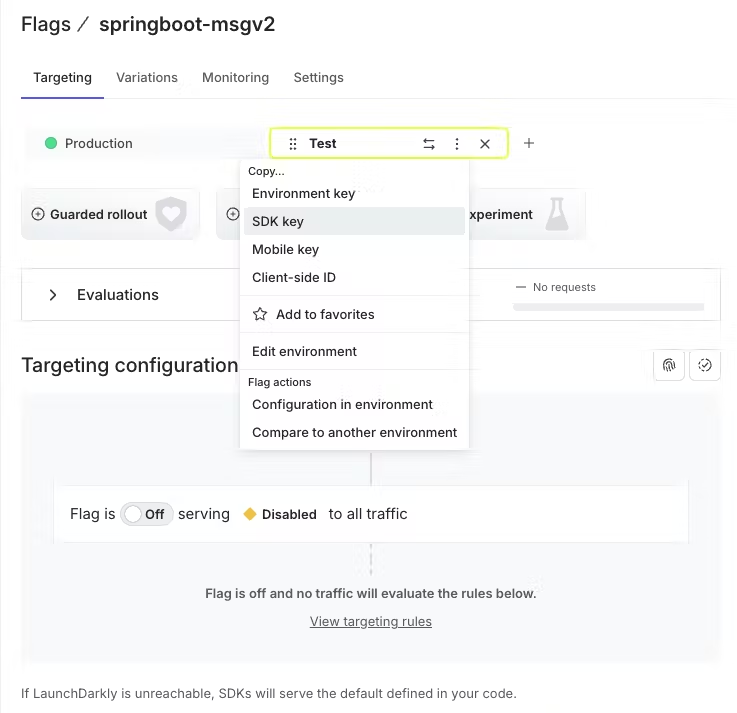
Turn the flag on using the toggle switch. Then click the "Review and save" button at the bottom.
If your LaunchDarkly setup requires it, comment and verify the name of the environment. Click the "Save changes" button. Great! Let’s safely secure the SDK key in the Spring Boot application.
Add the LaunchDarkly SDK Key to Your Spring Boot Application
Although it is not the best way to store sensitive information such as an SDK key, the application.properties file makes it convenient to manage, change, and update environment variables without modifying the code. Spring Boot also reads properties from this file, thus making it possible to inject values into the components with the @Value annotation.
Navigate to the src/main/resources/application.properties file and add a line below the spring.application.name.
launchdarkly.sdk-key=${LD_SDK_KEY}Then run the following command:
export LD_SDK_KEY=”sdk-XXXXXXXXXXX”Replace the SDK key with the key received in the previous step. It is best to hide the SDK key in the application.properties file and only expose the value directly in your system. You might even consider making an application-dev.properties file instead for extra security.
Let’s go on to add the kill switch flag to the Java Spring Boot application.
Build the Web Controller
Let’s get a Hello World application up and running. You will need to build a web controller to handle HTTP requests and return responses. In this case, the user will make a request to the Spring Boot application website and view a message on their web browser.
Right click on the com.example.springbootflags package to create a new Java class named WebController.java.
Copy and paste the following code into the newly created file:
package com.example.springbootflags;

import org.springframework.beans.factory.annotation.Value;
import org.springframework.web.bind.annotation.GetMapping;
import org.springframework.web.bind.annotation.RestController;
import com.launchdarkly.sdk.*;
import com.launchdarkly.sdk.server.*;

@RestController
public class WebController {
    private final LDClient client;

    public WebController(@Value("${launchdarkly.sdk-key}") String sdkKey) {
        if (sdkKey == null || sdkKey.isEmpty()) {
            throw new IllegalStateException("LaunchDarkly SDK key is not set");
        }
        this.client = new LDClient(sdkKey);
    }

    @GetMapping("/")
    public String index() {
        LDContext context = LDContext.builder("context-key-123abc")
                .name("Sandy")
                .build();

        boolean flagValue = client.boolVariation("springboot-msg", context, false);
        return "hello world";
    }
}
Go run the application from the SpringbootflagsApplication.java side and open localhost:8080 to see a "hello world" message.
As you can see, the server-side Java SDK required some import statements in order to connect to the LaunchDarkly client.
The @RestController annotation marks the request handler required to build and provide the RESTful web service during runtime. The only endpoint in this service is mapped to the "/" route.
Contexts are defined and passed through at the time of initiating the SDK after login. This process determines how feature flags should behave for a specific user or entity.
The "context-key-123abc" is the unique identifier for the context that ensures that the flag evaluations are consistent for the same user or entity across sessions.
The "kind" attribute is set to "user" to represent an individual user, who is named "Sandy" in this case. It is optional to change the name for personal debugging and viewing purposes.
If you have not done so already, terminate the page to further add code to the application.
Integrate a Third-Party API
To fully understand the capabilities of the kill switch flags, a third-party API will be used to demonstrate how quickly you can shut off the features in the application.
Add the following import statements to the top of the WebController:
import org.springframework.web.client.RestTemplate;
import org.springframework.http.ResponseEntity;
import java.util.Map;
import org.springframework.core.ParameterizedTypeReference;
import org.springframework.http.HttpMethod;
Replace the return "hello world"; line in the WebController.java file and replace it with the following call to the Motivational API:
       if (flagValue) {
            RestTemplate restTemplate = new RestTemplate();
            String apiUrl = "https://www.affirmations.dev/?ref=freepublicapis.com";
           ResponseEntity<Map<String, String>> response = restTemplate.exchange(
                apiUrl,
                HttpMethod.GET,
                null,
                new ParameterizedTypeReference<Map<String, String>>() {}
            );
            Map<String, String> responseBody = response.getBody();
            return responseBody.get("affirmation");
        }
        else {
            // The code to run if the flag is off
            return "I am positive that you deserve a stronger positive affirmation than this one!";
        }
If the kill switch flag is toggled on, then the Spring Boot class uses the RestTemplate object to send a GET request to the API endpoint. Since this API does not require authentication, the call can be made directly.
ResponseEntity<T> is a Spring class that represents the full HTTP response. The object defines a Map structure that expects String values since the API response will be a JSON object with key-value pairs. Spring will parse this later in the code with the ParameterizedTypeReference<T> special Spring class.
The responseBody object extracts the JSON response into a Java Map object in order to return the “affirmation” value.
Run the Spring Boot App
Go to the SpringbootflagsApplication.java file and run the public class.
Wait a few seconds for the project to build, download the project's dependencies, and compile.
Soon, the terminal should display a link to port 8080. Go to http://localhost:8080/ and you should see a random positive affirmation message displayed on your screen. Enjoy it because you deserve it!
To see the hardcoded message, go back to the Targeting section on the LaunchDarkly dashboard and toggle the flag again to turn it off.
Note: When building a production use case, you might want to start with your flag disabled rather than enabled, as we did here. Adding that extra step will help you ensure everything works as intended before exposing a new feature.
What’s Next?
In this post, you’ve learned how to use the LaunchDarkly Java SDK to add kill switch flags to your Spring Boot web application. If you want to learn more about what you can do with kill switch flags, check out the following articles:
Published at DZone with permission of Tilde Thurium. See the original article here.
Opinions expressed by DZone contributors are their own.
Comments