Deploy a Production-Ready Kubernetes Cluster Using kubespray
Check out the convenience of using kubespray to configure a production-ready Kubernetes cluster here.
Join the DZone community and get the full member experience.
Join For Free

What is Kubespray?
Kubespray provides a set of Ansible roles for Kubernetes deployment and configuration. Kubespray is an open-source project with an open development model that can use a bare metal Infrastructure-as-a-Service (IaaS) platform. The tool is a good choice for people who already know Ansible, as there’s no need to use another tool for provisioning and orchestration.
Environment Configuration
Below is the sample environment configuration where we will be installing a Kubernetes cluster with 3 Master and 3 Worker nodes.
Master Nodes #
1                       kubernetes-master-1                      10.60.40.112
2                       kubernetes-master-2                      10.60.40.113
3                       kubernetes-master-3                      10.60.40.114

Worker Nodes #
1                       kubernetes-worker-1                      10.60.40.115
2                       kubernetes-worker-2                      10.60.40.116
3                       kubernetes-worker-3                      10.60.40.117
The official Kubespray link is here, but the installation steps mentioned are very vague. Let me describe them in a more detailed manner.
Procedure
Execute these steps on all Master and Worker nodes.
1. Make sure the operating system is up-to-date.
$yum update -y2. Disable SELinux
$sed -i -e s/enforcing/disabled/g /etc/sysconfig/selinux
$sed -i -e s/permissive/disabled/g /etc/sysconfig/selinux
$setenforce 0
$sed -i --follow-symlinks 's/SELINUX=enforcing/SELINUX=disabled/g' /etc/sysconfig/selinux
3. Reboot the system
$reboot4. Disable and stop firewall services on all the nodes in the cluster
$systemctl disable firewalld
$systemctl stop firewalld
$modprobe br_netfilter
$echo '1' > /proc/sys/net/bridge/bridge-nf-call-iptables
5. Install some prerequisites packages on all Master and Worker nodes in the cluster
Ansible Packages
yum install epel-release
yum install ansible
JinaPackages
$easy_install pip
$pip2 install jinja2 --upgrade
Python Packages
$yum install python36 –yNow execute these steps on one of the Master Nodes (10.60.40.112 in this case).
1. Enable ssh (passwordless authentication) to all other nodes, including the current node from where the installation is triggered.
$ssh-keygen -t rsa
$cat ~/.ssh/id_rsa.pub | ssh   root@10.60.40.112 "mkdir -p ~/.ssh && cat >> ~/.ssh/authorized_keys && chmod 600 ~/.ssh/authorized_keys"
$cat ~/.ssh/id_rsa.pub | ssh   root@10.60.40.113 "mkdir -p ~/.ssh && cat >> ~/.ssh/authorized_keys && chmod 600 ~/.ssh/authorized_keys"
$cat ~/.ssh/id_rsa.pub | ssh   root@10.60.40.114 "mkdir -p ~/.ssh && cat >> ~/.ssh/authorized_keys && chmod 600 ~/.ssh/authorized_keys"
$cat ~/.ssh/id_rsa.pub | ssh   root@10.60.40.115 "mkdir -p ~/.ssh && cat >> ~/.ssh/authorized_keys && chmod 600 ~/.ssh/authorized_keys"
$cat ~/.ssh/id_rsa.pub | ssh   root@10.60.40.116 "mkdir -p ~/.ssh && cat >> ~/.ssh/authorized_keys && chmod 600 ~/.ssh/authorized_keys"
$cat ~/.ssh/id_rsa.pub | ssh   root@10.60.40.117 "mkdir -p ~/.ssh && cat >> ~/.ssh/authorized_keys && chmod 600 ~/.ssh/authorized_keys"
2. Clone the kubespray git repository.
$yum install git -y
$git clone https://github.com/kubernetes-incubator/kubespray.git
3. Go to the kubespray directory and install all dependency packages.
$cd kubespray
$pip install -r requirements.txt
4. Copy the inventory/sample as inventory/mycluster, (changing “mycluster” to any name you want for the cluster).
$cp -rfp inventory/sample inventory/mycluster
5. Running the two commands below will generate a "hosts.ini" file in the path by creating a "iventory/mycluster/hosts.ini" file and can be changed if there is a need.
$declare -a IPS=(10.60.40.112 10.60.40.113 10.60.40.114 10.60.40.115 10.60.40.116 10.60.40.117)
$CONFIG_FILE=inventory/mycluster/hosts.ini python36 contrib/inventory_builder/inventory.py ${IPS[@]}
6. Review and change the parameters under inventory/mycluster/group_vars
$cat inventory/mycluster/group_vars/all/all.yml
$cat inventory/mycluster/group_vars/k8s-cluster/k8s-cluster.yml
In “inventory/mycluster/group_vars/all.yml,” uncomment the following statement to enable metrics to fetch the cluster resource utilization data. Without this, HPAs will not work
7. Install Kubernetes by running this playbook
$ansible-playbook -i inventory/mycluster/hosts.ini cluster.ymlThis step takes some time to complete and it should be ready in few minutes to deploy your application.
8. Run these commands to access kubectl from the console
$mkdir -p $HOME/.kube
$sudo cp -i /etc/kubernetes/admin.conf $HOME/.kube/config
$sudo chown $(id -u):$(id -g) $HOME/.kube/config
To verify if kubectl is working or not, run the following command:
$kubectl get nodes
NAME                   STATUS     ROLES         AGE       VERSION
kubernetes-master-1     Ready     master,node   4m        v1.13.0
kubernetes-master-2     Ready     master,node   4m        v1.13.0
kubernetes-master-3     Ready     master,node   4m        v1.13.0
kubernetes-worker-1     Ready     node          4m        v1.13.0
kubernetes-worker-2     Ready     node          4m        v1.13.0
kubernetes-worker-3     Ready     node          4m        v1.13.0
8. In this step, we will create the service account for the Kubernetes Dashboard and get its credentials.
This command will create a service account for dashboard in the default namespace.
$kubectl create serviceaccount dashboard -n defaultThis command will add the cluster binding rules to your dashboard account.
$kubectl create clusterrolebinding dashboard-admin -n default --clusterrole=cluster-admin --serviceaccount=default:dashboardAnd this command will give you the token required for your dashboard login.
$ kubectl get secret $(kubectl get serviceaccount dashboard -o jsonpath="{.secrets[0].name}") -o jsonpath="{.data.token}" | base64 --decode9. Here's how to access the Kubernetes Dashboard from Master VM
By default, the dashboard will not be visible on the Master VM. Run the following command in the command line.
$kubectl proxyhttp://localhost:8001/api/v1/namespaces/kube-system/services/https:kubernetes-dashboard:/proxy/
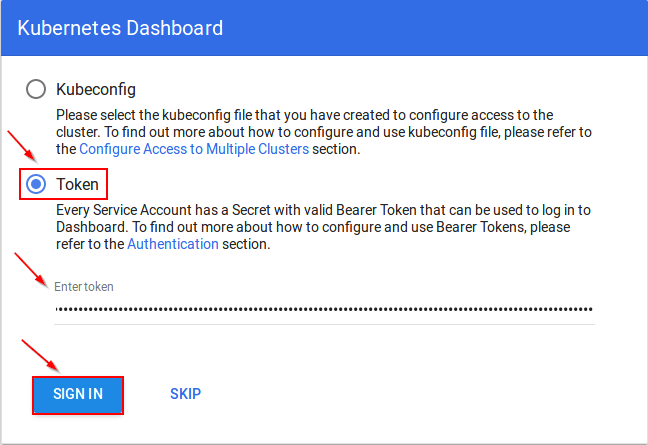
You will then be prompted with this page, to enter the credentials:

9. Follow the below procedure to access Kubernetes Dashboard if the Master VM does not have GUI.
Run the below command on bash terminal from your local system through "ssh" and feed the password.
$ssh -L 8001:localhost:8001 root@10.60.40.112
$kubectl proxy
http://localhost:8001/api/v1/namespaces/kube-system/services/https:kubernetes-dashboard:/proxy/
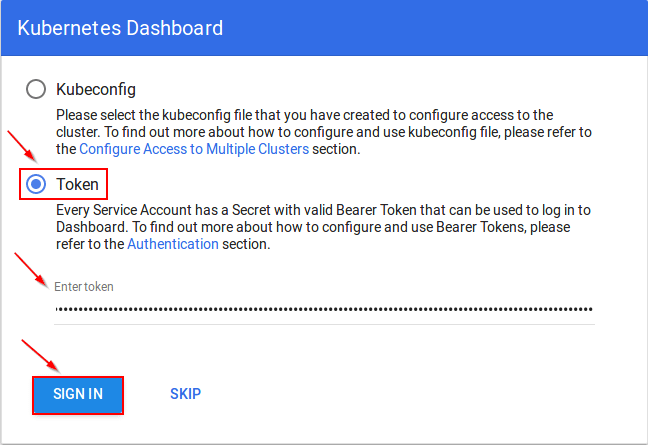
You will then be prompted with this page, to enter the credentials:

Opinions expressed by DZone contributors are their own.

Comments