Material Dashboard Using Angular 6
In this article, we are going to learn how to make use of Material Dashboard starter component into our application to get a Dashboard structure.
Join the DZone community and get the full member experience.
Join For FreeIntroduction
Recently, Angular released its latest version, Angular 6.0. In the latest version, they have focused more on the toolchain, which provides us with a way to quick start our tasks easier, as well as some synchronized versions, such as Angular/core, Angular/compiler, etc.
With the release of Angular 6.0, one of the features which I like the most is Material Dashboard, which is kind of a starter component with a list of dynamic card components.
You can find the official blog post for the release of Angular 6.0 here.
In this article, we are going to learn how to make use of the Material Dashboard starter component in our application to get a Dashboard structure.
Material Dashboard Using Angular 6.0
Material Dashboard is completely inspired by Google's Angular Material Design Component. In this dashboard, there are a number of Material Components used, which are listed below.
mat-grid-tilemat-grid-listmat-cardmat-menumat-icon
And also there are a few other components like mat-title, mat-header, mat-content, etc.
Let's start by implementing Dashboard using Angular 6.0. If you are new to Angular, do not worry, just follow a few steps and you will be able to create an application in Angular. I hope you have already installed a stable version or the latest version of Node.js as well as npm.
Create a new Angular 6.0 application by executing the following npm command.
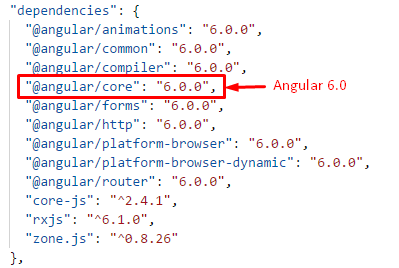
ng new materialdashboardangular6 After executing the above command, you can see that the Angular version is now updated to 6.0.0.
You can see in the above image that the core dependencies like core, compiler, HTTP, form, and others are updated to the latest version, which is now 6.0.0.
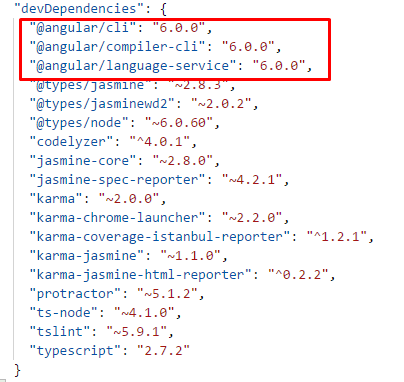
Other developer dependencies are also updated in the latest version of Angular.
For working with Material Dashboard, we need to install a few dependencies for Angular-material by using npm commands which are listed below.
Old Approach for Using Angular Material
Base dependency is angular/material, just type the below npm command into the console.
npm install @angular-material Our next move is to install Angular/cdk, which provides tools for developers to create awesome components. We can install a CDK by using the below npm command.
npm install @angular/cdk Apart from these two dependencies, we should have Angular/animations installed, because some of the effects in the Angular Material component are dependant on animation. Angular 6.0 comes with Angular/animations so that we do not need to re-install.
New Updates in Angular 6.0
In Angular 6.0, there is a tree of components which is used to create a group of components and, by using these components, we can get the Materialized Dashboard using Angular Material + Material CDK Components.
And one of the most important parts is the Angular Material Starter Component. By installing Angular/material, we will be able to generate a starter component.
For that, we need to install Angular/material by executing the following command.
ng add @angular/material Generating a Material Dashboard
Earlier, we installed @angular/material for generating a Material Dashboard, with which we can use a single command to generate a starter dashboard component.
Syntax :
ng generate @angular/material:material-dashboard --name = <Give_Any_Name>material-dashboard is a starter component, which generates a group of the materialized components in the form of the dashboard by just providing a name, as I've provided in the below command.
ng generate @angular/material:material-dashboard --name material-dashboard And as you can see in the console, there are a few files created inside the app directory with a component name provided. The file structure looks like the below screen.
Now, let's see the content of all the files generated one-by-one.
material-dashboard.component.html
<div class="grid-container">
  <h1 class="mat-h1">Dashboard</h1>
  <mat-grid-list cols="2" rowHeight="350px">
    <mat-grid-tile *ngFor="let card of cards" [colspan]="card.cols" [rowspan]="card.rows">
      <mat-card class="dashboard-card">
        <mat-card-header>
          <mat-card-title>
            {{card.title}}
            <button mat-icon-button class="more-button" [matMenuTriggerFor]="menu" aria-label="Toggle menu">
              <mat-icon>more_vert</mat-icon>
            </button>
            <mat-menu #menu="matMenu" xPosition="before">
              <button mat-menu-item>Expand</button>
              <button mat-menu-item>Remove</button>
            </mat-menu>
          </mat-card-title>
        </mat-card-header>
        <mat-card-content class="dashboard-card-content">
          <div>Card Content Here</div>
        </mat-card-content>
      </mat-card>
    </mat-grid-tile>
  </mat-grid-list>
</div>
Basically, an HTML file contains the group of material components. All of the components are the same as older versions of the material component and distributed in a tree structure.
<mat-grid-list> // Main grid container

  // divides structure in small chunks
  <mat-grid-tile *ngFor="let card of cards" [colspan]="card.cols" [rowspan]="card.rows">

    // Every chunks acts as card component
    <mat-card class="dashboard-card">

      // Card Header
      <mat-card-header>
        <mat-card-title>

          <mat-menu #menu="matMenu" xPosition="before">

          </mat-menu>

        </mat-card-title>
      </mat-card-header>

      // Content of Card
      <mat-card-content class="dashboard-card-content">
        <div>Card Content Here</div>
      </mat-card-content>

    </mat-card>

  </mat-grid-tile>

</mat-grid-list>
The above snippet is a basic building block which was generated by the component generator, which repeats based on the items of the array using the *ng-if statement.
material-dashboard.component.ts
import { Component } from '@angular/core';

@Component({
  selector: 'material-dashboard',
  templateUrl: './material-dashboard.component.html',
  styleUrls: ['./material-dashboard.component.css']
})
export class MaterialDashboardComponent {

  // Number of cards to be generated with column and rows to be covered
  cards = [
    { title: 'Card 1', cols: 2, rows: 1 },
    { title: 'Card 2', cols: 1, rows: 1 },
    { title: 'Card 3', cols: 1, rows: 2 },
    { title: 'Card 4', cols: 1, rows: 1 }
  ];
}
The above TypeScript file contains an array of cards to be generated while creating the dashboard. For that, we can specify how many rows and columns will be occupied to generate card components.
material-dashboard.component.css
This stylesheet file contains different classes to provide different positioning and directions throughout the page.
.grid-container {
  margin: 20px;
}

.dashboard-card {
  position: absolute;
  top: 15px;
  left: 15px;
  right: 15px;
  bottom: 15px;
}

.more-button {
  position: absolute;
  top: 5px;
  right: 10px;
}

.dashboard-card-content {
  text-align: center;
}
These files are automatically generated for creating a Material Dashboard. Now, the last step is to execute our dashboard app.
For that, just go to the app.component.html file. Remove all of the content and just add a markup tag like I've done in the following snippet :
<!-- To Use Dashboard On Application Home page -->

<material-dashboard>

</material-dashboard>
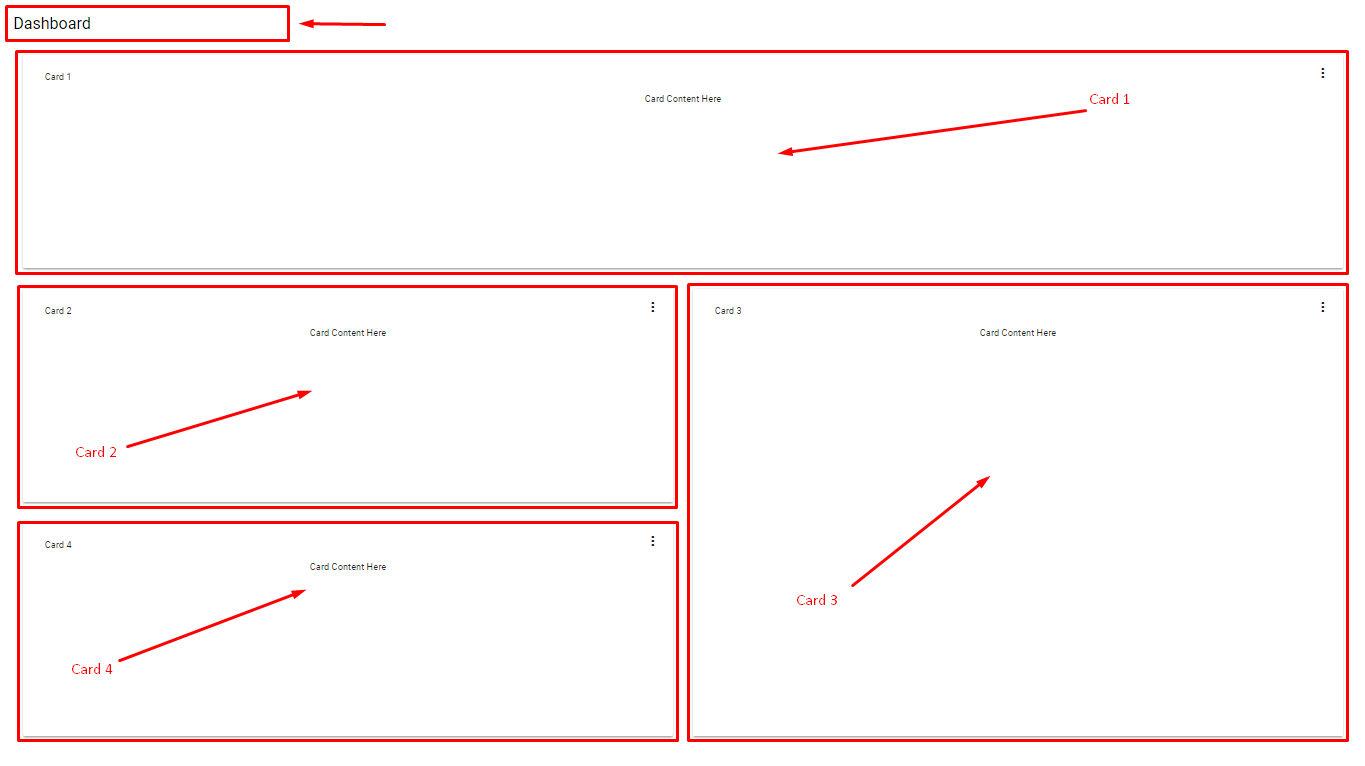
Now, let's run our Material Dashboard app by running the [ng generate -o] command and you can see the output.
Conclusion
In this article, we have covered a few things which are listed below.
- Overview of Material Dashboard and its components.
- Package.json file version updates.
- New updates in Angular 6.0.
- Material Dashboard generating process.
- Introduction of all generated files using Material Generator.
Thus, the generated dashboard is just a normal structure. We can enhance it by customizing as per our different requirements.
Follow my other articles on Angular Material.
Angular Material Component With Reactive Forms - Angular Part-1
Angular Material Component With Reactive Forms - Angular Part-2
I hope you have enjoyed this article, if I missed something, do let me know via the comments. Thanks!
If you enjoyed this article and want to learn more about Angular, check out our compendium of tutorials and articles from JS to 8.
Published at DZone with permission of Manav pandya. See the original article here.
Opinions expressed by DZone contributors are their own.


Comments