Measuring Customer Support Sentiment Analysis With GPT, Airbyte, and MindsDB
Set up sentiment analysis of Intercom chats, extract and analyze the data with GPT models, and visualize the results using Metabase.
Join the DZone community and get the full member experience.
Join For FreeUnderstanding customer sentiment is essential to excellent customer service. The sentiments expressed in customer support tools hold the key to unlocking valuable insights that drive better decision-making and enhance customer experiences. By combining the power of GPT models, Airbyte data sync capabilities, and MindsDB's AI logic automation, businesses can gain actionable insights and revolutionize their customer service strategies.
In this tutorial, we’ll set up sentiment analysis of Intercom chats, empowering you to understand your customers at a deeper level and enhance their satisfaction.
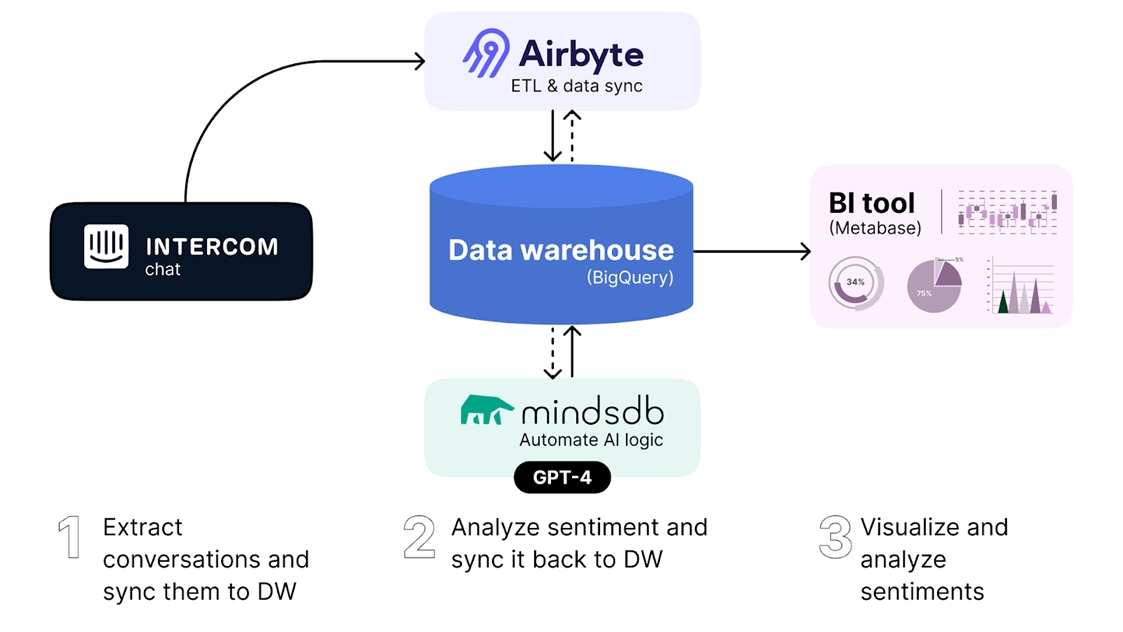
The solution is fully automated and consists of 3 parts:
- Use Airbyte to extract conversations from Intercom and store them in the data warehouse for analysis (we’ll use Google’s BigQuery for this example)
- Set up an automated sentiment analysis workflow using MindsDB, which will automatically process conversations through OpenAI’s GPT Large Language Model to analyze their sentiment and store the results back into the data warehouse.
- Visualize the results in a decision-maker-friendly BI dashboard using Metabase, an analytics platform.
Let's dive into the details of each step now.
Part 1: Ingest Intercom Data to BigQuery Using Airbyte
We’ll be leveraging our Intercom data to understand the sentiment of our customer support conversations. Airbyte and its Intercom connector is a perfect tool for the job and will allow us to bring that data into a data warehouse that could be read by MindsDB, in this case, BigQuery. For this tutorial, we’ll be setting things up using Airbyte Cloud, but you can also accomplish the same using the open-source version.
Step 1: Setting up Intercom as a Source
To begin, let’s set up Intercom as a data source in Airbyte:
- Open Airbyte Cloud
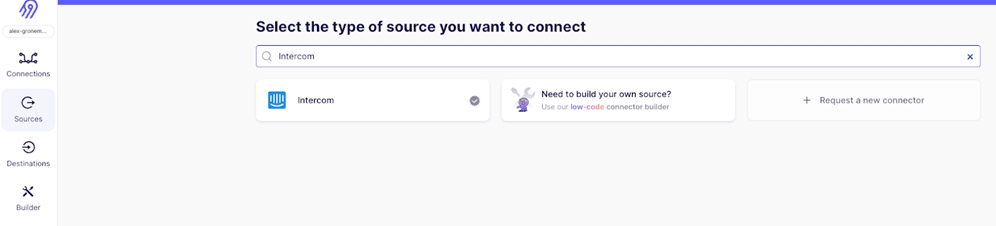
- Click on "Sources" in the left-hand navigation menu and select "Intercom."
![Click on "Sources" in the left-hand navigation menu and select "Intercom."]() Authenticate your Intercom source using OAuth.
Authenticate your Intercom source using OAuth.- Save and Test the connection to ensure Airbyte can access your Intercom data successfully.
 Authenticate your Intercom source using OAuth.
For more information, see the Airbyte docs for Intercom.
Step 2: Configuring BigQuery as a Destination
Next, we need to configure BigQuery as the destination for our Intercom data:
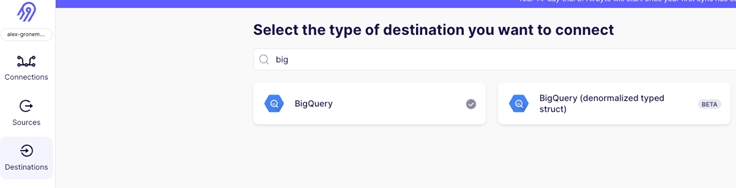
- Click on "Destinations" in the left-hand navigation menu and select "BigQuery."
![]() Enter your Google Cloud project details and authenticate Airbyte with your Google Cloud account.
Enter your Google Cloud project details and authenticate Airbyte with your Google Cloud account.- Specify the desired dataset and table name where you want to load the Intercom data in BigQuery.
- Test the connection to ensure Airbyte can successfully connect to your BigQuery project.
 Enter your Google Cloud project details and authenticate Airbyte with your Google Cloud account.
For more information, see the Airbyte docs for BigQuery.
Step 3: Creating a Connection
Now that both Intercom and BigQuery are set up as a source and destination, respectively, we can create a connection between the two and start to move the data:
- Click on "Connections" in the left-hand navigation menu and select "+ New Connection."
- Choose the existing Intercom source you set up in Step 1 and the existing BigQuery destination configured in Step 2.
- Configure the connection with a Connection name, replication frequency, and destination namespace. You should enable the following streams for this tutorial:
conversation_parts
conversations
- When you are finished, click “Set up connection.”
Step 4: Running the Connection
Once the connection is set up, you can run and monitor the data ingestion process:
- Click on "Connections" in the left-hand navigation menu.
- Click the connection you created
- Click “Sync enabled streams” to start a sync.
- Monitor the job status and progress to ensure the data is being transferred successfully.

The Airbyte connection will create the following tables in BigQuery that are used in MindsDB:
- conversations, which contains all intercom conversations
- conversation_parts, which contains individual messages from the conversations

Part 2: Automate GPT-Based Sentiment Analysis Using MindsDB Queries and Jobs
Now that our intercom data has been synced to BigQuery, it’s time to enrich our conversation data with user sentiment. We can leverage MindsDB and its OpenAI integration to bring the power of the GPT-4 large language model into the database. MindsDB will allow us to set up our model, construct a prompt, and run completions by simply using SQL.
Getting Started with MindsDB
Just like Airbyte, MindsDB is open-source and can be installed locally. However, we’ll be using MindsDB Cloud’s free demo tier to get up and running quickly.
After registering for a MindsDB Cloud account, you’ll be automatically provided a MindsDB Instance for you to use.
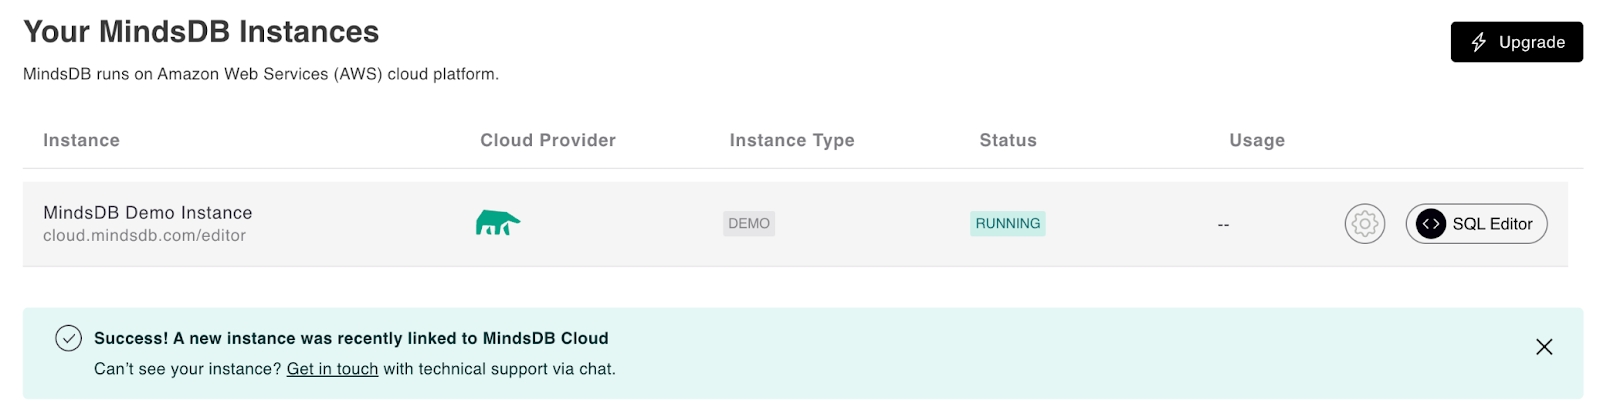
You’ll also get access to the built-in SQL Editor, where we’ll be running the queries to set up our sentiment analysis model. Click on your instance to access the editor.

Connecting to the BigQuery Data Source
We’ll first need to establish a connection between MindsDB and BigQuery. To do so, we can create a data source. This configuration will include the necessary parameters to connect to the appropriate project and dataset in BigQuery.
To create the BigQuery database connection in MindsDB, execute the following SQL statement:
CREATE DATABASE bq

WITH

   ENGINE = 'bigquery',

   PARAMETERS = {

     "project_id": "<your_project_id>",

     "dataset": "<your_dataset>",

     "service_account_json": {

         "type": "service_account",

         <...>

    }

};
Make sure to input your project_id, dataset, and service_account_json parameters as appropriate to connect to your BigQuery instance. For more information, see the MindsDB docs for Google BigQuery.
After executing the SQL statement, MindsDB will create the BigQuery database configuration named bq. This configuration will be used to reference the BigQuery data source in subsequent queries and operations within MindsDB. With the BigQuery data source successfully connected, we can proceed to leverage MindsDB's features and capabilities for sentiment analysis and predictive modeling on our Intercom data stored in BigQuery.
Setting up the Sentiment Analysis Model
We’ll be using OpenAI’s GPT-4 to calculate the user sentiment on our conversations. As a large language model, it’s been pre-trained to understand natural language and provide outputs in response to inputs or prompts, which means it can be used pretty much out of the box for our sentiment analysis use case without any additional training.
Let’s write a prompt for the model that instructs it to return the sentiment of a provided conversation. MindsDB’s built-in model support and prompt templates make it easy to set up prompts that can be combined with input variables, which we’ll need in order to pass along our conversation contents.
The following SQL statement shows how the OpenAI GPT-4 model can be enabled in MindsDB:
CREATE ML_ENGINE my_openai

FROM openai

USING

     api_key = 'YOUR_OPENAI_API_KEY';


CREATE MODEL sentiment_classifier_model

PREDICT sentiment

USING

  engine = 'my_openai',

  model_name = 'gpt-4',

  prompt_template = 'describe the user sentiment from the following conversation strictly as "positive", "neutral", or "negative".\n###\n{{conversation}}\n###\n';
First, we create an OpenAI engine using our own API key. Then, we use this ML engine while creating a model.
Note that in the prompt template, we specified {{conversation}} with double curly braces. This is how we can tell MindsDB that we’re working with an input variable that should be replaced.
After creating the model, it will take a few seconds to be ready for use. You can check on the status of the model by running the following query:
DESCRIBE sentiment_classifier_model;
Once the status shows up as “complete,” we’ll be able to use it for predictions.

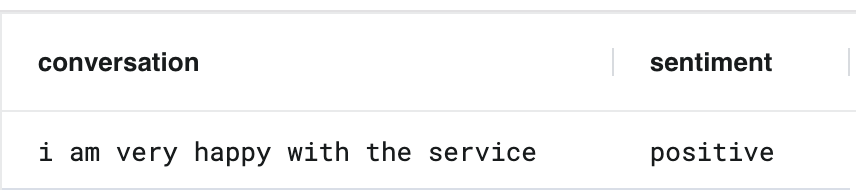
To test the model, we can do so with a simple SQL select statement. Here’s a quick example you can run to verify things are working:
SELECT conversation, sentiment FROM sentiment_classifier_model WHERE conversation = 'i am very happy with the service';
Running the Model on Intercom Conversation Data
As you may have noticed when building the prompt in the previous step, we’ll need to provide the text of the conversation to the model. Since the Intercom data as output by Airbyte to BigQuery contains each message of a conversation as separate rows in the conversation_parts table, we’ll need to aggregate these message parts into a single text column. Giving the model a chunk of the latest messages rather than calculating sentiment for each individual message allows it to better determine the overall sentiment of the conversation.
Before we run the model, let’s briefly preview what our data looks like. The following query will retrieve the 20 latest conversations, along with the conversation chunk as we will send it along to the model:
SELECT * FROM bq (
select
conversation_id,
RIGHT(string_agg(concat("[", json_value(p.author, '$.type'), "]", p.body), "\n" order by p.updated_at), 25000) as conversation
from conversations c
join conversation_parts p on p.conversation_id = c.id
where p.part_type = 'comment'
group by conversation_id, c.updated_at
having conversation is not null
order by c.updated_at
limit 20
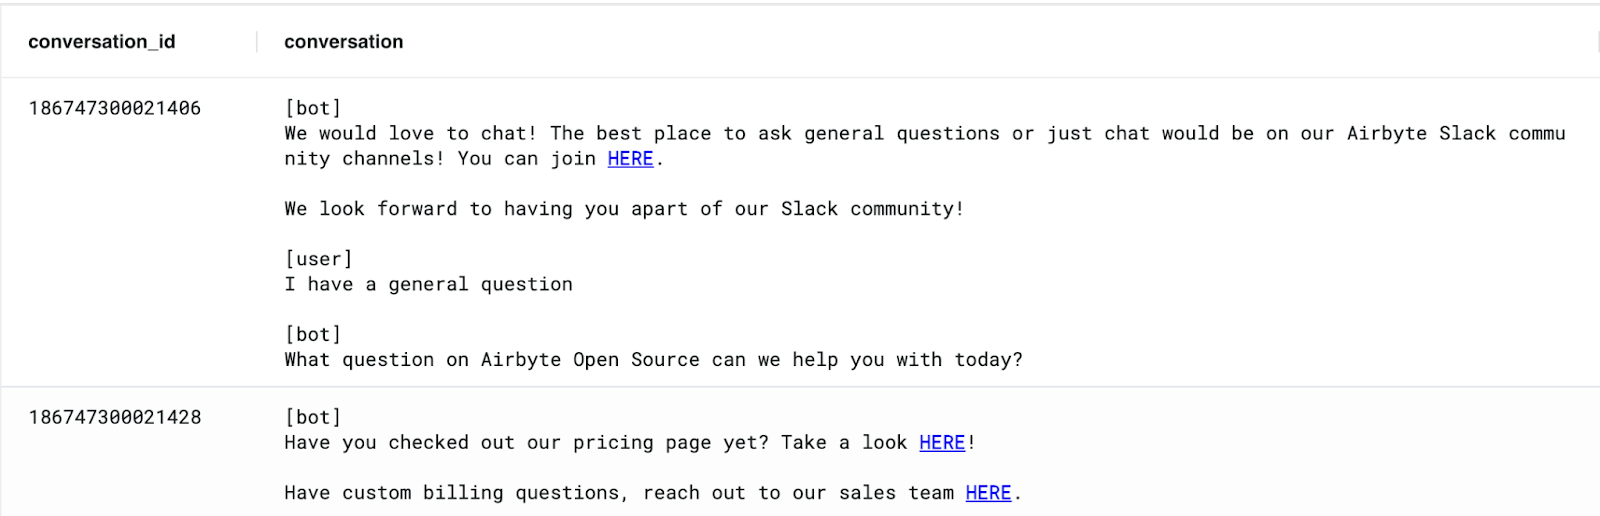
)Breaking it down a bit, you’ll notice we start with SELECT * FROM bq. This instructs MindsDB to run the subquery directly in BigQuery, allowing us to use BigQuery-specific syntax. The subquery then retrieves the intercom conversations, along with the concatenated conversation text. Note that the RIGHT function is used to limit the conversation text to the last 25,000 characters to prevent exceeding the model's input length limitation.
Here are the first two results from running this against our previously synced intercom data:
Then, to run the model and get sentiment prediction for each of these conversations, all we have to do is JOIN it with our data like so:
SELECT * FROM bq (
select
conversation_id,
RIGHT(string_agg(concat("[", json_value(p.author, '$.type'), "]", p.body), "\n" order by p.updated_at), 25000) as conversation
from conversations c
join conversation_parts p on p.conversation_id = c.id
where p.part_type = 'comment'
group by conversation_id, c.updated_at
having conversation is not null
order by c.updated_at
limit 20
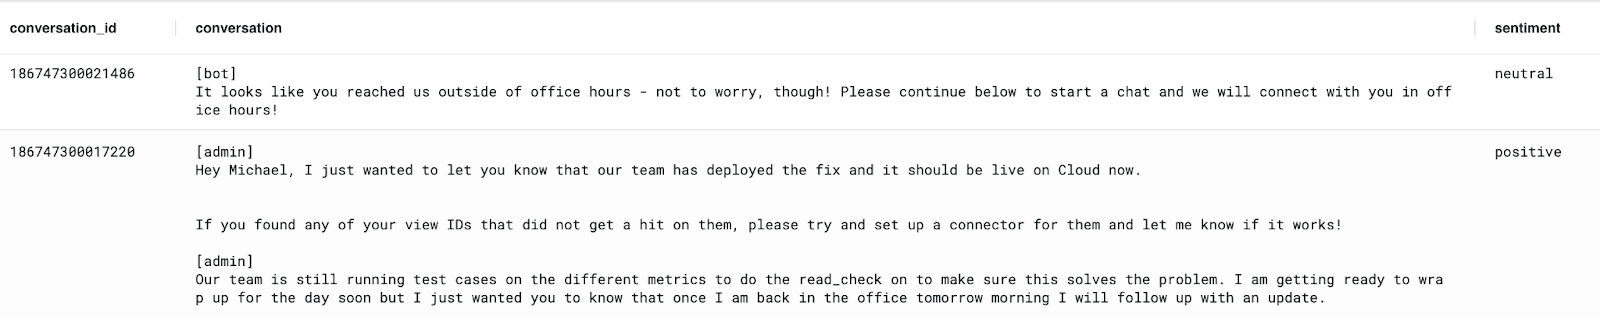
)as intercom_conversations JOIN sentiment_classifier_model AS sentimentBecause we constructed our prompt template with {{conversation}} as a placeholder for our conversation, MindsDB will replace this with the conversation column we selected when joining the data.
The results of the above query would look something like this:
Writing Sentiment Analysis Back to BigQuery
Great! We’re able to calculate the sentiment of a given conversation. But how do we get this information back to our data warehouse?
First, we need to create a new BigQuery table where the results should be stored. To create the table, you can run the following statement within the MindsDB editor:
SELECT * from bq (

  CREATE TABLE mindsdb_conversation_sentiments (

    conversation_id STRING NOT NULL,

    sentiment STRING NOT NULL,

    conversation_updated_at INT NOT NULL,

    created_at TIMESTAMP DEFAULT CURRENT_TIMESTAMP() NOT NULL

  )

)
Once the table is created, you can modify the previous query to insert the results into the new table by simply wrapping it with an insert statement and selecting the columns we want to insert:
INSERT INTO bq.mindsdb_conversation_sentiments (
SELECT conversation_id, sentiment, conversation_updated_at FROM bq (
select
conversation_id,
c.updated_at as conversation_updated_at,
RIGHT(string_agg(concat("[", json_value(p.author, '$.type'), "]", p.body), "\n" order by p.updated_at), 25000) as conversation
from conversations c
join conversation_parts p on p.conversation_id = c.id
where p.part_type = 'comment'
group by conversation_id, c.updated_at
having conversation is not null
order by c.updated_at
limit 20
) as intercom_conversations JOIN sentiment_classifier_model AS sentiment
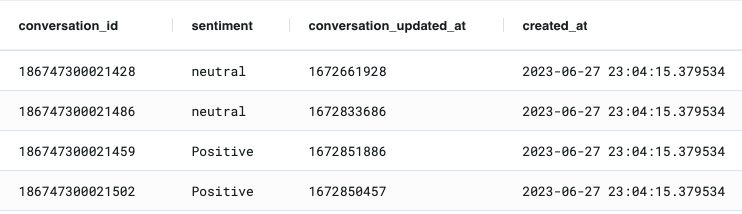
)After this runs, we can run a SELECT to see the calculated sentiment for each of our 20 conversations:
select * from bq.mindsdb_conversation_sentiments;
Creating a Recurring Job
To automate the sentiment analysis task and ensure that sentiment results are consistently updated, we can create a recurring job in MindsDB. Again, we can do this right from the MindsDB editor by running the following SQL to create a job that runs once per day:
We’ve modified our query to work incrementally to only process conversations that have been added or changed since our last sentiment calculation. By comparing the conversation_updated_at timestamp with the maximum timestamp from the existing results, we can identify and select only the conversations that need to be processed.
CREATE JOB run_intercom_sentiment_analysis (

  INSERT INTO bq.mindsdb_conversation_sentiments (

    SELECT conversation_id, sentiment, conversation_updated_at FROM bq (

      select

          conversation_id,

          c.updated_at as conversation_updated_at,

          RIGHT(string_agg(concat("[", json_value(p.author, '$.type'), "]", p.body), "\n" order by p.updated_at), 25000) as conversation

      from conversations c

      join conversation_parts p on p.conversation_id = c.id

      where p.part_type = 'comment' AND c.updated_at > IFNULL((SELECT max(conversation_updated_at) FROM mindsdb_conversation_sentiments), -1)

      group by conversation_id, c.updated_at

      having conversation is not null

      order by c.updated_at

    ) as intercom_conversations JOIN sentiment_classifier_model AS sentiment

  )

) EVERY day;
You can view any jobs that have been created by running SELECT * FROM jobs; or get the job history with SELECT * FROM jobs_history;.
Part 3: Visualize the Results
The MindsDB job we’ve set up will write the results of the job to a table in BigQuery. We can query this table from BigQuery directly, or visualize the output with a BI tool. In this example, we will visualize the results using Metabase Cloud.
Create Metabase Model
To start, we created a Model in Metabase called Intercom Sentiment Data using a SQL query against the conversation_sentiment table in BigQuery. We joined this with the support_case data that contains our modeled Intercom conversations:
with conversation_sentiments as (


    select * from conversation_sentiments


),


support_cases as (


    select * from support_case

),


intercom_chats as (


    select *

    from support_cases

    where intercom_chat_id is not null

),


joined as (


    select

        intercom_chats.*,

        conversation_sentiments.sentiment

    from intercom_chats

    left join conversation_sentiments

        on intercom_chats.intercom_chat_id = conversation_sentiments.conversation_id

),


final as (


    select *

    from joined

    where sentiment is not null


)


select * from final
Create Metabase Questions
We then used the Query Builder in Metabase to generate each of the charts in our dashboard.
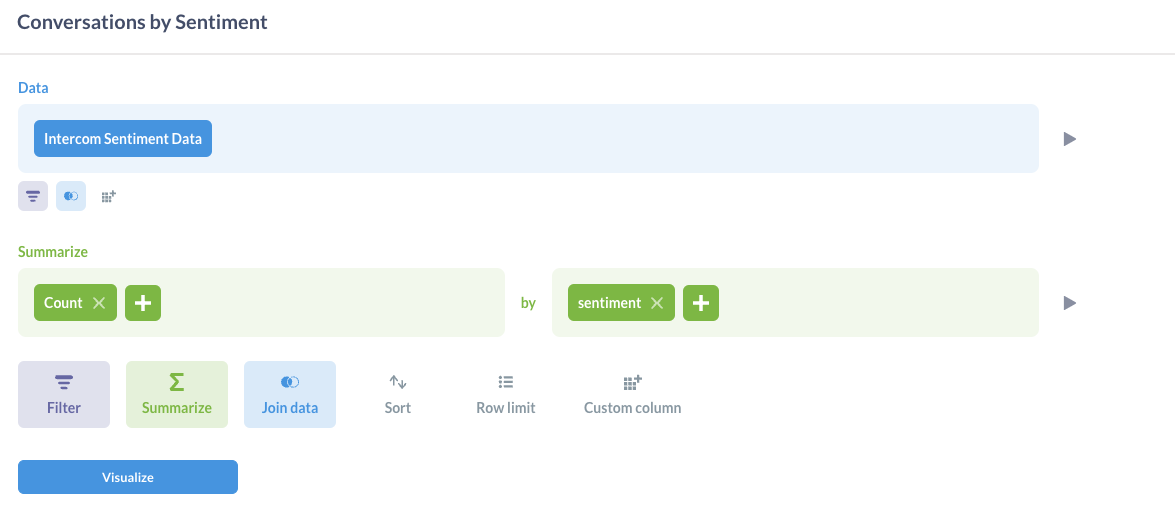
Here is an example of how we created the Conversations by Sentiment pie chart:
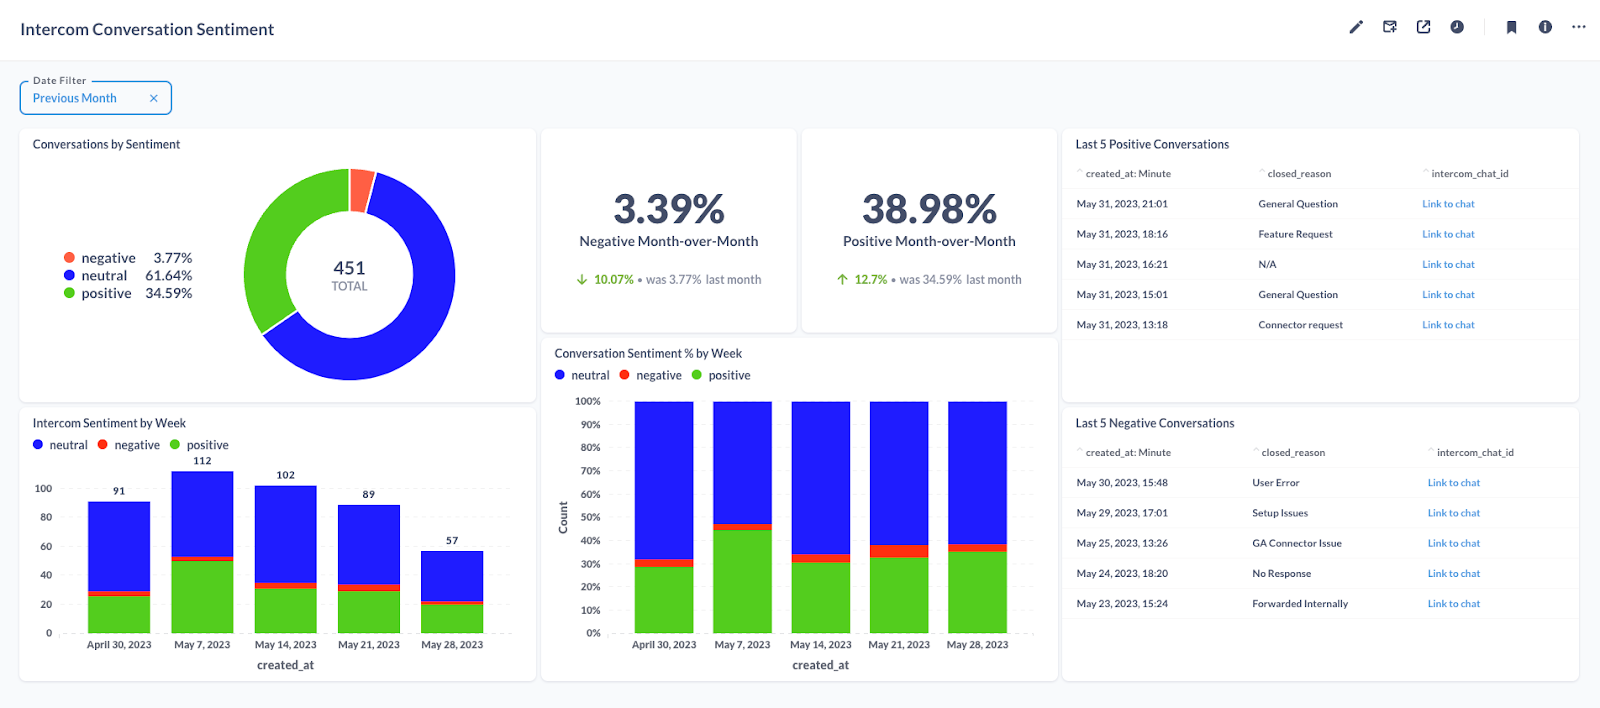
Create Dashboard
We arranged all of the charts on the Intercom Conversation Sentiment dashboard. This dashboard looks at the sentiment analysis for the previous month of support conversations.
We can use this dashboard to determine if our support conversations are trending in a positive or negative direction month over month. For Executives, it is a great tool to pulse check the general sentiment from customers each month. The Support team can use this data to further evaluate negative conversations and report any concerns to the Engineering and Product teams.
This is just a glance at the kind of insights you can derive from enriching your data with sentiment analysis; however, this can be extended with visualizations relevant to your use case.
Next Steps
In this tutorial, we’ve shown how you can harness Airbyte’s data integration tools, MindsDB’s AI logic automation, and OpenAI’s powerful models to leverage your data to keep an eye on customer sentiment and effectively turn that data into actionable insights. However, we’ve only scratched the surface of what’s possible.
Operationalizing the Data
Visualizing the results is just the beginning of the things that we can start to do with the output from MindsDB. To take this a step further, we can use Reverse ETL tools to push the sentiment data into our business systems, such as Salesforce or Zendesk. This allows our Sales and Support teams to quickly understand previous customer interactions without needing to read through all of the conversation data.
Beyond Sentiment Analysis
This same workflow can be used to power tons of other use cases for leveraging your data in other ways. This includes conversation summarization, extracting critical keywords, categorization, spotting spammy conversations, etc.
While we’ve used GPT-4 in this post, you can also experiment with other LLMs or models specifically tuned for tasks like sentiment analysis or text summarization, or tweak the prompts to get better results for your data.
Published at DZone with permission of John Lafleur. See the original article here.
Opinions expressed by DZone contributors are their own.
Comments