Building Micronaut Microservices Using MicrostarterCLI
This article demonstrates building a simple Micronaut microservices application using MicrostarterCLI.
Join the DZone community and get the full member experience.
Join For FreeMicrostarterCLI is a rapid development tool. It helps you as a developer generate standard reusable codes, configurations, or patterns you need in your application. In a previous article, I went through a basic example of creating REST and GraphQL endpoints in a Micronaut application.
This article demonstrates an example of bootstrapping a Micronaut microservices application using MicrostarterCLI. The application's architecture consists of the following:
- Fruit Service: A simple CRUD service for Fruit objects.
- Vegetable Service: A simple CRUD service for Vegetable objects.
- Eureka Service Discovery Server
- Consul Configuration Server.
- Spring Cloud Gateway.

Set Up the Environment
Download the MicrostarterCLI 2.5.0 or higher zip file. Then, unzip it and configure the folder in the environment variables. Then, you will be able to access the mc.jar, mc.bat, and mc from any folder in the operating system.
To verify the configuration, check the Microstarter CLI by running the below command from the command prompt:
mc --versionMy environment details are as follows:
| Operating System | Windows 11 |
| Java Version | 11 |
| IDE | IntelliJ |
Let's Start Development
Step 0: Create a Workspace Directory
Create a folder in your system in which you will save the projects. This step is optional, but it's helpful to organize the work. In this article, the workspace is c:\workspace.
Step 1: Create Fruit Service
The FruitService is a simple service with all CRUD operations to handle the Fruits objects. For simplicity, we will use the H2 database. We will use the MicrostarterCLI to generate all CRUD operation code and configuration as following steps:
First, generate a Micronaut application from the Micronaut Launch and extract the project zip file in the c:\workspace folder. Alternatively, we can use the init Command of the MicrostarterCLI to generate the project directly from the Micronaut launch as follows:
mc init --name FruitService --package io.hashimatiAfter running the init command, go to the FruitService directory. Then, run the entity command to add the required dependencies, configure the service, and generate the necessary CRUD services code.
cd fruit
mc entity -e Fruit
Once you run the command, the MicrostarterCLI will start with the configuration question.
Answer the configuration question as follows.
| Option` | Answer | Description |
| Is the application monolithic? | no | To specify if the service is monolithic or microservice |
Enter the server port number between 0 - 65535 |
-1 | To set the server port. This service will use a random port number to run the services. |
| Enter the service id: | fruit-service | To set the service ID. |
| Select Reactive Framework | reactor | To user reactor framework in case the developer wants to user reactive data access. |
| Do you want to use Lombok? | yes | To use the Lombok library to generate the entity class. |
| Select Annotation: | Micronaut | Micronaut enables the developer to use Micronaut, JAX-RS, or Spring. This step instructs the MicrostarterCLI to use Micronaut annotation in generating the code. |
| Enter the database name: | fruits | to set the database name. |
| Select Database Type: | H2 |
to specify the database management engine. |
| Select Database Backend: | JDBC | To specify the database access |
| Select Data Migration: | liquibase | To use liquibase as a data migration tool to create the database schema. |
| Select Messaging type: | none | |
| Do you want to add cache-caffeine support? | yes | To use cache |
| Do you want to add Micrometer feature? | yes | To collect metrics on the endpoints and service calls. |
| Select Distributed Tracing: | Jaeger | To use Jaeger for distributed tracing. |
| Do you want to add GraphQL-Java-Tools support? | yes | To add GraphQL dependency to the project. |
| Do you want to add GRPC support? | no | If the answer is "yes," MicrostarterCli will prepare the project to be ready for the GRPC services. In this example, will not user GRPC, |
| Do you want to use File Services? | no | This article will not use storage services. |
| Do you want to configure VIEWS? | yes | To confirm if you want to add a "view" dependency. |
| Select the views configuration | views-thymeleaf | To add Thymeleaf dependency. |

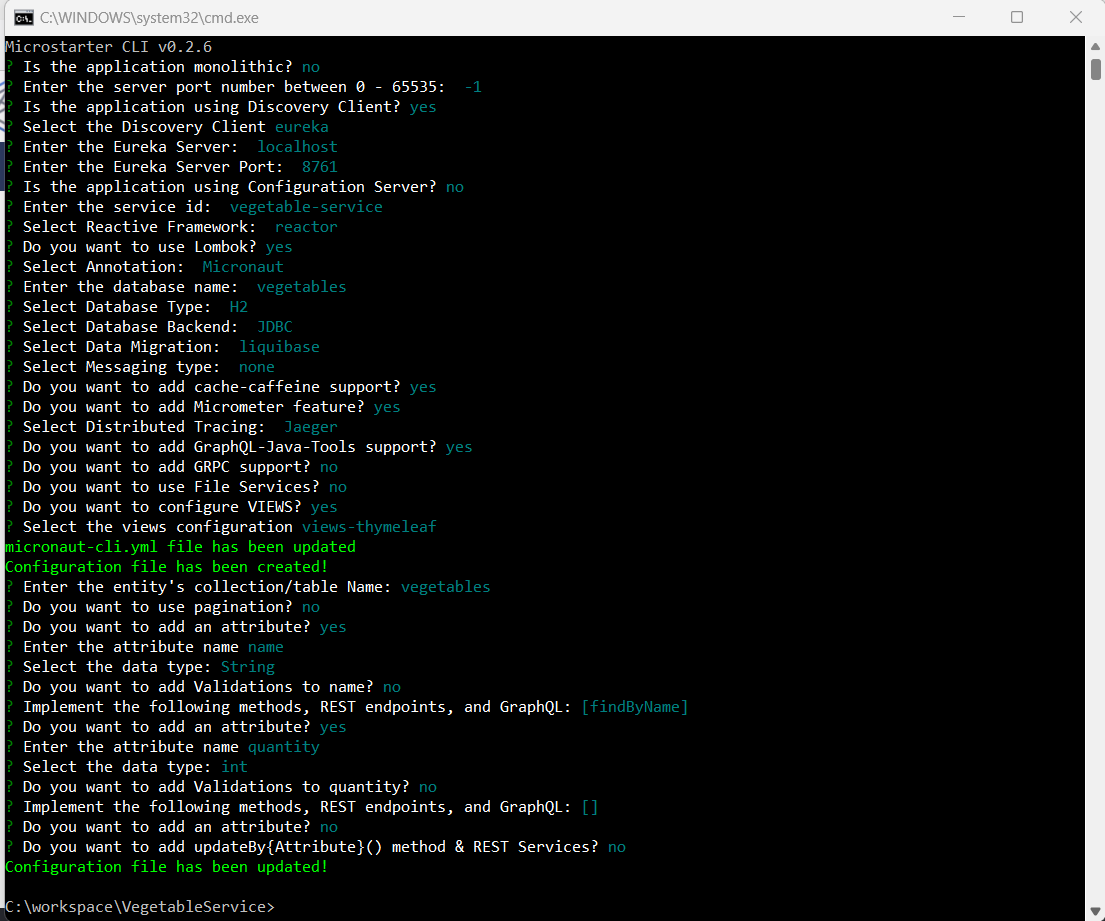
Once you complete the configuration, the MicrostarterCLI will ask you to enter the collection's name or the table. Then, it will prompt you to enter the attribute. Enter the attributes as follows:
| Attribute | Type | validation | FindBy()Method | FindAllBy() method | UpdateBy() Method |
|---|---|---|---|---|---|
| Name | String | - | Yes | Yes | No |
| quantity | Int | - | No | Yes | No |
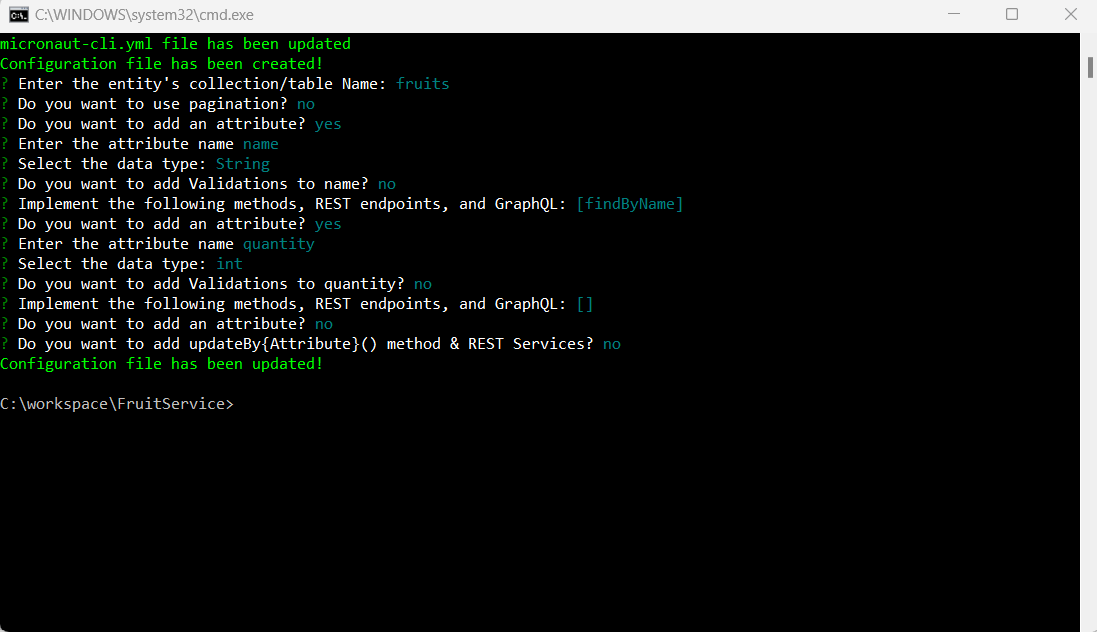
By the end of the step, the MicrostarterCLI will generate the classes of the entity, service, controller, client, test controllers, liquibase xml files, and configurations.
Step 2: Create Vegetable Service
The vegetable service will host the CRUD service of the Vegetable objects. To define it, we will repeat the same steps of Step 1 as follows:
Step 3: Create Eureka Server
In this step, we will create the Eureka service discovery server. The service will be listening on port 8761. The Fruit and Vegetable services will register in the Eureka server as we point their Eureka client to localhost and port 8761. To create the Eureka server project using MicorstarterCLI, run the below command from the c:\workspace
mc eureka -version 2.7.8 --javaVersion 11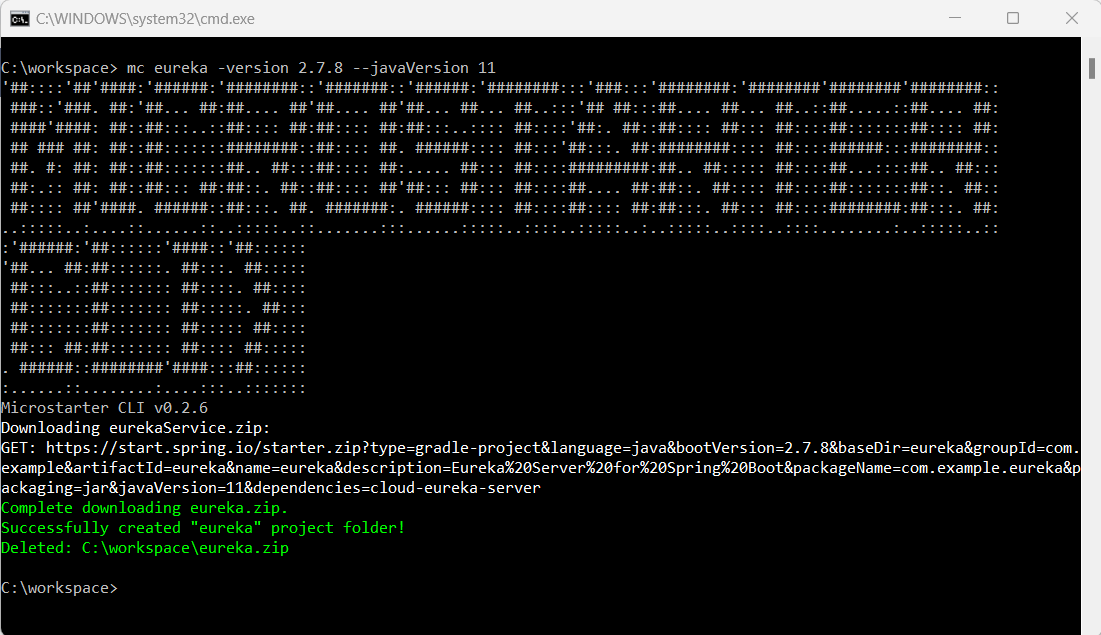
Step 4: Create a Gateway Service
The last component we will create is Spring Cloud Gateway. The gateway service will listen on port 8080. To generate the Gateway project using the MicrostarterCLI, run the gateway command below:
mc gateway -version 2.7.8 --javaVersion 11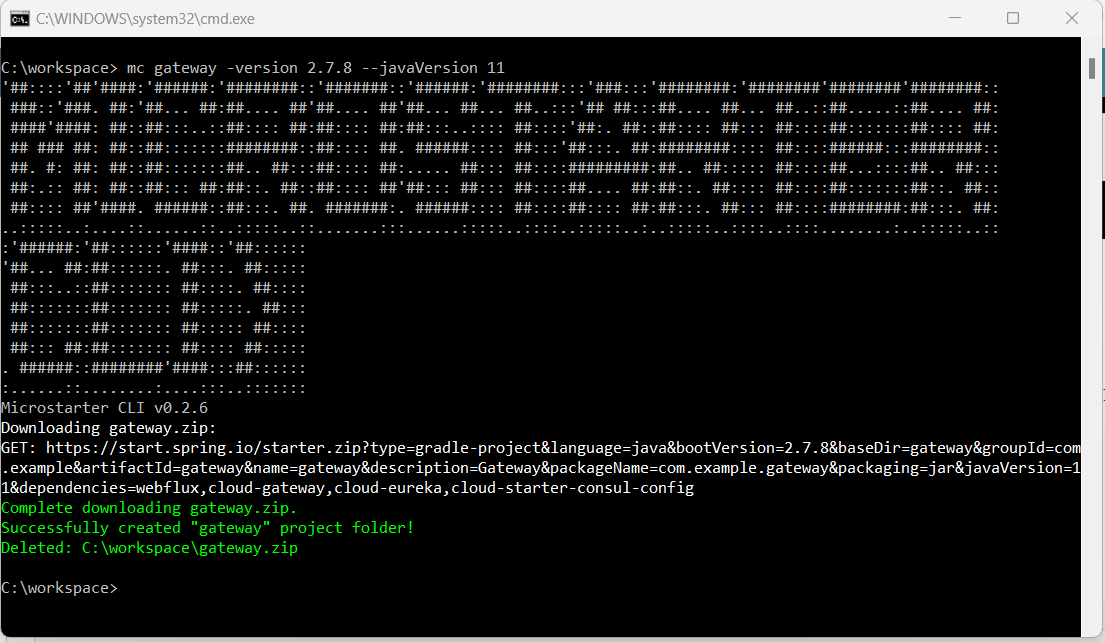
Step 5: Gateway/Microservice Routes Configurations
In this step, we will configure the root routes for both Fruit and Vegetable APIs. As generated by the MIcrostarterCLI, the root route for the Fruit API, as in @Controller annotation of io.hashimati.controllers.FruitController a class of the Fruit Service. The Vegetable API's root route is /api/v1/vegetable as in the io.hashimati.controllers.VegetableController class of the Vegetable Service. To register the routes, we will use the register subcommand of the gateway command. To run the command go to c:\workspace\gateway and run the below command:
mc gateway registerWhen the command run, the MicrostarterCLI will prompt you to enter the Service ID, Service Name, and the routes. Run the register subcommand twice to configure the root routes for the Fruit and the Vegetable APIs.
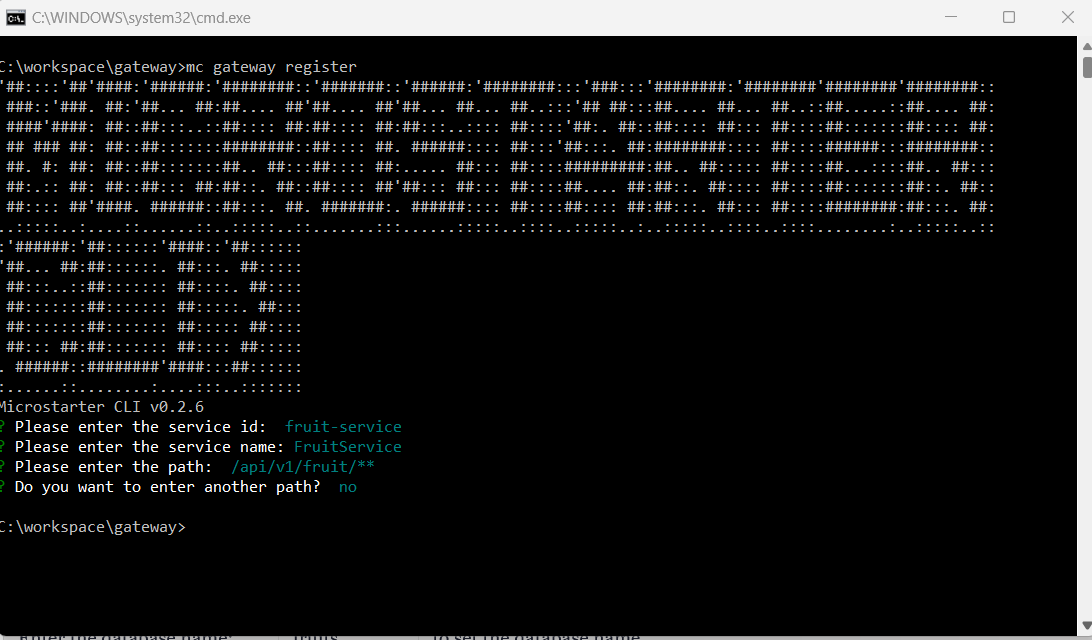
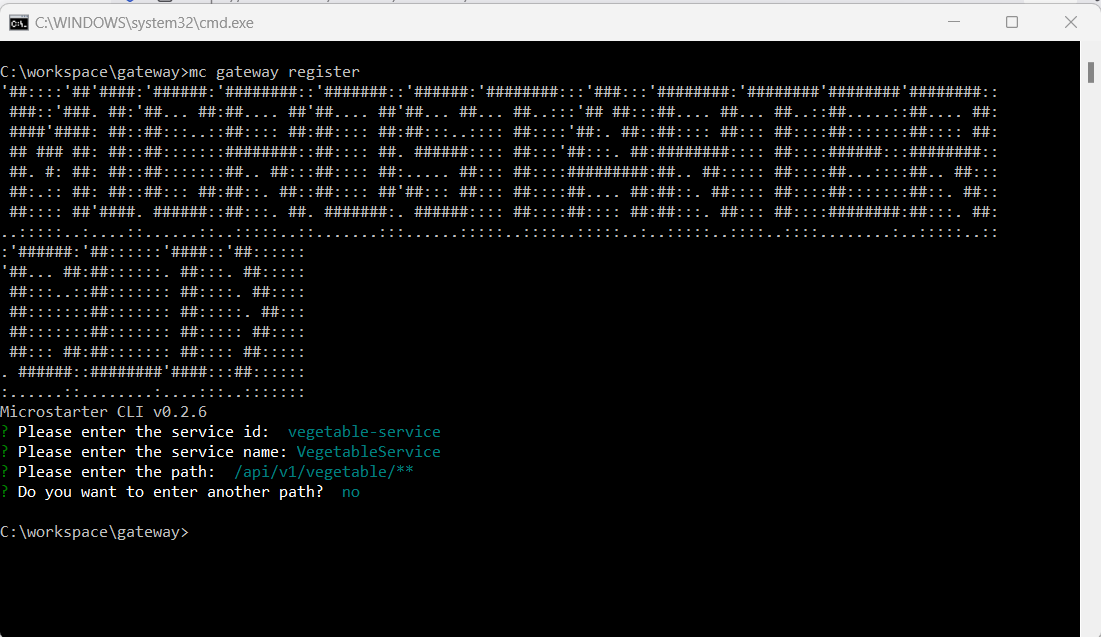
You configured the CRUD endpoints for the Fruit and Vegetable server from the Gateway by completing this step.
Run and Try
To run the service, we will create a run.bat file to launch all the services as below:
cd c:\workspace\eureka\
start gradlew bootRun -x test&

cd c:\workspace\FruitService
start gradlew run -x test&

cd c:\workspace\VegetableService
start gradlew run -x test&


cd c:\workspace\gateway
start gradlew bootRun -x test&
After running the run.bat file, all services start and run. wait until all the services complete their start-up process. Open this URL. You should see all services registered on the Eureka server.

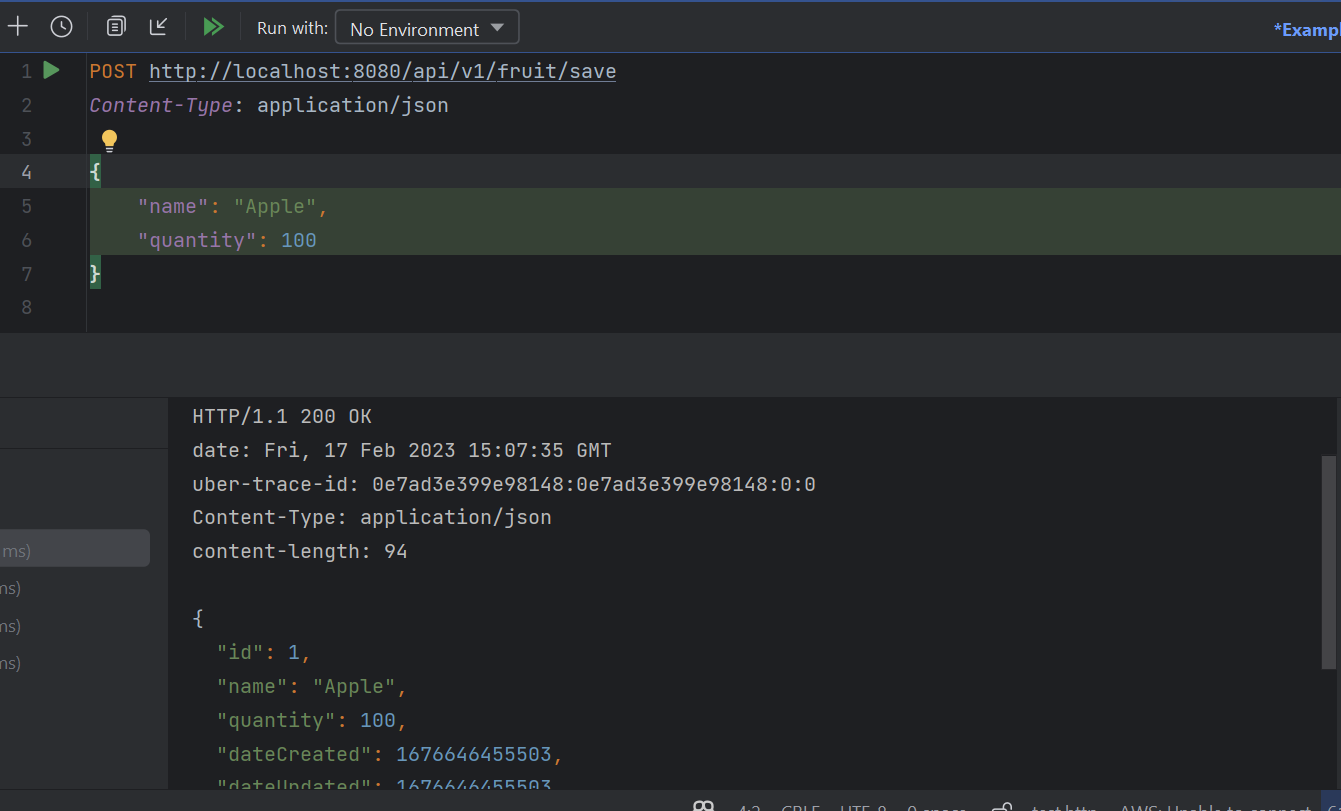
To try the CRUD services, you can use the .http file of IntelliJ. We will create test.http file as follows:
POST http://localhost:8080/api/v1/fruit/save
Content-Type: application/json

{
    "name": "Apple",
    "quantity": 100
}

###
GET http://localhost:8080/api/v1/fruit/findAll

###
POST http://localhost:8080/api/v1/vegetable/save
Content-Type: application/json

{
    "name": "Onion",
    "quantity": 100
}

###
GET http://localhost:8080/api/v1/vegetable/findAll
By running from IntelliJ, It works!
Conclusion
Using MicostarterCLI, you can generate the configuration of the needed component for Microservice Archtication like JWT security, distributed tracing, messaging, and observability. MicrostarterCLI also supports Groovy and Kotlin programming languages. Please visit the project repository for more information.
Check out the article example here.
Happy coding!
Opinions expressed by DZone contributors are their own.
Comments