Microservices and Spring Cloud Config Server
Spring Cloud's config server capabilities make updating microservices across your system a breeze. Let's walk through setting up and changing properties step by step.
Join the DZone community and get the full member experience.
Join For FreeWith microservices, we create a central config server where all configurable parameters of micro-services are written version controlled. The benefit of a central config server is that if we change a property for a microservice, it can reflect that on the fly without redeploying the microservice.
Before the microservices era, we created a properties files where we maintained our configurable parameters so that if we changed the parameter values or added or deleted a parameter, we generally needed to restart the application container. Moreover, think about the environments. Often, we have Development, Staging, and Prod, and each has separate URL for different services like JMS, JNDI, etc. Also, if the environment changes, we need to pick right properties file. For instance, for development, we need to load the development property file. Spring provides the Profile concept where, based on the passing profile, Spring loads the appropriate environment's properties.
Like if the profile value is dev it loads all {}-dev.properties.
But the main problem is that it is tied to the codebase or statically packaged, so any changes in the properties file means rebuilding and redeploying the application, which is a violation of the microservices principle, which clearly states:
Build just once and deploy it in any environment.
So, somehow, we need a technology that maintains all properties, and if any properties are changed, it will pick up the changes and reflect them without an application rebuild or restart.
The answer is Spring Cloud config server.
Spring Cloud Config Server Architecture
Let's cover a few important components of the config server.
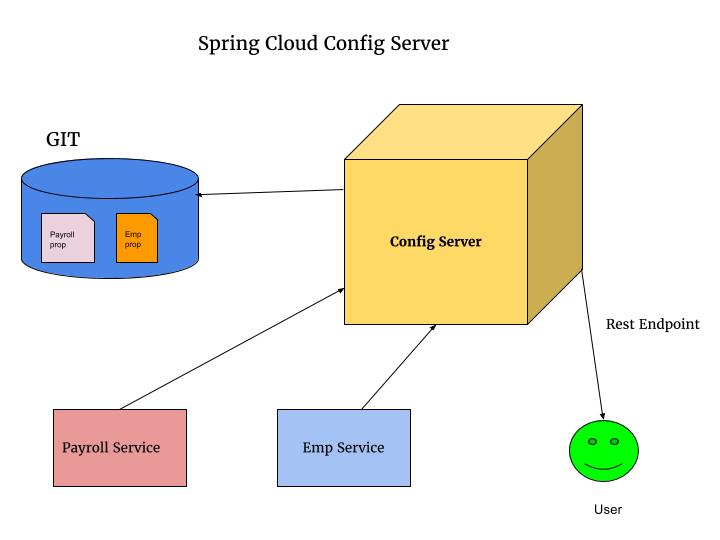
Repository area: The config server stores all microservices property files in a version control system so they can be... version controlled. And this version control system can be Git, the most popular, or SVN. Also, you can store it in a filesystem — then your profile should be native.
The config server stores each microservice property based on the Service ID. We can configure the microservice Service iD by giving a unique value of spring.application.name property in the bootstrap.properties file for that microservice.
Say I have an Employee Payroll microservice. I can create a Service ID as follows in my Employee Payroll bootstrap.property file.
spring.application.name=EmployeePayroll.Now, in the config server, we have a set of properties files for Employee Payroll based on environment like
EmployeePayroll-dev.properties

EmployeePayroll-stg.properties

EmployeePayroll-prod.properties
And those are based on profile value.
Note that the properties file name should be in the following format.
{ServiceID}-{profile}.properties.
If we do not give the profile name in the properties file, then it is considered as default. Here, EmployeePayroll-dev is the Service ID and dev/stg/prod are our environments.
REST endpoint: Every microservice needs to communicate with the config server so it can resolve the property value, as all properties are stored in thre. The config server publishes a REST endpoint through which microservices communicate, or we can see the properties in a browser.
Actuator: If any properties for a microservice have been changed, that means they have been refreshed through an Actuator refresh REST endpoint. By doing this, our microservice got updated without rebuilding the application.
Cloud bus: This is optional but very useful. Think if we needed to refresh the actuator endpoint manually for each service. That would be a hectic task, as a complex business domain has many microservices. In this scenario, the cloud bus helps to push the updated properties to all its subscribed microservices. But to trigger this action, we need to manually refresh one microservice endpoint. I will talk later about the cloud bus.
Load balancer: The config server should be highly available. If we maintain only one config server box/container, it would be a single point of failure. Ideally, it should be load balanced so that we can run multiple instances of config servers, and the load balancer pool should have one public address where every microservice communicates.
Config Server Architecture Diagram (Without Load Balancing and Cloud Bus)

Now we will create a config server using Spring Cloud.
Setting Up the Filesystem
Here I will setup a native filesystem-based config server. I am not using Git, so I will create a local file structure, but in production environments, please create a remote Git repository. To set up a local filesystem, execute the following commands in a Linux environment (same for Windows, but you just need to create a file using the GUI.)
- mkdir CentralRepo
- cd CentralRepo
- touch config.properties
- vi config.properties
- Hit insert
- Write welcome.message=Hello Spring Cloud
- Hit esc and wq!
Coding for the Config Server
To implement a config server, we will use the Spring Cloud Netflix config server distribution.
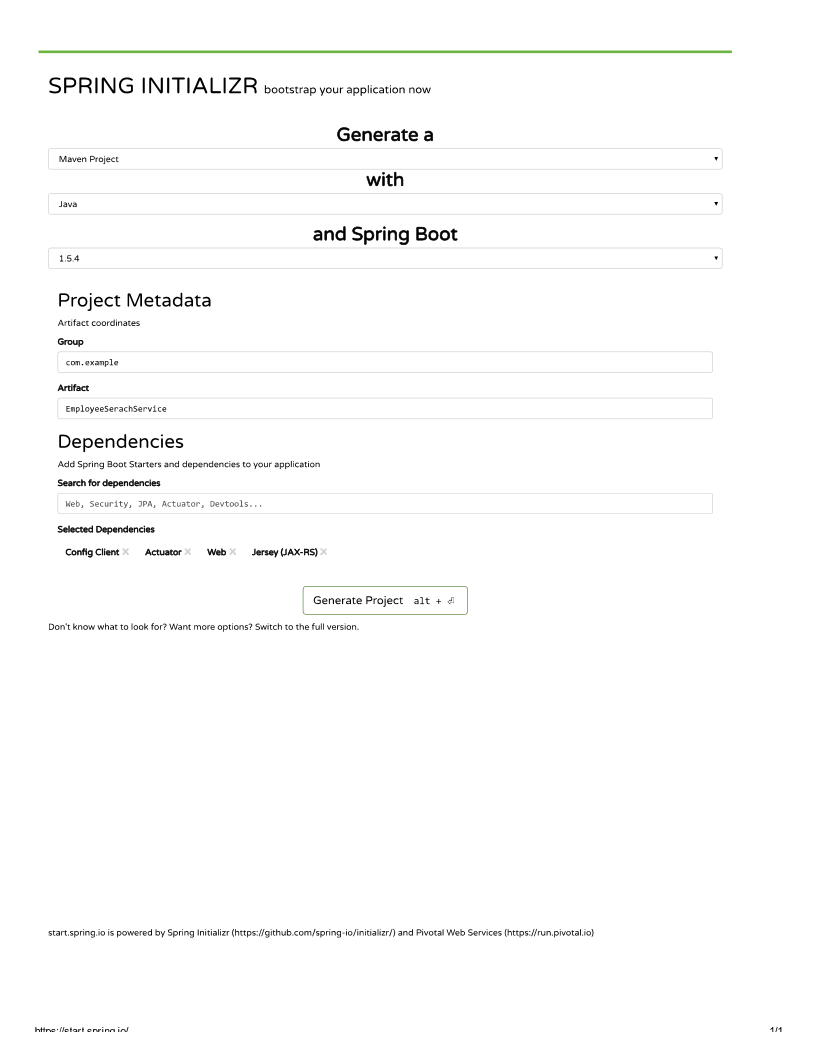
Go to https://start.spring.io/, then create a template project using the dependencies Actuator and Config server.
The page will look like the following:

Now hit the Generate Project button so it will download the code template.
After that, I extract the code template and then import the project as a Maven project into Eclipse.
If you open the pom.xml, it will look like the following:
<?xml version="1.0" encoding="UTF-8"?>
<project xmlns="http://maven.apache.org/POM/4.0.0" xmlns:xsi="http://www.w3.org/2001/XMLSchema-instance"
    xsi:schemaLocation="http://maven.apache.org/POM/4.0.0 http://maven.apache.org/xsd/maven-4.0.0.xsd">
    <modelVersion>4.0.0</modelVersion>

    <groupId>com.example</groupId>
    <artifactId>MicroserviceCongigServer</artifactId>
    <version>0.0.1-SNAPSHOT</version>
    <packaging>jar</packaging>

    <name>MicroserviceCongigServer</name>
    <description>Demo project for Spring Boot</description>

    <parent>
        <groupId>org.springframework.boot</groupId>
        <artifactId>spring-boot-starter-parent</artifactId>
        <version>1.5.4.RELEASE</version>
        <relativePath/> <!-- lookup parent from repository -->
    </parent>

    <properties>
        <project.build.sourceEncoding>UTF-8</project.build.sourceEncoding>
        <project.reporting.outputEncoding>UTF-8</project.reporting.outputEncoding>
        <java.version>1.8</java.version>
        <spring-cloud.version>Dalston.SR1</spring-cloud.version>
    </properties>

    <dependencies>
        <dependency>
            <groupId>org.springframework.boot</groupId>
            <artifactId>spring-boot-starter-actuator</artifactId>
        </dependency>
        <dependency>
            <groupId>org.springframework.cloud</groupId>
            <artifactId>spring-cloud-config-server</artifactId>
        </dependency>

        <dependency>
            <groupId>org.springframework.boot</groupId>
            <artifactId>spring-boot-starter-test</artifactId>
            <scope>test</scope>
        </dependency>
    </dependencies>

    <dependencyManagement>
        <dependencies>
            <dependency>
                <groupId>org.springframework.cloud</groupId>
                <artifactId>spring-cloud-dependencies</artifactId>
                <version>${spring-cloud.version}</version>
                <type>pom</type>
                <scope>import</scope>
            </dependency>
        </dependencies>
    </dependencyManagement>

    <build>
        <plugins>
            <plugin>
                <groupId>org.springframework.boot</groupId>
                <artifactId>spring-boot-maven-plugin</artifactId>
            </plugin>
        </plugins>
    </build>


</project>
Now open the MicroserviceConfigServerApplication.java under com.example.MicroserviceCongigServer package.
Put an @EnableConfigServer annotation on top of the class. By doing som we tell the Spring Boot app to treat it as a config server module.
MicroserviceConfigServerApplication.java
package com.example.MicroserviceConfigServer;

import org.springframework.boot.SpringApplication;
import org.springframework.boot.autoconfigure.SpringBootApplication;

@SpringBootApplication
@EnableConfigServer
public class MicroserviceConfigServerApplication {

    public static void main(String[] args) {
        SpringApplication.run(MicroserviceConfigServerApplication.class, args);
    }
}
Now rename the application properties to bootstrap.properties and put the following lines
server.port=9090
spring.cloud.config.server.native.searchLocations=file://${user.home}/CentralRepo/
SPRING_PROFILES_ACTIVE=native
So the config server runs on port 9090 and we put the native filesystem location so the config server gets the properties files from it rather than Git. We also tell a config server that this is a native profile.
At this point, we are all set to run MicroserviceConfigServerApplication.java. Now test it using http://localhost:9090/config/default/master, and and we can see following response:
{
    "name":"config",
    "profiles":[
        "default"
    ],
    "label":null,
    "version":null,
    "state":null,
    "propertySources":[
        {
            "name":"file:///home/shamik/centralRepo/config.properties",
            "source":{
                "welcome.message":"Hello Spring Cloud"
            }
        }
    ]
}Opinions expressed by DZone contributors are their own.

Comments