Migration from Lovable Cloud to Supabase
This article provides a step-by-step guide to migrating your data and users from Lovable Cloud to Supabase, breaking the process down into seven clear steps.
Join the DZone community and get the full member experience.
Join For FreeOnce your vibe-coded prototype on Lovable is up and running, you might be ready to graduate to self-hosting or a more advanced service that scales better and gives you more control. If your Lovable application uses Lovable Cloud, a common choice is to migrate your data to Supabase. Supabase is a popular Backend-as-a-Service platform based on PostgreSQL. It has a reasonable free tier and it offers baked-in solutions for auth, serverless code execution (Edge Functions), real-time database change notifications and REST API. One of the big advantages of the platform is that at its core it's based on Open Source technologies and the vast PostgreSQL ecosystem.
Internally, Lovable Cloud is already using a shared Supabase instance behind the scenes, but it doesn't expose direct database access making migration a little more involved than it needs to be. Below we list specific instructions for getting your data and users to Supabase in just 7 steps.
For this exercise, I created a demo "SpendSmart" Lovable application - it shows analytics for credit card spending, supports email-based authentication and enables row-level security to protect users from viewing each other's personal information and transactions.
I assume that you already have development tools installed on your machine, such as git , node
and npm.
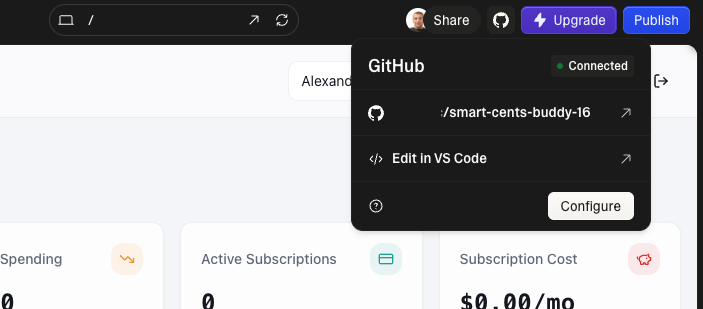
Step 1: Connect your GitHub account and sync your Lovable project to a repository
As our first step, we will need to export the project code from Lovable. Fortunately, it is easy to do using their GitHub sync. You can follow the detailed instructions in their official documentation.
Step 2: Clone your repository locally
After the project code has been successfully synced to GitHub, we can clone the repository locally:
git clone [email protected]:<USER>/<REPO>.git
cd <REPO>
Step 3: Create a new Supabase project
If you don't already have an existing project, navigate to and create it. As of this writing, their free tier provides a shared CPU, 500 MB RAM and 500 MB database size. While this is indeed not enough for a production database serving live traffic, it's plenty for moving your prototype from Lovable.
Step 4: Initialize Supabase config in your repo
After creating the Supabase project, we need to initialize it with our repo. Note that Lovable already exports Supabase database schema and RLS policies along with the original project code, so we don't need a separate step to export it.
npm install supabase --save-dev
npx supabase login
npx supabase link
npx supabase db push # this will create the schema and RLS policies
Step 5: Update the project's environment variables
The project's environment variables for connecting the application to Supabase backend are stored in the .env file in our repo:
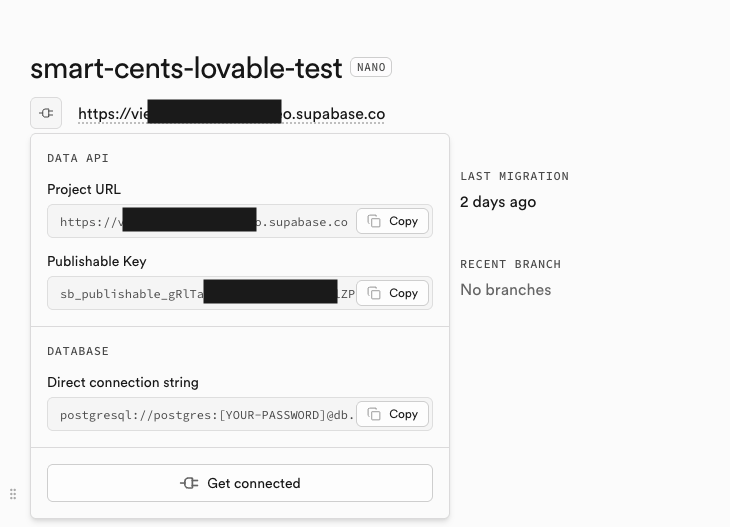
VITE_SUPABASE_PROJECT_ID="..."
VITE_SUPABASE_PUBLISHABLE_KEY="..."
VITE_SUPABASE_URL="..."
From the Supabase Project view in your Web Browser, get Supabase Project Id, Url, and Publishable Key.
Replace the values in the .env file for all three variables.
If your application is serving live traffic, at this point you should temporarily un-publish your app in Lovable=>Project Settings to preserve data integrity.
Step 6: Migrate auth data from Lovable
If your Lovable app is serving live traffic, before we proceed with steps 6 and 7, I recommend that you temporarily un-publish your app in Lovable=>Project Settings. This is done to preserve data integrity, because now we will be migrating the database itself.
Step 6 is a bit non-trivial as to make things clean, we need to capture records from Lovable Cloud's auth.users table and import it using Supabase's createUser() API. We wrote a simple helper script for that. Save it as migrate.js and edit SUPABASE_URL and SERVICE_ROLE_KEY:
import fs from 'node:fs';
import csv from 'csv-parser';
import { createClient } from '@supabase/supabase-js';
// 1. Configuration - Update these with your NEW project details
const SUPABASE_URL = // New Supabase Project URL
const SERVICE_ROLE_KEY = // Supabase secret key from Settings->API Keys
const supabase = createClient(SUPABASE_URL, SERVICE_ROLE_KEY);
async function migrateUsers(filePath) {
const users = [];
// 2. Read and parse the CSV
fs.createReadStream(filePath)
.pipe(csv({ separator: ';' })) // Using the semicolon delimiter from your example
.on('data', (row) => users.push(row))
.on('end', async () => {
console.log(`Found ${users.length} users. Starting migration...`);
for (const user of users) {
try {
// Parse the metadata JSON string
const metadata = user.raw_user_meta_data ? JSON.parse(user.raw_user_meta_data) : {};
const { data, error } = await supabase.auth.admin.createUser({
id: user.id, // Keeps the original ID so your foreign keys don't break
email: user.email,
password_hash: user.encrypted_password, // Injects the hash directly
user_metadata: metadata,
email_confirm: true // Prevents sending confirmation emails to everyone
});
if (error) {
console.error(`Error importing ${user.email}:`, error.message);
} else {
console.log(`Imported: ${user.email}`);
}
} catch (parseError) {
console.error(`Failed to parse data for ${user.email}:`, parseError.message);
}
}
console.log('Migration complete!');
});
}
// Get the filename from the command line argument
const csvFile = process.argv[2];
if (!csvFile) {
console.log('Usage: node migrate.js your_file.csv');
} else {
migrateUsers(csvFile);
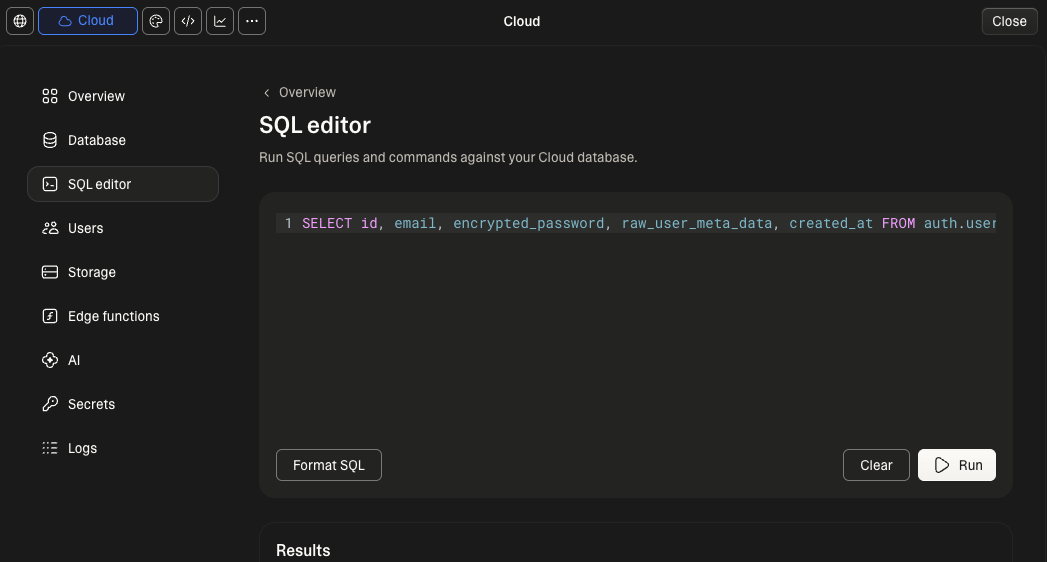
}Now run the following SQL query in Lovable Cloud to get the auth information. Export the result as a CSV file using the "Export CSV" button in the UI:
SELECT id, email, encrypted_password, raw_user_meta_data, created_at FROM auth.users;
After that, you can import the users using the script above:
npm install @supabase/supabase-js csv-parser
node migrate_auth.js query-results-export-....csv
Step 7: Migrate your tables from Lovable Cloud to Supabase (Final Step)
Finally, export each table's data as CSV files:
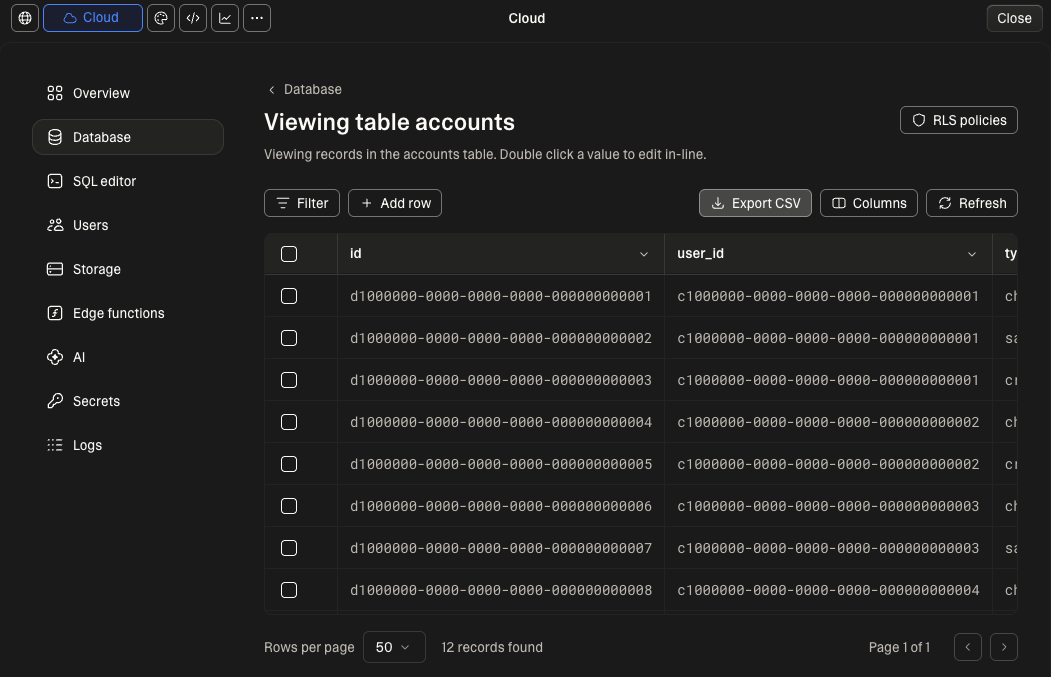
To import the data into your Supabase project, you can use pgAdmin, write a script with psql and the COPY command, or use a tool like Dsync. Here we used Dsync because it automates the whole import task and doesn't require custom scripting or ordering the files with respect to foreign keys in the schema.
Lovable exports CSV files with the naming convention <TABLE_NAME>-export-<DATE>.csv. Rename those files into <TABLE_NAME>.csv and put them into a temporary folder, like /tmp/love-export/public/. The "public" subfolder name will be interpreted by Dsync as the schema name. The file names will be interpreted as table names.
You will also need your new Supabase direct connection string (IPv4 compatible if IPv6 doesn't work):

The sample Dsync command:
dsync --mode InitialSync file:///tmp/love-export --delimiter=";" postgresql://postgres....:.....@....:5432/postgres"Done
After the Dsync command has successfully completed, you should check the tables in Supabase and ensure that they all exist and are populated.
You can now start your project locally, authenticate with the same credentials and see the same data in your app:
npm i
npm run devOpinions expressed by DZone contributors are their own.
Comments