Minions in Minikube - A Kubernetes Intro for Java Developers
Java developers, it would be despicable not to take a look at this cute project that will give you a hands-on introduction to Kubernetes.
Join the DZone community and get the full member experience.
Join For FreeWe want our microservices to be replicable, replaceable workers that we can easily upgrade or downgrade without any downtime and minimal management. We might say we want them to be our minions. In this article we’ll walk through a simple example to see what Kubernetes can do for us by creating and orchestrating an army of minions. You can code along with this article or clone the project from here.
Prerequisites
We will need to containerize our microservices to run them in Kubernetes—we’ll use Docker for this. Rather than using a cloud-hosted Kubernetes we’ll use Minikube so that we can sandbox locally.
The Aim
Our minion army will be Java microservices. We want different types of minions in our army so that we see what Kubernetes can do for us. So we’ll aim for each microservice to respond to a simple http request with a response like:

We'll use ASCII art to represent the minion types.
Building a Java Minion Service
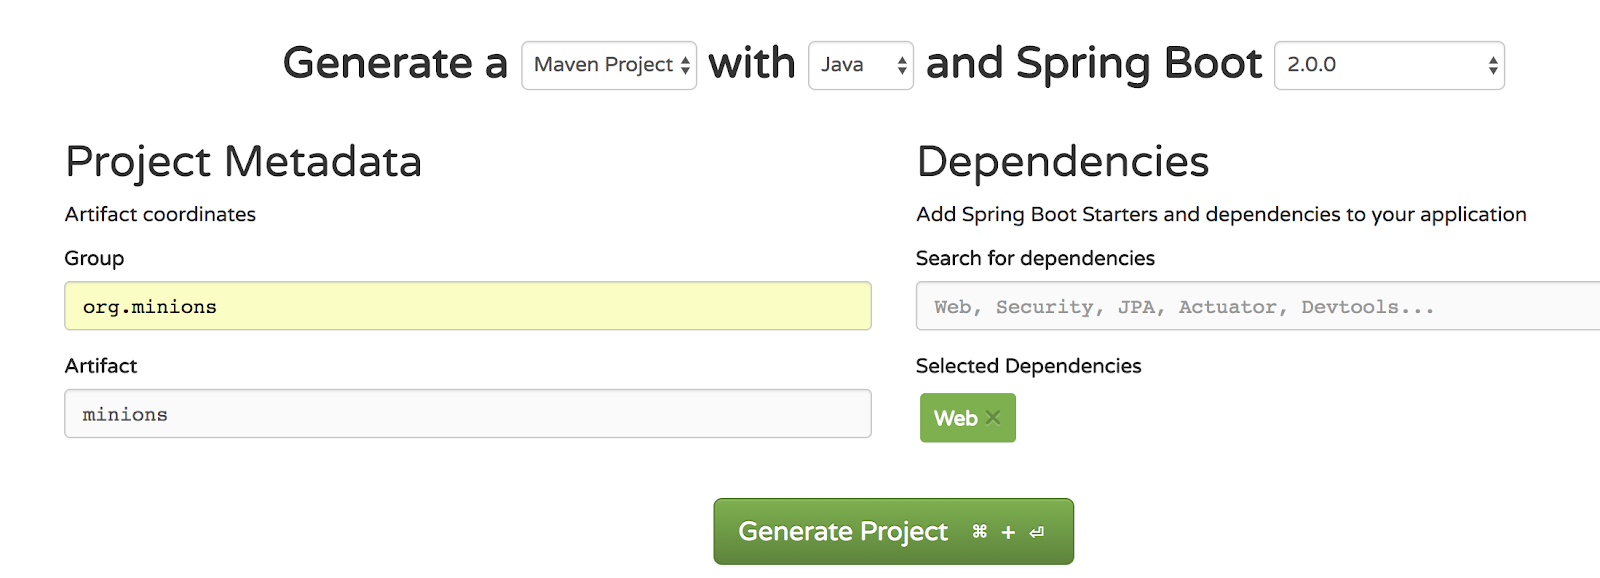
We can kickstart our microservice as a Spring Boot Web app using the Spring Initializr with the Web starter dependency:
In the project we’ll create a Controller annoted with @RestController to handle requests. We’ll use an @RequestMapping(method=GET) to provide a response body. So to start with we can do something like:
@RequestMapping( method=GET)
@ResponseBody
public String minion() throws UnknownHostException {

   StringBuilder stringBuilder = new StringBuilder();
   stringBuilder.append("Host: ").append(InetAddress.getLocalHost().getHostName()).append("<br/>");
   return stringBuilder.toString();

}
But this won’t quite give us what we want. We could output the ASCII art here but which minion type do we choose? For this we can use a trick. We’ll create one app that can take the form of any minion type we choose. To do that we’ll need it to contain a library of ASCII art minions. So we create a class called MinionsLibrary that we annotate with @Component and inside we create a map that we initialise with some minions from this blog :
@Component
public class MinionsLibrary {

    private Map<String,String> map = new HashMap<>();

    public MinionsLibrary(){

      map.put("one-eyed-minion",<COPY-PASTE MINION ASCII ART HERE>);
      map.put("two-eyed-minion",<COPY-PASTE MINION ASCII ART HERE>);
      map.put("sad-minion",<COPY-PASTE MINION ASCII ART HERE>);
      map.put("happy-minion",<COPY-PASTE MINION ASCII ART HERE>);

    }
}
Alternatively you can get the class from https://github.com/ryandawsonuk/minions/tree/master/src/main/java/org/minions/demo
Then we can tell our microservice which minion type to be. We can do this using the spring application name property (which we’ll later be able to set using a docker environment variable). It’ll also help us later to show the version of our application in the response so now our Controller becomes:
@RestController
public class Controller {

    private final String version = "0.1";

    private MinionsLibrary minionsLibrary;

    @Value("${spring.application.name}")
    private String appName;

    public Controller(MinionsLibrary minionsLibrary){
        this.minionsLibrary=minionsLibrary;
    }

    @RequestMapping( method=GET)
    @ResponseBody
    public String minion() throws UnknownHostException {

        StringBuilder stringBuilder = new StringBuilder();
        stringBuilder.append("Host: ").append(InetAddress.getLocalHost().getHostName()).append("<br/>");
        stringBuilder.append("Minion Type: ").append(appName).append("<br/>");
        stringBuilder.append("IP: ").append(InetAddress.getLocalHost().getHostAddress()).append("<br/>");
        stringBuilder.append("Version: ").append(version).append("<br/>");
        stringBuilder.append(minionsLibrary.getMinion(appName));
        return stringBuilder.toString();
    }
}
Now the library ‘image’ will be chosen to match the application name, which will be the minion type name (e.g. ‘one-eyed-minion’).
Dockerise and Deploy
We need to create a Docker image for our app. We want to build the exectuable jar inside the Docker image and then start the Java app when the container starts. We can do this using a multi-stage Docker build. The Dockerfile is:
FROM maven:3.5-jdk-8 as BUILDMINION
COPY src /usr/src/myapp/src
COPY pom.xml /usr/src/myapp
RUN mvn -f /usr/src/myapp/pom.xml clean package -DskipTests

FROM openjdk:alpine
COPY --from=BUILDMINION /usr/src/myapp/target/*.jar /maven/
CMD java $JAVA_OPTS -jar maven/*.jar
Everything down to ‘FROM openjdk:alpine’ builds the JAR and then just the jar is copied over into a subsequent build stage based on the lightweight openjdk:alpine image. We start it with the JAVA_OPTS param exposed so that we’ve got the option to limit memory consumption (see this article about reducing memory consumption).
Then we can build an image using the command "docker build . -t minion”
And we can deploy it by creating a Kubernetes deployment file—let’s call it “minion-army.yml”. This will contain entries for each minion type. Here is an entry for one minion type:
apiVersion: apps/v1beta1
kind: Deployment
metadata:
 name: one-eyed-minion
labels:
   serviceType: one-eyed-minion
spec:
 replicas: 2
template:
   metadata:
     name: one-eyed-minion
     labels:
       serviceType: one-eyed-minion
   spec:
     containers:
       - name: one-eyed-minion
         image: minion:latest
         imagePullPolicy: Never
         ports:
         - containerPort: 8080
         env:
         - name: JAVA_OPTS
           value: -Xmx64m -Xms64m
         - name: SPRING_APPLICATION_NAME
           value: "one-eyed-minion"
---
apiVersion: v1
kind: Service
metadata:
 name: one-eyed-minion-entrypoint
namespace: default
spec:
 selector:
   serviceType: one-eyed-minion
ports:
   - port: 8080
     targetPort: 8080
     nodePort: 30080
type: NodePort
Note that the “SPRING_APPLICATION_NAME” variable is automatically matched to the spring.application.name property so that this minion service becomes a one-eyed-minion. There will be two instances (replicas) of this minion type available and the Kubernetes service will automatically route requests to one or the other of them.
The Service will be exposed to the world outside Kubernetes—with Minikube a request to port 30080 will go to the Service. (This bit of the Service would be a little different for real Kubernetes as we’d use LoadBalancer rather than NodePort and wouldn’t be restricted to the minikube port range.) The Service will handle it using Pods that are matched to the Service. We will have one Service per minion type.
The Deployment for the minion type will create two Pods. Each will be a minion of that type.
We can repeat the configuration above for each minion type, each time increasing the external port number so that different ports are used. Or we can use this Github repository, which also has additional configuration for doing a minion version upgrade without downtime. (We could avoid the repetition here if we used helm but we don’t want to add more tools than we have to.)
Create the Army
First start minikube:
minikube start --memory 4000 --cpus 3Wait for it to start then link your Docker registry to the Minikube one and build the minion image for Minikube:
eval $(minikube docker-env)
docker build . -t minion
Then we can deploy the army:
kubectl create -f minion-army.ymlAnd see the troop types:
open http://$(minikube ip):30080
open http://$(minikube ip):30081
open http://$(minikube ip):30082
open http://$(minikube ip):30083
Each will look a lot like the happy-minion page from the beginning of the article.
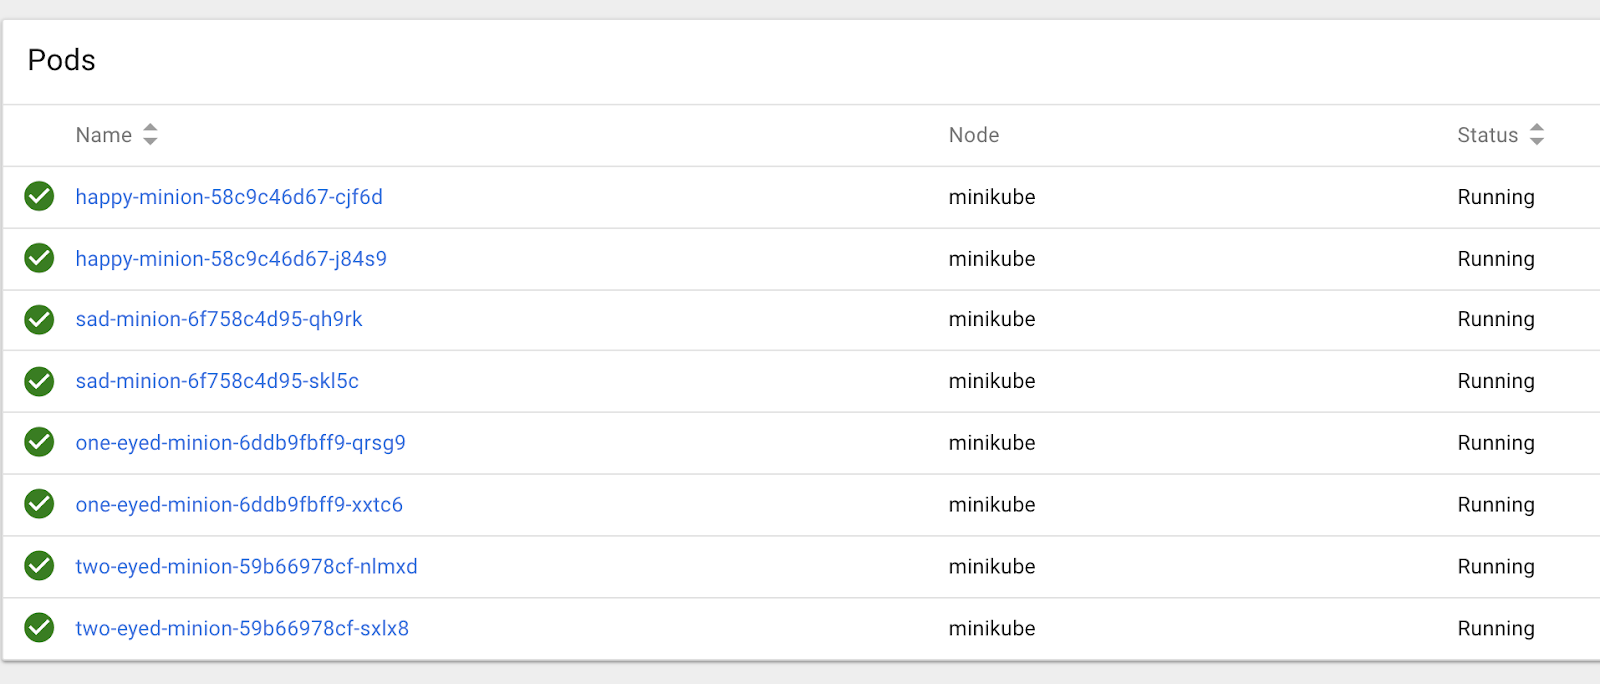
And we can see the whole army by doing “ kubectl get pods ” or doing “ minikube dashboard” and going to the Pods page:
Creating More Troops
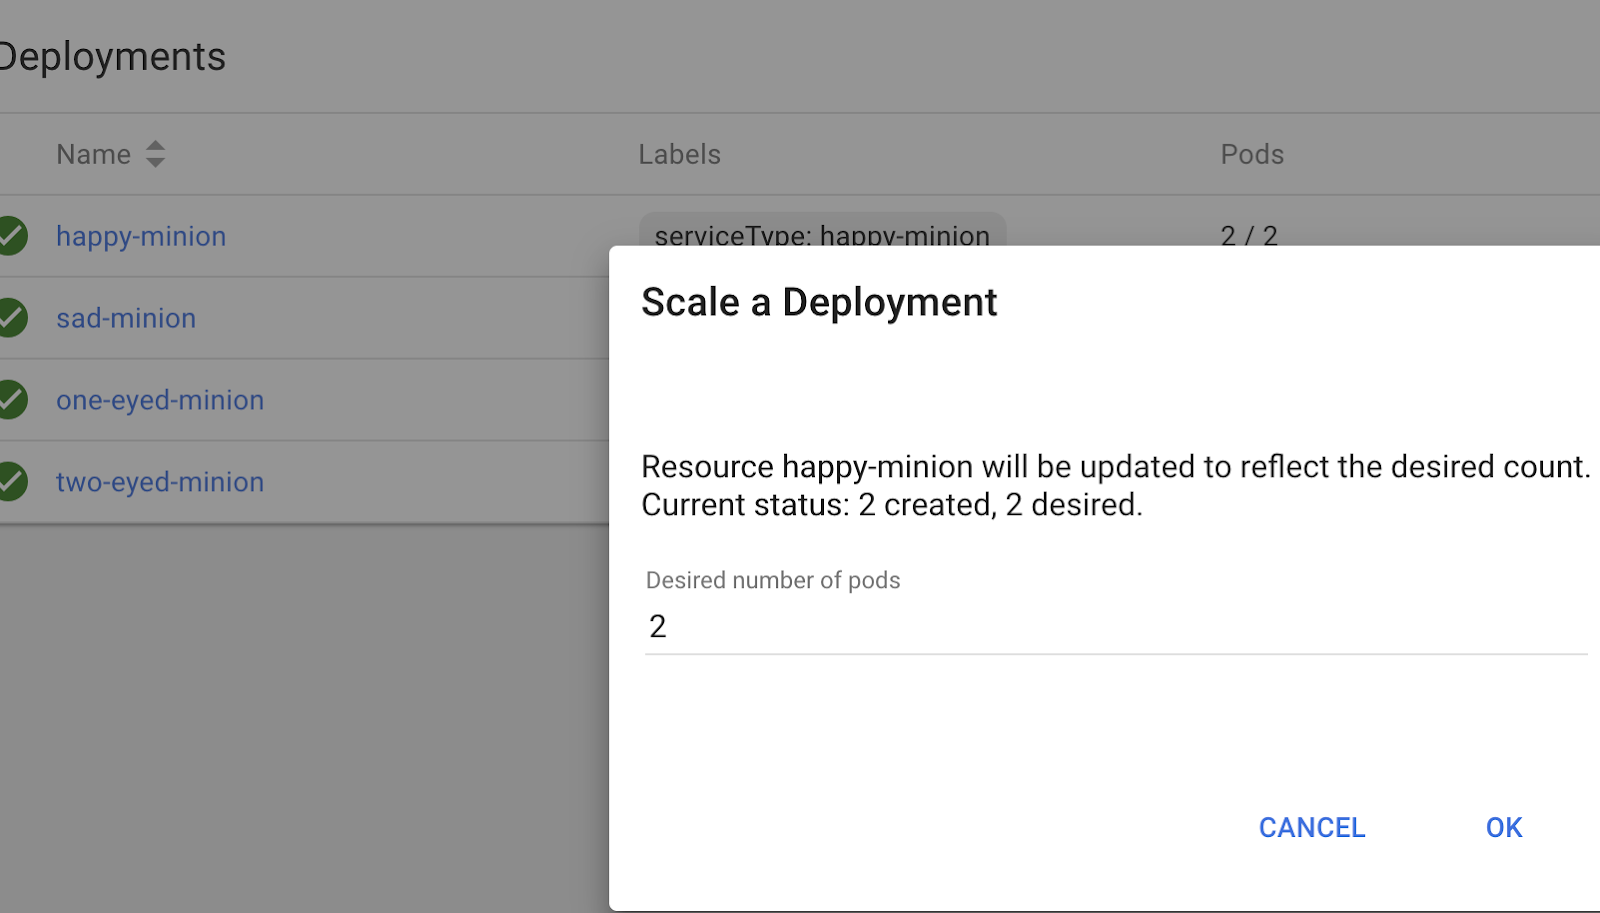
We can create more minions of a particular type under the Deployments section of the minikube dashboard:
One Minion Falls, Another Takes His Place
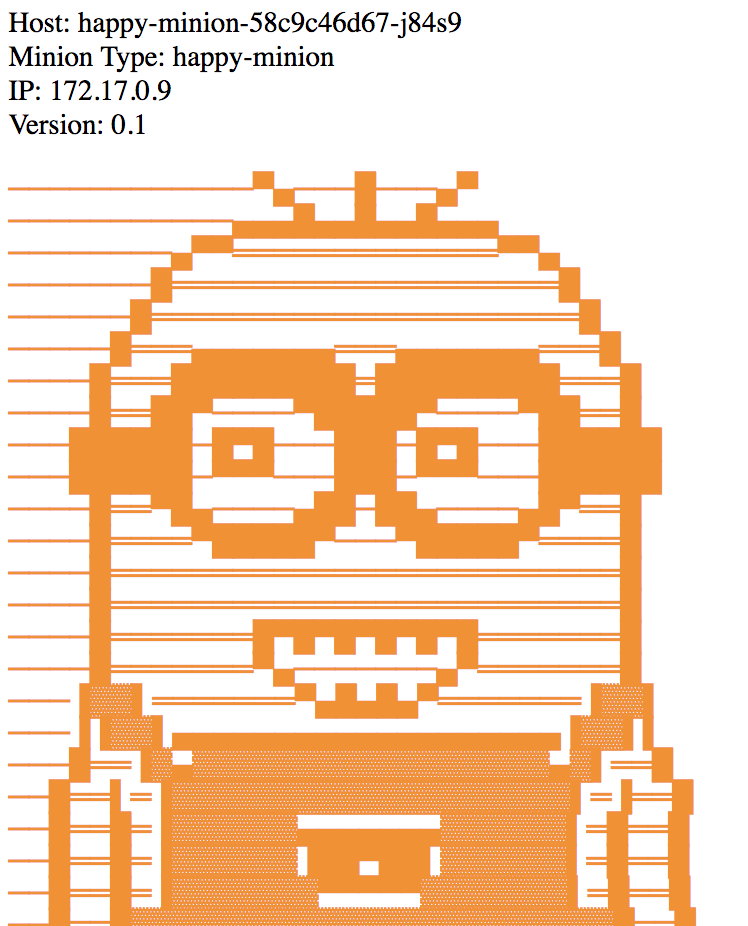
Let’s say this is what we get when we hit our happy minion Service from the browser:
What will happen if we kill the “happy-minion-58c9c46d67-j84s9”? We can try it with a delete from the Pods section of the dashboard or:
kubectl delete pod happy-minion-58c9c46d67-j84s9If you hit refresh in the browser a few times (it could take a little while to kill the minion), you’ll see that the other minion of that type is then used by the Service. And if you go to the Pods section of the dashboard you’ll see that Kubernetes creates a new Pod to take the place of the one you deleted so that there remain two for that Deployment.
Minion Upgrades
We can also see a rolling upgrade on our minions. For this we should have the following under the ‘spec’ section (it can go immediately beneath ‘replicas’ at the same level) in each Deployment section in our minions-army.yml file:
minReadySeconds: 10
strategy:
   type: RollingUpdate
   rollingUpdate:
     maxUnavailable: 1
     maxSurge: 1
Then we can change the version in the Controller class to 0.2, save it and then do:
docker build . -t minion:0.2Then open minion-army.yml and find-replace all the "latest" with "0.2". Save the changes and do:
kubectl apply -f minion-army.yml --recordRefresh the browser of one of the minion types to see the version change in line with what you see from kubectl rollout status deployment where <deployment_name> is a minion type (e.g. one-eyed-minion).
Minion Rollbacks
To see the history of what was deployed do kubectl rollout history deployment <deployment_name> and to rollback do kubectl rollout undo deployment <deployment_name> --to-revision=1 (can take a little while)
Destroy the Army
Destroy the army with:
kubectl delete -f minion-army.ymlStop minikube with “minikube stop”.
Opinions expressed by DZone contributors are their own.
Comments