Mule 4 CI/CD Using GitLab Pipelines and JFrog Artifactory
A practical CI/CD strategy for automating deployments of Mule 4 applications into CloudHub using GitLab CI/CD pipelines and JFrog Artifactory.
Join the DZone community and get the full member experience.
Join For FreeIntroduction to CI/CD Methodologies
Continuous integration (CI) and continuous delivery (CD) defines a practice that enables application development teams to deliver code changes more frequently and reliably. The implementation is also known as the CI/CD pipeline. CI/CD is one of the best practices for DevOps teams to implement. It involves continuously building, testing, and deploying code changes at every small cycle, reducing the chance of developing new code based on bugged or failed previous versions.
Mule 4 CI/CD Framework Tool Set
For this example we will use the below applications to implement the CI/CD framework for deploying Mule 4 applications into CloudHub:
1. GitLab Enterprise Edition 12.1.6 on Red Hat Enterprise Linux (RHEL), alternatively you can use gitlab.com free tier
2. Apache Maven 3.6.3
3. JFrog Artifactory (OSS) version 7.4.3
4. Mule Application version 4.3.0
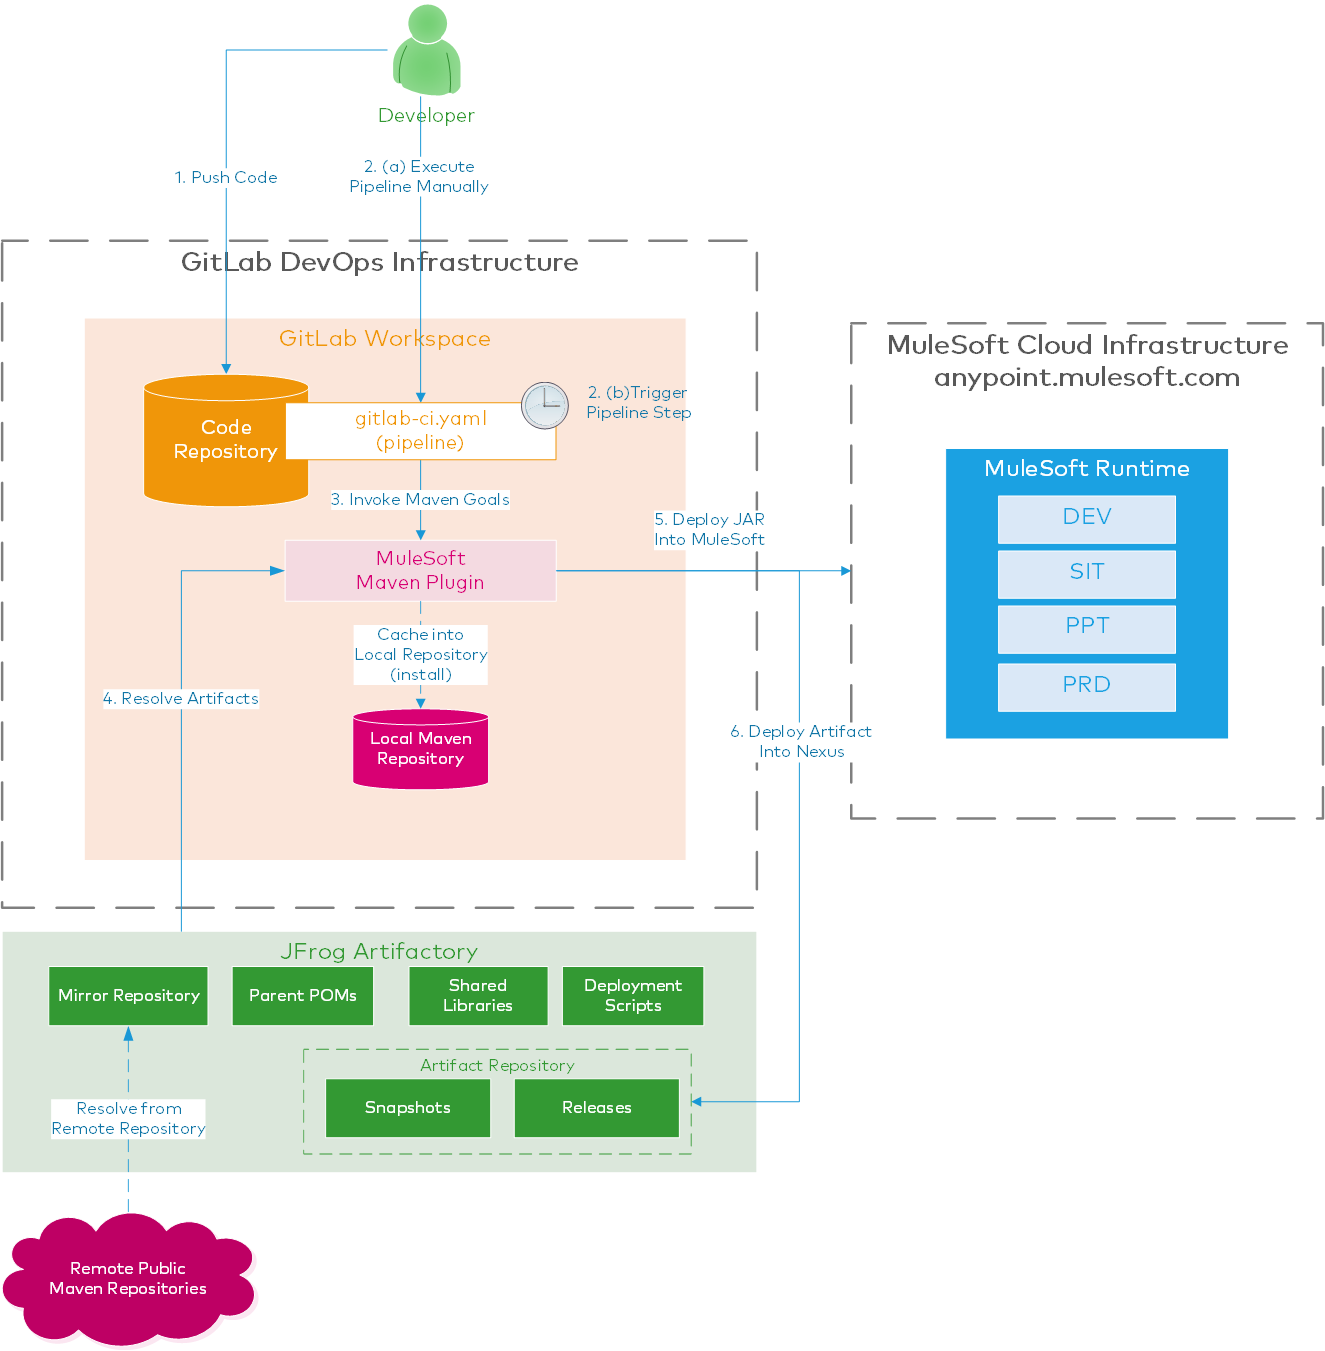
Below diagram describes the CI/CD flow:
Installations
To install GitLab EE and JFrog in your workstation please follow the steps mentioned in the below links:
Maven Installation: http://maven.apache.org/install.html
GitLab EE Installation: https://about.gitlab.com/install/
JFrog Artifactory (OSS) Installation: https://www.jfrog.com/confluence/display/JFROG/Installing+Artifactory
Purpose of GitLab
GitLab acts as a code repository as well as the CI/CD execution engine, we will leverage the GitLab CI feature which allows the creation of pipeline scripts to deploy the application by cloning from the code repository, compiling it, running MUnit (optionally) and finally deploying into the CloudHub. The component which executes the pipelines is called a GitLab Runner.
Purpose of JFrog Artifactory
Artifactory is required for resolving dependencies required for building your application. For example, a Parent POM file, or a shared library. It is also used as a mirror for multiple remote repositories using a single virtual artifactory repository.
Step 1: Set Up Your Artifactory
1. Login to artifactory using the admin user (default password is 'password' which is recommended to be changed after you log in).
http://{artifactory_host}:{artifactory_port}/ui/ where default artifactory_port is 8083
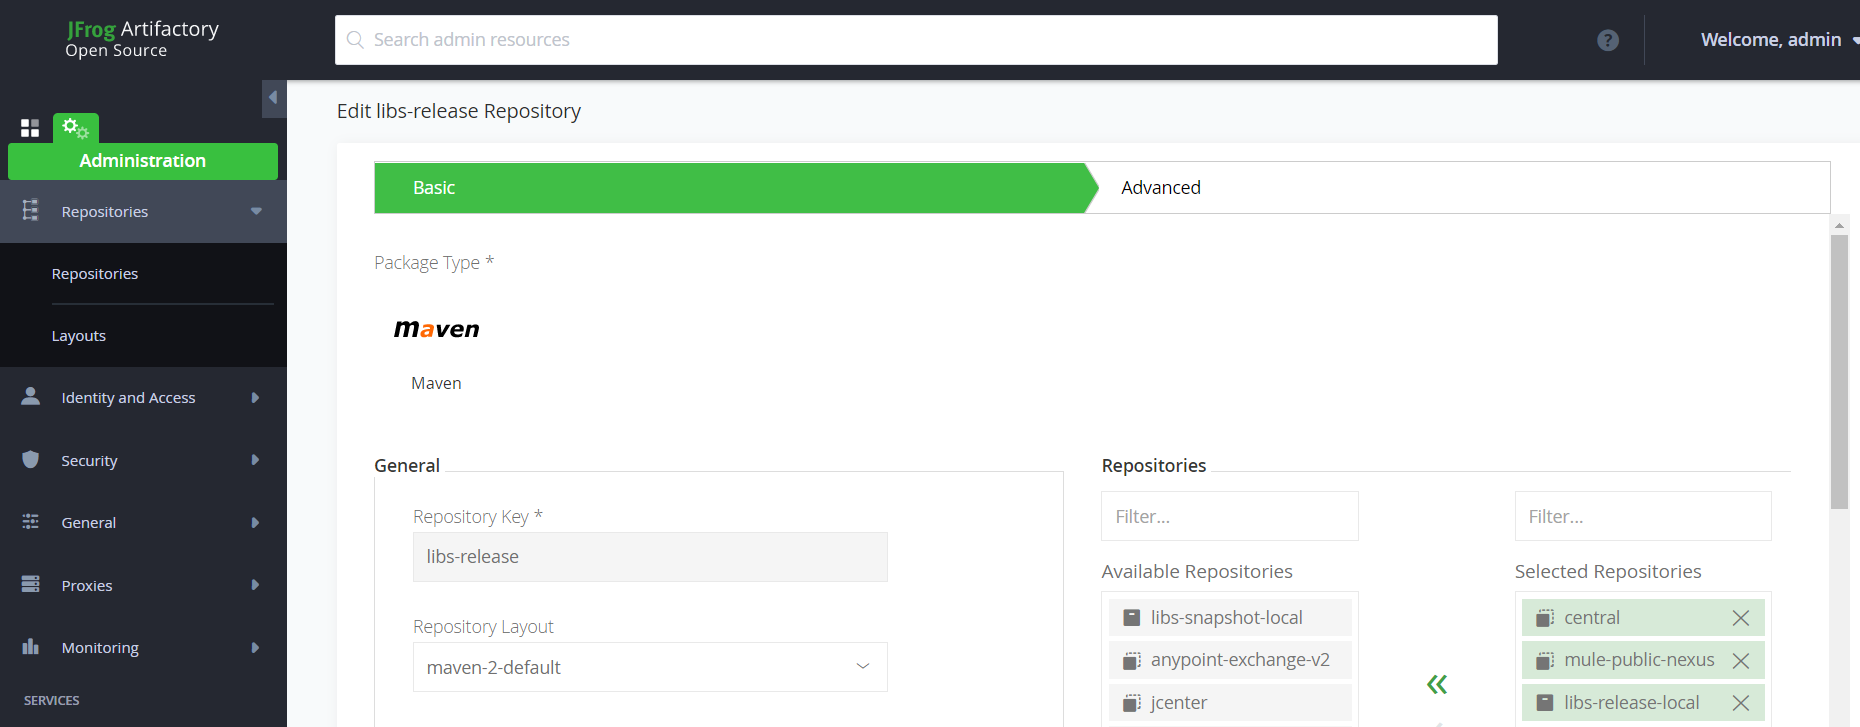
2. Go to Administration -> Repositories -> Remote (Tab)
Add below Remote Repositories:
- Central — https://repo.maven.apache.org/maven2
- Mule-Public-Nexus — https://repository.mulesoft.org/nexus/content/repositories/public
3. Go to Administration -> Repositories -> Virtual (Tab)
Add these 2 remote repositories in the virtual repository libs-release which will be created by default. So hereon, the virtual repository URL — http://{artifactory_host}:{artifactory_port}/artifactory/libs-release will be used to resolve the dependencies using Maven mirror configurations.
3. Now edit your <<User Home>>/.m2/settings.xml if the file doesn't exist copy from <<Maven Home>>/conf to resolve all your dependencies using the artifactory mirror:
x
<mirror>
<id>jfrog_mirror</id>
<mirrorOf>*</mirrorOf>
<name>JFrog Artifactory Mirror for resolving Remote Repositories</name>
<url>http://{artifactory_host}:{artifactory_port}/artifactory/libs-release/</url>
</mirror>
4. Encrypt the passwords of the artifactory users in the Maven settings.xml following the steps mentioned in the Apache Maven website:
https://maven.apache.org/guides/mini/guide-encryption.html
Add the server credentials using the encrypted passwords.
xxxxxxxxxx
<servers>
<server>
<id>jfrog_mirror</id>
<username>admin</username>
<password>{4SiWJu2DwqAHa4fryKSeXTj5P6PqUqwm1rXJKA/m0O8=}</password>
</server>
<server>
<id>jfrog_snapshot</id>
<username>admin</username>
<password>{4SiWJu2DwqAHa4fryKSeXTj5P6PqUqwm1rXJKA/m0O8=}</password>
</server>
<server>
<id>jfrog_release</id>
<username>admin</username>
<password>{4SiWJu2DwqAHa4fryKSeXTj5P6PqUqwm1rXJKA/m0O8=}</password>
</server>
</servers>
Note that the jfrog_mirror is the id of the mirror configuration. The other two credentials will be used later when we mention the artifactory as the distribution management server in the POM files.
This settings.xml needs to be shared with the Developers so they use it in their local workspace so you may use a different user instead of the admin which has sufficient privileges.
Step 2: Set Up a GitLab Runner With Shell Executor
GitLab Runner is the open-source project that is used to run your jobs and send the results back to GitLab. It is used in conjunction with GitLab CI/CD, the open-source continuous integration service included with GitLab that coordinates the jobs. Main features of the GitLab runner are:
- Allows:
- Running multiple jobs concurrently.
- Using multiple tokens with multiple servers (even per-project).
- Limiting the number of concurrent jobs per-token. Tokens will be specific to the GitLab group or individual repositories.
- Jobs can be run:
- Locally.
- Using Docker containers.
- Using Docker containers and executing jobs over SSH.
- Using Docker containers with autoscaling on different clouds and virtualization hypervisors.
- Connecting to the remote SSH server.
According to your platform follow the steps mentioned in the GitLab website to install the GitLab runner in your server.
https://docs.gitlab.com/runner/install/
- It is important to install Maven in the server where the GitLab runner is installed, for this example we will use the shell executor for the GitLab runner so that it will allow you to execute shell commands like mvn (for Maven).
- To use the GitLab runner you need to register it with the GitLab instance (either your GitLab EE installation or ). Follow the steps to register your GitLab runner, for this example, we will register it with the GitLab group so it will be shared across all the repositories so in that case, it is called the group or shared runner; however, you may register your runner with a particular repository so it will be a private runner.
- In case you want your runner to execute concurrent jobs, you can configure the same in the config.toml file. Ref: https://docs.gitlab.com/runner/configuration/advanced-configuration.html
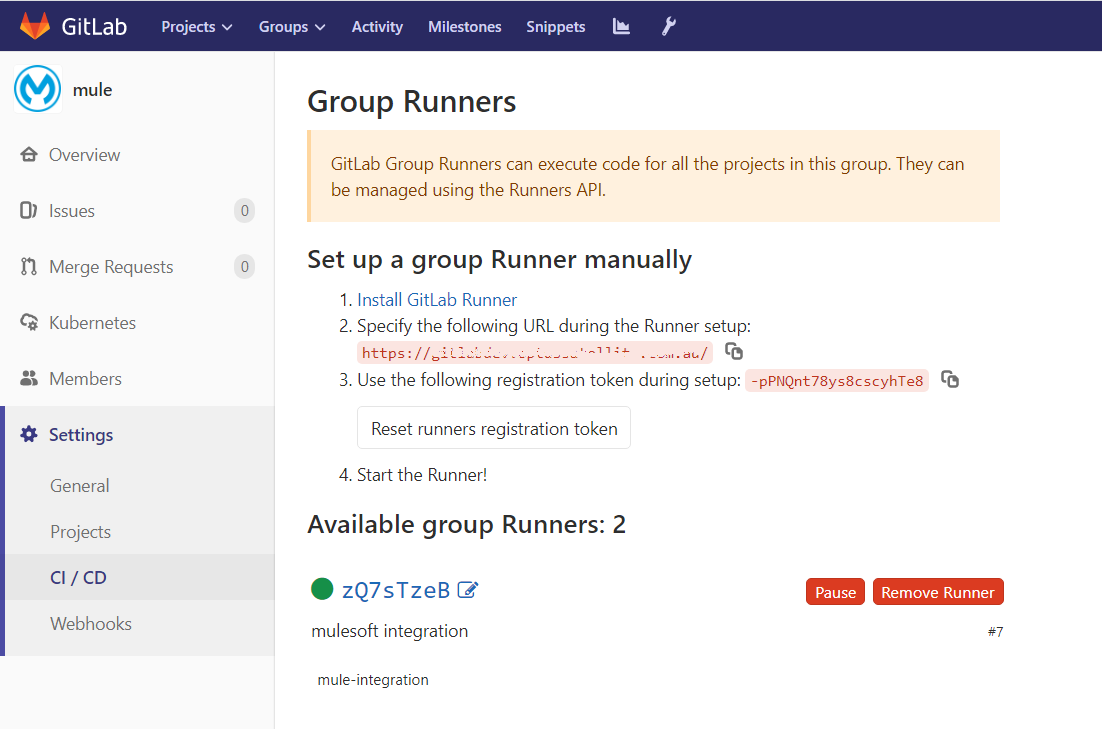
- Create the runner with the tag — mule-integration so it can be referred from the pipeline script.
Step 3: Create a Parent POM and Deploy Into Artifactory
Maven parent POM (or super POM) is used to structure the project to avoid redundancies or duplicate configurations using inheritance between pom files. It helps in easy maintenance in the long term. In our example, we will use it to maintain the Mule Maven Plugin configuration.
1. Mention your artifactory host and port in the parent pom file. Note the properties mentioned in the CloudHub maven deployment plugin such as ${MULE_ORG}, ${MULE_USER}, etc. These will be configured in GitLab and should not be hard-coded in the POM file.
2. In Step 1 we created the credentials for the server — jfrog_release so make sure the same is mentioned in the <id> element of the distribution management repository in the parent pom.
x
<project
xmlns="http://maven.apache.org/POM/4.0.0"
xmlns:xsi="http://www.w3.org/2001/XMLSchema-instance"
xsi:schemaLocation="http://maven.apache.org/POM/4.0.0 https://maven.apache.org/xsd/maven-4.0.0.xsd">
<modelVersion>4.0.0</modelVersion>
<groupId>com.myorg</groupId>
<artifactId>my-parent-pom</artifactId>
<version>1.0.0</version>
<packaging>pom</packaging>
<profiles>
<profile>
<id>artifactReleaseDeployment</id>
<distributionManagement>
<repository>
<id>jfrog_release</id>
<name>artirelease</name>
<url>http://artifactoryhost:artifactoryport/artifactory/libs-release-local/</url>
</repository>
</distributionManagement>
</profile>
<profile>
<id>cloudHubDeployment</id>
<build>
<plugins>
<plugin>
<groupId>org.mule.tools.maven</groupId>
<artifactId>mule-maven-plugin</artifactId>
<version>${mule.maven.plugin.version}</version>
<extensions>true</extensions>
<configuration>
<cloudHubDeployment>
<uri>https://anypoint.mulesoft.com</uri>
<muleVersion>${MULE_VERSION}</muleVersion>
<username>${MULE_USER}</username>
<password>${MULE_PASSWORD}</password>
<environment>${MULE_ENV}</environment>
<applicationName>${MULE_PROJECT_APP_NAME}</applicationName>
<region>${MULE_REGION}</region>
<businessGroup>${MULE_ORG}</businessGroup>
<properties>
<anypoint.platform.analytics_base_uri>https://analytics-ingest.anypoint.mulesoft.com</anypoint.platform.analytics_base_uri>
<anypoint.platform.client_id>${MULE_ENV_CLIENT_ID}</anypoint.platform.client_id>
<anypoint.platform.client_secret>${MULE_ENV_CLIENT_SECRET}</anypoint.platform.client_secret>
<anypoint.platform.platform_base_uri>https://anypoint.mulesoft.com/apiplatform</anypoint.platform.platform_base_uri>
<mule.env>${MULE_ENV}</mule.env>
<mule.key>${MULE_PROJECT_KEY}</mule.key>
</properties>
<workers>${MULE_WORKERS}</workers>
<workerType>${MULE_WORKER_TYPE}</workerType>
</cloudHubDeployment>
</configuration>
</plugin>
</plugins>
</build>
</profile>
</profiles>
</project>
3. Deploy the Parent POM file into the artifactory using the below maven command.
mvn -PartifactReleaseDeployment deploy
Step 4: Develop a Mule Application for CloudHub
- Create a Mule Application for runtime 4.x that is supported by CloudHub. In your application, you can use secured properties specific to CloudHub environments. Make sure you inject the Parent POM reference in the POM file of your application under the <project> element.
xxxxxxxxxx
<parent>
<groupId>com.au.optus.ows</groupId>
<artifactId>ows-parent-pom</artifactId>
<version>1.0.0</version>
</parent>
- In Step 3, we deployed the Parent POM into the libs-release repository in the artifactory. Note the application properties mentioned in the Parent POM, some of them are specific to CloudHub applications to connect to the API Manager for the auto-discovery feature; however, the two specific properties — ${mule.env} and ${mule.key} are meant to be used in your Mule application to refer to the environment-specific properties file i.e. — ${mule.env}.properties and ${mule.key} property can be used as the key to creating the secured properties.
xxxxxxxxxx
<secure-properties:config name="Secure_Properties_Config" doc:name="Secure Properties Config" doc:id="5f81129b-31a0-40cc-a10e-af51413a6db2" file="properties/${mule.env}.properties" key="${mule.key}" />
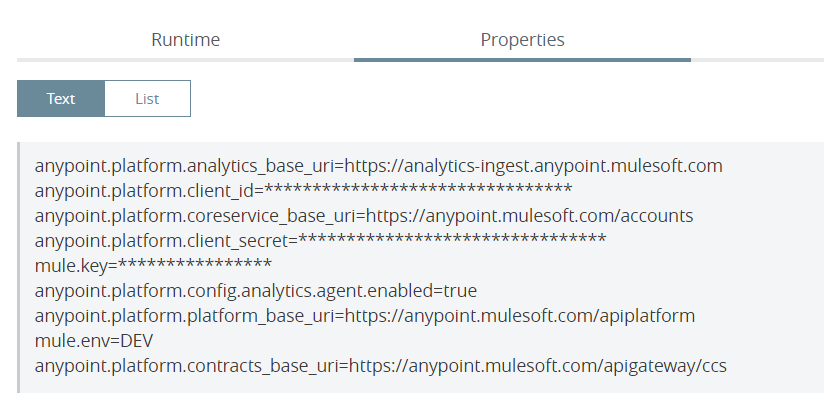
- As a part of coding best practice it is recommended to mask the sensitive information in the CloudHub application properties, so make sure the mule-artifact.json deployment descriptor file has the below section specified:
xxxxxxxxxx
"secureProperties": [
"mule.key", "anypoint.platform.client_id", "anypoint.platform.client_secret"
]
After the application is deployed the properties will be masked as shown below:
Step 5: Setup GitLab Repository
- Create a group and organize all the projects (repositories) containing Mule applications within the group.
Group ---> Mule
Projects ---> Project 1
---> Project 2 - Following Step 2 create a GitLab shared or group runner and pair it with the Group -> Mule. Only the GitLab users with Maintainer or Owner permissions in the group will have the right to view or edit the Group level variables.
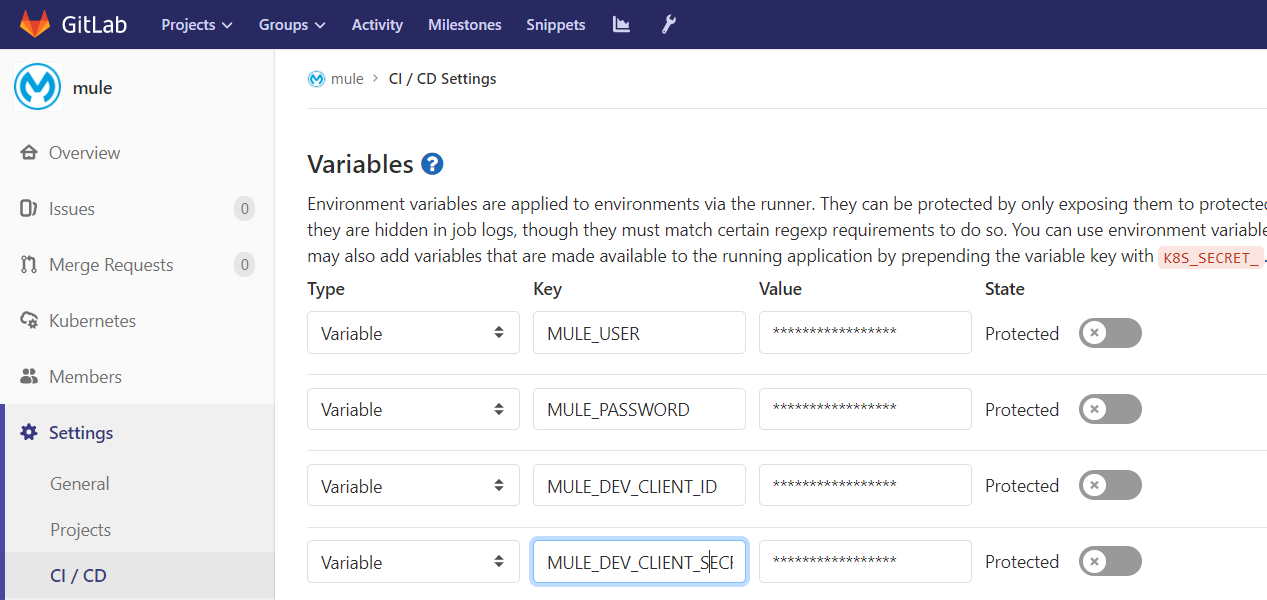
- Add the following variables at the Group level. Go to the GitLab group, click Settings -> CI/CD from the left panel, expand the Variables section to add the variables. Group level variables will be shared between all the Mule applications (Projects).
| MULE_VERSION | 4.3.0 or any other Mule 4.x version supported by CloudHub |
| MULE_USER | Anypoint Platform user, preferably a service account user which has CloudHub Admin permission |
| MULE_PASSWORD | Anypoint Platform User's Password |
| MULE_REGION | CloudHub region ex — ap-southeast-2 |
| MULE_ORG | Your CloudHub Business Group name |
| MULE_DEV_CLIENT_ID | Your CloudHub Environment's Client ID this is required in application properties to connect to the API manager |
| MULE_DEV_CLIENT_SECRET | Your CloudHub Environment's Client Secret |
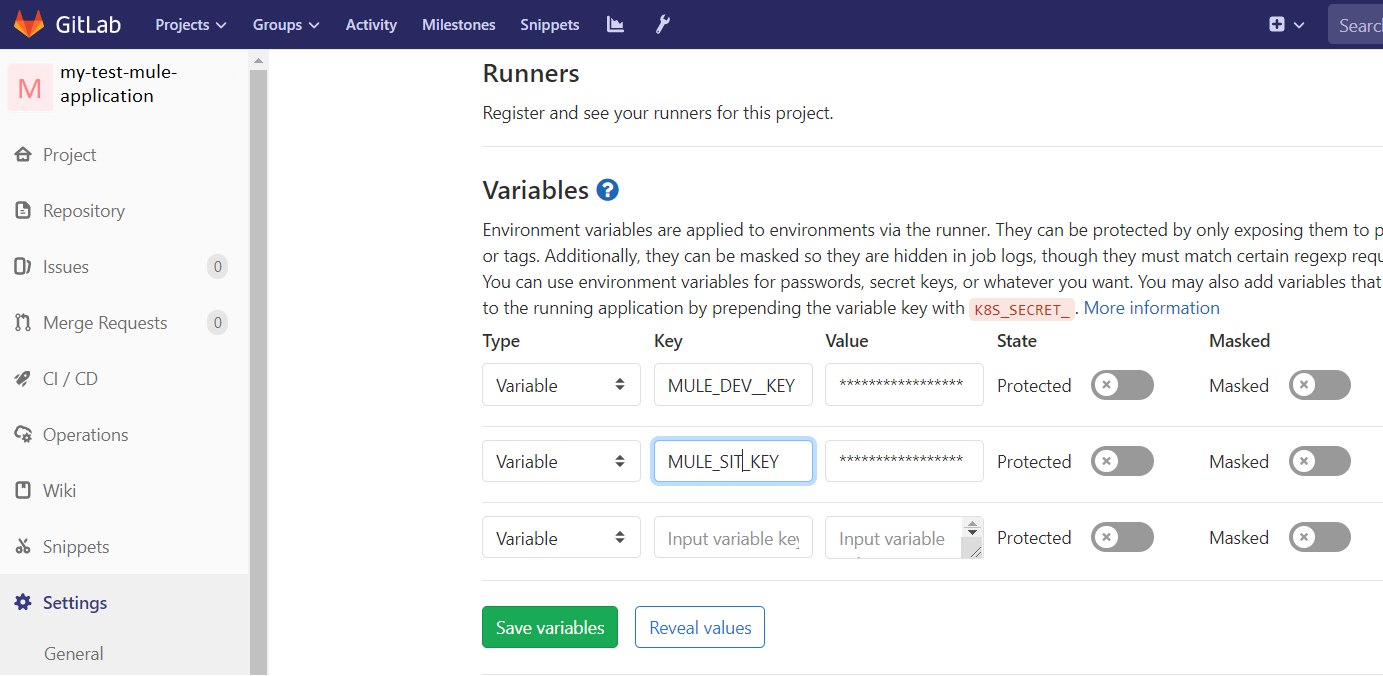
- Some of the variables which are specific to the Mule application will be created at the Project level. This includes the key used to encrypt the secured properties, if you want to use different keys for the different environments you may name the variables — ${MULE_DEV_KEY}, ${MULE_SIT_KEY} etc. Go to GitLab project -> Settings -> CI/CD -> Expand variables.
Step 6: Script and Execute Your GitLab Pipeline
- In Step 2, we made sure Maven is installed in the server where GitLab runner will execute as the runner will execute the shell script which in turn will execute maven commands to deploy our Mule application into CloudHub.
- The variables we created at the group level and the project level will be accessible in the shell script and we will pass those into the Maven plugin as input in the maven command options.
- Create a shell script build.sh and keep it in a folder accessible by your GitLab runner. For example — /opt/build/build.sh, this script will be triggered by the GitLab pipeline job. Alternatively, you can keep the shell script in GitLab or JFrog and unpack it using the Maven unpack goal.
-
Shell
x22
1echo "##### Starting CloudHub Deployment #####"23MULE_OPTION=${1}4MULE_ENV=${2}5MAVEN_BASE_COMMAND="mvn -f $CI_PROJECT_DIR/pom.xml -gs $M2_HOME/conf/settings.xml"67if [ ${MULE_OPTION} == 'clean' ]; then89echo "Cleaning up the Mule Application"10${MAVEN_BASE_COMMAND} clean -U1112elif [ ${MULE_OPTION} == 'deploy' ] && [ ${MULE_ENV} == 'dev' ]; then1314echo "Deploying Mule Application to the Development environment"15MULE_APP_NAME=${CI_PROJECT_NAME}-${MULE_ENV}16echo "Deploying Application: ${MULE_APP_NAME}"17${MAVEN_BASE_COMMAND} -PcloudHubDeployment deploy -DmuleDeploy \18-DMULE_USER=${MULE_USER} -DMULE_PASSWORD=${MULE_PASSWORD} -DMULE_ENV=DEV -DMULE_VERSION=${MULE_VERSION} -DMULE_REGION=${MULE_REGION} -DMULE_ORG=${MULE_ORG} \19-DMULE_ENV_CLIENT_ID=${MULE_DEV_CLIENT_ID} -DMULE_ENV_CLIENT_SECRET=${MULE_DEV_CLIENT_SECRET} \20-DMULE_PROJECT_APP_NAME=${MULE_APP_NAME} -DMULE_PROJECT_KEY=$DEV_MULE_KEY2122fi
- Create a Group level variable to refer to the script:
MULE_BUILDER /opt/build/build.sh
GitLab-ci.yml
GitLab CI/CD pipelines are configured using a YAML file called .gitlab-ci.yml within each project. The .gitlab-ci.yml file defines the structure and order of the pipelines and determines:
- What to execute using GitLab Runner.
- What decisions to make when specific conditions are encountered. For example, when a process succeeds or fails.
Check the GitLab documentation for the details: https://docs.gitlab.com/ee/ci/yaml/
In our case, we will define the GitLab-ci.yml as below:
xxxxxxxxxx
stages
clean
deploy_dev
clean_mule
stageclean
tags
mule-integration
script
$MULE_BUILDER clean
whenmanual
deploy_dev_mule
stagedeploy_dev
tags
mule-integration
script
$MULE_BUILDER deploy dev
whenmanual
Similarly, you can include subsequent stages to deploy your Mule application to SIT, UAT, and Production environments.
- To execute the pipeline, go to the Project repository in GitLab -> Pipeline.
- Click the 'Run Pipeline' option and select the appropriate branch for which you want to execute the pipeline.
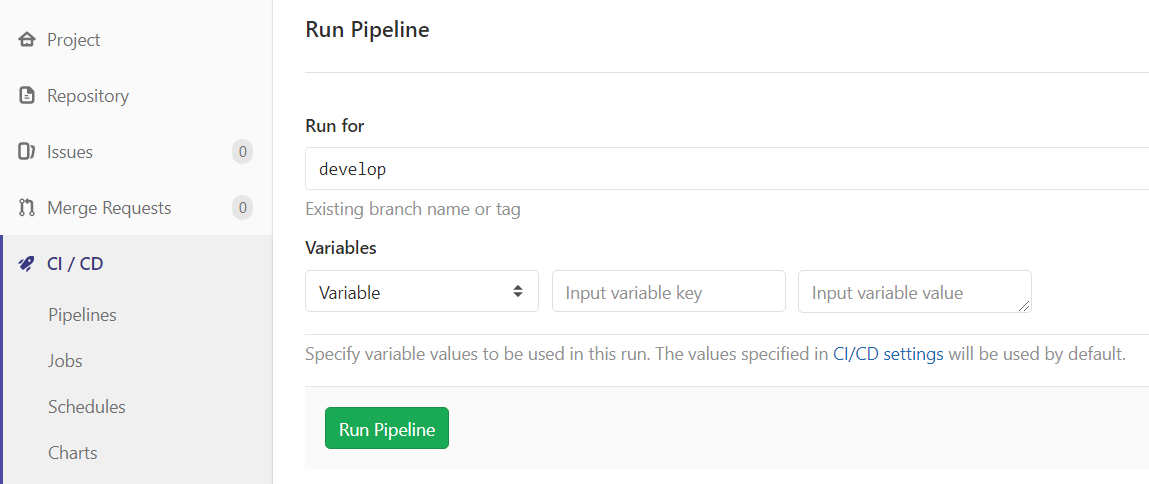
- It will show the stages mentioned in your GitLab-ci.yml which you can execute by clicking those respectively. Note that in this example we have mentioned the steps as manual if the stages are not manual those will get executed on every code commit.
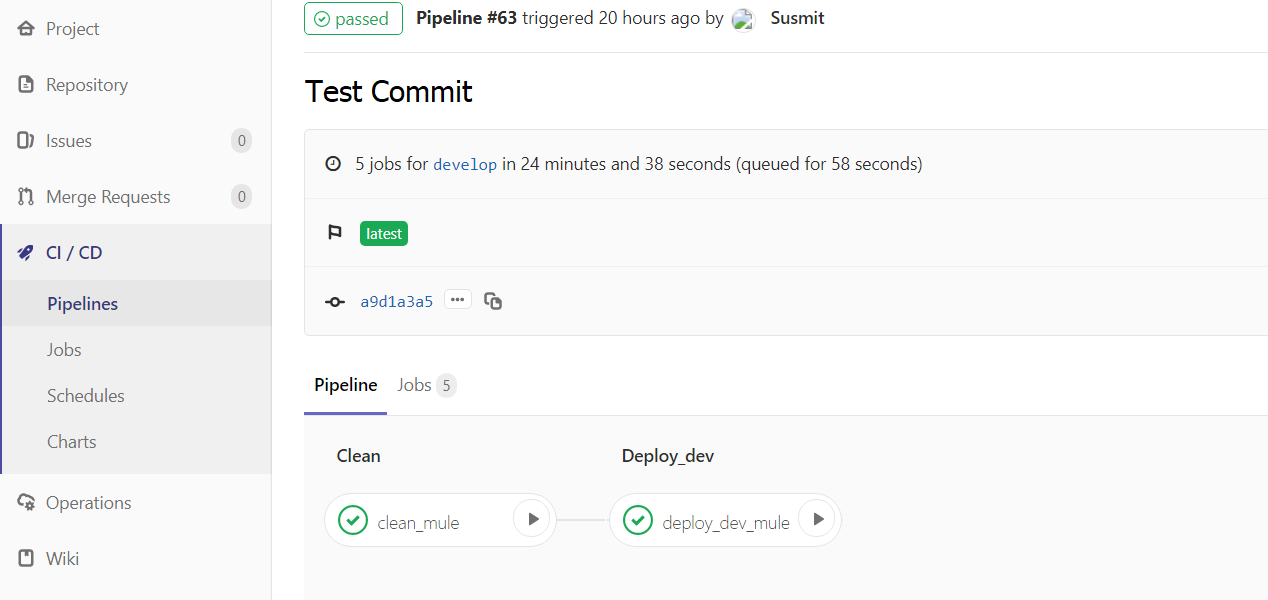
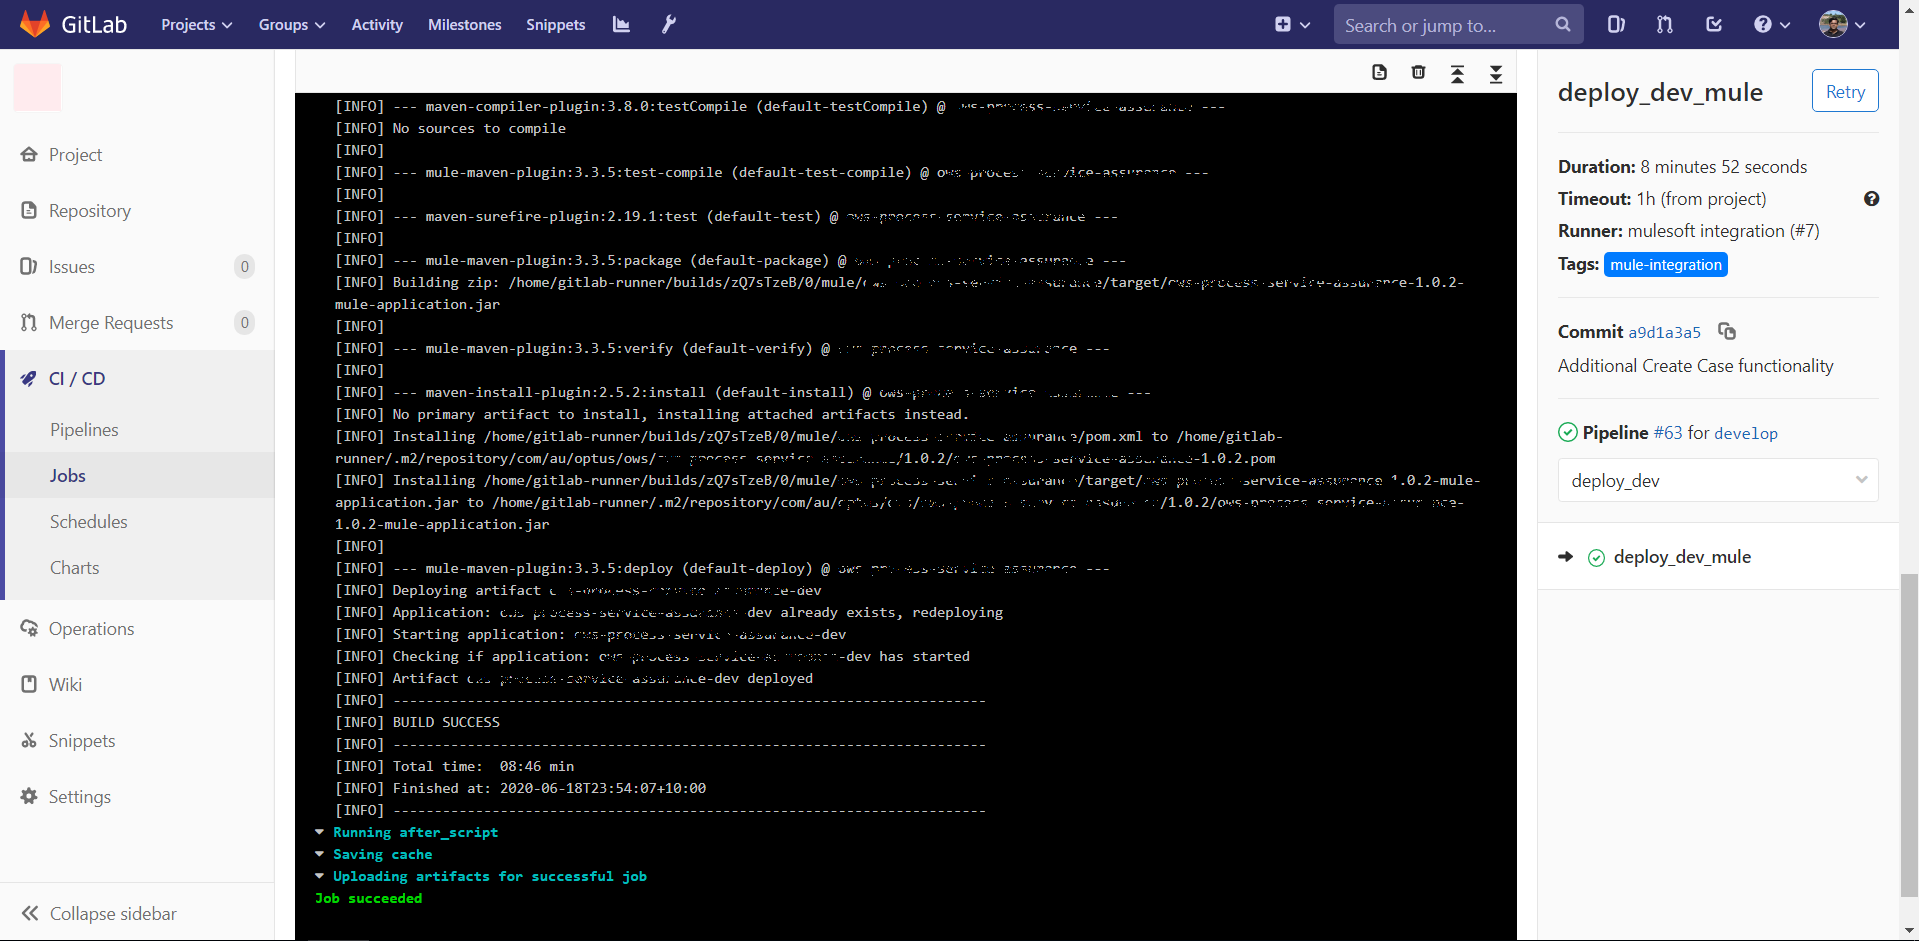
- You can click each stage and see the trace of the pipeline execution.
Security Considerations
If the user is allowed to edit the pipeline script any shell command can be executed as a part of the pipeline execution which creates a security vulnerability, also the user can easily do an 'echo' of the Group variables where we have stored the CloudHub credentials for deployments to display the values in the pipeline execution console. To address this issue GitLab has a feature to restrict Developers from editing the pipeline script as a security measure however the feature is only available in the Premium version.
Ref: https://gitlab.com/gitlab-org/gitlab-foss/-/issues/20826
Conclusion
This is a practical example of a CI/CD framework using GitLab pipelines as well as JFrog artifactory. Using this approach we could demonstrate the use of GitLab both as a code repository as well as a CI/CD platform. Since we could utilize the pipeline feature of GitLab we didn't require an automation server like Jenkins to execute the CI/CD jobs. This framework can be further enhanced to execute MUnit test cases, perform code analysis, deploy compiled JARs into JFrog artifactory, or integrate with automated testing tools.
Opinions expressed by DZone contributors are their own.
Comments