Multi-Tenancy With Keycloak, Angular, and SpringBoot
Multi-tenancy is a critical aspect of contemporary software architecture. It assists in overcoming significant difficulties, particularly for SaaS software.
Join the DZone community and get the full member experience.
Join For FreeTo propose an implementation, we will present a use case that allows us to define the requirements. We will describe the functional and technical context in which we will operate and then specify the requirements. Based on these requirements, we will propose a Keycloak implementation to meet them and make the necessary adaptations on the Angular and Springboot side.
Environment
Functional Context
This concerns an accountancy firm that provides services to external clients and has employed staff to manage the files. If a customer (external user) wishes to connect, they must create an account on the Saas application. In the same manner, when the staff (internal user) desire to work on the files, they must use their Active Directory account to log in.
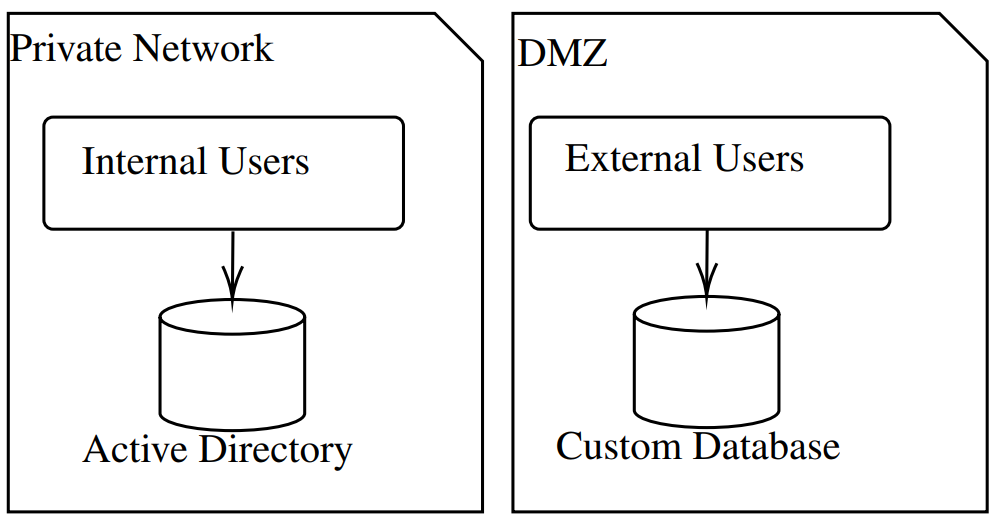
It is important to consider that customers and employees may share some rights but also have distinct ones. The two databases must not be affected, and any changes made to internal users should not affect customers.
Technical Context
The existing Saas product is divided into three components: Frontend, Backend, and database.
Frontend
It is an Angular application and is responsible for displaying information and collecting data that has been entered by internal and external users. Authorization to access specific pages must also be established.
Backend
It is built with SpringBoot and is expected to retrieve data from the database, interface with external APIs, and, most importantly, manage data access authorizations. It also manages configuration for the front end.
Database
A PostgreSQL database that stores and organizes data. Consequently, the application components will require modification to meet this requirement.
Keycloak
Authentication will utilize the OAuth2 protocol in OpenID Connect. Keycloak satisfies these and other requirements.
Architecture
One possible solution could be to have two entirely standalone Keycloak instances, which could lead to higher maintenance and infrastructure costs. Therefore, we will investigate the possibility of using a single instance of Keycloak.
Realms
To logically separate our users, we can use realms. We are going to create two Realms: Internal Realm: Users who will be pulled from Active Directory using UserFederation will be designated for the Internal Realm. External Realm: External users who require accounts within the software will be designated for the External Realm.
Clients
We will use two clients in each realm. The front-end client: It is a public client that is not confidential. We will make it available to the front-end component to obtain the login page, transmit the connection information, and enter the application. The back-end client: This client will be private, and access to it will require a secret. It can only be contacted by the backend application. The purpose of this client is to verify the JWT tokens sent by the front-end application.
Roles
The roles may differ because they are kingdom-specific. If some of them are common, you just need to give them the same name to refer to them while keeping the component code realm agnostic.
Results
Finally, we have the following architecture: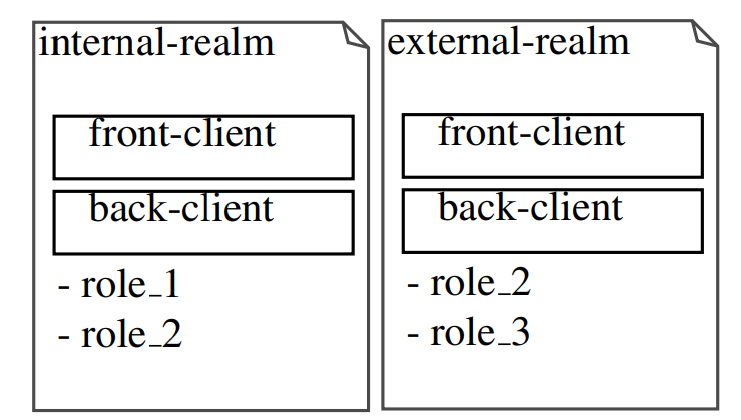
NB: The roles could also be implemented at a realm level and a client level for greater precision.
Deployments
To make deployment easier, we’re going to use a docker-compose :
version: ’3’
services:
keycloak:
image:
quay.io/keycloak/keycloak:22.0.1
ports:
- "8080:8080"
environment:
- KEYCLOAK_ADMIN=admin
- KEYCLOAK_ADMIN_PASSWORD=admin
command: ["start-dev"]
You can deploy your application just using ’docker-compose up -d’. Then, create the two realms. No special configurations are required. Then, create a client-front and client-back in each realm. For the client-front, you do not need to modify the default realm. For client-back, you will have to set ’Client authentication’ to ’On.’
Components Adaptation
Now that we have Keycloak installed and configured, we need to customize the components.
Frontend
For the front end, we consider a simple Angular application.
Configuration
Keycloak proposes a javascript adapter. We will use it in combination with an angular adapter: npm install keycloakangular keycloak-js
Code Adaptation
Thanks to these libraries, we can use the keycloak initialization function in the app.module.ts when initializing the app, as follows: Declaration of the provider and use of the initializeKeycloak method.
{
provide: APP_INITIALIZER,
useFactory: initializeKeycloak,
multi: true,
deps: [KeycloakService,
KeycloakConfigService]
},
Declaration of initialiseKeycloak method :
export function initializeKeycloak(
    keycloak: KeycloakService,
    keycloakConfigService:
        KeycloakConfigService
) {
// Set default realm
    let realm = "EXTERNAL";
    const pathName: string[] =
        window.location.pathname.split('/');
    if (pathName[1] === "EXTERNAL") {
        realm = "EXTERNAL";
    }
    if (pathName[1] === "INTERNAL") {
        realm = "INTERNAL";
    }
    return (): Promise<any> => {
        return new Promise<any>(async (resolve, reject) => {
            try {
                await initMultiTenant(keycloak, keycloakConfigService, realm);
                resolve(auth);
            } catch (error) {
                reject(error);
            }
        });
    };
}

export async function initMultiTenant(
    keycloak: KeycloakService,
    keycloakConfigService:
        KeycloakConfigService,
    realm: string
) {
    return keycloak.init({
        config: {
            url: await
                firstValueFrom(keycloakConfigService
                    .fetchConfig()).then(
                    (conf: PublicKeycloakConfig) => {
                        return conf?.url;
                    }
                ),
            realm,
            clientId: 'front-client'
        },
        initOptions: {
            onLoad: 'login-required',
            checkLoginIframe: false
        },
        enableBearerInterceptor: true,
        bearerExcludedUrls:
            ['/public-configuration/keycloak']
    });
}
Backend
In the backend, we should intercept incoming requests in order to: 1. Get the current realm to contact keycloak on the appropriate configuration. 2. Based on the previous realm, contact keycloak to validate the bearer token.
Configuration
To handle Keycloak interactions, we first need to import Keycloak adapters and Spring security to manage the Oauth2 process :
<dependency>
    <groupId>org.springframework.boot</groupId>
    <artifactId>
        spring-boot-starter-security
    </artifactId>
</dependency>
<dependency>
    <groupId>org.keycloak</groupId>
    <artifactId>
        keycloak-spring-boot-starter
    </artifactId>
    <version>18.0.2</version>
</dependency>
<dependency>
    <groupId>org.keycloak.bom</groupId>
    <artifactId>keycloak-adapter-bom</artifactId>
    <version>18.0.2</version>
    <type>pom</type>
    <scope>import</scope>
</dependency>
Code Adaptation
Now, we can intercept the incoming request to read the headers and identify the current realm of the request:
    @Override
    public KeycloakDeployment
    resolve(OIDCHttpFacade.Request request) {
        String header =
                request.getHeaders(CUSTOM_HEADER_REALM_SELECTOR)
                        .stream().findFirst().orElse(null);
        if (EXT_XEN_REALM.equals(header)) {
            buildAdapterConfig(extXenKeycloakConfig);
        } else {
            buildAdapterConfig(intXenKeycloakConfig);
        }
        return
                KeycloakDeploymentBuilder.build(adapterConfig);
    }
Conclusion
Finally, we obtain the following architecture: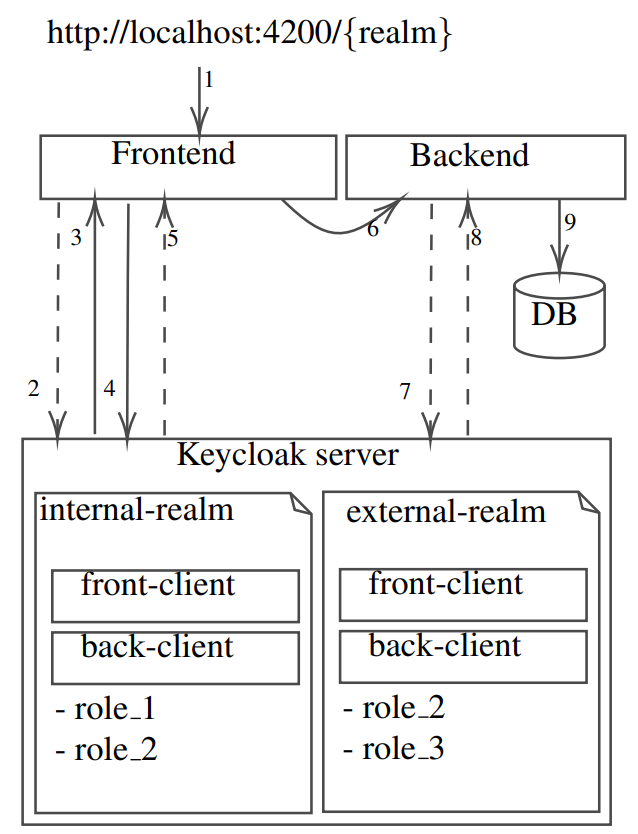
- Step 1: We can contact our application with two different URLs:
- Step 2: The front-end application asks Keycloak for the login page 3 with the realm as a parameter to let the user log in on the appropriate login page.
- Step 3: The login page is sent back to the front end.
- Step 4: The credentials are sent to Keycloak using keycloak-jsadatper, which allows for the secure transfer of this sensitive information.
- Step 5: If the credentials are valid4, an HTTP 302 is returned to redirect the user to the front-end home page.
- Step 6: A request is sent to the backend to retrieve data to display the home page.
- Step 7: After intercepting and parsing the request to retrieve the realm and Bearer, the backend resolver contacts the Keycloak server on the requested realm to validate the Bearer 3Only if the user is not connected yet 4 If not valid, a http-401:unauthaurized is returned token5.
- Step 8: Token validity is sent back to the backend server.
- Step 9: Finally, the backend can access the requested data and send it back to the frontend.
By following these steps, we can ensure that a user lands on the correct login page and navigates through the application independently of their realm, all controlled by a single instance of Keycloak.
Published at DZone with permission of Pier-Jean MALANDRINO. See the original article here.
Opinions expressed by DZone contributors are their own.
Comments