Next.js Event Management Application Using File-Based Routing
Next.js is arguably the most versatile framework for building web applications using React. Here, learn how to build a Next.js event management application.
Join the DZone community and get the full member experience.
Join For FreeNext.js is arguably the most versatile framework when it comes to building web applications using React. Next.js makes building production-ready applications easy. In this post, we are going to look at building a Next.js event management application.
Once we are done, our application will look like the image below:
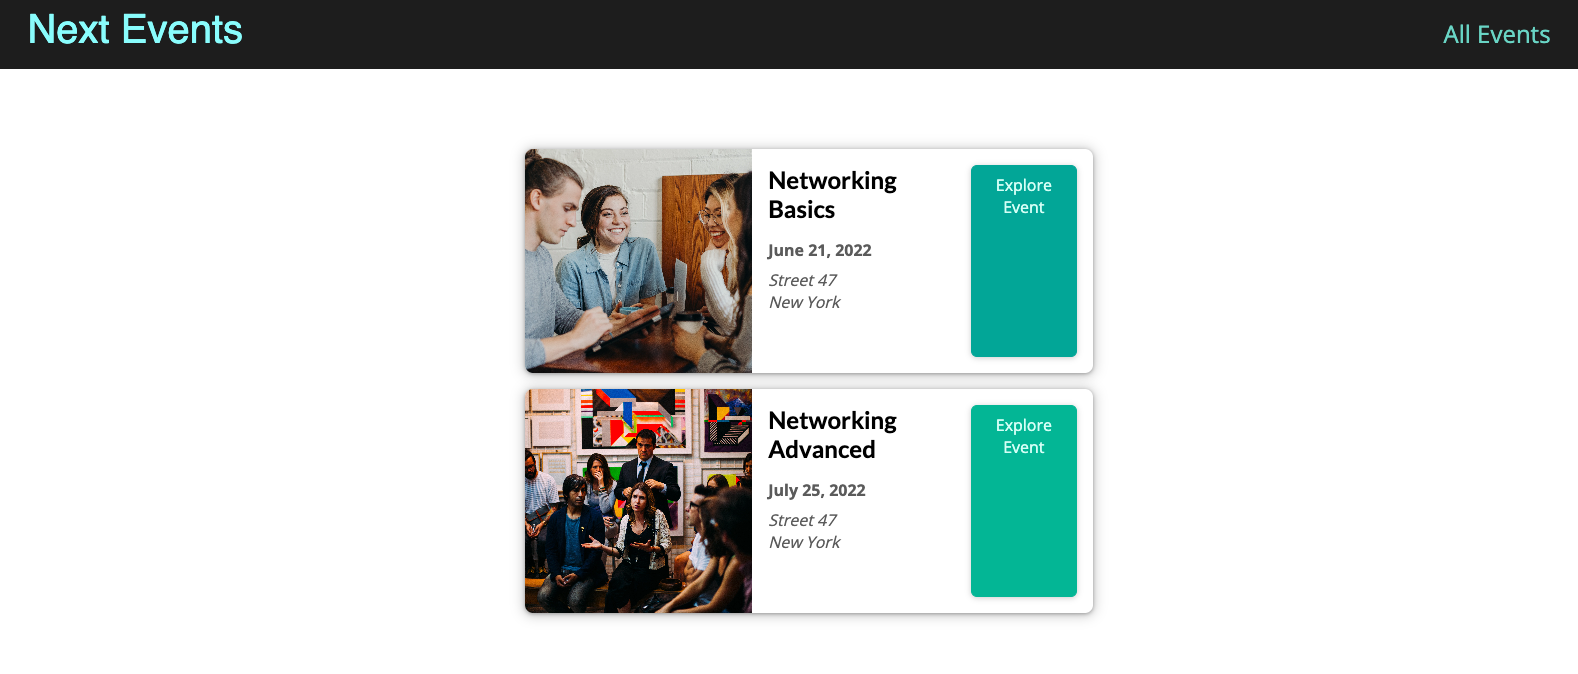
Ultimately, the idea of this application is to demonstrate how we can build a larger application using Next.js and normal React.
1. Setting up a New Next.js Project
As a prerequisite to using Next.js, we need to have Node.js installed on our system. You can install Node.js for your operating system from the official website.
Once Node.js is set up, we can start with our event management application using Next.js.
First, we will create a new Next.js project using the below command.
$ npx create-next-appThe above command generates a starter project of sorts.
Anyhow, the important thing to note here is the package.json file. If you open the file, you will be able to see the various scripts and dependencies.
package.json{
  "name": "nextjs-app",
  "version": "0.1.0",
  "private": true,
  "scripts": {
    "dev": "next dev",
    "build": "next build",
    "start": "next start",
    "lint": "next lint"
  },
  "dependencies": {
    "next": "12.2.3",
    "react": "18.2.0",
    "react-dom": "18.2.0"
  },
  "devDependencies": {
    "eslint": "8.20.0",
    "eslint-config-next": "12.2.3"
  }
}
2. Creating Dummy Event Management Data
While a typical prod application might have a database to store information, we will be using some dummy event data to get our app running. Often, developers prefer to start this way so that they can get a feel of the application before meddling with database-related changes, and so on.
At the root of our project, we create a file dummy-data.js. See below:
dummy-data.jsconst DUMMY_EVENTS = [
    {
        id: 'event1',
        title: 'Programming for Everyone',
        description: 'Everyone can learn to code! Yes, everyone! Live Event',
        location: 'A street 25,  San Francisco',
        date: '2022-06-14',
        image: 'images/coding-event.jpg',
        isFeatured: false
    },
    {
        id: 'event2',
        title: 'Networking Basics',
        description: 'Making networking for introverts fun',
        location: 'Street 47, New York',
        date: '2022-06-21',
        image: 'images/network-event.jpg',
        isFeatured: true
    },
    {
        id: 'event2',
        title: 'Networking Advanced',
        description: 'Making networking for advanced use-cases',
        location: 'Street 47, New York',
        date: '2022-07-25',
        image: 'images/network-event-advanced.jpg',
        isFeatured: true
    }
]

export function getFeaturedEvents() {
    return DUMMY_EVENTS.filter((event) => event.isFeatured);
}

export function getAllEvents() {
    return DUMMY_EVENTS;
}

export function getFilteredEvents(dateFilter) {
    const { year, month } = dateFilter;

    let filteredEvents = DUMMY_EVENTS.filter((event) => {
        const eventDate = new Date(event.date);
        return eventDate.getFullYear() === year && eventDate.getMonth() === month - 1;

    })

    return filteredEvents;
}

export function getEventById(id) {
    return DUMMY_EVENTS.find((event) => event.id === id);
}
As you can see, we have the DUMMY_EVENTS array that contains a list of events with their various details. Also, we export a bunch of functions from this file.
Basically, these functions are used for fetching or filtering the events from the events array. Below are the details of each function.
getFeaturedEvents()– This function returns a list of events with theirisFeaturedflag set to true.getAllEvents()– This function returns all the events.getFilteredEvents()– This function returns the list of events based on a filter condition. In the current implementation, we support filtering by year and month.getEventById()– Lastly, this function returns a single event for an input event id.
You could think of these functions as an interface to fetch the event date. We have not exposed these functions as external REST APIs since we will be using them only internally in our application.
3. Creating the Next.js Routes Using File-Based Routing
At this point, we can begin to construct the Next.js routes for the various pages of our Event Management application.
Broadly, we will have the below routes for our application:
- The root path (/) – This is the starting page and will show a list of featured events. In other words, those events that have the
isFeaturedflag set to true. - All events page (/events) – This page will show the list of all events.
- Single Event (/events/<some_id>) – This page will display the details of a single event based on the input id.
- Filtered Events (/events/…slug) – This page will display a list of filtered events based on the criteria. For example, if we access /events/2022/06, it should show the list of events in the month of June 2022.
For each of the above paths, let us create the appropriate Next.js components.
3.1: The Home Page
Next.js has a special system for handling routes.
Basically, there is a specific folder named pages in our project. Any component we create in this folder is exposed as a route by Next.js. This is also known as Next.js file-based routing.
Within the pages directory, we will create a file known as index.js. This is the file for rendering the home page of our application.
See below:
pages/index.jsimport { getFeaturedEvents } from '../dummy-data';
import EventList from '../components/events/EventList';

function HomePage() {

    const featuredEvents = getFeaturedEvents();

    return (
    <div>
        <EventList items={featuredEvents} />
    </div>)
}

export default HomePage;
As you can see, this is a normal React component. It fetches the list of featured events from the appropriate function exposed as part of the dummy-data.js file.
Once it gets the data, it passes the list to another React component EventList. Details of the React components are present in the next section for reference.
3.2: All Events Page
This page shows a list of all the events. For better segregation, we place the component file for this page within the folder events inside the pages directory.
pages/events/index.jsimport { useRouter } from 'next/router';

import EventList from "../../components/events/EventList";
import EventSearch from "../../components/events/EventSearch";
import { getAllEvents } from "../../dummy-data";

function AllEventsPage() {
    const router = useRouter();
    const events = getAllEvents();

    function findEventsHandler(year, month) {
        const fullPath = `/events/${year}/${month}`;
        router.push(fullPath);
    }

    return (
        <div>
            <EventSearch onSearch={findEventsHandler} />
            <EventList items={events} />
        </div>
    )
}

export default AllEventsPage;
There are a few important points to note in this component:
- Firstly, we use the
getAllEvents()function to fetch all events from the dummy event data. The list is rendered using the commonEventListcomponent. - Second, we also have the feature to search events based on filter criteria on this page. For this purpose, we have an
EventSearchcomponent. This component takes a proponSearchthat points to thefindEventsHandlerfunction. Basically, theEventSearchcomponent passes the filter year and filter month to theAllEventsPagecomponent. Using the filter year and filter month, we construct a route path and use therouter.push()utility to programmatically change the route of our application.
You can check the code for the EventSearch component below:
component/events/EventSearch.jsimport { useRef } from 'react';

import Button from "../ui/Button";
import classes from "./event-search.module.css";

function EventSearch(props) {

    const yearInputRef = useRef();
    const monthInputref = useRef();

    function submitHandler(event) {
        event.preventDefault();

        const selectedYear = yearInputRef.current.value;
        const selectedMonth = monthInputref.current.value;

        props.onSearch(selectedYear, selectedMonth);
    }

    return (
        <form className={classes.form} onSubmit={submitHandler}>
            <div className={classes.controls}>
                <div className={classes.control}>
                    <label htmlFor="year">Year</label>
                    <select id="year" ref={yearInputRef}>
                        <option value="2021">2021</option>
                        <option value="2022">2022</option>
                    </select>
                </div>
                <div className={classes.control}>
                    <label htmlFor="month">Month</label>
                    <select id="month" ref={monthInputref}>
                        <option value="1">January</option>
                        <option value="2">February</option>
                        <option value="3">March</option>
                        <option value="4">April</option>
                        <option value="5">May</option>
                        <option value="6">June</option>
                        <option value="7">July</option>
                        <option value="8">August</option>
                        <option value="9">September</option>
                        <option value="10">October</option>
                        <option value="11">November</option>
                        <option value="12">December</option>
                    </select>
                </div>
            </div>
            <Button>Find Events</Button>
        </form>
    )
}

export default EventSearch;
Basically, this component simply handles the form fields of filter year and filter month.
Currently, we support only the years 2021 and 2022 as per this file. In a real application, we would have a calendar widget in this component.
When the user submits the form by clicking the form button, we call props.onSearch that passes the selectedYear and selectedMonth to the parent component.
3.3: The Single Event Page
The single event page is basically the page for a particular event. It just shows the details of the selected event.
From an implementation point of view, it is an extremely simple component. See below:
pages/events/[eventId].jsimport { useRouter } from 'next/router';
import EventItem from '../../components/events/EventItem';
import { getEventById } from '../../dummy-data';

function EventDetailPage() {
    const router = useRouter();
    const eventId = router.query.eventId;

    const event = getEventById(eventId);

    if (!event) {
        return <p>No Event Found</p>
    }

    return (
        <EventItem
        id={event.id}
        title={event.title}
        location={event.location}
        date={event.date}
        image={event.image} />
    )
}

export default EventDetailPage;
The only thing to note is that this is a dynamic page. In other words, the contents depend on the eventId in the path.
In Next.js, we create such components with a naming convention as [eventId].js. Basically, this signifies that eventId is dynamic and is available in the browser path. To extract the eventId, we utilize the useRouter() hook and then call the getEventById() function.
This page also uses a common component EventItem. We will cover it in the next section.
3.4: The Filtered Event Page
Finally, we can also create a page for filtered events.
Since this is also a dynamic page depending on the value of year and month, we name the file [...slug].js. Here, the slug will contain the list of all the parts of the path.
For example, if we access /events/2022/06, the slug array will contain the values ['2022', '06'].
Check out the below implementation:
pages/events/[...slug].jsimport { useRouter } from 'next/router';
import EventList from '../../components/events/EventList';
import { getFilteredEvents } from '../../dummy-data';

function FilteredEventsPage() {

    const router = useRouter();
    const filterData = router.query.slug;

    if (!filterData) {
        return <p className='center'>Loading...</p>
    }

    const filteredYear = filterData[0];
    const filteredMonth = filterData[1];

    const numYear = +filteredYear;
    const numMonth = +filteredMonth;

    if (isNaN(numYear) || isNaN(numMonth)) {
        return <p className='center'>Invalid Filter Criteria. Please check...</p>
    }

    const filteredEvents = getFilteredEvents({
        year: numYear,
        month: numMonth
    });

    if (!filteredEvents || filteredEvents.length === 0) {
        return <p>No Events Found!!</p>
    }

    return(
        <div>
            <EventList items={filteredEvents} />
        </div>
    )
}

export default FilteredEventsPage;
Just like the previous component, here also we use the useRouter() hook to extract the slug. Then, we make sure that the year and month are having numeric values. If the values are fine, we simply call the getFilteredEvents() function.
Once more, we use the same EventList component to render the list of events.
4. Common React Components for Handling Event Data
Now that the main pages of our application are done, let us look at the common React components we used in our application.
To better manage our source code, we keep the common components in a separate directory named components. Note that we cannot keep these components in the pages directory. This is because whatever is in the pages directory is used by Next.js to create a route.
Within the components directory, we create a folder for event-related components.
The first important component is the EventList component.
components/events/EventList.jsimport EventItem from './EventItem';
import classes from './event-list.module.css';

function EventList(props) {
    const { items } = props;

    return (
        <ul className={classes.list}>
            {items.map(event => <EventItem key={event.id}
            id={event.id}
            title={event.title}
            location={event.location}
            date={event.date}
            image={event.image} />)}
        </ul>
    )
}

export default EventList;
Basically, this component receives the list of events and generates an unordered list. It also uses the EventItem component. See below:
components/events/EventItem.jsimport Link from 'next/link';
import Button from '../ui/Button';

import classes from './event-item.module.css';

function EventItem(props) {

    const { title, image, date, location, id } = props;

    const humanReadableDate = new Date(date).toLocaleDateString('en-US', {
        day: 'numeric',
        month: 'long',
        year: 'numeric'
    });

    const formattedAddress = location.replace(', ', '\n')

    const exploreLink = `/events/${id}`

    return (
        <li className={classes.item}>
            <img src={'/' + image} alt={title} />
            <div className={classes.content}>
                <div className={classes.summary}>
                    <h2>{title}</h2>
                    <div className={classes.date}>
                        <time>{humanReadableDate}</time>
                    </div>
                </div>
                <div className={classes.address}>
                    <address>{formattedAddress}</address>
                </div>
            </div>
            <div className={classes.actions}>
                <Button link={exploreLink}>Explore Event</Button>
            </div>
        </li>
    )
}

export default EventItem;
Basically, this component receives the data for a single event. It reformats the data for presentation purposes: for example, changing the date into a human-readable format and also formatting the address. Also, it constructs the appropriate link for the button for Explore Event.
Also, we have a special Button component as well.
components/ui/Button.jsimport Link from 'next/link';
import classes from './button.module.css';

function Button(props) {
    if (props.link) {
        return <Link href={props.link}>
            <a className={classes.btn}>{props.children}</a>
        </Link>
    }

    return <button className={classes.btn} onClick={props.onClick}>{props.children}</button>

}

export default Button;
Basically, the Button component handles the case where it acts as a Link. Also, if the props.link is undefined, it acts as a normal button.
5. Next.js Event Management Application Navigation
While our application shows the individual pages, there is no proper navigation bar. We need this navigation bar on every page.
Therefore, we create another common component for the same.
First is the Layout component.
components/layout/Layout.jsimport { Fragment } from "react";
import MainHeader from "./MainHeader";

function Layout(props) {
    return <Fragment>
        <MainHeader />
        <main>
            {props.children}
        </main>
    </Fragment>
}

export default Layout;
The second is the MainHeader component.
components/events/MainHeader.jsimport Link from 'next/link';
import classes from './main-header.module.css';

function MainHeader() {
    return (
        <header className={classes.header}>
            <div className={classes.logo}>
                <Link href="/">Next Events</Link>
            </div>
            <nav className={classes.navigation}>
                <Link href="/events">All Events</Link>

            </nav>
        </header>
    )
}

export default MainHeader;
Basically, this is where we define the Logo of our application and a link to navigate to the AllEvents page. To navigate, we use the special Link component that comes along with Next.js. The Next.js Link component helps with app navigation without using React router.
Lastly, to make this show on every page, we wrap our application’s main component i.e. the MyApp component (_app.js file) within pages directory.
pages/_app.jsimport Layout from '../components/layout/layout'
import '../styles/globals.css'

function MyApp({ Component, pageProps }) {
  return <Layout>
    <Component {...pageProps} />
  </Layout>
}

export default MyApp
Note that this file is present in the starter project. We just have to modify the same.
6. Styling the Next.js Application
Lastly, you may have noticed we have used a bunch of CSS classes in our various components. To scope the CSS to specific components, we used the CSS module system.
While CSS is completely optional, it certainly helps in the look and feel of our project.
Below are the CSS files for the various components.
event-item.module.css.item {
    box-shadow: 0 1px 4px rgba(0, 0, 0, 0.3), 0 1px 12px 2px rgba(0, 0, 0, 0.2);
    border-radius: 8px;
    overflow: hidden;
    background-color: white;
    margin: 1rem;
    display: flex;
    flex-direction: column;
    gap: 1rem;
  }

  .item img {
    width: 100%;
    object-fit: cover;
    height: 10rem;
  }

  .content {
    width: 100%;
    padding: 0 1rem;
    text-align: center;
  }

  .content h2 {
    margin: 0.5rem 0;
  }

  .date,
  .address {
    display: flex;
    gap: 0.5rem;
    align-items: center;
  }

  .date svg,
  .address svg {
    width: 1.25rem;
    height: 1.25rem;
    color: #666666;
  }

  .content time {
    color: #666666;
    font-weight: bold;
  }

  .content address {
    margin: 0.5rem 0;
    color: #666666;
    white-space: pre;
  }

  .actions {
    display: flex;
    flex-direction: column;
    padding: 1rem;
  }

  .actions a {
    display: block;
  }

  .actions a span {
    vertical-align: middle;
  }

  .icon {
    margin-left: 0.5rem;
    display: inline-flex;
    justify-content: center;
    align-items: center;
  }

  .icon svg {
    width: 1.25rem;
    height: 1.25rem;
  }

  @media (min-width: 768px) {
    .item {
      flex-direction: row;
    }

    .item img {
      width: 40%;
      height: 14rem;
    }

    .content {
      width: 60%;
      padding: 0;
      text-align: left;
    }

    .content h2 {
      margin: 1rem 0;
    }

    .actions {
      flex-direction: row;
      justify-content: flex-end;
    }
  }
event-list.module.css.list {
    width: 90%;
    max-width: 40rem;
    margin: 5rem auto;
  }
event-search.module.css.form {
    margin: 2rem auto;
    box-shadow: 0 1px 4px rgba(0,0,0,0.2);
    padding: 1rem;
    background-color: white;
    border-radius: 6px;
    width: 90%;
    max-width: 40rem;
    display: flex;
    justify-content: space-between;
    flex-direction: column;
    gap: 1rem;
  }

  .controls {
    width: 100%;
    display: flex;
    gap: 1rem;
    flex-direction: column;
  }

  .control {
    flex: 1;
    display: flex;
    gap: 1rem;
    align-items: center;
    justify-content: space-between;
  }

  .control label {
    font-weight: bold;
  }

  .control select {
    font: inherit;
    background-color: white;
    border-radius: 6px;
    width: 70%;
    padding: 0.25rem;
  }

  .form button {
    width: 100%;
    font: inherit;
    padding: 0.25rem 0.5rem;
    background-color: #03be9f;
    border: 1px solid #03be9f;
    color: #dafff7;
    border-radius: 4px;
  }

  @media (min-width: 768px) {
    .form {
      flex-direction: row;
    }

    .controls {
      width: 80%;
      flex-direction: row;
    }

    .control select {
      width: 100%;
    }

    .form button {
      width: 20%;
    }
  }
main-header.module.css.header {
    width: 100%;
    display: flex;
    justify-content: space-between;
    align-items: baseline;
    padding: 1rem 10%;
    height: 5rem;
    background-color: #202020;
  }

  .logo {
    font-size: 1.5rem;
    color: white;
    font-family: 'Fira', sans-serif;
    height: 100%;
    display: flex;
    justify-content: center;
    align-items: center;
    color: #94fdfd;
  }

  .logo a {
    text-decoration: none;
    color: #94fdfd;
  }

  .navigation a {
    text-decoration: none;
    color: #74dacc;
    font-size: 1rem;
  }

  @media (min-width: 768px) {
    .logo {
      font-size: 2.5rem;
    }

    .navigation a {
      font-size: 1.5rem;
    }
  }
button.module.css.btn {
    text-decoration: none;
    cursor: pointer;
    font: inherit;
    background-color: #03be9f;
    border: 1px solid #03be9f;
    border-radius: 6px;
    color: #dafff7;
    padding: 0.5rem 1.5rem;
    text-align: center;
    box-shadow: 0 1px 6px rgba(0, 0, 0, 0.2);
  }

  .btn:hover,
  .btn:active {
    background-color: #02afa1;
    border-color: #02afa1;
  }
You can place these CSS files right next to the component files in your project hierarchy. This will help in easy reference and maintenance.
Conclusion
With this, our Next.js event management application is ready.
We use file-based routing to make the high-level pages work. However, for individual pieces of functionality, we leveraged basic React components. This joint combination of using Next.js concepts with React is what makes Next.js an awesome tool for building complex applications.
The code for this application is available on GitHub.
We can enhance the app further using Next.js Firebase integration for static and server-side rendering and storing data.
If you have any comments or queries about this post, please feel free to mention them in the comments section below.
Published at DZone with permission of Saurabh Dashora. See the original article here.
Opinions expressed by DZone contributors are their own.
Comments