Nginx: Reverse Proxy and Load Balancing
In this article, I would like to share my experience of setting up Nginx for load balancing and reverse proxy with SSL termination in Nginx.
Join the DZone community and get the full member experience.
Join For FreeYou might have seen many articles on the internet regarding Nginx and how we can use Nginx for load balancing and reverse proxy. In this article, I would like to share my experience of setting up Nginx for load balancing and reverse proxy with SSL termination in Nginx.
Are Reverse Proxy and Load Balancer Similar?
Though both terminologies sound similar, a reverse proxy accepts requests from clients and forwards the request to servers for the actual processing. The reverse proxy relays the results from servers to the client.
A load balancer distributes client requests among a group of backend servers and then relays the response from the selected server to the appropriate client.
So, Do We Need Both?
Yes, in most of the use cases we need to use both.
Load balancers help to eliminate a single point of failure, making the website/API more reliable by allowing the website/API to be deployed in multiple backend servers. Also, load balancers enhance the user experience by reducing the number of error responses for clients either by detecting when one of the backend servers goes down and diverting requests away from that server to the other servers in the backend pool or by allowing an application health check. This is when the load balancer sends separate health-check requests in the frequent interval and determines a server is healthy based on the specified type of response like response code 200 or response messages "OK".
Load balancer makes sense when we have multiple backend servers because it often makes sense to deploy a reverse proxy even with just one web server or application server. The benefits of reverse proxy are the following:
- Security: With a reverse proxy, clients will not have information about our backend servers, so there is no way any malicious client cannot access them directly to exploit any vulnerabilities. Many reverse proxy servers provide features that help protect backend servers from DDoS attacks, IP address blacklisting to reject traffic from particular client IP, or Rate Limit, which is limiting the number of connections accepted from each client.
- Scalability and high availability: Along with load balancing, the reverse proxy allows to scale/ add/remove servers to backend pool based on traffic volume as clients see only the reverse proxy’s IP address. This makes you achieve high availability for your websites/API.
- Optimized SSL Encryption/Decryption: Implementing SSL/TLS can significantly impact backend server performance because the SSL handshake and encrypting/decrypting operation for each request is quite CPU-intensive.
How Do You Set Up Nginx as a Reverse Proxy and Load Balancer?
Nginx supports proxying requests to servers using HTTP(s), FastCGI, SCGI, and uwsgi, or Memcached protocols through separate sets of directives for each type of proxy. In this article, I will use the HTTP protocol.
By default, Nginx uses proxy_pass directive to hand over requests to a single server that can communicate using HTTP. You can find the proxy_pass directive in location contexts.
location /api/card {
proxy_pass http://example.com;
}
When a request for API/card/report is handled by this block, the request URI will be sent to the example.com server as http://example.com/api/card/report.
So, if your backend server supports multiple operations, you need to set up location context as the code below:
x
location /api/creditcard{
proxy_pass http://example.com;
}
location /api/debitcard {
proxy_pass http://example.com;
}
Set-Up Load Balancing
Above, I mentioned how to do a simple HTTP proxy to a single backend server. Nginx allows us to easily scale this configuration out by specifying entire pools of backend servers that we can pass requests to.
To implement multiple backend pool servers, Nginx provides an upstream directive, and we can scale out our infrastructure to handle the high volume of traffic with almost no effort. The upstream directive must be set in the HTTP context of your Nginx configuration.
x
upstream app1 {
server host1.example.com;
server host2.example.com;
server host3.example.com;
}
server {
listen 80;
server_name example.com;
location /api/card {
proxy_pass http://app1;
}
}
In the above example, we’ve set up an upstream context called app1. Once defined, we can use app1 in the proxy_pass as http://app1, and any request made to example.com/api/card will be forwarded to the pool (app1) we defined above. Within that pool, a host is selected by applying a configurable algorithm. By default, Nginx uses a round-robin selection process.
Changing the Upstream Balancing Algorithm
Nginx opensource supports 4 load balancing methods. They are defined in the subsections below.
Round Robin: This is a default method and requests are distributed evenly across the servers with server weights taken into consideration.
xxxxxxxxxx
upstream backend {
# no load balancing method is specified for Round Robin
server host1.example.com;
server host2.example.com;
}
Least Connections: A request is sent to the server with the least number of active connections with server weights taken into consideration again.
xxxxxxxxxx
upstream backend {
least_conn;
server host1.example.com;
server host2.example.com;
}
IP Hash: The server to which a request is sent is determined from the client's IP address. In this case, either the first three octets of the IPv4 address or the whole IPv6 address are used to calculate the hash value. The method guarantees that requests from the same address get to the same server unless it is not available.
xxxxxxxxxx
upstream backend {
ip_hash;
server host1.example.com;
server host2.example.com;
}
Generic Hash: The server to which a request is sent is determined from a user‑defined key which can be a text string, variable, or a combination. For example, the key may be a paired source IP address and port, or a URI as in the example below:
xxxxxxxxxx
upstream backend {
hash $request_uri consistent;
server host1.example.com;
server host2.example.com;
}
Set Up an HTTPS Server
To set up an HTTPS server in the Nginx.conf file, we need to add the below SSL parameter to the listen directive in the server block, and we also need to configure the locations of the server certificate and private key files like so:
server {
listen 443 ssl;
server_name www.example.com;
ssl_certificate /etc/nginx/ssl/server.crt;
ssl_certificate_key /etc/nginx/ssl/server.key;
ssl_client_certificate /etc/nginx/ssl/server-truststore.pem;
#set up mutual ssl, if you want to set up mutual authentication, configure the value as 'on' else 'optional'.
ssl_verify_client on;
ssl_protocols TLSv1 TLSv1.1 TLSv1.2;
ssl_ciphers HIGH:!aNULL:!MD5;
}
Now, we understood the reverse proxy and load-balancing support in Nginx. To configure both, create a nginx.conf file in the /etc/nginx directory, and add the below configuration.
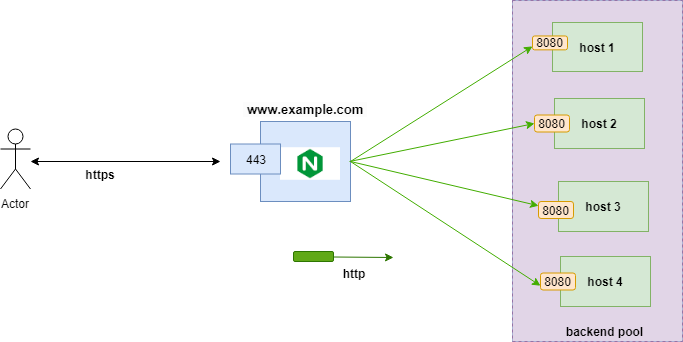
Nginx. conf
xxxxxxxxxx
events {}
http {
upstream backend {
server host1.example.com:8080;
server host2.example.com:8080 max_fails=2 fail_timeout=5s;
}
ssl_session_cache shared:SSL:10m;
ssl_session_timeout 10m;
server{
listen 443 ssl;
keepalive_timeout 70;
ssl_certificate /etc/nginx/ssl/server.crt;
ssl_certificate_key /etc/nginx/ssl/server.key;
ssl_client_certificate /etc/nginx/ssl/server-truststore.pem;
#setting for mutual ssl, if you want to set up mutual authentication, configure the value as 'on' else 'optional'.
ssl_verify_client on;
location /services/api1 {
proxy_pass http://backend;
}
location /services/api2 {
proxy_pass http://backend;
}
}
}
Note: Nginx opensource does not support health probe checks. To achieve health probe functionality, one can configure the max_fails and fail_timeout attribute to the server in the upstream directive. However, the Nginx+, supports the health probe endpoint.
Opinions expressed by DZone contributors are their own.
Comments