Open Source RT-Thread RTOS Auto-Initialization Mechanism Analysis
RT-Thread is an open-source embedded real-time operating system with rich middle-tier components and an excellent hardware and software ecosystem.
Join the DZone community and get the full member experience.
Join For FreeRT-Thread is an open-source embedded real-time operating system with rich middle-tier components and an excellent hardware and software ecosystem, all delivering fantastic support for the Internet of Things industry. Since its inception in 2006, RT-Thread has powered 1.5 billion devices, including Wearables, Smart Home Appliances, Automotive Electronics, Medical Electronics, Consumer Electronics, Energy, and many other industries.
On March 15, RT-Thread is partnered with NXP Semiconductors, STMicroelectronics, and WCHElectronics to bring an IoT Webinar: Power the IoT Devices. Free Register Here.
Let’s go back to the Auto-Initialization Mechanism.
General Initialization
During the embedded development, we’re mainly taking this approach to initialize a peripheral.
int main(int argc, char *argv[])
{
    clk_init();
    led_init();
    beep_init();
    key_init();
    .....
    while(1)
    {
        ...
    }
}
The order of this initialization is relatively clear, and it is quite easy to figure out the peripherals that have been initialized and the order in which they are initialized. However, the main function is particularly cumbersome, especially when there are a lot of peripherals that need to be initialized.
Auto-Initialization
Programming C on the computer to print a hello world
#include <stdio.h>
int main(int argc, char *argv[])
{
    printf("hello world\r\n");
    return 1;
}
Here, we can directly use printf to print without any initialization steps; this idea leads to the RT-Thread automatic initialization mechanism.
RT-Thread Auto-Initialization:
int led_init()
{
    ...
}
INIT_APP_EXPORT(led_init);
int main(int argc, char *argv[])
{
    led_on();
    rt_kprintf("hello rt thread\r\n");
    return 1;
}
The central thought of automatic initialization is that the initialization of each peripheral is completed before executing to the main function, and all the peripherals can be used directly in the main function. For example, the above program directly uses rt_kprintf for output and lit the LED.
Auto-Initialized API
The auto-initialized API intercepted from the RT-Thread source code, as shown as follows:
/* board init routines will be called in board_init() function */
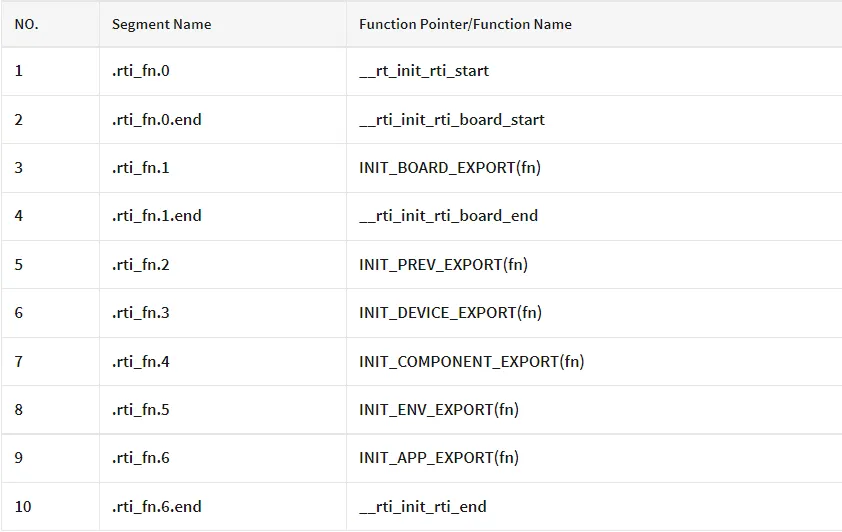
#define INIT_BOARD_EXPORT(fn) INIT_EXPORT(fn, "1")
/* pre/device/component/env/app init routines will be called in init_thread */
/* components pre-initialization (pure software initilization) */
#define INIT_PREV_EXPORT(fn) INIT_EXPORT(fn, "2")
/* device initialization */
#define INIT_DEVICE_EXPORT(fn) INIT_EXPORT(fn, "3")
/* components initialization (dfs, lwip, ...) */
#define INIT_COMPONENT_EXPORT(fn) INIT_EXPORT(fn, "4")
/* environment initialization (mount disk, ...) */
#define INIT_ENV_EXPORT(fn) INIT_EXPORT(fn, "5")
/* appliation initialization (rtgui application etc ...) */
#define INIT_APP_EXPORT(fn) INIT_EXPORT(fn, "6")
API functions list is shown in the following table
Mechanism Analysis
INIT_EXPORT Function
Seeing from the initialization functions, we’re getting to know that their final call is the INIT_EXPORT function. Only the entered parameters are different. Let's take a look at the definition of this function:
#define INIT_EXPORT(fn, level)                                                       \
    RT_USED const init_fn_t __rt_init_##fn SECTION(".rti_fn." level) = fn
The INIT_EXPORT() function has two parameters; the first parameter indicates which function needs to be initialized, delivering the function pointer(the function name), and the second parameter indicates which segment to place the function pointer into. Let's get into the Macro next, and there are several prerequisites required to know before we jump to the macro.
- RT_USED
- #define RT_USED attribute((used))
The attribute__(used) function has been marked in the object file to prevent the linker from deleting unused sections.
- init_fn_t type
- typedef int (*init_fn_t)(void);
Here, a return value of int is defined a function pointer type with the function parameter void and renamed to init_fn_t.
##
## belongs to the C language, and its role is to combine two language symbols into a single language symbol
- SECTION
- #define SECTION(x) attribute((section(x)))
__attribute__((section(name))) puts the functional functions or data into an input segment specified named name
With the above preliminary backup, let’s analyze the following INIT_EXPORT macro. Expand the macro to as below:
RT_USED const init_fn_t __rt_init_fn SECTION(".rti_fn." level) = fnThe function of this macro is to assign the pointer to the function fn to the variable __rt_init_fn, this variable type is RT_USED const init_fn_t, and it is stored in the specified segment .rti_fn.level. So after the function is exported using an automatic initialization macro, pointers to each initialization function will be stored in these data segments. When we're dereferencing, these pointers will be taken as we're executing the corresponding function.
Division of Segments
The segments are divided in component.c, and the source code is as follows:
static int rti_start(void)
{
return 0;
}
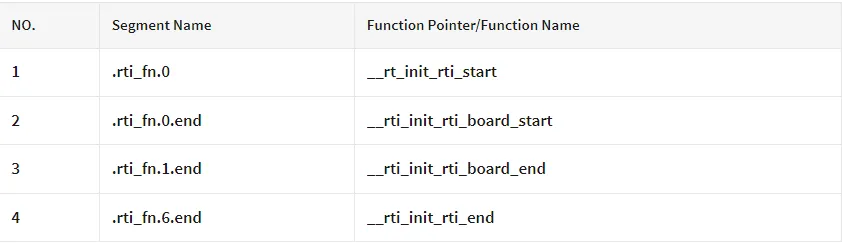
INIT_EXPORT(rti_start, "0");
static int rti_board_start(void)
{
return 0;
}
INIT_EXPORT(rti_board_start, "0.end");
static int rti_board_end(void)
{
return 0;
}
INIT_EXPORT(rti_board_end, "1.end");
static int rti_end(void)
{
return 0;
}
INIT_EXPORT(rti_end, "6.end");
The distribution of the segments exported above using the INIT_EXPORT macro is shown in the following table:
After adding the six segments that are exported after auto-initialization, the distribution of each segment is shown in the following table:
rt_components_board_init function
Head to check about the implementation of the rt_components_board_init function:
void rt_components_board_init(void)
{
#if RT_DEBUG_INIT
    int result;
    const struct rt_init_desc *desc;
    for (desc = &__rt_init_desc_rti_board_start; desc < &__rt_init_desc_rti_board_end; desc ++)
    {
        rt_kprintf("initialize %s", desc->fn_name);
        result = desc->fn();
        rt_kprintf(":%d done\n", result);
    }
#else
    volatile const init_fn_t *fn_ptr;
    for (fn_ptr = &__rt_init_rti_board_start; fn_ptr < &__rt_init_rti_board_end; fn_ptr++)
    {
        (*fn_ptr)();
    }
#endif
}
If not, consider the RT_DEBUG_INIT, it's clear to find that the rt_components_board_init is executing the following:
volatile const init_fn_t *fn_ptr;
for (fn_ptr = &__rt_init_rti_board_start; fn_ptr < &__rt_init_rti_board_end; fn_ptr++)
{
    (*fn_ptr)();
}
The above code defines a fn_ptr pointer, which is dereferenced when the range of the pointer is within the range of __rt_init_rti_board_start and rt_init_rti_board_end, where the pointer is the function pointer put during automatic initialization, so it is quite the execution of the function. That is, the function exported by INIT_BOARD_EXPORT(fn) is executed.
rt_components_init Function
Source code:
void rt_components_init(void)
{
#if RT_DEBUG_INIT
    int result;
    const struct rt_init_desc *desc;
    rt_kprintf("do components initialization.\n");
    for (desc = &__rt_init_desc_rti_board_end; desc < &__rt_init_desc_rti_end; desc ++)
    {
        rt_kprintf("initialize %s", desc->fn_name);
        result = desc->fn();
        rt_kprintf(":%d done\n", result);
    }
#else
    volatile const init_fn_t *fn_ptr;
    for (fn_ptr = &__rt_init_rti_board_end; fn_ptr < &__rt_init_rti_end; fn_ptr ++)
    {
        (*fn_ptr)();
    }
#endif
}
If not, consider the RT_DEBUG_INIT, it's clear to find that the rt_components_init is executing the following:
volatile const init_fn_t *fn_ptr;
for (fn_ptr = &__rt_init_rti_board_end; fn_ptr < &__rt_init_rti_end; fn_ptr ++)
{
    (*fn_ptr)();
}
The code also defines a fn_ptr pointer, which is dereferenced when the range of the pointer is within the range of __rt_init_rti_board_end and __rt_init_rti_end, where the pointer is the function pointer put during automatic initialization; again, we're getting this function executed. That is, the function derived between the INIT_PREV_EXPORT(fn) to INIT_APP_EXPORT(fn) segments are executed
Execution of Auto-Initialized Functions
The startup process of RT-Thread:
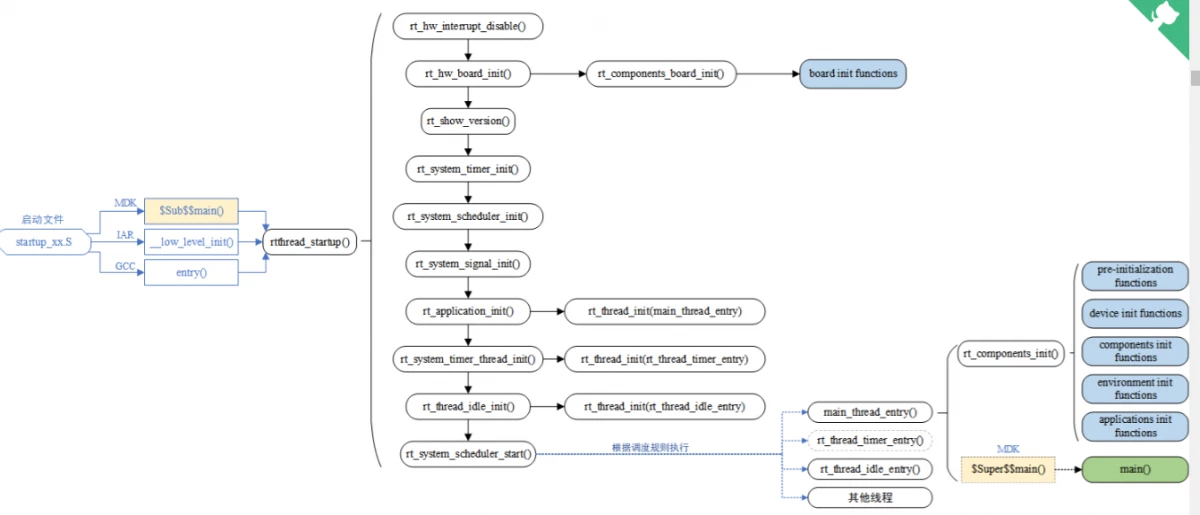
The rt_components_board_init() function and the rt_componenets_init() function are executed.
Sample
Add the following test code to the main.c function:
int led_init(void)
{
    return 1;
}
INIT_APP_EXPORT(led_init);
The compiled .map file is shown as follows:
The function pointer __rt_init_led_init is located in the .rti_fn.6 segment, and the function rt_components_init() will dereference this pointer when it is executed, that is, execute the led_init function.
Published at DZone with permission of Nath Abby. See the original article here.
Opinions expressed by DZone contributors are their own.
Comments