Template-Based PDF Document Generation in JavaScript
A guide to creating PDF documents from JSON/XML/Database in your js application using eDocGen.
Join the DZone community and get the full member experience.
Join For FreeDocument generation is a very common requirement in the life of a developer. Whether it is an e-commerce site, Management app, or anything. It can be invoice generation, insurance document preparation, doctor's prescription, HR Offer generation, and Payslip generation and you could think of tons of use cases. There always will be a need for document generation.
From a developer's perspective, there are a few common approaches to getting this job done.
- Create HTML elements and print them to generate the documents
- Using some library to generate the documents
- Letting the server handle document generation based on a static template
These approaches didn't help me. The clients want to have their documents customized by themself. I have been searching for an approach and found eDocGen as a single-point solution.
Unlike other services, eDocGen provides RestAPI that can be integrated into our application.
In this article, we will discuss how we can integrate eDocGen into our js application to generate documents from various data formats like JSON/XML/Database schema. Please get your free trial to get started with the coding.
Let's dive in and write code.
Project Setup
For the demo purpose, I have created a sample js application that runs on Node.js.
Please follow the step below to set up a coding playground for us.
Step 1:
Use npm init to create package.json
Step 2:
Add axios, form-data, request, xhr2 dependencies needed for developing this application using npm install axios form-data request xhr2
Step 3:
We need an index file that will act as the starting point of our application. Create an index.js file in the root directory and modify package.json like below.
"scripts": {
    "start": "node index.js"
  }
Now we have a basic application to start with. End of these steps, the package.json should look like something below.
{
  "name": "nodejs-multiple-upload-files",
  "version": "1.0.0",
  "main": "index.js",
  "scripts": {
    "start": "node index.js"
  },
  "dependencies": {
    "axios": "^0.27.2",
    "form-data": "^4.0.0",
    "request": "^2.88.2",
    "xhr2": "^0.2.1"
  }
}
Login
Though the article is about document generation, we need to log in to get our access token. It's a typical JWT token that will be used for authorizing the document generation API.
var XMLHttpRequest = require("xhr2");
var xhr = new XMLHttpRequest();

module.exports.getToken = function (callback) {
  var data = JSON.stringify({
    username: "<your username>",
    password: "<password>",
  });

  xhr.addEventListener("readystatechange", function () {
    if (this.readyState === 4) {
      token = JSON.parse(this.responseText).token;

      console.log("User Token", token);
      callback(token);
    }
  });

  xhr.open("POST", "https://app.edocgen.com/login");
  xhr.setRequestHeader("content-type", "application/json");
  xhr.setRequestHeader("cache-control", "no-cache");
  xhr.send(data);
};
We can cache the token in the application for a time period less than the expiration time and use it to generate documents or upload templates. After the expiration time, we can refresh the token. The cache can be Redis or an in-memory cache. It's up to your application design.
Template Design
As explained above, eDocGen lets the users customize and upload the templates. But how will the data be mapped dynamically? There are certain rules that map the data to the document. We will see how to create a template with the rules.
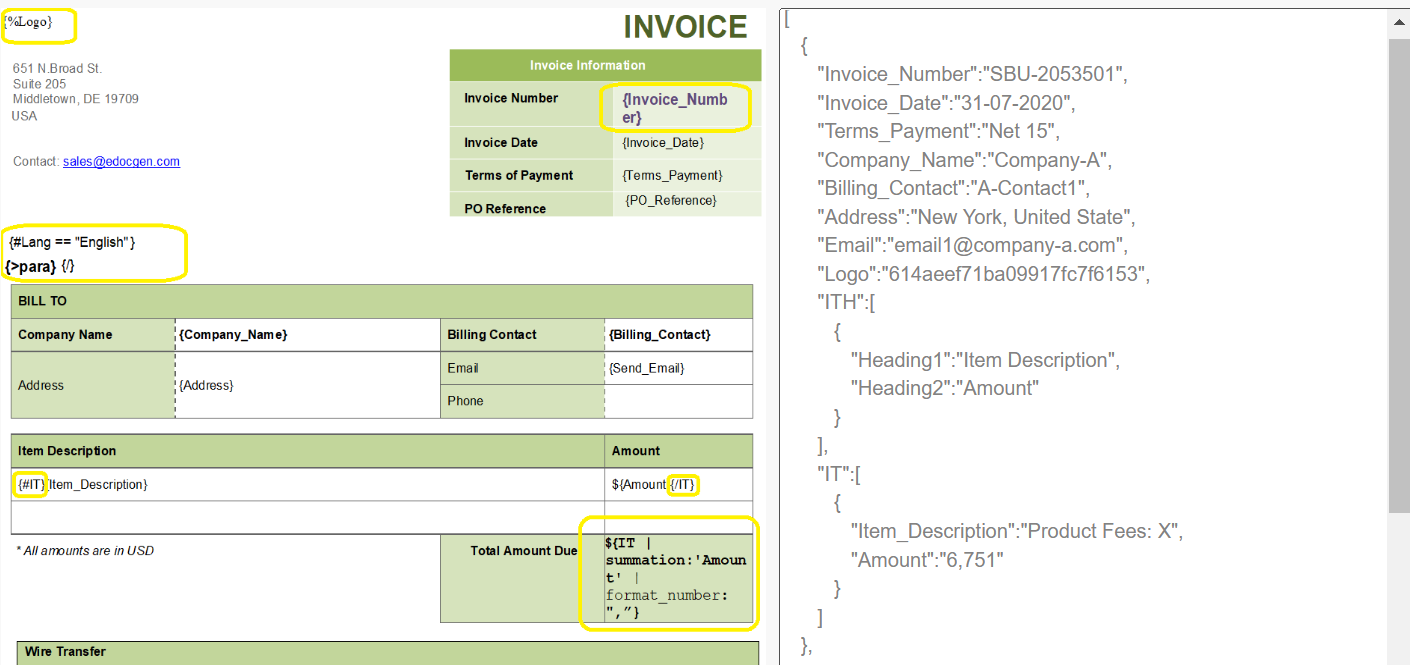
Take a look at this document.
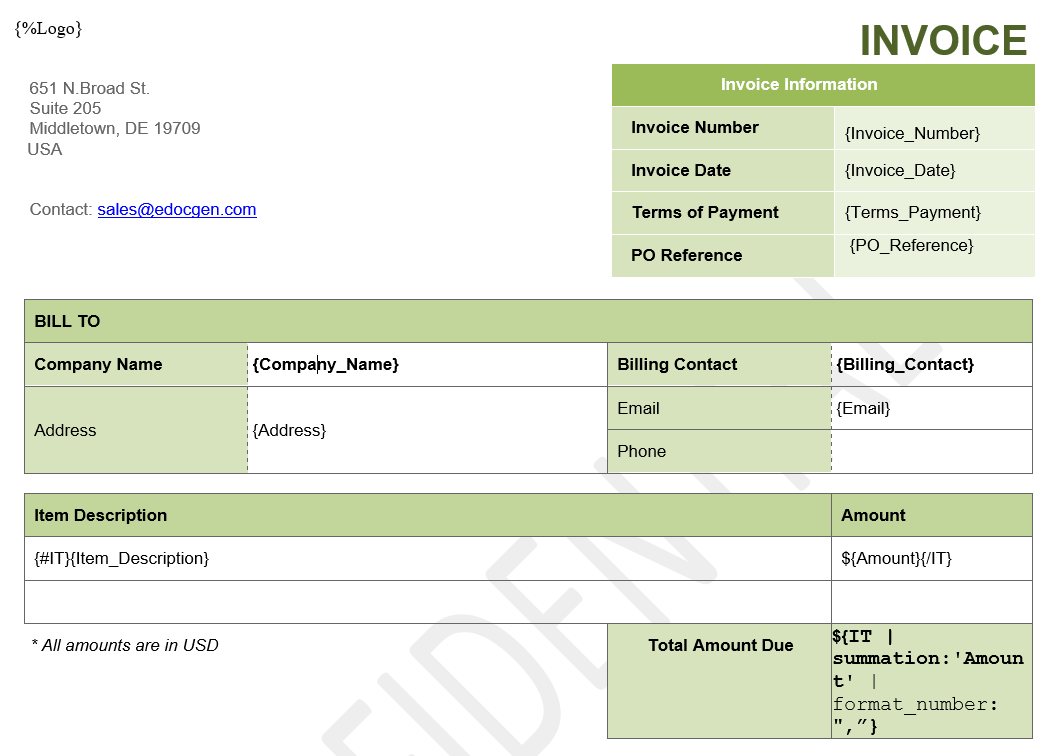
eDocGen uses tags that are enclosed by {} for the dynamic fields. We can dynamically add text, logos, tables, conditional statements, mathematical calculations, etc.
For example, in the image above,
String fields: {Invoice_Number} and {Invoice_Date} are configured to be replaced as text in the template. Anything inside {} in the template will be matched with input data and replaced.
Dynamic Tables: Dynamic tables would be a go-on option when there is an array of data that needs to be looped and replaced in a table. The row in the table starts with {#tablename} and ends with {/tablename}. In the example above, a row in the invoice table is started with {#IT} in the first column and ended with {/IT} in the last column. Columns in the rows can have String fields. In our example, {Item_description} and {Amount}
Image: eDocGen offers to add images dynamically to the template. Follow the steps below.
- Upload the image to the eDogGen that should respond with an image_id.
{%image_id}is the tag for populating images. The image will be fetched byimage_idfrom eDocGen storage and replaced in the place of{%image_id}. Theimage_idis expected to be present in the input data.
Conditional-based Dynamic fields (If-Else): Displaying content conditionally can be done with the Conditional tags. For example, When the language is English, {#language == "english"} English content will be displayed in the document. Likewise, multiple languages can be supported in a single document template.
Mathematical calculations: eDocGen supports mathematical calculations based on formulae defined in the template. The summation of the amount of the items in the invoice can be calculated using the below formulae.
{
    IT // array of items
    | summation:'Amount' // value that needs to be used for calculation
    | format_number: ",” // format of the value
}
Please head over to JSON-to-pdf for more details.
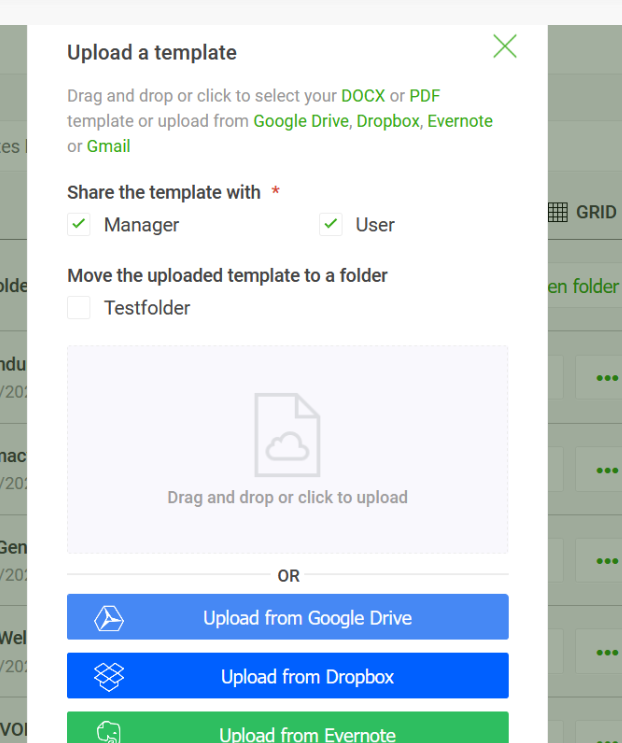
Template Upload
Once the template is prepared, this can be uploaded for consumption. There are two ways.
- eDocGen's interactive UI - which has integration with dropbox, drive, Evernote
- eDocGen's RestAPI - which can be integrated into the client code for uploading templates.
For the demo, purpose I have used the UI for uploading the template. On the successful upload, we get an ID as a response. This is the ID that will be used for generating the documents.
Leaving here the Upload API structure for your reference, in case you wish to use API.
"/api/v1/document": {
  "post": {
    "tags": [
      "Document"
    ],
    "description": "Upload template to eDocGen",
    "produces": [
      "application/json"
    ],
    "consumes": [
      "multipart/form-data"
    ],
    "parameters": [
      {
        "name": "documentFile",
        "description": "file to upload",
        "required": true,
        "type": "file",
        "in": "formData"
      },
      {
        "name": "x-access-token",
        "in": "header",
        "description": "JWT auth token from login",
        "required": true,
        "type": "string"
      }
    ],
    "responses": {
      "200": {
        "description": "Successfully uploaded document file"
      },
      "other": {
        "description": "Operation failed"
      }
    }
  }
}
JSON to Document Generation
Now we have our template ready. Let's generate the document.
Document generation has two phases.
- .Request to generate the document
- .Download the document
Step 1: Request To Generate the Document
We request document generation with the details required and we get an acknowledgment. The process happens behind the screen asynchronously.
Parameters Needed for the Document Generation
API: POST - /api/v1/document/generate/bulk
Request Body
Form Data
| documentId | id of the template |
| format | pdf/docx (Format should be supported by the template) |
| outputFileName | The file name for the output file. |
| inputFile | The file contains marker values. json, xlsx and xml supported. |
Header
| Content-Type | multipart/form-data |
| x-access-token | JWT auth token from login |
Input Data
The data in the inputFile should be in a structure defined by the template. For example, For the above template mapping will be like the below.
Invoice_Numberin JSON should be matching with{Invoice_Number}in the template.- For table data, it should be an array of objects, with
Item_DescriptionandAmount. The amount should be a number for summation calculation.
Step 2: Download the Document
The generated document can be downloaded using the output ID obtained from the above step and the name of the output file.
We will use two APIs here.
- API to know the file's existence :
/api/v1/output/name/${fileName} - API to download the file :
/api/v1/output/download/${outputId}
Since document generation happens asynchronously, to know whether the document is generated or not, we will use the /api/v1/output/name api.
On the success response from API /api/v1/output/name will download the file.
I have combined both of these steps in a single js file and it looks below.
let login = require("../edocgen_login");
const fs = require("fs");
const uuid = require("uuid");
const FormData = require("form-data");
let axios = require("axios");
let fileName = uuid.v4();
const headers = {
  "Content-Type": "multipart/form-data",
  "x-access-token": "null",
};

const hostName = "https://app.edocgen.com/api/v1/document/generate/bulk";


const outputFormat = "<format>";// pdf / docx
const documentId = "<template_id>";    // id of the template we want to use

module.exports.generateFiles =  function () {
  let authToken = login.getToken(function handleUsersList(token) {

    headers["x-access-token"] = token;

    var formBody = new FormData();
    formBody.append("documentId", documentId);
    formBody.append("format", outputFormat);
    formBody.append("outputFileName", fileName);
    // json data for the template
    formBody.append("inputFile", fs.createReadStream("./JSON_Data_Single.json"));   // local path forjson file

    let config = {
      method: "post",
      url: hostName,
      headers: headers,
      data: formBody,
    };

    console.log(`https://app.edocgen.com/api/v1/output/name/${fileName}.${outputFormat}`);
    let config_output = {
      method: "get",
      url:`https://app.edocgen.com/api/v1/output/name/${fileName}.${outputFormat}`,
      headers: headers,
    };

    const MAX_RETRY = 50;
    let currentRetry = 0;

    // max retry for 50 times
    function errorHandler() {
      if (currentRetry < MAX_RETRY) {
        currentRetry++;
        console.log("Document is not prepared yet! Retrying...");
        sendWithRetry(processResponse);
      } else {
        console.log("No luck. Document is not generated. Retried multiple times.");
      }
    }

    // sendWithRetry checks for file existence
    // on success, it proceeds to download the file
    // on failure, it retries
    // todo: introduce spin lock
    function sendWithRetry(callback) {
      axios(config_output)
        .then(function (response) {
          if (response.data.output.length !== 1) {
            throw new axios.Cancel("Document is not found. Throw error.");
          } else {
            callback(response);
          }
        })
        .catch(errorHandler);
    }

    axios(config)
      .then(function (response) {
        sendWithRetry(processResponse);
      })
      .catch(function (error) {
        console.log(error);
      });
  });
};

function processResponse(response) {
  const outputId = response.data.output[0]._id;
  console.log(
    "Output Document is Generated. Id = ",
    response.data.output[0]._id
  );

  let config_download = {
    method: "get",
    url: `https://app.edocgen.com/api/v1/output/download/${outputId}`,
    headers: headers,
    responseType: "arraybuffer",

  };

  axios(config_download)
    .then(function (response) {
      console.log("Output file is downloaded " + `${fileName}.${outputFormat}`);
      fs.writeFileSync(`./${fileName}.${outputFormat}`, response.data);
    })
    .catch(function (error) {
      console.log("Error while downloading");
      console.log(error);
    });
}
Single vs Multiple Documents
When the data is single JSON, a single document of the given format will be generated.
When the data is an array of objects, documents for each array element will be generated and zipped into a file.
XML to Document Generation
The procedure is simple for XML data. All we need to do is pass the XML file in the place of JSON data.
Like JSON to document, For XML to Document as well, we need documentId, outputFileName, format and inputFile. Everything same as JSON, except the input file, will be an XML file.
The sample XML data would look like below
<?xml version="1.0" encoding="UTF-8" ?>
<marker>
  <values>
    <Invoice_Number>SBU-2053501</Invoice_Number>
    <Invoice_Date>31-07-2020</Invoice_Date>
    <Terms_Payment>Net 15</Terms_Payment>
    <Company_Name>ABC company</Company_Name>
    <Billing_Contact>ABC-Contact1</Billing_Contact>
    <Address>New york, United State</Address>
    <Email>[email protected]</Email>
	<Logo>621cd2b783a6095d7b15a443</Logo>
     <Sum1>6,751</Sum1>
	 <para>61b334ee7c00363e11da3439</para>
    <ITH>
      <Heading1>Item Description</Heading1>
      <Heading2>Amount</Heading2>
    </ITH>
    <IT>
      <Item_Description>Product Fees: X</Item_Description>
      <Amount>5,000</Amount>
    </IT>
  </values>
<marker>
Code change that I made for XML as the data source is simple as below
var formBody = new FormData();
formBody.append("documentId", documentId);
formBody.append("format", outputFormat);
formBody.append("outputFileName", fileName);
formBody.append("inputFile", fs.createReadStream("./XML_Invoice.xml"));
Database to Document Generation
Document generation from Databases is almost the same as other data sources. But in this case, instead of uploading the inputFile, we require to provide the connection details and SQL query.
The output columns of the SQL query should be matching with the tags in the document template.
Let's look at how to configure this in code.
const templateId = "<template id>";
const dbVendor = "mysql";
const dbUrl = "<jdbc connection URL>";
const dbLimit = "100";
const dbPassword = "<database password>";
const dbQuery = "SELECT JSON_ARRAY(first, last) FROM customers;";
const outputFormat = "pdf";

// form data prepareation
let formBody = new FormData();
formBody.append("documentId", templateId);
formBody.append("format", outputFormat);
formBody.append("dbVendor", dbVendor);
formBody.append("dbUrl", dbUrl);
formBody.append("dbLimit", dbLimit);
formBody.append("dbPassword", dbPassword);
formBody.append("dbQuery", dbQuery);
formBody.append("outputFileName", fileName);
Everything else would remain the same.
Sending the Document Over Email
eDocGen provides the facility to send the generated document over Email.
Parameters Needed for the Document Generation
API: POST - /api/v1/output/email
Request Body
JSON
outId |
Put output ID here which needs to be sent via email |
| emailId | Put user email here |
Header
| Content-Type | multipart/form-data |
| x-access-token | JWT auth token from login |
Code Sample
let login = require("../edocgen_login");
let axios = require("axios");
const hostName = "https://app.edocgen.com/api/v1/output/email";
const headers = {
  "Content-Type": "application/json",
  "x-access-token": "null",
};

const outId = "<output ID>"; // Put output ID here which need to be sent via email
const emailId = "<user email>"; // Put user email here

module.exports.generateFiles = function () {
  let authToken = login.getToken(function handleUsersList(token) {
    headers["x-access-token"] = token;

    let payload = { outId: outId, emailId: emailId };
    let config = {
      method: "post",
      url: hostName,
      headers: headers,
      data: payload,
    };

    axios(config)
      .then(function (response) {
        console.log("Mail sent");
      })
      .catch(function (error) {
        console.log(error);
      });
  });
};
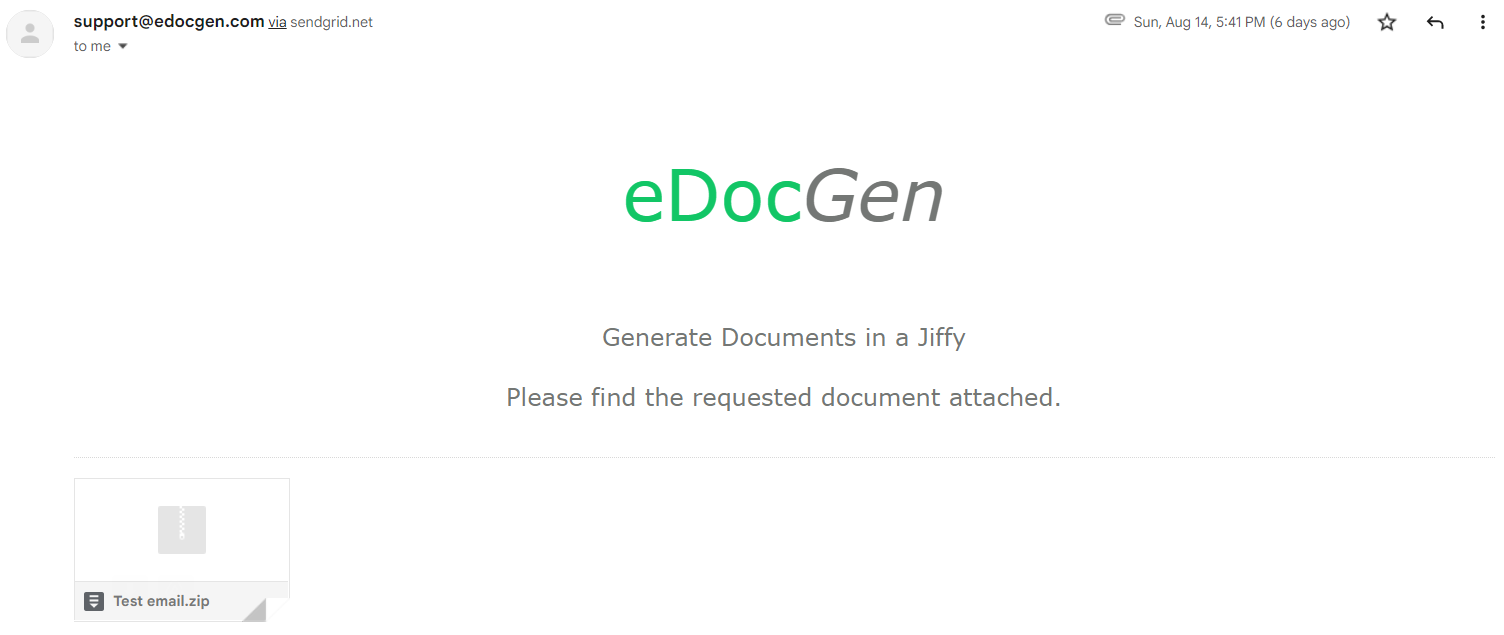
The email from eDocGen would look like below:
There are tons of other features that I couldn't cover here. But I hope this article could provide you with an idea of where to start.
Will meet you with another exciting article. Have a good day!
Opinions expressed by DZone contributors are their own.
Comments