Playwright: Test Automation You Must Know
If you love to automate and test applications, there is a new tool in the market to grab your attention and satisfy your needs for test automation.
Join the DZone community and get the full member experience.
Join For FreeIf you love to automate and test applications, you have good news. A new tool is there in the market to grab your attention and satisfy your needs for test automation.
Playwright is an open-source, powerful, and reliable framework to perform end-to-end automation testing of modern web applications. It is filled with features like:
- Cross-browser testing on all modern rendering engines, including Chromium, WebKit, and Firefox.
- Cross-platform testing on Windows, Linux, and macOS, locally or on CI, headed or headless.
- Cross-language support in JavaScript, TypeScript, Java, Python, and .Net.
- Mobile Web Test.
- Auto-wait, leading to no flaky tests.
- Web-first Assertions, with automatic retry.
- Capture execution trace, videos, and screenshots.
- Generate custom test reports.
- Supports various development IDEs and editors.
Getting Started With Playwright
It is very easy to get started with Playwright installation, configuration, and create our first test. We can choose to work with Eclipse, WebStorm, IntelliJ, VSCode, or any other IDE with a choice of language (JavaScript, TypeScript, Java, Python, and .Net).
We will see here how to work using Playwright with TypeScript and VSCode.
Pre-Requisites
- Download Node.js and install it on the machine.
- Download VSCode (Visual Studio Code) and install it on the machine.
Steps to Install Playwright
- Create a new project folder with the name: Learn_PlayWright at the desired location in the machine.
- Open VSCode IDE and open the project folder Learn_PlayWright.
- Let us change the icon pack in VSCode to view beautiful and distinctive icons for different file formats.
- Navigate to extensions by using the shortcut CTRL + SHIFT + X, search for VSCode Great Icons and click the "Install' button.
- Open the command palette by using the shortcut CTRL + SHIFT + P.
- Type "Preferences: File Icon Theme" and select "VSCode Great Icons" from the populated list.
- Let us install Playwright.
- Navigate to extensions, and search for Playwright.
- Select "Playwright Test for VSCode" and click the "Install" button.
- Open the command palette.
- Type “playwright” and select “Test: Install Playwright.”
- Select the browsers to install.
- A terminal window will appear. Type “Y” to proceed when prompted. This will install all the necessary libraries of Playwright and create our first automation test with the necessary configuration files.
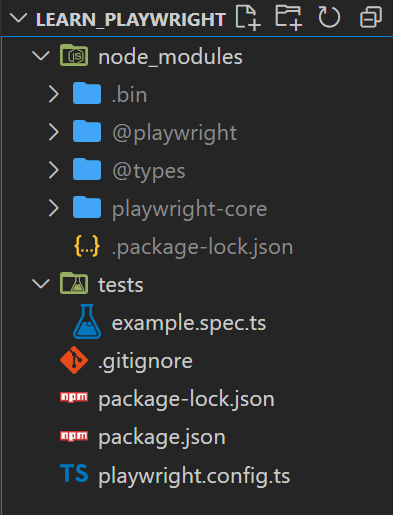
Create Our First test
- Open the example.spec.ts file and try to understand the first automation test. It is quite overwhelming to see such a lengthy code without learning Playwright commands.
- Let’s keep this code aside for our future reference and create a new test.
- Create a new file with the name “my1stTest.spec.ts” under the tests folder.
- Here is the code for the test file:
TypeScript
import { test, expect, Page } from '@playwright/test';

test.beforeEach(async ({ page }) => {
  await page.goto('https://demo.playwright.dev/todomvc');
});

test.describe('Add To Do Item', () => {
  test('should allow me to add to do item', async ({ page }) => {
    // Create a new to do item
    await page.locator('.new-todo').fill("Do homework");
    await page.locator('.new-todo').press('Enter');

    // Make sure the list only has one to do item
    await expect(page.locator('.view label')).toHaveText("Do homework");
    })
});
Execute Our First Test
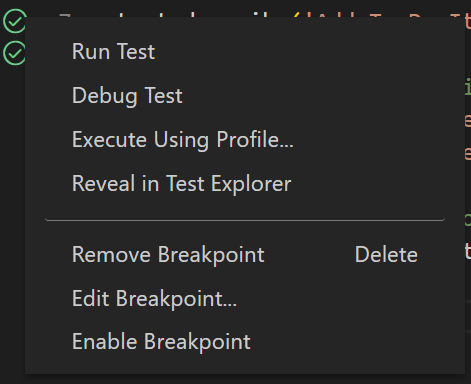
Technique 01:
- Right-click on the left-side beginning of Line 7 or Line 8.
![]()
- Select “Run Test” from the available options.
![]()
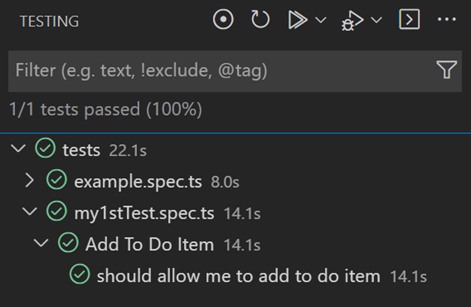
- The test execution will happen and updated on the left side panel.
![]()

Technique 02:
- Open the Terminal window, and type the command.
npx playwright test my1stTest.spec.ts
2. The test execution will happen, and the standard test report will open in the browser.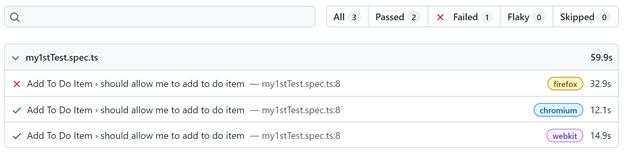
As per the default configuration in the playwright.config.ts file,
- Tests are running in parallel.
- The default report is HTML.
- Tests are running on all three browsers (Chromium, Firefox, WebKit) in headless mode.
We can change the configuration as desired. For example, use headless: false.
Interesting Features in Playwright
1. Record Scripts
The playwright has a feature that allows recording user interactions and generating code snippets.
Open the Terminal window and type the command.
npx playwright codegen demo.playwright.dev/todomvc
This will open the test application "demo.playwright.dev/todomvc" in a new browser window along with the Playwright Inspector window.
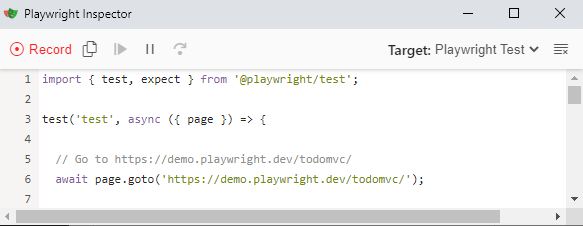
By default, the recording is started. Once we navigate and perform user interactions within our application, each and every step will be recorded in the Playwright Inspector. It has options to start/pause/stop recording and a choice of language to generate code.
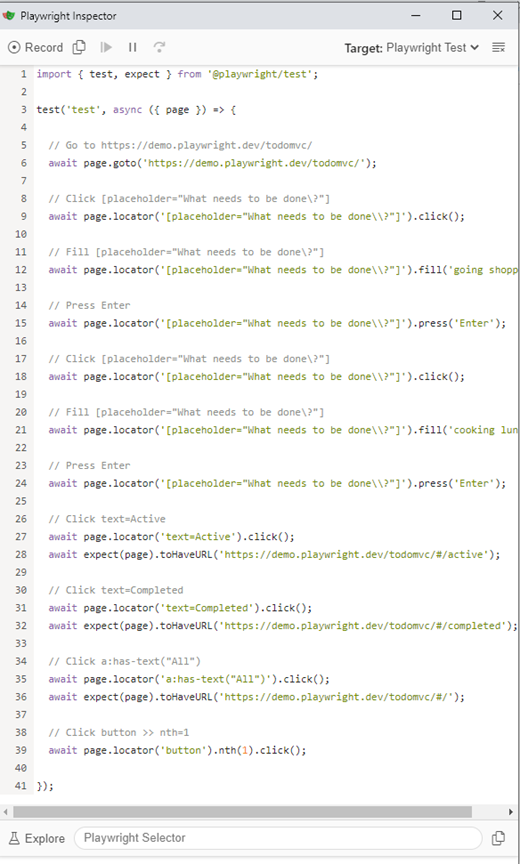
Now, copy the recorded script into a new test file, "myRecordedTest.spec.ts." We can customize the test as needed and execute the test.
2. Record Videos of Test Execution
Playwright has the capability to record videos for the entire test execution and save them in the desired location. We can modify the browser context and specify the video settings. It is also important to close the context at end of the test.
Here is the code for the test file:
import { chromium, test, expect } from '@playwright/test';

let browser = null;
let context = null;
let page = null;

test.describe('Add To Do Item', () => {

    test('Launch the browser', async() => {
        browser = await chromium.launch({
            headless: false
        })
        context = await browser.newContext({
            recordVideo: {
              dir: './videos/',
              size: { width: 640, height: 480 },
            }
        });
        page = await context.newPage();
        await page.goto('https://demo.playwright.dev/todomvc');
    })

    test('should allow me to add to do item', async () => {
    // Create a new to do item
    await page.locator('.new-todo').fill("Do homework");
    await page.locator('.new-todo').press('Enter');

    // Make sure the list only has one to do item
    await expect(page.locator('.view label')).toHaveText("Do homework");

    await context.close();
    await browser.close();
    });
});
In this code, we have specified the browser details and context within the test code. We want both the tests to do sequentially. So, update the fullyParallel: false property in playwright.config.ts.
Post execution, open the videos folder, and play the recorded video. This video will contain the entire test execution.
3. Capture Screenshots
Playwright has the capability to take screenshots of an element or entire page and save them in the desired location.
Here is the code for the test file:
await page.screenshot({ path: Date.now() + 'loginPageScreenshot.png', fullPage: true });

await page.locator('.header').screenshot({ path: Date.now() + 'headerElementScreenshot.png' });
4. Various Playwright Test Configurations
We can customize the playwright.config.ts file with various configurations and options like test directory, test timeout, assertion timeout, parallel execution, number of retries if a test failed, types of reports like HTML and JSON, headless settings, automatic screenshot, video capturing, and trace capturing on failure.
Here is the code for the playwright.config.ts file:
const config: PlaywrightTestConfig = {
/* path of all the test files */
testDir: './tests',
/* Maximum time one test can run for. */
timeout: 30 * 1000,
expect: {
/* Maximum time expect() should wait for the condition to be met. */
timeout: 5000
},
/* Run tests in files in parallel */
fullyParallel: false,
/* Retry */
retries: 2,
/* Reporter to use */
reporter: [["dot"],["json", { outputFile: "test-result.json"}],["html"]],
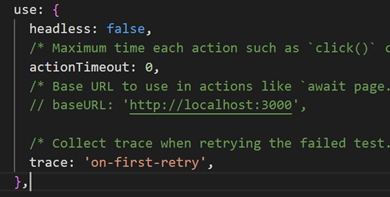
use: {
headless: false,
screenshot: "only-on-failure",
video: "retain-on-failure",
/* Maximum time each action such as `click()` can take. Defaults to 0 (no limit). */
actionTimeout: 0,
/* Collect trace when retrying the failed test. */
trace: 'on-first-retry',
},
};Here is the code for the test file:
import { test, expect } from '@playwright/test';
test.beforeEach(async ({ page }) => {
await page.goto('https://demo.playwright.dev/todomvc');
});
test.describe('Add To Do Item', () => {
test('should allow me to add to do item', async ({ page }) => {
// Create a new to do item
await page.locator('.new-todo').fill("Do homework");
await page.locator('.new-todo').press('Enter');
// Make sure the list only has one to do item
await expect(page.locator('.view label')).toHaveText("Do homwork");
});
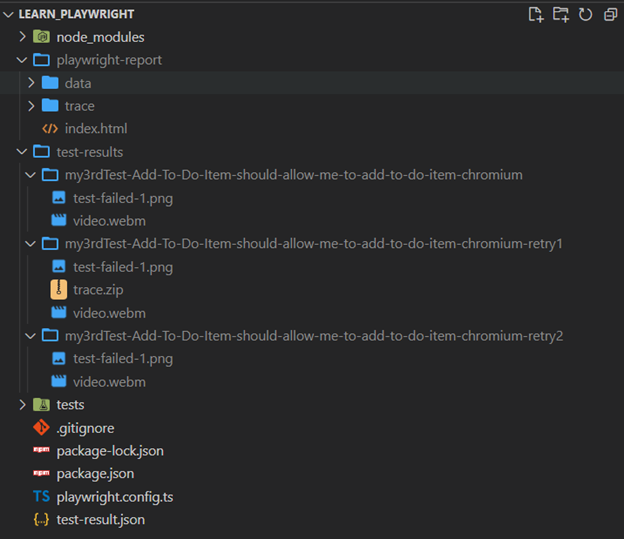
});Observe the index.html file, test-result.json file, and test-results folder with screenshots and videos of failed tests with 2 retries executions.
5. Visual Comparisons
Playwright has the capability to produce and visually compare screenshots. In the first execution, it generates reference screenshots and then performs visual comparison in subsequent executions. It uses the pixelmatch library with various options.
await expect(page).toHaveScreenshot();This command will capture the page screenshot, fail the test, and save the screenshot as a reference in the project directory. On subsequent execution, it will take the page screenshot and perform pixel by pixel comparison with the reference screenshot.
We must modify the above command if we rename the reference screenshot.
await expect(page).toHaveScreenshot('newPage.png');If the application page is modified, we can update our reference screenshot by using the command.
npx playwright test --update-snapshots
We can also specify the maximum allowed visual differences.
await expect(page).toHaveScreenshot({ maxDiffPixels: 100 });6. Relative Locators
It allows us to locate elements based on page layout. Very helpful when combined with CSS Selector.
// Fill an input to the right of "Email".
await page.locator('input:right-of(:text("Email"))').fill('data');

// Click a button near the FAQs.
await page.locator('button:near(.faqs)').click();

// Click the button in the list closest to the "Subject".
await page.locator('[type=radio]:left-of(:text("Subject"))').first().click();
Apart from Relative Locators, it provides us:
- Text Selector
- CSS Selector
- Selecting Visible Elements
- Selecting elements containing other elements
- Augmenting existing locators
- Selecting elements in Shadow DOM
- Selecting elements by label text
- XPath Selector
- Nth Element Selector
- React Selectors
- Vue Selectors
- Role Selector
- Chaining Selectors
7. Handle HTTP Authentication
Playwright has APIs that can monitor and modify network traffic. It can handle HTTP Authentication, HTTP Proxy, handle, modify and abort requests, modify responses and work with WebSocket also.
We can handle HTTP Authentication in our test application by modifying the browser context.
Here is the code for the test file:
test('Launch the browser', async() => {
        browser = await chromium.launch({
            headless: false
        })

        const context = await browser.newContext({
          httpCredentials: {
            username: 'myUserName',
            password: 'myPassword',
          },
        });

        page = await context.newPage();

        await page.goto('https://demo.playwright.dev/todomvc');
    })
8. Extract Text From Image
In certain applications, we come across text elements on which the text() property does not work. The reason is such elements are not text elements but rather pseudo-elements (combination of multiple elements). To fetch text from such elements, we need to use a third-party library called Tesseract JS. This library supports >100 languages and can run in a browser or in a NodeJS server.
To install Tesseract JS, run the command.
npm install tesseract.js
We can convert the pseudo-elements into images by taking a screenshot and then converting the images into text by using Tesseract to recognize the command.
Here is the code for the test file:
const Tesseract = require('tesseract.js');
import { test } from '@playwright/test';

test.describe('Convert Image to Text', () => {
    test('Test 01', async ({ page }) => {
        await page.goto('https://mySampleTestApplication');
        const imageElement = await page.locator('.image');

        const name = Date.now();
        await imageElement.screenshot({ path: `${name}.png` });
        await convertToText(`${name}.png`);
      });
});

async function convertToText(name: string) {
    let imgText = await Tesseract.recognize(`./${name}`);
};
There is a lot to learn and explore in Playwright for everyone.
Let's play with Playwright. Happy Learning!!
Opinions expressed by DZone contributors are their own.
Comments