Prometheus Metrics Autoscaling in Kubernetes
This set-up demonstrates how we can use the Prometheus adapter to autoscale deployments based on some custom metrics.
Join the DZone community and get the full member experience.
Join For FreeIntroduction
One of the major advantages of using Kubernetes for container orchestration is that it makes it really easy to scale our application horizontally and account for increased load. Natively, horizontal pod autoscaling can scale the deployment based on CPU and Memory usage but in more complex scenarios we would want to account for other metrics before making scaling decisions.
Enter Prometheus Adapter. Prometheus is the standard tool for monitoring deployed workloads and the Kubernetes cluster itself. Prometheus adapter helps us to leverage the metrics collected by Prometheus and use them to make scaling decisions. These metrics are exposed by an API service and can be readily used by our Horizontal Pod Autoscaling object.
Deployment
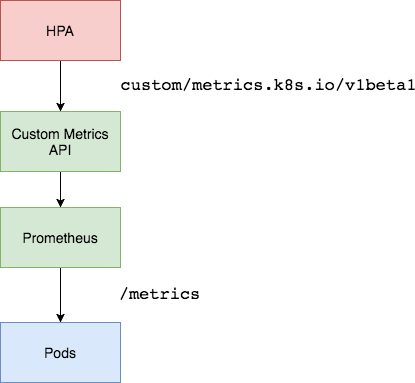
Architecture Overview
We will be using Prometheus adapter to pull custom metrics from our Prometheus installation and then let the Horizontal Pod Autoscaler (HPA) use it to scale the pods up or down.
Prerequisite
- Basic knowledge about horizontal pod autoscaling
- Prometheus deployed in-cluster or accessible using an endpoint.
We will be using a Prometheus-Thanos Highly Available deployment.
Deploying the Sample Application
Let’s first deploy a sample app over which we will be testing our Prometheus metrics autoscaling. We can use the manifest below to do it
apiVersion: v1
kind: Namespace
metadata:
name: nginx
---
apiVersion: extensions/v1beta1
kind: Deployment
metadata:
namespace: nginx
name: nginx-deployment
spec:
replicas: 1
template:
metadata:
annotations:
prometheus.io/path: "/status/format/prometheus"
prometheus.io/scrape: "true"
prometheus.io/port: "80"
labels:
app: nginx-server
spec:
affinity:
podAntiAffinity:
preferredDuringSchedulingIgnoredDuringExecution:
- weight: 100
podAffinityTerm:
labelSelector:
matchExpressions:
- key: app
operator: In
values:
- nginx-server
topologyKey: kubernetes.io/hostname
containers:
- name: nginx-demo
image: vaibhavthakur/nginx-vts:1.0
imagePullPolicy: Always
resources:
limits:
cpu: 2500m
requests:
cpu: 2000m
ports:
- containerPort: 80
name: http
---
apiVersion: v1
kind: Service
metadata:
namespace: nginx
name: nginx-service
spec:
ports:
- port: 80
targetPort: 80
name: http
selector:
app: nginx-server
type: LoadBalancer
This will create a namespace named nginx and deploy a sample Nginx application in it. The application can be accessed using the service and also exposes nginx vts metrics at the endpoint /status/format/prometheus over port 80. For the sake of our setup, we have created a DNS entry for the ExternalIP which maps to .
xxxxxxxxxx
root$ kubectl get deploy
NAME READY UP-TO-DATE AVAILABLE AGE
nginx-deployment 1/1 1 1 43d
root$ kubectl get pods
NAME READY STATUS RESTARTS AGE
nginx-deployment-65d8df7488-c578v 1/1 Running 0 9h
root$ kubectl get svc
NAME TYPE CLUSTER-IP EXTERNAL-IP PORT(S) AGE
nginx-service ClusterIP 10.63.253.154 35.232.67.34 80/TCP 43d
root$ kubectl describe deploy nginx-deployment
Name: nginx-deployment
Namespace: nginx
CreationTimestamp: Tue, 08 Oct 2019 11:47:36 -0700
Labels: app=nginx-server
Annotations: deployment.kubernetes.io/revision: 1
kubectl.kubernetes.io/last-applied-configuration:
{"apiVersion":"extensions/v1beta1","kind":"Deployment","metadata":{"annotations":{},"name":"nginx-deployment","namespace":"nginx"},"spec":...
Selector: app=nginx-server
Replicas: 1 desired | 1 updated | 1 total | 1 available | 0 unavailable
StrategyType: RollingUpdate
MinReadySeconds: 0
RollingUpdateStrategy: 1 max unavailable, 1 max surge
Pod Template:
Labels: app=nginx-server
Annotations: prometheus.io/path: /status/format/prometheus
prometheus.io/port: 80
prometheus.io/scrape: true
Containers:
nginx-demo:
Image: vaibhavthakur/nginx-vts:v1.0
Port: 80/TCP
Host Port: 0/TCP
Limits:
cpu: 250m
Requests:
cpu: 200m
Environment: <none>
Mounts: <none>
Volumes: <none>
Conditions:
Type Status Reason
---- ------ ------
Available True MinimumReplicasAvailable
OldReplicaSets: <none>
NewReplicaSet: nginx-deployment-65d8df7488 (1/1 replicas created)
Events: <none>
root$ curl nginx.gotham.com
<!DOCTYPE html>
<html>
<head>
<title>Welcome to nginx!</title>
<style>
body {
width: 35em;
margin: 0 auto;
font-family: Tahoma, Verdana, Arial, sans-serif;
}
</style>
</head>
<body>
<h1>Welcome to nginx!</h1>
<p>If you see this page, the nginx web server is successfully installed and
working. Further configuration is required.</p>
<p>For online documentation and support please refer to
<a href="http://nginx.org/">nginx.org</a>.<br/>
Commercial support is available at
<a href="http://nginx.com/">nginx.com</a>.</p>
<p><em>Thank you for using nginx.</em></p>
</body>
</html>
These are all the metrics currently exposed by the application:
xxxxxxxxxx
$ curl nginx.gotham.com/status/format/prometheus
# HELP nginx_vts_info Nginx info
# TYPE nginx_vts_info gauge
nginx_vts_info{hostname="nginx-deployment-65d8df7488-c578v",version="1.13.12"} 1
# HELP nginx_vts_start_time_seconds Nginx start time
# TYPE nginx_vts_start_time_seconds gauge
nginx_vts_start_time_seconds 1574283147.043
# HELP nginx_vts_main_connections Nginx connections
# TYPE nginx_vts_main_connections gauge
nginx_vts_main_connections{status="accepted"} 215
nginx_vts_main_connections{status="active"} 4
nginx_vts_main_connections{status="handled"} 215
nginx_vts_main_connections{status="reading"} 0
nginx_vts_main_connections{status="requests"} 15577
nginx_vts_main_connections{status="waiting"} 3
nginx_vts_main_connections{status="writing"} 1
# HELP nginx_vts_main_shm_usage_bytes Shared memory [ngx_http_vhost_traffic_status] info
# TYPE nginx_vts_main_shm_usage_bytes gauge
nginx_vts_main_shm_usage_bytes{shared="max_size"} 1048575
nginx_vts_main_shm_usage_bytes{shared="used_size"} 3510
nginx_vts_main_shm_usage_bytes{shared="used_node"} 1
# HELP nginx_vts_server_bytes_total The request/response bytes
# TYPE nginx_vts_server_bytes_total counter
# HELP nginx_vts_server_requests_total The requests counter
# TYPE nginx_vts_server_requests_total counter
# HELP nginx_vts_server_request_seconds_total The request processing time in seconds
# TYPE nginx_vts_server_request_seconds_total counter
# HELP nginx_vts_server_request_seconds The average of request processing times in seconds
# TYPE nginx_vts_server_request_seconds gauge
# HELP nginx_vts_server_request_duration_seconds The histogram of request processing time
# TYPE nginx_vts_server_request_duration_seconds histogram
# HELP nginx_vts_server_cache_total The requests cache counter
# TYPE nginx_vts_server_cache_total counter
nginx_vts_server_bytes_total{host="_",direction="in"} 3303449
nginx_vts_server_bytes_total{host="_",direction="out"} 61641572
nginx_vts_server_requests_total{host="_",code="1xx"} 0
nginx_vts_server_requests_total{host="_",code="2xx"} 15574
nginx_vts_server_requests_total{host="_",code="3xx"} 0
nginx_vts_server_requests_total{host="_",code="4xx"} 2
nginx_vts_server_requests_total{host="_",code="5xx"} 0
nginx_vts_server_requests_total{host="_",code="total"} 15576
nginx_vts_server_request_seconds_total{host="_"} 0.000
nginx_vts_server_request_seconds{host="_"} 0.000
nginx_vts_server_cache_total{host="_",status="miss"} 0
nginx_vts_server_cache_total{host="_",status="bypass"} 0
nginx_vts_server_cache_total{host="_",status="expired"} 0
nginx_vts_server_cache_total{host="_",status="stale"} 0
nginx_vts_server_cache_total{host="_",status="updating"} 0
nginx_vts_server_cache_total{host="_",status="revalidated"} 0
nginx_vts_server_cache_total{host="_",status="hit"} 0
nginx_vts_server_cache_total{host="_",status="scarce"} 0
nginx_vts_server_bytes_total{host="*",direction="in"} 3303449
nginx_vts_server_bytes_total{host="*",direction="out"} 61641572
nginx_vts_server_requests_total{host="*",code="1xx"} 0
nginx_vts_server_requests_total{host="*",code="2xx"} 15574
nginx_vts_server_requests_total{host="*",code="3xx"} 0
nginx_vts_server_requests_total{host="*",code="4xx"} 2
nginx_vts_server_requests_total{host="*",code="5xx"} 0
nginx_vts_server_requests_total{host="*",code="total"} 15576
nginx_vts_server_request_seconds_total{host="*"} 0.000
nginx_vts_server_request_seconds{host="*"} 0.000
nginx_vts_server_cache_total{host="*",status="miss"} 0
nginx_vts_server_cache_total{host="*",status="bypass"} 0
nginx_vts_server_cache_total{host="*",status="expired"} 0
nginx_vts_server_cache_total{host="*",status="stale"} 0
nginx_vts_server_cache_total{host="*",status="updating"} 0
nginx_vts_server_cache_total{host="*",status="revalidated"} 0
nginx_vts_server_cache_total{host="*",status="hit"} 0
nginx_vts_server_cache_total{host="*",status="scarce"} 0
Among these, we are particularly interested in nginx_vts_server_requests_total. We will be using the value of this metric to determine whether or not to scale our Nginx deployment.
Create Prometheus Adapter ConfigMap
Use the manifest below to create the Prometheus Adapter Configmap.
apiVersionv1
kindConfigMap
metadata
nameadapter-config
namespacemonitoring
data
config.yaml
rules:
- seriesQuery: 'nginx_vts_server_requests_total'
resources:
overrides:
kubernetes_namespace:
resource: namespace
kubernetes_pod_name:
resource: pod
name:
matches: "^(.*)_total"
as: "${1}_per_second"
metricsQuery: (sum(rate(<<.Series>>{<<.LabelMatchers>>}[1m])) by (<<.GroupBy>>))
This config map only specifies a single metric. However, we can always add more metrics.
Create Prometheus Adapter Deployment
Use the following manifest to deploy Prometheus Adapter
xxxxxxxxxx
apiVersionapps/v1
kindDeployment
metadata
labels
appcustom-metrics-apiserver
namecustom-metrics-apiserver
namespacemonitoring
spec
replicas1
selector
matchLabels
appcustom-metrics-apiserver
template
metadata
labels
appcustom-metrics-apiserver
namecustom-metrics-apiserver
spec
serviceAccountNamemonitoring
containers
namecustom-metrics-apiserver
imagequay.io/coreos/k8s-prometheus-adapter-amd64v0.4.1
args
/adapter
--secure-port=6443
--tls-cert-file=/var/run/serving-cert/serving.crt
--tls-private-key-file=/var/run/serving-cert/serving.key
--logtostderr=true
--prometheus-url=http://thanos-querier.monitoring:9090/
--metrics-relist-interval=30s
--v=10
--config=/etc/adapter/config.yaml
ports
containerPort6443
volumeMounts
mountPath/var/run/serving-cert
namevolume-serving-cert
readOnlytrue
mountPath/etc/adapter/
nameconfig
readOnlytrue
volumes
namevolume-serving-cert
secret
secretNamecm-adapter-serving-certs
nameconfig
configMap
nameadapter-config
This will create our deployment which will spawn the Prometheus adapter pod to pull metrics from Prometheus. It should be noted that we have set the argument
--prometheus-url=http://thanos-querier.monitoring:9090/. This is because we have deployed a Prometheus-Thanos cluster in the monitoring namespace in the same Kubernetes cluster as the Prometheus adapter. You can change this argument to point to your Prometheus deployment.
If you notice the logs of this container you can see that it is fetching the metric defined in the config file.
xxxxxxxxxx
I1122 00:26:53.228394 1 api.go:74] GET http://thanos-querier.monitoring:9090/api/v1/series?match%5B%5D=nginx_vts_server_requests_total&start=1574381213.217 200 OK
I1122 00:26:53.234234 1 api.go:93] Response Body: {"status":"success","data":[{"__name__":"nginx_vts_server_requests_total","app":"nginx-server","cluster":"prometheus-ha","code":"1xx","host":"*","instance":"10.60.64.39:80","job":"kubernetes-pods","kubernetes_namespace":"nginx","kubernetes_pod_name":"nginx-deployment-65d8df7488-sbp95","pod_template_hash":"65d8df7488"},{"__name__":"nginx_vts_server_requests_total","app":"nginx-server","cluster":"prometheus-ha","code":"1xx","host":"*","instance":"10.60.64.8:80","job":"kubernetes-pods","kubernetes_namespace":"nginx","kubernetes_pod_name":"nginx-deployment-65d8df7488-mwzxg","pod_template_hash":"65d8df7488"}
Creating Prometheus Adapter API Service
The manifest below will create an API service so that our Prometheus adapter is accessible by Kubernetes API and thus metrics can be fetched by our Horizontal Pod Autoscaler.
xxxxxxxxxx
apiVersion: v1
kind: Service
metadata:
name: custom-metrics-apiserver
namespace: monitoring
spec:
ports:
- port: 443
targetPort: 6443
selector:
app: custom-metrics-apiserver
---
apiVersion: apiregistration.k8s.io/v1beta1
kind: APIService
metadata:
name: v1beta1.custom.metrics.k8s.io
spec:
service:
name: custom-metrics-apiserver
namespace: monitoring
group: custom.metrics.k8s.io
version: v1beta1
insecureSkipTLSVerify: true
groupPriorityMinimum: 100
versionPriority: 100
Testing the Set-Up
Let’s check what all custom metrics are available
xxxxxxxxxx
root$ kubectl get --raw "/apis/custom.metrics.k8s.io/v1beta1" | jq .
{
"kind": "APIResourceList",
"apiVersion": "v1",
"groupVersion": "custom.metrics.k8s.io/v1beta1",
"resources": [
{
"name": "pods/nginx_vts_server_requests_per_second",
"singularName": "",
"namespaced": true,
"kind": "MetricValueList",
"verbs": [
"get"
]
},
{
"name": "namespaces/nginx_vts_server_requests_per_second",
"singularName": "",
"namespaced": false,
"kind": "MetricValueList",
"verbs": [
"get"
]
}
]
}
We can see that nginx_vts_server_requests_per_second metric is available. Now, let’s check the current value of this metric.
xxxxxxxxxx
root$ kubectl get --raw "/apis/custom.metrics.k8s.io/v1beta1/namespaces/nginx/pods/*/nginx_vts_server_requests_per_second" | jq .
{
"kind": "MetricValueList",
"apiVersion": "custom.metrics.k8s.io/v1beta1",
"metadata": {
"selfLink": "/apis/custom.metrics.k8s.io/v1beta1/namespaces/nginx/pods/%2A/nginx_vts_server_requests_per_second"
},
"items": [
{
"describedObject": {
"kind": "Pod",
"namespace": "nginx",
"name": "nginx-deployment-65d8df7488-v575j",
"apiVersion": "/v1"
},
"metricName": "nginx_vts_server_requests_per_second",
"timestamp": "2019-11-19T18:38:21Z",
"value": "1236m"
}
]
}
Create an HPA which will utilize these metrics. We can use the manifest below to do it.
xxxxxxxxxx
apiVersion: autoscaling/v2beta1
kind: HorizontalPodAutoscaler
metadata:
name: nginx-custom-hpa
namespace: nginx
spec:
scaleTargetRef:
apiVersion: extensions/v1beta1
kind: Deployment
name: nginx-deployment
minReplicas: 2
maxReplicas: 10
metrics:
- type: Pods
pods:
metricName: nginx_vts_server_requests_per_second
targetAverageValue: 4000m
Once you have applied this manifest, you can check the current status of HPA as follows:
xxxxxxxxxx
root$ kubectl describe hpa
Name: nginx-custom-hpa
Namespace: nginx
Labels: <none>
Annotations: autoscaling.alpha.kubernetes.io/metrics:
[{"type":"Pods","pods":{"metricName":"nginx_vts_server_requests_per_second","targetAverageValue":"4"}}]
kubectl.kubernetes.io/last-applied-configuration:
{"apiVersion":"autoscaling/v2beta1","kind":"HorizontalPodAutoscaler","metadata":{"annotations":{},"name":"nginx-custom-hpa","namespace":"n...
CreationTimestamp: Thu, 21 Nov 2019 11:11:05 -0800
Reference: Deployment/nginx-deployment
Min replicas: 2
Max replicas: 10
Deployment pods: 0 current / 0 desired
Events: <none>
Now, let's generate some load on our service. We will be using a utility called Vegeta for this.
In a separate terminal run the following command.
xxxxxxxxxx
echo "GET http://nginx.gotham.com/" | vegeta attack -rate=5 -duration=0 | vegeta report
Meanwhile monitor the Nginx pods and horizontal pod autoscaler and you should see something like this
xxxxxxxxxx
root$ kubectl get -w pods
NAME READY STATUS RESTARTS AGE
nginx-deployment-65d8df7488-mwzxg 1/1 Running 0 9h
nginx-deployment-65d8df7488-sbp95 1/1 Running 0 4m9s
NAME AGE
nginx-deployment-65d8df7488-pwjzm 0s
nginx-deployment-65d8df7488-pwjzm 0s
nginx-deployment-65d8df7488-pwjzm 0s
nginx-deployment-65d8df7488-pwjzm 2s
nginx-deployment-65d8df7488-pwjzm 4s
nginx-deployment-65d8df7488-jvbvp 0s
nginx-deployment-65d8df7488-jvbvp 0s
nginx-deployment-65d8df7488-jvbvp 1s
nginx-deployment-65d8df7488-jvbvp 4s
nginx-deployment-65d8df7488-jvbvp 7s
nginx-deployment-65d8df7488-skjkm 0s
nginx-deployment-65d8df7488-skjkm 0s
nginx-deployment-65d8df7488-jh5vw 0s
nginx-deployment-65d8df7488-skjkm 0s
nginx-deployment-65d8df7488-jh5vw 0s
nginx-deployment-65d8df7488-jh5vw 1s
nginx-deployment-65d8df7488-skjkm 2s
nginx-deployment-65d8df7488-jh5vw 2s
nginx-deployment-65d8df7488-skjkm 3s
nginx-deployment-65d8df7488-jh5vw 4s
root$ kubectl get hpa
NAME REFERENCE TARGETS MINPODS MAXPODS REPLICAS AGE
nginx-custom-hpa Deployment/nginx-deployment 5223m/4 2 10 3 5m5s
It can be clearly seen that the HPA scaled up our pods as per the requirement, and when we interrupted the Vegeta command, we got the vegeta report. It clearly shows that all our requests were served by the application.
xxxxxxxxxx
root$ echo "GET http://nginx.gotham.com/" | vegeta attack -rate=5 -duration=0 | vegeta report
^CRequests [total, rate, throughput] 224, 5.02, 5.02
Duration [total, attack, wait] 44.663806863s, 44.601823883s, 61.98298ms
Latencies [mean, 50, 95, 99, max] 63.3879ms, 60.867241ms, 79.414139ms, 111.981619ms, 229.310088ms
Bytes In [total, mean] 137088, 612.00
Bytes Out [total, mean] 0, 0.00
Success [ratio] 100.00%
Status Codes [code:count] 200:224
Error Set:
Conclusion
This set-up demonstrates how we can use the Prometheus adapter to autoscale deployments based on some custom metrics. For the sake of simplicity, we have only fetched one metric from our Prometheus server. However, the adapter Configmap can be extended to fetch some or all the available metrics and use them for autoscaling.
If the Prometheus installation is outside of our Kubernetes cluster, we just need to make sure that the query end-point is accessible from the cluster and update it in the adapter deployment manifest. With more complex scenarios, multiple metrics can be fetched and used in-combination to make scaling decisions.
Feel free to reach out should you have any questions around the set-up and we would be happy to assist you.
This article was originally published on https://appfleet.com/blog/prometheus-metrics-based-autoscaling-in-kubernetes/.
Published at DZone with permission of Sudip Sengupta. See the original article here.
Opinions expressed by DZone contributors are their own.
Comments