Python curses, Part 2: How to Create a Python curses-Enabled Application
Learn how to use the Python curses library to draw text in Linux. Generate your first "Hello, World" example and master text positioning techniques in Python.
Join the DZone community and get the full member experience.
Join For FreeIn the first part of this programming tutorial series, "Python curses, Part 1: Drawing With Text," we learned how to install and setup the Python curses module, which is related to the C ncurses library. Today, we will continue that discussion as we create our first “Hello, World!” example using the curses library.
Creating a Hello, World! Application With Python curses
With all of the formalities concluded, it is now time to create a simple program that will demonstrate basic ncurses functionality via a Python curses-enabled program. The code below will write a customary “Hello, world!” message to the terminal:
# demo-ncurses-hello-world.py

import curses
import sys

def main(argv):
  # BEGIN ncurses startup/initialization...
  # Initialize the curses object.
  stdscr = curses.initscr()

  # Do not echo keys back to the client.
  curses.noecho()

  # Non-blocking or cbreak mode... do not wait for Enter key to be pressed.
  curses.cbreak()

  # Turn off blinking cursor
  curses.curs_set(False)

  # Enable color if we can...
  if curses.has_colors():
    curses.start_color()

  # Optional - Enable the keypad. This also decodes multi-byte key sequences
  # stdscr.keypad(True)

  # END ncurses startup/initialization...

  caughtExceptions = ""
  try:
    # Coordinates start from top left, in the format of y, x.
    stdscr.addstr(0, 0, "Hello, world!")
    screenDetailText = "This screen is [" + str(curses.LINES) + "] high and [" + str(curses.COLS) + "] across."
    startingXPos = int ( (curses.COLS - len(screenDetailText))/2 )
    stdscr.addstr(3, startingXPos, screenDetailText)
    stdscr.addstr(5, curses.COLS - len("Press a key to quit."), "Press a key to quit.")

    # Actually draws the text above to the positions specified.
    stdscr.refresh()

    # Grabs a value from the keyboard without Enter having to be pressed (see cbreak above)
    stdscr.getch()
  except Exception as err:
   # Just printing from here will not work, as the program is still set to
   # use ncurses.
   # print ("Some error [" + str(err) + "] occurred.")
   caughtExceptions = str(err)

  # BEGIN ncurses shutdown/deinitialization...
  # Turn off cbreak mode...
  curses.nocbreak()

  # Turn echo back on.
  curses.echo()

  # Restore cursor blinking.
  curses.curs_set(True)

  # Turn off the keypad...
  # stdscr.keypad(False)

  # Restore Terminal to original state.
  curses.endwin()

  # END ncurses shutdown/deinitialization...

  # Display Errors if any happened:
  if "" != caughtExceptions:
   print ("Got error(s) [" + caughtExceptions + "]")

if __name__ == "__main__":
  main(sys.argv[1:])
The first line in main, stdscr = curses.initscr(), shows that the curses treats the screen as a curses window object that happens to cover the entire screen. All of the other functions that write text to the screen are members of the curses object. However, stdscr = curses.initscr() goes further by initializing the ncurses module so that it can do its work on the terminal.
Text Positioning With curses in Python
The code above makes use of ncurses’ positioning grid to place the text on the screen. ncurses uses a zero-indexed grid system, represented by X and Y values, to position elements on the screen:
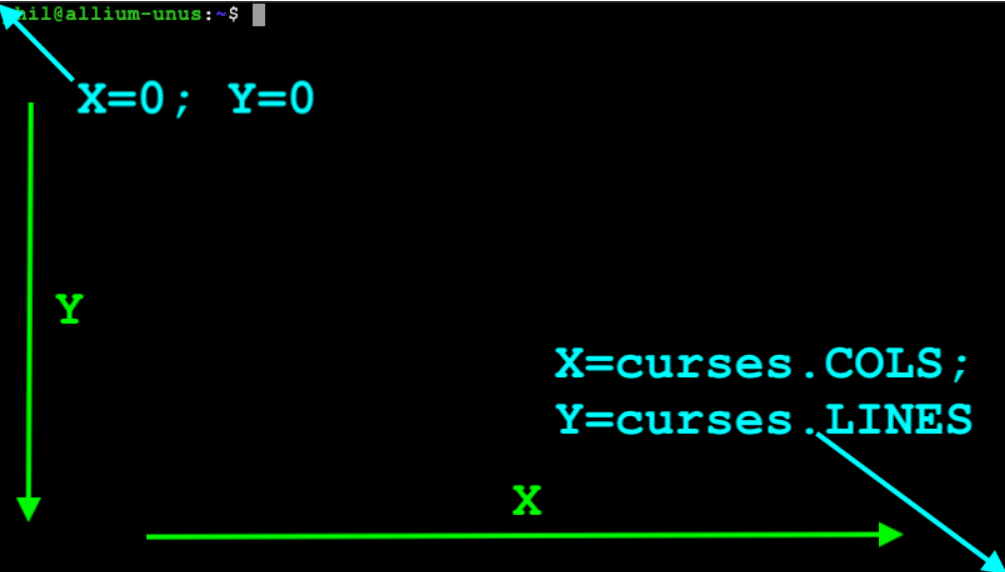
The two values, curses.COLS and curses.LINES refer to the maximum number of columns in the terminal and the maximum number of lines in the terminal, respectively.
The “Hello, World!” program above makes use of three different coordinate positions in the terminal in order to display text. The first position, 0, 0,, simply writes “Hello, World!” to the top-left corner of the terminal. While ncurses, in general, is very sensitive to writing text outside of its containing window, the code makes the assumption that the terminal is wide enough to accommodate the text. Be aware that running the “Hello, World!” program above with a very narrow space (less than the length of “Hello, World!”) will cause an exception.
The second position, which is calculated based on the width of a string, is an approximation of the center of the terminal on a fixed line. Note that, unlike a truly graphical program, the position is always going to be either 1 over, 1 less, or exactly on the width of the terminal. This variance is because the terminal width must be an integer, as cursor positions cannot be fractional. The code even casts the result of the calculation to an integer for this very reason.
The third position right-justifies the text literal with the instructions to press a (any) key to quit. As with the second position, the starting X coordinate is calculated relative to the curses.COLS, except that there is no division by 2.
Note: The exception messages returned by the Python curses module due to incorrect sizing of strings, windows, or other objects often make no mention of a size problem. One way to mitigate this is to check all of these calculations before passing any values into any curses object, and if the math does not allow for a fit, then prematurely raise an exception with a suitable error message.
How to Draw or Place Text With Python curses
As the comment above the stdscr.refresh() code indicates, this is where all the text is actually drawn to the screen. This implies that, should alternate text need to be placed at a location in which text already exists, then another call to stdscr.refresh() is necessary. If the text that replaces existing text is not long enough to completely cover the existing text, then spaces will need to be appended to the new text in order to cover up the existing text. Calls to stdscr.addstr(…) generally do not overwrite existing text.
User Input and Python curses
The stdscr.getch() code works in tandem with the curses.cbreak(), curses.curs_set(False), and curses.noecho() calls above it. Without curses.cbreak(), it would be necessary to press Enter after pressing any other key. For this example, that would not be the desired operation. Without curses.noecho(), the value of whatever key was pressed would be echoed back to the terminal. That echoing would have the potential to undesirably change the text on the screen. Lastly, without curses.curs_set(False), the blinking cursor would still be displayed on the screen, and this can potentially confuse users in applications with more complex interfaces.
Windows and Python curses
As 99% of the “selling point” of ncurses is the ability to display windows in a text-based terminal interface it begs the point of actually creating some. And, why not make this a little more interesting by adding some colors to the output too?
The code below makes further use of the Python curses.window object, along with the colors defined in the curses module to create three randomly generated windows on the terminal. Now, a more seasoned developer might call out the “non-usage” of object-oriented code here, as this code would be a good use case for that, but for the purposes of an introductory demonstration, it is easier to focus more on the curses objects themselves, as opposed to how Python calls them, even if it makes for longer code:
# demo-3-windows2.py

# Uses the curses library to create 3 randomly sized windows with different color
# backgrounds on the screen.

# Note that this is not the most efficient way to code this, but I want to break out
# the individual objects so that it is easier to trace what is going on.

import curses
import math
import random
import sys

# A set of layouts, to be randomly chosen.
layouts = ['2 top, 1 bottom', '2 left, 1 right', '1 top, 2 bottom', '1 left, 2 right']

def main (argv):
  # Initialize the curses object.
  stdscr = curses.initscr()

  # Do not echo keys back to the client.
  curses.noecho()

  # Non-blocking or cbreak mode... do not wait for Enter key to be pressed.
  curses.cbreak()

  # Turn off blinking cursor
  curses.curs_set(False)

  # Enable color if we can...
  if curses.has_colors():
    curses.start_color()

  # Optional - Enable the keypad. This also decodes multi-byte key sequences
  # stdscr.keypad(True)

  # Beginning of Program...
  # Create a list of all the colors except for black and white. These will server as
  # the background colors for the windows. Because these constants are defined in
  # ncurses,
  # we can't create the list until after the curses.initscr call:
  bgColors = [curses.COLOR_BLUE, curses.COLOR_CYAN, curses.COLOR_GREEN,
   curses.COLOR_MAGENTA, curses.COLOR_RED, curses.COLOR_YELLOW]
  colors = random.sample(bgColors, 3)

  # Create 3 ncurses color pair objects.
  curses.init_pair(1, curses.COLOR_WHITE, colors[0])
  curses.init_pair(2, curses.COLOR_WHITE, colors[1])
  curses.init_pair(3, curses.COLOR_WHITE, colors[2])

  caughtExceptions = ""
  try:
   # Note that print statements do not work when using ncurses. If you want to write
   # to the terminal outside of a window, use the stdscr.addstr method and specify
   # where the text will go. Then use the stdscr.refresh method to refresh the
   # display.
   #stdscr.addstr(0, 0, "Gonna make some windows.")
   #stdscr.refresh()

   # The lists below will eventually hold 4 values, the X and Y coordinates of the
   # top-left corner relative to the screen itself, and the number of characters
   # going right and down, respectively.
   window1 = []
   window2 = []
   window3 = []

   # The variables below will eventually contain the window objects.
   window1Obj = ""
   window2Obj = ""
   window3Obj = ""

   # The variables below will correspond roughly to the X, Y coordinates of the
   # of each window.
   window1 = []
   window2 = []
   window3 = []

   # There's going to be a caption at the bottom left of the screen, but it needs to
   # go in the proper window.
   window1Caption = ""
   window2Caption = ""
   window3Caption = ""


   # The randomly sized windows that don't take up one side of the screen shouldn't
   # be less than 1/3 the screen size, or more than one third of the screen size on
   # either edge.
   minWindowWidth = math.floor(curses.COLS * 1.0/3.0)
   maxWindowWidth = math.floor(curses.COLS * 2.0/3.0)
   minWindowHeight = math.floor(curses.LINES * 1.0/3.0)
   maxWindowHeight = math.floor(curses.LINES * 2.0/3.0)
   # Pick a layout. The random.randrange command will return a value between 0 and 3.
   chosenLayout = layouts[random.randrange(0,4)]
   if '2 top, 1 bottom' == chosenLayout:
    # Windows 1 and 2 will be the top, Window 3 will be the bottom.
    window1Width = random.randrange(minWindowWidth, maxWindowWidth)
    window1Height = random.randrange(minWindowHeight, maxWindowHeight)
    window1 = [0, 0, window1Width, window1Height]

    window2Width = curses.COLS - window1Width
    window2Height = window1Height
    window2 = [window1Width, 0, window2Width, window2Height]

    window3 = [0, window1Height, curses.COLS, curses.LINES - window1Height]
    window3Caption = chosenLayout + " - Press a key to quit."

   elif '2 left, 1 right' == chosenLayout:
    # Windows 1 and 2 will be on the left, Window 3 will be on the right.
    window1Width = random.randrange(minWindowWidth, maxWindowWidth)
    window1Height = random.randrange(minWindowHeight, maxWindowHeight)
    window1 = [0, 0, window1Width, window1Height]

    window2Width = window1Width
    window2Height = curses.LINES - window1Height
    window2 = [0, window1Height, window2Width, window2Height]
    window2Caption = chosenLayout + " - Press a key to quit."

    window3Width = curses.COLS - window1Width
    window3Height = curses.LINES
    window3 = [window1Width, 0, window3Width, window3Height]

   elif '1 top, 2 bottom' == chosenLayout:
    # Window 1 will be on the top, Windows 2 and 3 will be on the bottom.
    window1Width = curses.COLS
    window1Height = random.randrange(minWindowHeight, maxWindowHeight)
    window1 = [0, 0, window1Width, window1Height]

    window2Width = random.randrange(minWindowWidth, maxWindowWidth)
    window2Height = curses.LINES - window1Height
    window2 = [0, window1Height, window2Width, window2Height]
    window2Caption = chosenLayout + " - Press a key to quit."

    window3Width = curses.COLS - window2Width
    window3Height = window2Height
    window3 = [window2Width, window1Height, window3Width, window3Height]

   elif '1 left, 2 right' == chosenLayout:
    # Window 1 will be on the left, Windows 2 and 3 will be on the right.
    window1Width = random.randrange(minWindowWidth, maxWindowWidth)
    window1Height = curses.LINES
    window1 = [0, 0, window1Width, window1Height]
    window1Caption = chosenLayout + " - Press a key to quit."

    window2Width = curses.COLS - window1Width
    window2Height = random.randrange(minWindowHeight, maxWindowHeight)
    window2 = [window1Width, 0, window2Width, window2Height]

    window3Width = window2Width
    window3Height = curses.LINES - window2Height
    window3 = [window1Width, window2Height, window3Width, window3Height]

   # Create and refresh each window. Put the caption 2 lines up from bottom
   # in case it wraps. Putting it on the last line with no room to wrap (if
   # the window is too narrow for the text) will cause an exception.

   window1Obj = curses.newwin(window1[3], window1[2], window1[1], window1[0])
   window1Obj.bkgd(' ', curses.color_pair(1))
   # Calculate rough center...
   window1Center = [math.floor(window1[2]/2.0), math.floor(window1[3]/2.0)]
   # Add the string to the center, with BOLD flavoring.
   window1Obj.addstr(window1Center[1], window1Center[0] - 4, "Window 1",
    curses.color_pair(1) | curses.A_BOLD)
   if "" != window1Caption:
    window1Obj.addstr(curses.LINES - 2, 0, window1Caption,
     curses.color_pair(1) | curses.A_BOLD)
   window1Obj.refresh()

   window2Obj = curses.newwin(window2[3], window2[2], window2[1], window2[0])
   window2Obj.bkgd(' ', curses.color_pair(2))
   # Calculate rough center...
   window2Center = [math.floor(window2[2]/2.0), math.floor(window2[3]/2.0)]
   # Add the string to the center, with BOLD flavoring.
   window2Obj.addstr(window2Center[1], window2Center[0] - 4, "Window 2",
    curses.color_pair(2) | curses.A_BOLD)
   if "" != window2Caption:
    # The "Y coordinate" here is the bottom of the *window* and not the screen.
    window2Obj.addstr(window2[3] - 2, 0, window2Caption,
     curses.color_pair(2) | curses.A_BOLD)
   window2Obj.refresh()

   window3Obj = curses.newwin(window3[3], window3[2], window3[1], window3[0])
   window3Obj.bkgd(' ', curses.color_pair(3))
   # Calculate rough center...
   window3Center = [math.floor(window3[2]/2.0), math.floor(window3[3]/2.0)]
   # Add the string to the center, with BOLD flavoring.
   window3Obj.addstr(window3Center[1], window3Center[0] - 4, "Window 3",
    curses.color_pair(3) | curses.A_BOLD)
   if "" != window3Caption:
    # The "Y coordinate" here is the bottom of the *window* and not the screen.
    window3Obj.addstr(window3[3] - 2, 0, window3Caption,
     curses.color_pair(3) | curses.A_BOLD)
   window3Obj.refresh()

   # Necessary so we can "pause" on the window output before quitting.
   window3Obj.getch()

   # Debugging output.
   #stdscr.addstr(0, 0, "Chosen layout is [" + chosenLayout + "]")
   #stdscr.addstr(1, 10, "Window 1 params are [" + str (window1)+ "]")
   #stdscr.addstr(2, 10, "Window 2 params are [" + str(window2) + "]")
   #stdscr.addstr(3, 10, "Window 3 params are [" + str(window3)+ "]")
   #stdscr.addstr(4, 10, "Colors are [" + str(colors) + "]")
   #stdscr.addstr(5, 0, "Press a key to continue.")
   #stdscr.refresh()
   #stdscr.getch()
  except Exception as err:
   caughtExceptions = str(err)

  # End of Program...
  # Turn off cbreak mode...
  curses.nocbreak()

  # Turn echo back on.
  curses.echo()

  # Restore cursor blinking.
  curses.curs_set(True)

  # Turn off the keypad...
  # stdscr.keypad(False)

  # Restore Terminal to original state.
  curses.endwin()

  # Display Errors if any happened:
  if "" != caughtExceptions:
   print ("Got error(s) [" + caughtExceptions + "]")
  return 0

if __name__ == "__main__":
  main(sys.argv[1:])
The color constants, along with the formatting constants for the bolded text, are all defined in the "curses — Terminal handling for character-cell displays" section of the Python documentation.
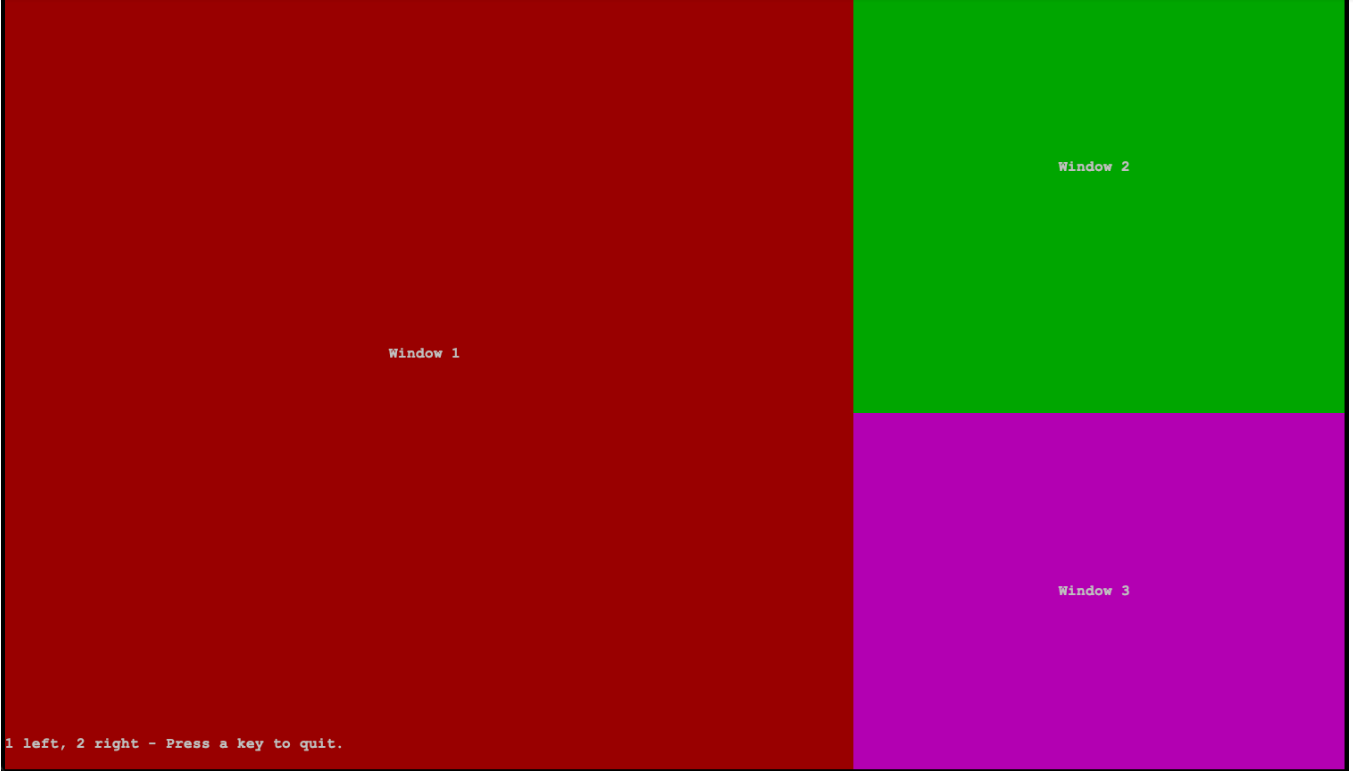
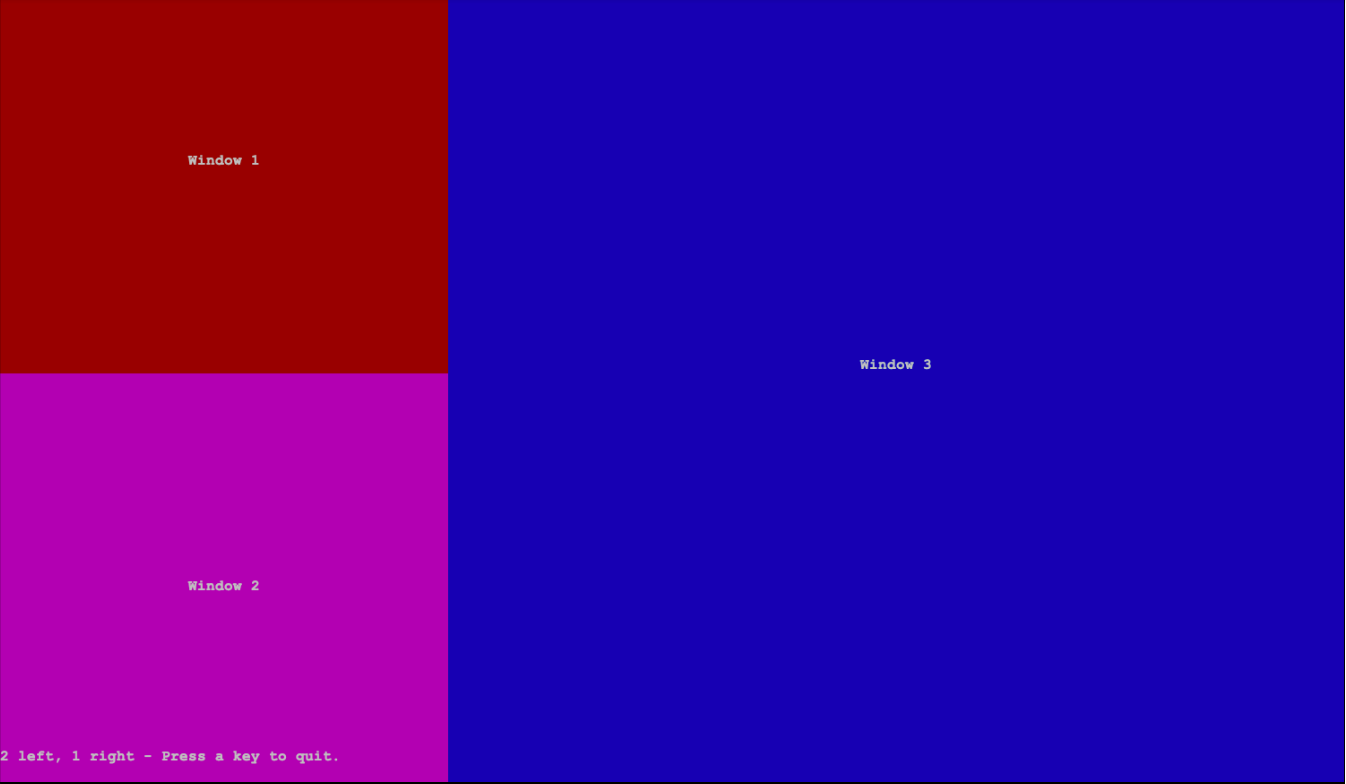
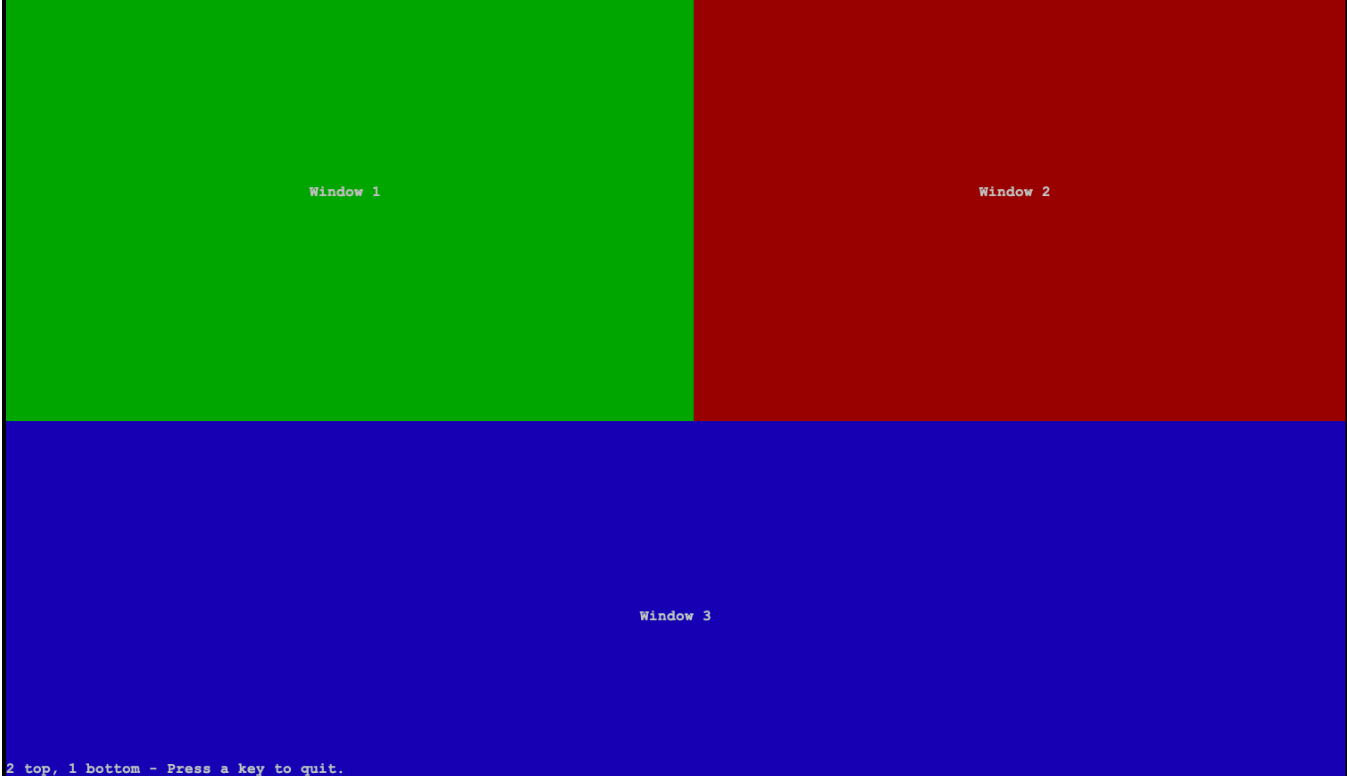
There are four possible types of outputs to this program, as indicated by the layouts list at the top of the code:
- One window on the left; two windows on the right (Figure 1)
- Two windows on the left; one window on the right (Figure 2)
- One window on the top; two windows on the bottom (Figure 3)
- Two windows on the top; one window on the bottom (Figure 4)

The Window Object
Each window in the output above is represented by a distinct instantiation of the curses window object. The window object is returned by each call to the curses.newwin(…) function. Note that, while each of the three windows above is instantiated via the curses.newwin(…) function, this function by itself does not initialize the ncurses module (nor do they de-initialize the same for return to the prompt). That still has to be done with curses.initscr(), even though the stdscr window object returned by this call is not going to be used in this code.
The curses.newwin(…) function has two overloads, the second of which is being used as it allows for the placement of the top-left corner anywhere on the screen, in addition to specifying the size of the window:
curses.newwin(number-of-lines, number-of-columns, starting-column-position, starting-row-position)
All four parameters are non-negative integers.
The first two values number-of-lines and number-of-columns are calculated as “random” integers that range in between ⅓ and ⅔ the height and width of the terminal window, respectively.
In this particular example, regardless of what the value of one of the randomly chosen layouts is, the first window is always the one that occupies the top-left corner of the terminal. The other two windows’ sizes and positions are calculated relative to the first window.
Text Within Windows
Any text that is placed within a window created using the curses.newwin(…) function must fully fit within the window. Any text that ends outside of the bounds of the window will cause an exception to be raised. The code above creates a caption that is placed in whatever window ends up occupying the bottom-left corner of the screen. Depending on what width is calculated for the size of this window, it is possible that the length of the caption may exceed the width of the window. If this is not accounted for, an exception will be raised.
In the above code example, it can be seen that the caption is not on the bottom-most line. This is because this particular implementation of curses will wrap the text to the next line should it overshoot the edge of the window, as shown below:

For this particular example, the terminal window was shrunk down significantly.
However, if there is no extra line to which the remainder of the text can be wrapped, an exception will be raised. Note: this line-wrapping behavior may not be consistent across all implementations of ncurses. In a production environment, extra code should be used to split the line into separate calls to window.addstr(…).
Color Pairs
The Python curses module deals with colors in pairs. Each Python color_pair object contains a foreground text color and a background color. The reason for this is because for any text that is drawn to the screen, a foreground and background color must be specified, and for the sake of a “good look,” the background color of any text drawn or placed in a window should match the background color of the window.
It may be noted that the examples previous to this listing presumed that the foreground text color was white and the background color was black. Depending on the terminal, and how meticulous a programmer may be, this may not be a wise presumption.
Final Thoughts on Drawing Text With Python curses
That is it for part two of this three-part programming tutorial series discussing how to work with the Python curses library to draw text in Linux. We will wrap up the final part in this series in our final piece where we'll be working with windowed content.
Opinions expressed by DZone contributors are their own.
Comments