RESTful Web Services With Python Flask
Learn about developing RESTful web services using Python, from the plan to Flask install, and more!
Join the DZone community and get the full member experience.
Join For FreeThe idea of this post is to describe how to develop a RESTful Web Services in Python.
RESTful Web Service is an architectural style, where the data or the structural components of a system is described in the form of URI ( Uniform Resource Identifier) and the behaviors are described in terms of methods. The resources can be manipulated using CRUD (Create, Read, Update and Delete) operations. The communication protocol for REST is HTTP since it suits the architecture requirement of being a stateless communication across the Client and Server.
There are many frameworks available in Python for web development, but Django (pronounced as yango) and Flask stands out of the crowd being a full stack frameworks. I prefer Flask framework since it is very small and easy to learn for beginners, whereas Django is too big for beginners.
1. The Plan
In this exercise, we will create an in-memory JSON DB to store and manipulate a simple employee database and develop RESTful APIs to perform CRUD operations using GET, POST, PUT, and DELETE methods. We will develop the below APIs
i) GET /empdb/employee/ - Retrieve all the employees from the DB
ii) GET /empdb/employee/ - Retrieve the details of given employee Id
ii) POST /empdb/employee/ - Create a record in the employee DB, whereas the employee details are sent in the request as a JSON object
III) PUT /empdb/employee/ - Update the employee DB, with the given details of employee in the data part as a JSON object
Iv) DELETE /empdb/employee/ - Delete the employee from the DB for the employee Id.
2. Installation of Flask
To install flask framework, please refer the official website [1]. If you have pip installed in your Python environment, please follow this step.
$ pip install FlaskIf you don't have pip, please download the flask from http://pypi.python.org/packages/source/F/Flask/Flask-0.10.1.tar.gz and execute the setup.py
3. Hello World - Web Server
First, we create a web server, create a dictionary to hold a JSON objects for a couple of employee records and then we add RESTful APIs for each supported operations. Please look at the below program, which creates a web server. Save the below program into hello.py and execute it.
from flask import Flask
app = Flask(__name__)

@app.route("/")
def hello():
    return "Hello World!"

if __name__ == "__main__":
    app.run()
The below line of the code creates an app object from Flask.
app = Flask(__name__)app.run() starts the web server and ready to handle the request. But at this moment, it can handle only one request. It is defined in the below line of code.
@app.route("/")
def hello():
    return "Hello World !"
Execute the above program and you will see that you web server is ready to service you.
* Running on http://localhost:5000/Now you can open your web browser and check your web server. The server is available in the URL http://localhost:5000/. If you are familiar with cUrl execute the below to check the status.
$ curl -i http://localhost:5000/4. Develop the RESTful Services
To develop the restful services for the planned objective, let's create an in-memory database in python using the dictionary data type. Please find the code snippet below: We can continue to use the hello.py and type the below code, just after the Flask app creation statement app = Flask(__name__). You can also refer the below section 5 for the complete code.
empDB=[
 {
 'id':'101',
 'name':'Saravanan S',
 'title':'Technical Leader'
 },
 {
 'id':'201',
 'name':'Rajkumar P',
 'title':'Sr Software Engineer'
 }
 ]
4.1 GET
In the previous section, we have created two employees in the dictionary. Now let's write a code to retrieve them using web services. As per our plan, we need two implementations one is to retrieve all the employees and another one to retrieve the specific employee with the given id.
4.1.1 GET All
@app.route('/empdb/employee',methods=['GET'])
def getAllEmp():
    return jsonify({'emps':empDB})
In the above code snippet, we have created a URI named '/empdb/employee' and also we defined the method as "GET". To service the GET call for the URI, Flask will call the function getAllEmp(). It will in turn simply call the "jsonify" method with employeeDB as the argument. The "jsonify" is a flask method, will set the data with the given JSON object which is passed as a Python dictionary and set the headers appropriately, in this case "Content-type: application/json". We can check the above Web Service with cUrl as below:
cUrl> curl -i http://localhost:5000/empdb/employee[caption id="attachment_91" align="alignleft" width="660"] Response for CURL[/caption]
4.1.2 Get Specific
Now we develop the rest service to get an employee with a given id.
@app.route('/empdb/employee/<empId>',methods=['GET'])
def getEmp(empId):
    usr = [ emp for emp in empDB if (emp['id'] == empId) ]
    return jsonify({'emp':usr})
The above code will find the employee object with the given id and send the JSON object in the data. Here I have used the list comprehension technique in Python if you don't understand you can simply write in an imperative way of processing the entire dictionary using a for loop.
CURL > curl -i http://localhost:5000/empdb/employee/101The response would be :
4.2 PUT
PUT method is used to update the existing resource. The below code gets the employee id from the URL and finds the respective object. It checks the request.json from the request for the new data & then it overwrites the existing. NOTE: the request.json will contain the JSON object set in the client request.
@app.route('/empdb/employee/<empId>',methods=['PUT'])
def updateEmp(empId):
    em = [ emp for emp in empDB if (emp['id'] == empId) ]
    if 'name' in request.json :
        em[0]['name'] = request.json['name']
    if 'title' in request.json:
        em[0]['title'] = request.json['title']
 return jsonify({'emp':em[0]})
We can also use a Postman client or cUrl to update an existing employee. The data must contain the JSON object either with a name or title.The service can be invoked as follows in cUrl. Here we update the "title" for employee id 201 with "Technical Leader". The request is responded with employee JSON object with updated values. It also updates the employee DB.
4.3 POST
POST method is used to create a new employee inside the database. The code snippet is below:
@app.route('/empdb/employee',methods=['POST'])
def createEmp():
    dat = {
    'id':request.json['id'],
    'name':request.json['name'],
    'title':request.json['title']
    }
 empDB.append(dat)
 return jsonify(dat)
The above code simply reads the request.json for the expected values, and stores them in the local dictionary object and appends it to the employee DB dictionary. This also returns the newly added employee object as the response.
4.4 DELETE
Let's write a code to delete a given employee id.
@app.route('/empdb/employee/<empId>',methods=['DELETE'])
def deleteEmp(empId):
    em = [ emp for emp in empDB if (emp['id'] == empId) ]
    if len(em) == 0:
    abort(404)

    empDB.remove(em[0])
    return jsonify({'response':'Success'})
the above service can be used as follows: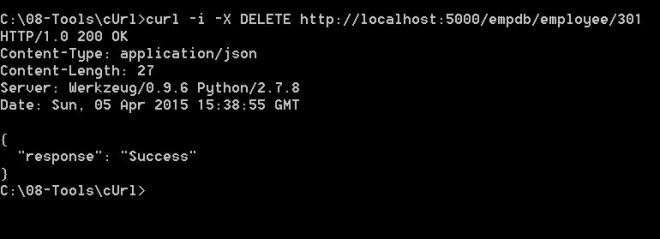

5 Complete Code
from flask import Flask
from flask import jsonify
from flask import request

app = Flask(__name__)

empDB=[
 {
 'id':'101',
 'name':'Saravanan S',
 'title':'Technical Leader'
 },
 {
 'id':'201',
 'name':'Rajkumar P',
 'title':'Sr Software Engineer'
 }
 ]

@app.route('/empdb/employee',methods=['GET'])
def getAllEmp():
    return jsonify({'emps':empDB})

@app.route('/empdb/employee/<empId>',methods=['GET'])
def getEmp(empId):
    usr = [ emp for emp in empDB if (emp['id'] == empId) ]
    return jsonify({'emp':usr})


@app.route('/empdb/employee/<empId>',methods=['PUT'])
def updateEmp(empId):

    em = [ emp for emp in empDB if (emp['id'] == empId) ]

    if 'name' in request.json :
        em[0]['name'] = request.json['name']

    if 'title' in request.json:
        em[0]['title'] = request.json['title']

    return jsonify({'emp':em[0]})


@app.route('/empdb/employee',methods=['POST'])
def createEmp():

    dat = {
    'id':request.json['id'],
    'name':request.json['name'],
    'title':request.json['title']
    }
    empDB.append(dat)
    return jsonify(dat)

@app.route('/empdb/employee/<empId>',methods=['DELETE'])
def deleteEmp(empId):
    em = [ emp for emp in empDB if (emp['id'] == empId) ]

    if len(em) == 0:
       abort(404)

    empDB.remove(em[0])
    return jsonify({'response':'Success'})

if __name__ == '__main__':
 app.run()
6 Conclusion
This is a very basic web services we have developed. I hope this helps to understand basics of RESTful Web Services development. We can make this implementation clean by proper error handling and authentication. I suggest to everyone to visit the official documentation of Flask for further learning.
Opinions expressed by DZone contributors are their own.
Comments