Reverse SSH Tunnel: Export Your Mac Laptop to the Internet
Want to get at your Mac remotely and securely without having to resort to VNC? Check out this post as we walk through how to do just that.
Join the DZone community and get the full member experience.
Join For Freeas most professional programmers, we use macs quite a lot in daily work. but did you know we can easily export our data to the internet? trusted people can access our laptop directly from anywhere . keep in mind, this is definitely for temporary use. it could be ssh operations or various web services.
here is a simple and complete guy to teach you how to do just that in 10 minutes. if you like it, share it.

let’s say you’re working remotely and you need to share some of your work with your colleagues or clients. what would you do? take screenshots with a lot of explanations? start an ec2 instance, do the setup again, and migrate your current work there? that all takes money and time. a lot of extra time. worse than that, it compromises our result. what if we could easily export our laptops directly to the audience?
here, we just focus on mac os x, but t he same technique would apply to all linux boxes. theoretically speaking, it would work for ubuntu or centos with some minor changes.

below, we try to:
- export an ssh service from our mac laptop. tech geeks are addicted to ssh, right?
- export a web service . here, we use apache. it is installed by default in mac os x.
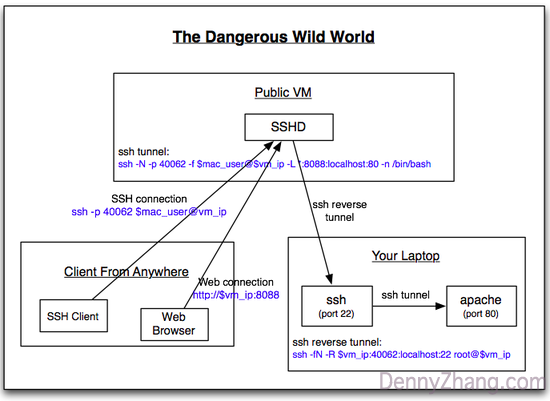
the main trick is the ssh reverse tunnel.
preparation
- a vm in a public cloud : we need a public ip to do the proxy. don’t worry, the resource overhead is very small.
- root access for the vm : we need this to configure sshd, and/or iptables.
1. configure your public vm
- make sure the sshd config file contains gatewayports clientspecified.
# mac: vim /etc/sshd_config
# ubuntu/centos: vim /etc/ssh/sshd_conf- if the vm has iptables enabled, make sure it allows incoming traffic for port 40062 and 8088.
# use ufw for ubuntu env
ufw allow 40062/tcp
ufw allow 8088/tcp

# or use iptables directly
iptables -a input -i eth0 -p tcp --dport 40062 -j accept
iptables -a output -o eth0 -p tcp --dport 40062 -j accept
iptables -a input -i eth0 -p tcp --dport 8088 -j accept
iptables -a output -o eth0 -p tcp --dport 8088 -j accept
we use 40062 to do the ssh reverse tunnel so that people can ssh to our laptop. as for web services, we start apache in our laptop — it listens on port 80. then, we set up port forwarding from 8088 to 80 in this vm.
for better security, only allow traffic from trusted source ip addresses.
2. enable ssh service in your laptop
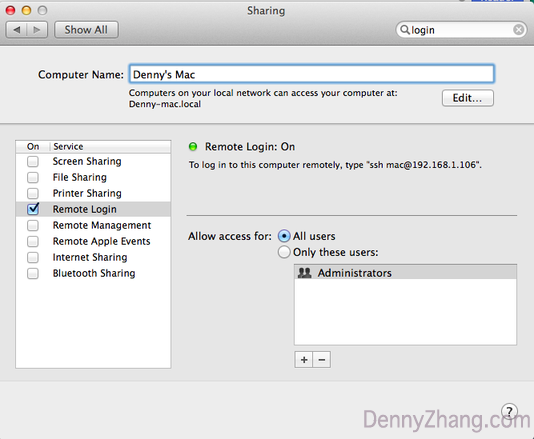
for security concerns, mac os doesn’t enable ssh remote login. let’s turn it on: system preferences -> sharing -> remote login. then verify by " telnet localhost 22 ."

3. start ssh reverse tunnel in your laptop
# replace below with your vm's public ip
export vm_ip=your_vm_ip

# perform ssh reverse tunnel
# parameters: -r(reverse tunnel), -4(ipv4)
# here we choose 40062 to do the tunnel.
ssh -4 -v -p 22 -fn \
-o "pubkeyauthentication=yes" \
-o "stricthostkeychecking=false" \
-o "passwordauthentication=no" \
-o "serveraliveinterval 60" \
-o "serveralivecountmax 3" \
-r $vm_ip:40062:localhost:22 root@$vm_ip

# verify connection
telnet $vm_ip 40062
showtime!
run this:
ssh -p 40062 root@$vm_ip
from any machine. input the root password of your laptop. then people can ssh your laptop now!
4. export your website to the internet
we want to simulate exporting web services. mac os x preinstalls apache.
let’s start apache in our laptop.
# start apache service in mac
sudo apachectl start

# verify apache works
curl http://localhost
in vm, ssh tunnel from $vm_ip:8088 to port 80 in our laptop.
# ssh tunnel for port forwarding
ssh -v -n -p 40062 -f root@$vm_ip \
-l *:8088:localhost:80 -n /bin/bash
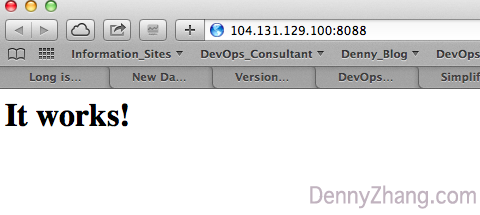
in any other machines, visit http://$vm_ip:8088 in a web browser.

what if i don’t need it anymore?
simply kill the process in your laptop, which runs ssh reverse tunnel.
# find pid in mac
ps -ef | grep 40062

# kill process. if it fails, use 'kill -9'
kill $pid

# verify it's done

ps -ef | grep 40062

telnet $vm_ip 40062
use autossh to handle "ssh connection unstable"
quite naturally, an ssh connection might break up in our laptop. network turbulence or the computer goes to idle or hibernate.
autossh : automatically restart ssh sessions and tunnels. let’s set up the auto connection with autossh.
# install autossh
brew install autossh

# verify installation
which autossh
to take effect, let’s make a small change in step #2 of the ssh reverse tunnel.
from:
ssh -4 -v -p 22 -fn \
-o "pubkeyauthentication=yes" \
-o "stricthostkeychecking=false" \
-o "passwordauthentication=no" \
-o "serveraliveinterval 60" \
-o "serveralivecountmax 3" \
-r $vm_ip:40062:localhost:22 root@$vm_ip
autossh -m 40063 -4 -v -p 22 -fn \
-o "pubkeyauthentication=yes" \
-o "stricthostkeychecking=false" \
-o "passwordauthentication=no" \
-o "serveraliveinterval 60" \
-o "serveralivecountmax 3" \
-r $vm_ip:40062:localhost:22 root@$vm_ipmake sure your vm won’t block the traffic of port 40063. let’s verify the change, by telnet $vm_ip 40062 .
all good? then congratulations, you're set!
Published at DZone with permission of Denny Zhang, DZone MVB. See the original article here.
Opinions expressed by DZone contributors are their own.

Comments