Schedule Pipelines in Azure DevOps Using Cron Expressions
This article helps you with an easy way to trigger pipelines using Cron Expression or Jobs in Azure DevOps. A step-by-step tutorial is helpful for beginners.
Join the DZone community and get the full member experience.
Join For FreeAzure DevOps UI provides an option to trigger multiple days or once a week. We know that many times we need to execute Azure DevOps pipeline triggers once a month, or twice a month, and this can be done using Cron Expressions in Azure DevOps.
Azure DevOps uses NCronTab to evaluate cron expressions, so advanced expressions are not fully supported by Azure DevOps. However, most of the expression is supported so it does the job.
In this tutorial, I have explained step by step how to configure Cron Scheduler in Mircosoft Azure DevOps.
The tool NCrontab Expression Tester is very helpful to evaluate cron expressions, especially when we consider Azure DevOps. There are many tools I suggest not using because when I tried on that the tool it evaluated successfully but it caused an error in Azure DevOps. The reason is Azure DevOps is supporting only NCronTab basic expressions since the tool is built on the same which is helpful to us. Let's say thanks to this guy.
Step-by-Step Guide to Schedule Pipeline Build or Release using Cron Job or Cron Expressions
Let’s consider my requirement is I want to schedule build First Sunday of every month.
There are two things you need to consider here:
- The pipeline which you have already created, let’s say some deployment release pipeline (Example: MyRelease Pipeline).
- The new Pipeline (let's call it as Scheduler Pipeline this is build) triggers the above Pipeline, i.e., MyRelease Pipeline (Pipeline mentioned Point No. 1).
In a simple way, Scheduler Pipeline triggers the MyRelease Pipeline.
In other words, you have already created the MyRelease Pipeline (Point no. 1) and you are looking for that pipeline to be triggered in specific intervals that will be done by Scheduler Pipeline.
Let’s see how to trigger My Release Pipeline from Scheduler Pipeline.
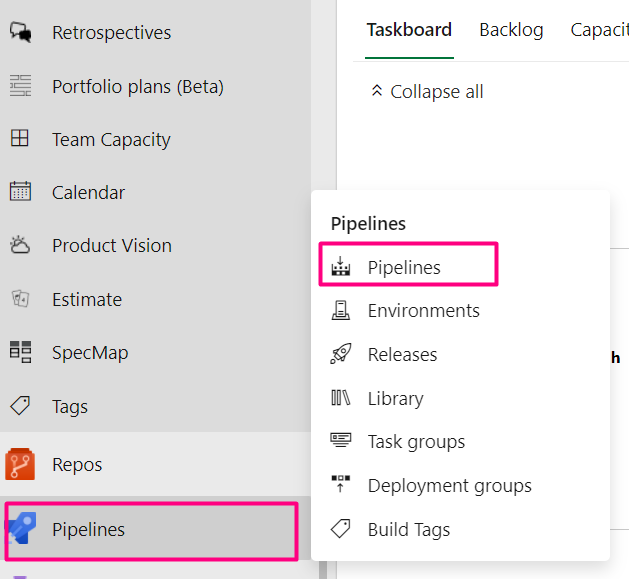
Step 1: Create a New Pipeline, i.e., Scheduler Pipeline
Navigate to Azure DevOps page > Hover on Pipelines > Choose Pipelines.
Step 2: Click on New Pipeline

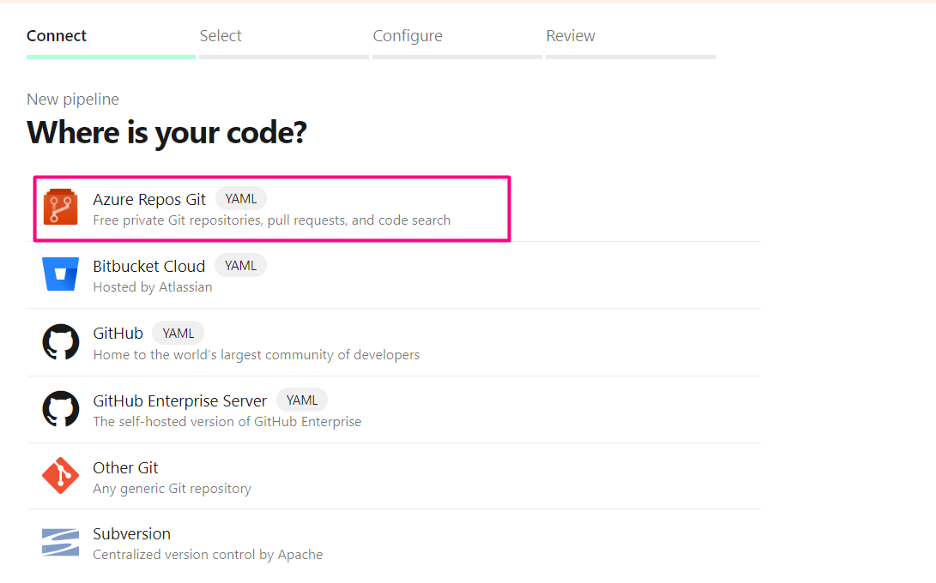
Step 3: Where is Your Code? Section: Choose Use Classic Editor (Refer to Image)
Once you complete step 2, you will be asked to choose the source of your code. Choose Azure Repos Git as your source.
Step 4: Choose Desired Project and Repository
Your YAML file will be saved in this location, so choose as per your requirement.

Step 5: Choose Template as YAML
When the Choose Template window appears, choose Start pipeline from the list.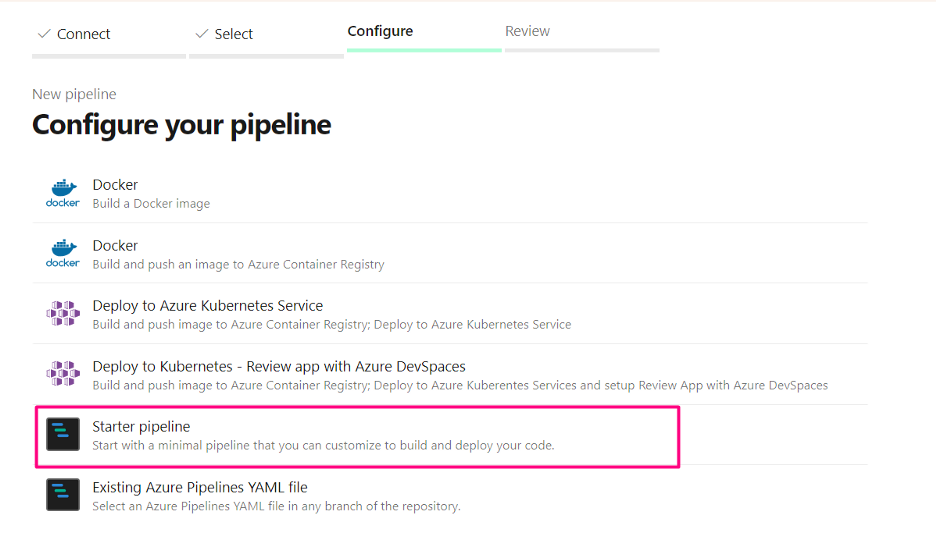
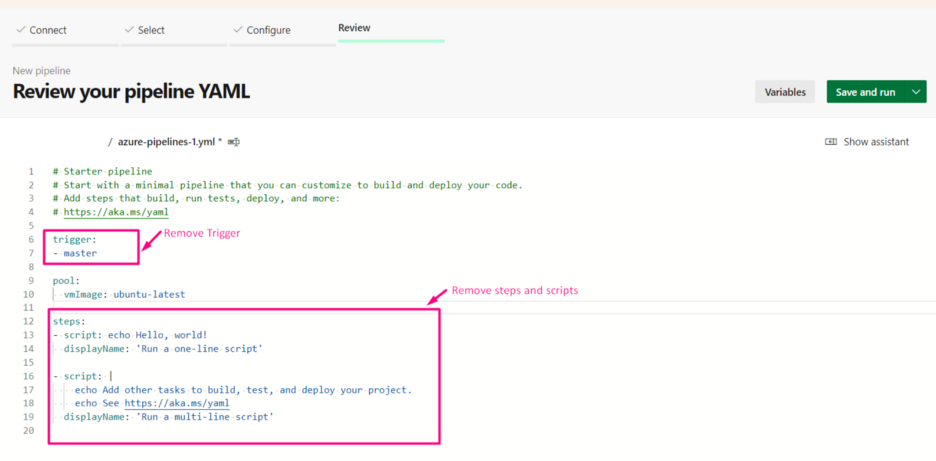
Once you are done with Step 5, the default YAML file will be created and it looks like the below image.
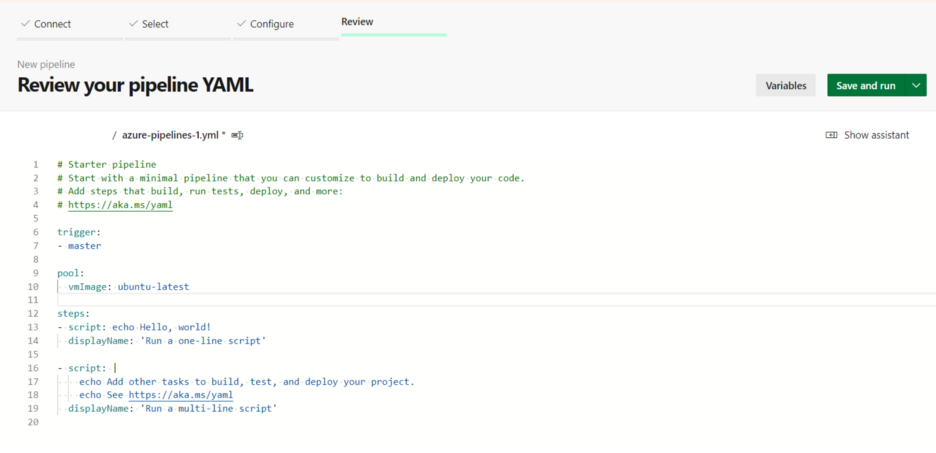
Step 6: Remove the Unwanted Line From The Default Script
Please note that pool: option I am giving is ubuntu-latest. This might change in your organization, you can specify as per your requirement. So, type the correct agent pool in the pool: section.
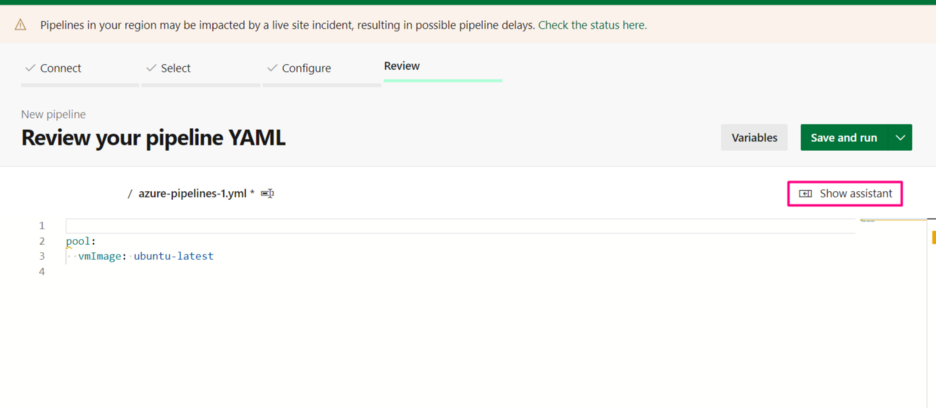
Step 7: Click on Show Assistant
Azure DevOps YAML pipeline comes with an assistant, This helps you fill the required details in the text box and it will be added as YAML script. To get the assistant click on right most section show the assistant option.
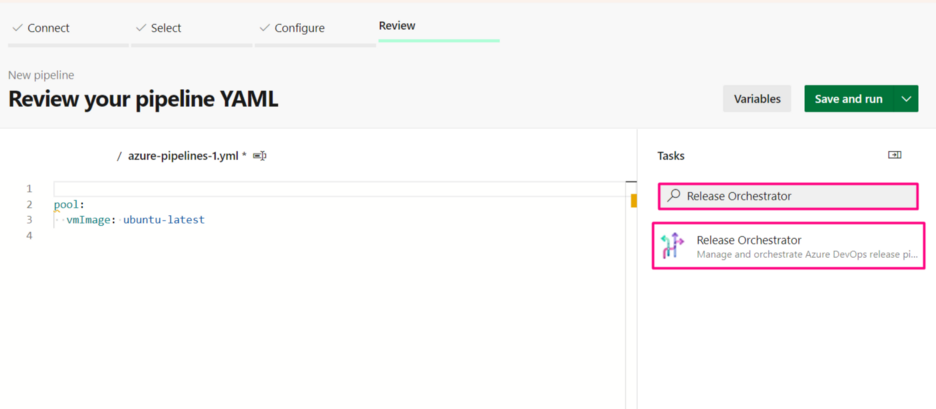
Step 8: Search and Select the Release Orchestrator
Once you click on show assistant the assistant opens up, in the search box type 'Release Orchestrator'. The release orchestrator task shows up at the beginning choose that.
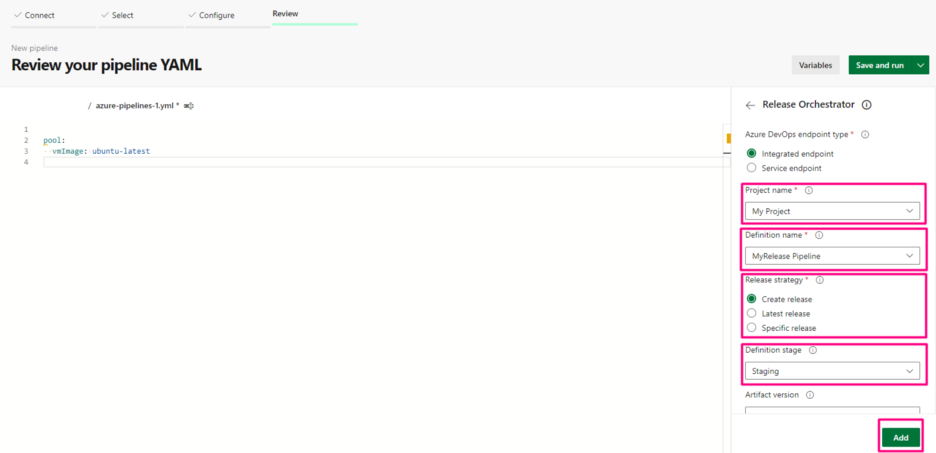
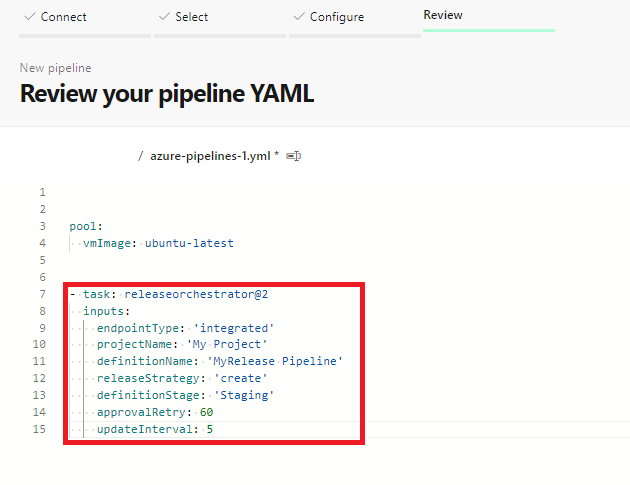
Step 9: Enter Details for Release Orchestrator Task
As I have shown below image, enter the correct details as per your project details:
Project Name: <Choose the correct one>
Definition Name: <Choose the Release Pipeline Name>
Release Strategy: Click on Create, or you can choose Other if you wish.
Definition Stages: <Choose from Stage options>
Step 10: Click on Add
Once you click on Add from the Release Orchestrator task the entry -task will be added to your YAML file
Step 11: Add Cron Job Details
As per the Microsoft Azure DevOps document below is the syntax to add cron expression.
//Cron Job Syntax for Azure DevOps, This is Just a syntax not an actual code.
schedules:
- cron: string # cron syntax defining a schedule
  displayName: string # friendly name given to a specific schedule
  branches:
    include: [ string ] # which branches the schedule applies to
    exclude: [ string ] # which branches to exclude from the schedule
  always: boolean
Considering the above syntax, you need to construct Cron Job Schedules like below.
schedules:
- cron: "0 2 1-7 * SUN"
  displayName: 25th 5:30 AM (IST) Every Month
  branches:
    include:
    - master
Note:
1. I have mentioned 0 2 1–7 * SUNthat means the first Sunday of every month.
2. If are not sure how to build the cron expression read the details on Azure DevOps Cron Syntax for Azure Pipelines.
3. Once you construct the Cron Expression validate here for correctness. NCrontab Expression Tester this tool tells you exact dates as per your cron expression.
Your Complete YAML File
Once you complete all the steps your code looks like below.
schedules:
- cron: "0 2 1-7 * SUN"
  displayName: 25th 5:30 AM (IST) Every Month
  branches:
    include:
    - master
pool:
  vmImage: 'ubuntu-latest'
steps:
- script: echo Hello, world!
  displayName: 'Run a one-line script'
- task: releaseorchestrator@2
  inputs:
    endpointType: 'integrated'
    projectName: 'My Project'
    definitionName: 'MyRelease Pipeline'
    releaseStrategy: 'create'
    definitionStage: 'Staging'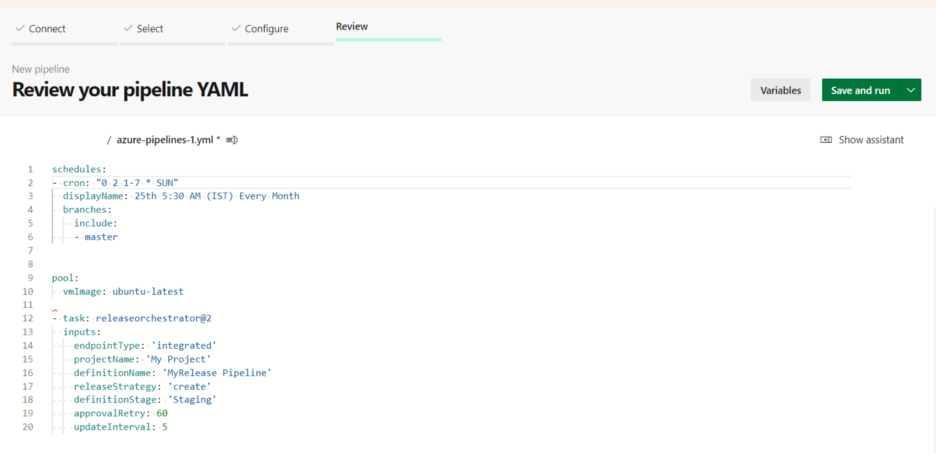
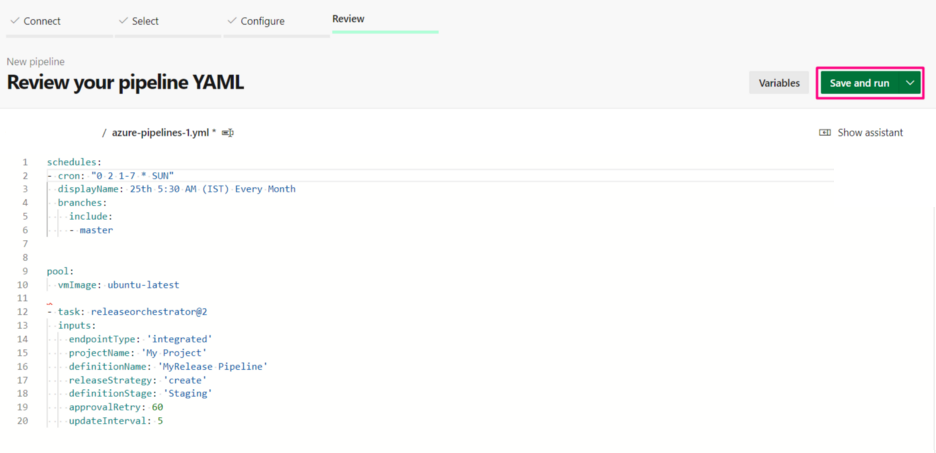
Step 12: Click on Save and run Button
Once you click on Save and run, Azure DevOps Triggers the mentioned Release as per Scheduled Timing which we mentioned in the Cron Syntax.
Encourage me to write more articles, buy a coffee for me.

If you are looking for any help, support, guidance contact me on LinkedIn|https://www.linkedin.com/in/ganeshsirsi/.
Opinions expressed by DZone contributors are their own.
Comments