Seamless Feature Release Without Deployment Using IBM Cloud AppConfiguration: An Alternative to LaunchDarkly
IBM Cloud AppConfiguration provides a seamless feature release process without the need for deployment, offering an alternative to LaunchDarkly.
Join the DZone community and get the full member experience.
Join For FreeIn today’s fast-paced software development landscape, releasing new features quickly and efficiently to meet user demands is crucial. Traditional deployment processes often involve downtime and complex release cycles. However, with IBM Cloud AppConfiguration, you can seamlessly release new features without the need for deployment, minimizing disruptions and maximizing user satisfaction. In this article, we will explore how you can leverage the power of IBM Cloud AppConfiguration to effortlessly release features.
What Is IBM Cloud AppConfiguration?
IBM Cloud AppConfiguration is a feature management service provided by IBM Cloud. It allows developers to easily control the release of features in their applications without the need for complex deployment processes. With AppConfiguration, developers can toggle feature flags, manage configuration parameters, and target specific user segments for feature rollouts. This flexibility enables agile development, seamless feature releases, and a personalized user experience.
How Does AppConfiguration Work?

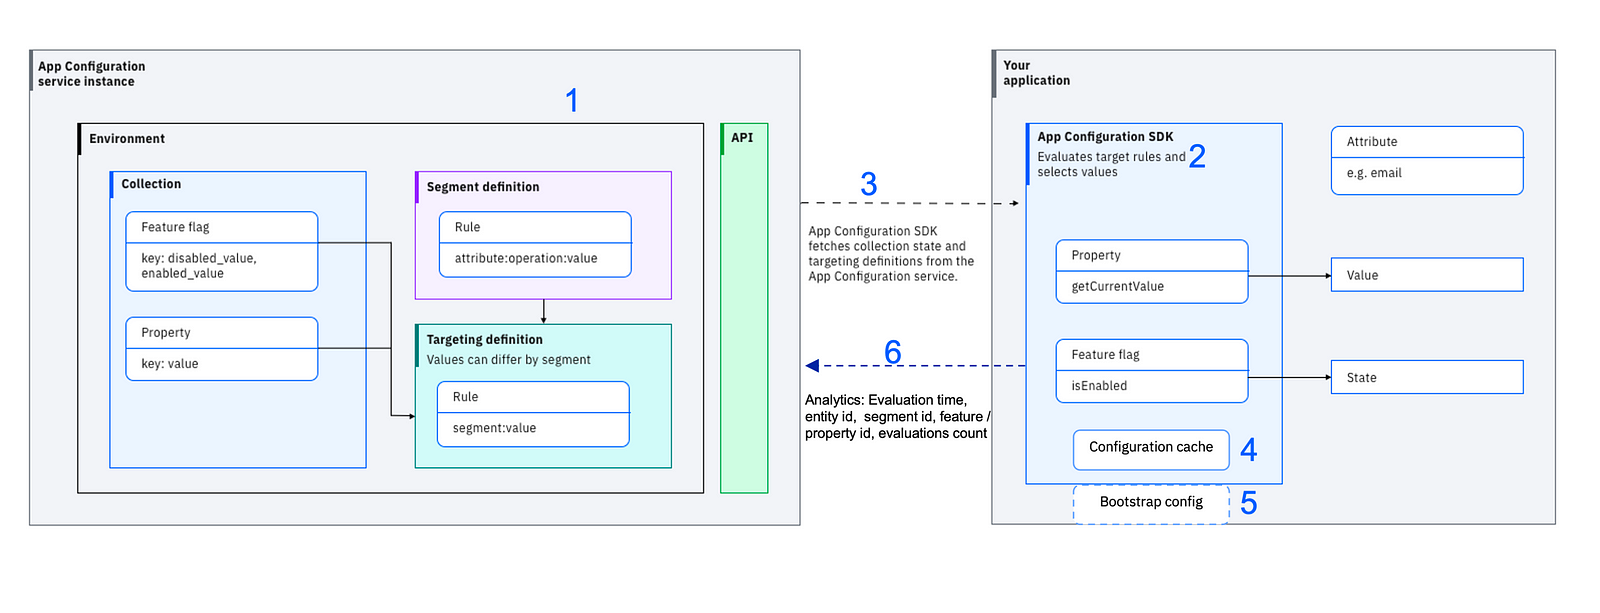
During normal operation, the AppConfiguration SDK (shown as #2 in Figure 1) handles the automatic delivery of the appropriate flag state or property value into your application from the IBM Cloud AppConfiguration instance (shown as #1 in Figure 1). When initializing, the SDK connects to the AppConfiguration API and fetches the specified collections, segment rules, and targeting rules (shown as #3 in Figure 1). It then evaluates the rules against attribute values that are programmed into your application to select the correct segment and target values. The attributes used by the rules are stored locally, ensuring that confidential information such as social security numbers never leaves the local application environment.
After initialization, the application receives updated values in two ways, depending on whether you are using server-side or client-side SDKs. Server-side SDKs connect to the AppConfiguration service through a WebSocket, and modified values are delivered to your application in real time. On the other hand, client-side SDKs pull values from the AppConfiguration service upon a lifecycle change, such as being opened or brought to the foreground.
During normal operation, various metrics are sent back to the AppConfiguration cloud service (shown as #6 in Figure 1), enabling the service to operate properly and allowing you to monitor its performance.
A Demonstration of the Sample BlueCharge Web Application With IBM Cloud AppConfiguration
You need an IBM Cloud® account for illustration purposes. If you don’t have an account, create one. Log in to your IBM Cloud® account.
Create an Instance of the AppConfiguration Service
To create an instance of the App Configuration service, follow these steps:
- Log in to your IBM Cloud account.
- In the IBM Cloud catalog, search for App Configuration and click on App Configuration. This will open the service provisioning page.
- Select a region — Currently, Dallas (us-south), London (eu-gb), Sydney (au-syd), and Washington DC (us-east) regions are supported.
- Select a pricing plan and resource group, and configure your resource with a service name, or use the preset name.
- Click Create. A new service instance will be created, and the App Configuration dashboard will be displayed.
Setup the App Configuration Service Instance
To set up the App Configuration service instance, follow these steps:
- Download the source code:
$ git clone https://github.com/IBM/appconfiguration-samples.git
$ cd appconfiguration-samples/nodejs
2. Install jq, a command-line JSON processor. You can download it from here.
3. Go to the dashboard of your App Configuration instance in the IBM Cloud UI.
4. Navigate to the Service Credentials section and generate a new set of credentials. Note down the region, guid, and apikey values. These credentials will be required in the next steps.
5. From your terminal, execute the demo.sh script by running the following command:
$ cd appconfiguration-samples/common/script
$ ./demo.sh
6. Provide all the required inputs during the script execution. An example is shown in the figure below:

7. The script execution may take some time. It is considered successful only when you see the log ---script run complete--- at the end of your terminal.
8. This script will create the collections, feature flags, properties, and segments using the default development environment in the instance, which is required for the sample web app called Bluecharge.
Run the Sample
To run the sample application, follow these steps:
Prerequisites: Node.js version 14 or newer.
- Provide all the configuration values in the
.envfile. - Install the dependencies by running
npm installfrom the root folder (appconfiguration-samples/nodejs). - Run
npm startto start the application. - Access the running application in a browser at http://localhost:3000.
Note: Steps are provided to run the app on Kubernetes:
Explore the Key Use-Cases Included in the Sample
Keep the app running and log in with different email IDs at the same time.
Use Case 1: Canary Release
Keep the default rollout percentage to 50% and turn on the toggle for the Left Navigation feature flag. When you log in to the sample app with the email ID jack@ibm.com, you will see the navigation links on the top position to the left side inside the hamburger menu. If you sign out and log in with the email james@ibm.com, you will see the old UI. This is because the user jack falls under the 50% rollout while the user james doesn't. Now, increase the rollout percentage to 75%, and both users will see the hamburger menu. This demonstrates how you can perform a canary release by gradually rolling out a change to a small subset of users before making it available to everybody.

Use Case 2: Dark Launch in a Phased Manner
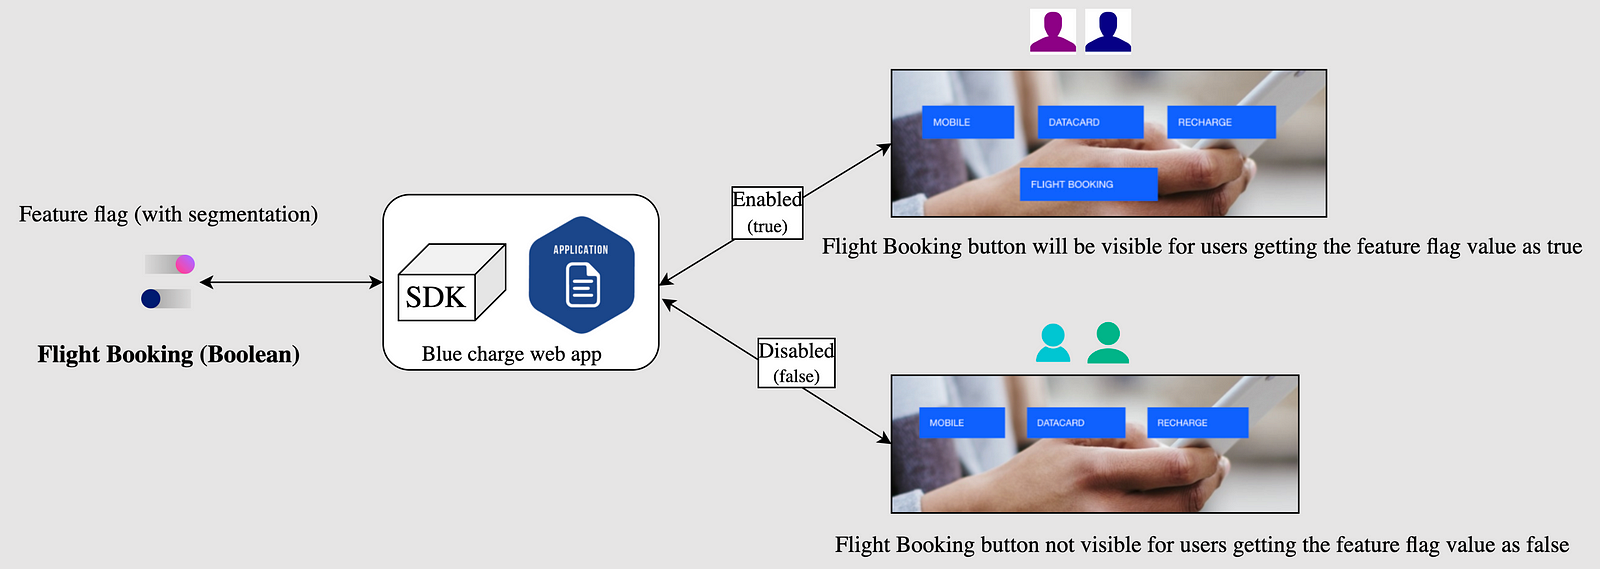
Keep the default rollout percentage to 0% and turn on the toggle for the Flight Booking feature flag. When you log in with the email ID alice@bluecharge.com, you will see the flight booking button displayed on the home screen banner. This is because, for all user emails ending with @bluecharge.com, the feature flag is set to be enabled according to its targeting rules. You can then roll out this feature to a new group called Business Users by increasing the rollout percentage of this group from 0 to 50% in the Edit targeting screen. This means that 50% of the user emails belonging to this group will also see the flight booking button. Finally, you can increase the default rollout percentage from 0 to 100% to make the flight booking button available to all users.

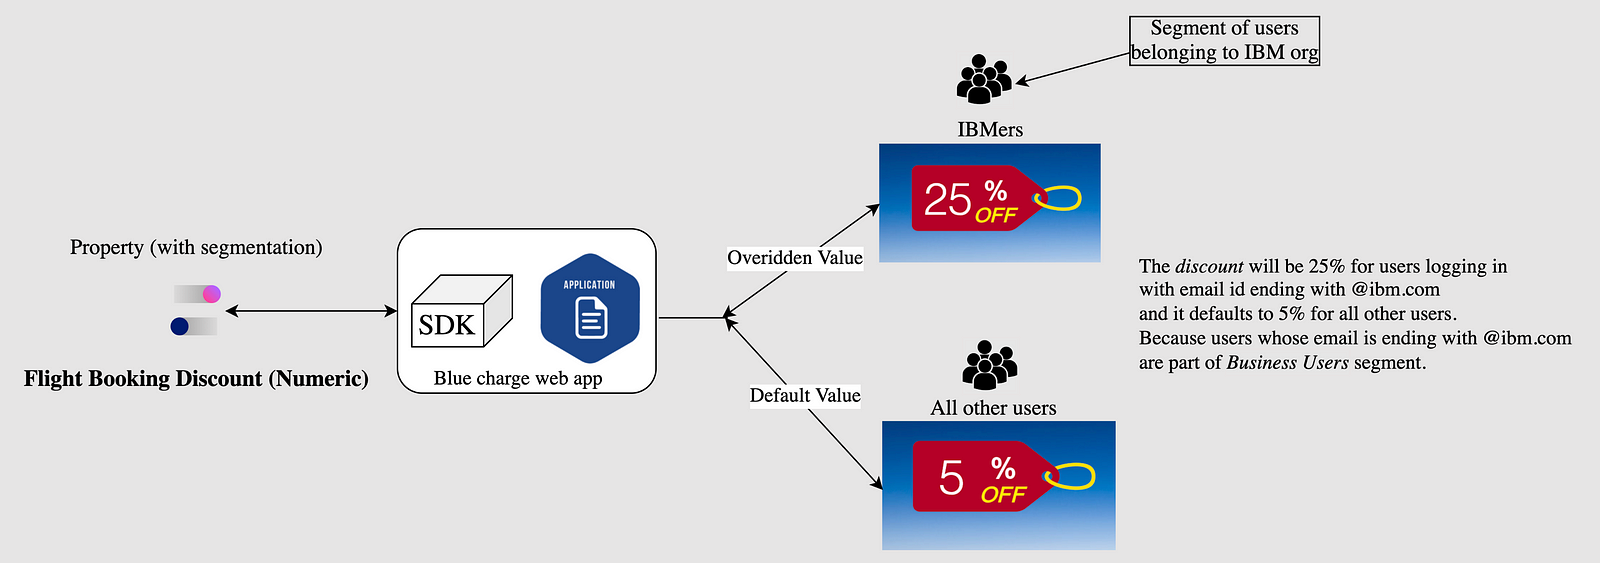
Use Case 3: Properties
Segmentation applied to properties.

Conclusion
IBM Cloud AppConfiguration offers a powerful solution for seamless feature releases without the need for deployment. By leveraging AppConfiguration’s feature management capabilities, developers can release new features quickly, reduce risks associated with deployment, and target specific user groups based on various criteria. With AppConfiguration, you can embrace an agile development approach and ensure a superior user experience. For detailed documentation on the App Configuration service, see here.
Opinions expressed by DZone contributors are their own.

Comments