How to Implement Istio in Multicloud and Multicluster
The tutorial will guide you through the process of setting up Istio in multicloud GKE and EKS clusters, while also enabling L4 and L7 authorization policies.
Join the DZone community and get the full member experience.
Join For FreeToday every application has microservices architecture where individual services are spread across public clouds and multiple Kubernetes clusters. Since all the communication of messages among services happens over the internet, it is very important to ensure the security of your data. You don’t want any malicious guy to read and record the data-in-transit (known as packet sniffing), or intervene in between the communication as someone you trust (IP spoofing), or perform a DoS attack such as bandwidth flooding or connection flooding, etc.
The idea is security should always be developed in a layered approach to build defense in depth. When software engineers are developing containerized applications they need to think about security at Code, Container, Cluster, and Cloud levels (read 4 C’s of container security).
So in this article, we will explain how you can avoid all the security vulnerabilities by securing the communication of microservices in multicloud and multicuster using open-source Istio service mesh. We have considered two different Kubernetes clusters — GKE and AKS — where we will implement two applications and ensure they talk to each other using secure channels (mTLS).
Prerequisites
- Ready-to-use GKE (primary cluster) and AKS (secondary cluster)
- Configure the environment variables
- Terminal to access primary and secondary cluster through kubectl.
- Refer to all the files in the IMESH GitHub repo.
Watch the Video for Securing Multicluster Kubernetes Apps Using Istio
If you are comfortable watching and referring to video to implement the security of multicluster apps using Istio, then watch the following video:
Steps
There are 6 important steps you need to follow to try to implement Istio in multicloud, deploy services, and then implement mTLS, L4, and L7 authorization.
- Install and configure Istio in GKE
- Configure the remote cluster (AKS)
- Allow Istio in GKE to access the remote cluster
- Deploy applications in each cluster and validate mTLS
- Implement L4 authorization policy using Istio
- Implement L7 authorization policy using Istio
Step 1: Install and Configure Istio in the Primary Cluster (GKE)
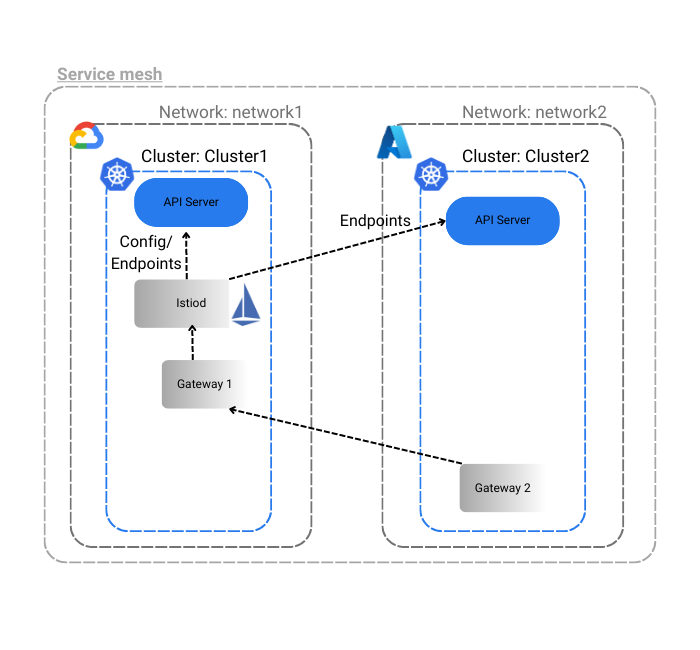
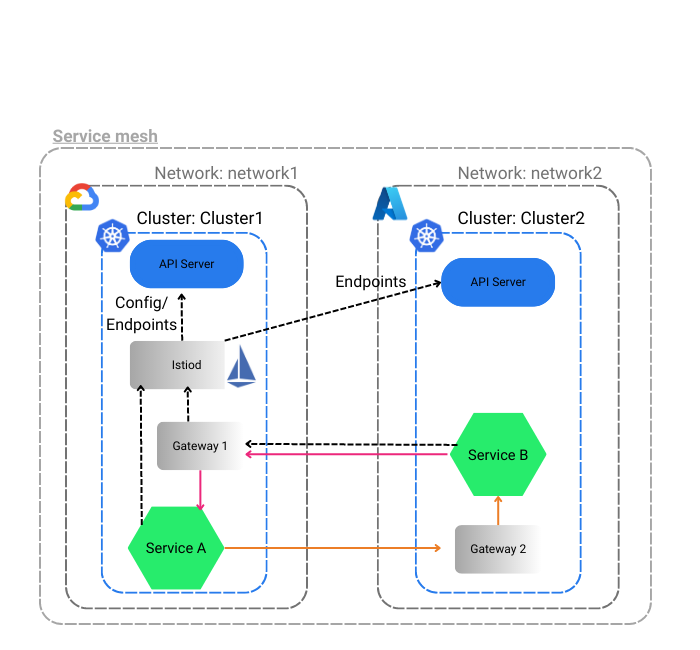
The idea from step 1 to step 3 is to configure Istio in the GKE and AKS clusters so that apps in each cluster can talk to each other using an east-west ingress gateway. Please refer to the image below of the Istio configuration that we are trying to achieve.
Step 1.1: Configure Istio Operator
We will use the following IstioOperator yaml to define the desired state of Istio components. We will treat GKE as the primary cluster and the name of the whole service mesh is Mesh1 and call the primary cluster GKE datacenter network as network1.
Refer the yaml file below. You can also download the file from GitHub.
apiVersion: install.istio.io/v1alpha1
kind: IstioOperator
spec:
  values:
    pilot:
      env:
        EXTERNAL_ISTIOD: true
    global:
      meshID: mesh1
      multiCluster:
        clusterName: cluster-gke
      network: network1
      proxy:
        privileged: true
In the above file, we have done two things:
- Set the flag
EXTERNAL_ISTIODastrueto allow Istio control plane to handle remote clusters. - Set the flag
proxy->privilegeastrueto get root access to the proxy container. (Note: this is NOT ideal for production implementation.)
Step 1.2: Install Istio Using Istio Operator
Execute the command to install Istio:
istioctl install $env:GKE -f <<Istio Operator file name>>You will observe that the Istio core, Istiod, and Ingress gateways are installed.
Step 1.3: Install Istio East-West Gateway
We will use the Istio operator to install an ingress gateway in GKE that can handle traffic from outside the cluster (from AKS). We have given the name of the ingress as istio-eastwestgateway.
Note: Using the Istio operator, we are installing an east-west ingress controller (which is slightly different from a normal ingress controller acting as an API). Once we install the east-west ingress controller, we will create a gateway resource to link with east-west gateway and later on create virtual services to make sure the gateway resource in GKE listens to ASK in certain ports.
You can refer to the east-west-gateway-cluster-gke.yaml file on GitHub or refer to the code below:
apiVersion: install.istio.io/v1alpha1
kind: IstioOperator
metadata:
  name: eastwest
spec:
  revision: ""
  profile: empty
  components:
    ingressGateways:
      - name: istio-eastwestgateway
        label:
          istio: eastwestgateway
          app: istio-eastwestgateway
          topology.istio.io/network: network1
        enabled: true
        k8s:
          env:
            # traffic through this gateway should be routed inside the network
            - name: ISTIO_META_REQUESTED_NETWORK_VIEW
              value: network1
          service:
            ports:
              - name: status-port
                port: 15021
                targetPort: 15021
              - name: tls
                port: 15443
                targetPort: 15443
              - name: tls-istiod
                port: 15012
                targetPort: 15012
              - name: tls-webhook
                port: 15017
                targetPort: 15017
  values:
    gateways:
      istio-ingressgateway:
        injectionTemplate: gateway
    global:
      network: network1
Note that the east-west gateway file could be create using the below command as well:
samples/multicluster/gen-eastwest-gateway.sh --network network1Install the ingress gateway using the following command:
istioctl install $env:GKE -f <<ingress gateway file name>>Ingress istio-eastwestgateway will be active now.
Step 1.4: Set Up East-West Gateway to Allow the Remote Cluster (AKS) to Access GKE
Execute the following command to find out the IP of the ingress gateway istio-eastwestgateway. Copy it and we will use it in step 3 while configuring Istio in remote cluster.
Kubectl get svc -n istio-system $env:GKEWe will then create a port to receive the external traffic from AKS into GKS through the gateway.
Note: Since the eastwest IP is public, for production implementation, we suggest considering security measures to secure the IP such as HTTPS, firewall, certificates, etc.
Create two yaml files of Gateway kind to expose Istiod and the services in GKE to the AKS.
Please apply the expose-istiod.yaml and expose-services.yaml files in the istio-system namespace.
Declaration of expose-istiod.yaml file below:
apiVersion: networking.istio.io/v1alpha3
kind: Gateway
metadata:
  name: istiod-gateway
  namespace: istio-system
spec:
  selector:
    istio: eastwestgateway
  servers:
    - port:
        name: tls-istiod
        number: 15012
        protocol: tls
      tls:
        mode: PASSTHROUGH
      hosts:
        - "*"
    - port:
        name: tls-istiodwebhook
        number: 15017
        protocol: tls
      tls:
        mode: PASSTHROUGH
      hosts:
        - "*"
---
apiVersion: networking.istio.io/v1alpha3
kind: VirtualService
metadata:
  name: istiod-vs
  namespace: istio-system
spec:
  hosts:
  - "*"
  gateways:
  - istiod-gateway
  tls:
  - match:
    - port: 15012
      sniHosts:
      - "*"
    route:
    - destination:
        host: istiod.istio-system.svc.cluster.local
        port:
          number: 15012
  - match:
    - port: 15017
      sniHosts:
      - "*"
    route:
    - destination:
        host: istiod.istio-system.svc.cluster.local
        port:
          number: 443
Declaration of expose-services.yaml file below:
apiVersion: networking.istio.io/v1alpha3
kind: Gateway
metadata:
  name: cross-network-gateway
  namespace: istio-system
spec:
  selector:
    istio: eastwestgateway
  servers:
    - port:
        number: 15443
        name: tls
        protocol: TLS
      tls:
        mode: AUTO_PASSTHROUGH
      hosts:
        - "*.local"
Apply the following commands to deploy these two files and to allow cross-cluster communication:
kubectl apply $env:GKE -f .\expose-istiod.yaml kubectl apply $env:GKE -f .\expose-services.yamlStep 2: Configure the Remote Cluster (AKS)
Step 2.1: Label and Annotate the Istio-System Namespace in AKS
You need to label and annotate istio-system namespace to let Istiod know that the control plane of istio is cluster-gke — the primary cluster, when the remote cluster is attached to it. You can do so by applying the below namespace. (I have given the name as cluster-aks-remote-namespace-prep.yaml).
apiVersion: v1
kind: Namespace
metadata:
  name: istio-system
  labels:
    topology.istio.io/network: network2
  annotations:
    topology.istio.io/controlPlaneClusters: cluster-gke
Step 2.2: Use the East-West Gateway of GKE While Configuring Istio in AKS
I have used cluster-aks-remote.yaml in AKS to set up Istio. Use the IP of the east-west gateway of GKE cluster as the value under remotePilotAddress in the yaml file.
apiVersion: install.istio.io/v1alpha1
kind: IstioOperator
spec:
  profile: remote
  values:
    istiodRemote:
      injectionPath: /inject/cluster/cluster-aks/net/network2
    global:
      remotePilotAddress: <replace with ip of east-west gateway of primary cluster>
      proxy:
        privileged: true
Step 2.3: Install Istio Using the Istio Operator in AKS
Use the command to install cluster-aks-remote.yaml
istioctl install $env:AKS -f .\cluster-aks-remote.yamlStep 3: Allow Istio in GKE to Access the API Server of AKS
This step is crucial to allow the Istio control plane to access the API server of AKS to be able to perform its core activities such as service discovery, patching webhooks, etc. The idea is to create a remote secret and apply the remote secret in the primary cluster GKE.
Step 3.1: Create Remote Cluster Secrets
Use the following command to generate the remote secret of remote cluster (AKS) and store it in a secret yaml file.
istioctl x create-remote-secret $env:AKS --name=cluster-aks > apiserver-creds-aks.yaml
The output file apiserver-creds-aks.yaml will look something like below:

Step 3.2: Apply the Remote Cluster Secrets in Primary Cluster (GKE)
Use the following command to implement the secrets in GKE so that it can access the API server of AKS.
kubectl apply $env:GKE -f .\apiserver-creds-aks.yamlNote: Apply the remote credentials first to connect both the cluster and then create east-west gateway, expose the services in the remote cluster, otherwise there will be errors.
Step 3.3: Install East-West Ingress Gateway in Remote Cluster (AKS)
Use the command to install east-west ingress gateway controllers in AKS.
istioctl install $env:AKS -f east-west-gateway-cluster-aks.yamlAfter the controller is installed, we will create a gateway resource to link with the east-west gateway in the remote cluster by applying the following commands:
kubectl apply $env:AKS -f .\expose-services.yaml Step 4: Deploy Application into Primary and Remote Kubernetes Clusters in Istio Service Mesh
Step 4.1: Deploy Service and Deployment into Each Cluster (GKE and AKS)
We will deploy a service in each cluster and then deploy the Deployment file with version 1 and version 2 of hello world for GKE and AKS respectively. The idea is to see how two services in different clusters communicate with each other through the gateway.
Use the following commands to deploy services and deployments into each cluster.
kubectl apply $env:GKE -f .\demo-service.yaml
kubectl apply $env:AKS -f .\demo-service.yaml
kubectl apply $env:GKE -f .\demo-deployment-v1.yaml
kubectl apply $env:AKS -f .\demo-deployment-v2.yaml
Step 4.2: Deploy Another Service to Request to Hello Service in GKE and AKS
Link to sleep-deployment-cluster-gke.yaml and sleep-deployment-cluster-aks.yaml.
kubectl apply $env:GKE -f .\sleep-deployment-cluster-gke.yaml
kubectl apply $env:AKS -f .\sleep-deployment-cluster-aks.yaml
Step 4.3: Get into One of the ‘Sleep’ Service Pods and Request the Hello Service
Give the command to enter into one the pods of the sleep services:
kubectl exec -it <<sleep service pod name in gke>> $env:GKE -n multi-cluster -- shRequest the hello service from the pod:
curl helloworld/hello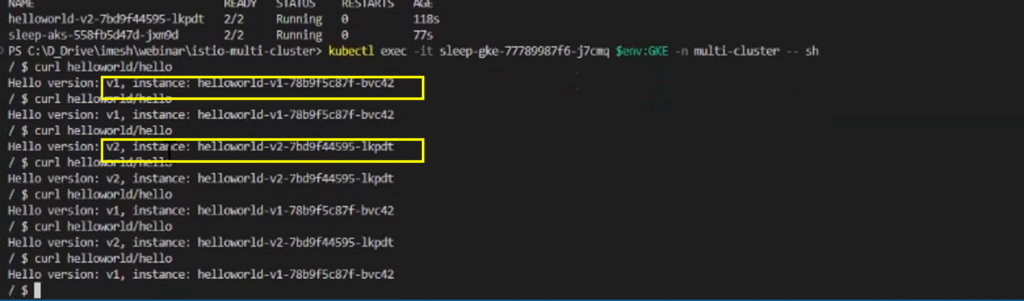
sleep service in AKS.
Step 4.4: Verify if Communications Are Secured With mTLS
You can verify the communication between services in the multicluster by dumping TCP/IP packets on the Envoy proxy container. Use the below command to enter into envoy proxy container:
kubectl exec -it <<helloworld deployment-v1-pod name>> -c istio-proxy -n <<namespace>> -- shRun the following command to dump TCP/IP packets:
sudo tcpdump -nA port 5000You will see an output like the below:
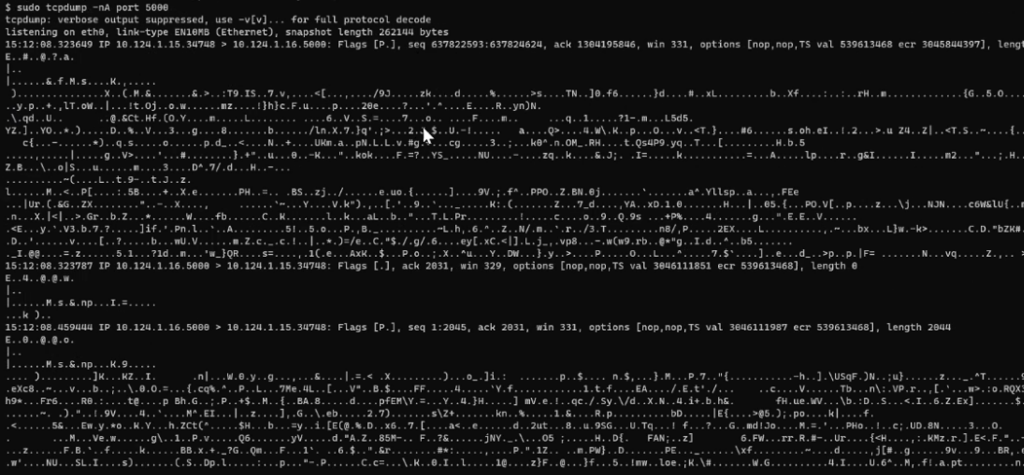
You can see all the packets exchanged between two services across clusters are encrypted with mTLS encryption.
Step 5: Apply L4 Authorization Policies to Multicluster Communication With Istio
To apply granular policies such as restricting a service from getting accessed by a certain service, you can use Istio authorization policies.
Step 5.1: Create and Deploy an Istio L4 Authorization Policy
You can refer to the following helloworld-policy to create your authorization policy or check out GitHub. The objective of the policy is:
- Allow
deployment-1to be accessed fromsleepservice in the remote cluster only ( i.e. from AKS). If we send a request from thesleepservice pod in AKS tohello-worldservice, we should get response from bothdeployment-1anddeployment-2. - Don’t allow
deployment-1to be accessed from any other services in the mesh. If a pod from GKE requestshello-worldservices, the response should come from onlydeployment-2pods.
apiVersion: security.istio.io/v1beta1
kind: AuthorizationPolicy
metadata:
  name: helloworld-policy
  namespace: multi-cluster
spec:
  selector:
    matchLabels:
      version: v1
  action: ALLOW
  rules:
  - from:
    - source:
        principals: ["cluster.local/ns/multi-cluster/sa/sleep-aks"]
Deploy the the authorization policy with the below command:
Kubectl apply -f .\demo-authorization.yamlStep 5.2: Verify L4 Authorization Policy Implementation
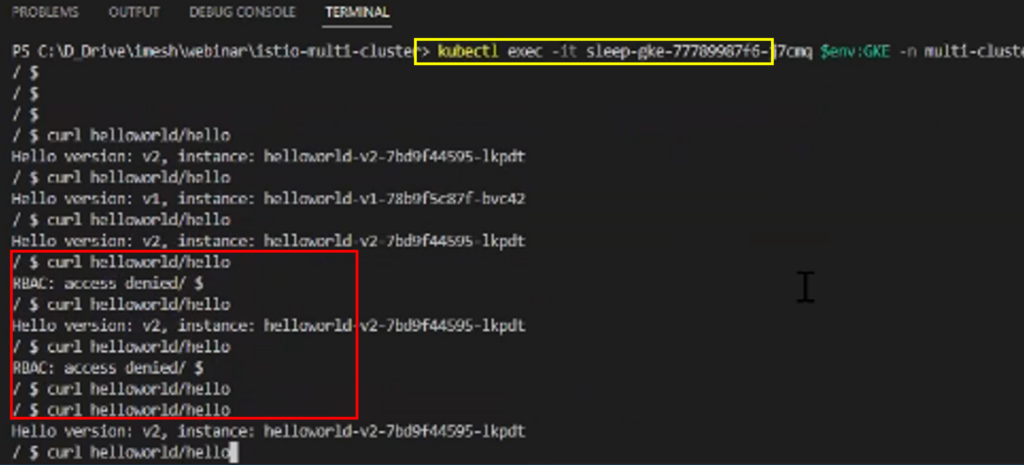
After you apply the L4 policy, to verify if the policy is applicable, enter into the sleep service pods of GKE and AKS respectively and try to curl helloworld service. You will realize you can access deployment-1 from sleep-service AKS only, and access from GKE will through RBAC denied error. Refer to the screenshots below.

Access from GKE will throw an error.
Step 6: Apply L7 Authorization Policies to Multicluster Communication With Istio
Now you can apply L7 authorization policies to create rules on HTTP traffic. Below is the example of the L7 auth policy used to allow only HEAD and block all kinds of API access. The idea here is to allow traffic requests to deployment-v1 from sleep service in AKS, provided the HTTP request is placed using HEAD method.
apiVersion: security.istio.io/v1beta1
kind: AuthorizationPolicy
metadata:
  name: helloworld-policy
  namespace: multi-cluster
spec:
  selector:
    matchLabels:
      version: v1
  action: ALLOW
  rules:
  - from:
    - source:
        principals: ["cluster.local/ns/multi-cluster/sa/sleep-aks"]
    to:
    - operation:
        methods: ["HEAD"]
Once you apply the L7 policy, you can validate the traffic using logs which would look something like the below screenshot. Note, if you try to access the deployment-v1 service from AKS using direct curl (GET request) then it would fail. But if you use the HEAD method using curl -I helloworld/hello , then we will get a response HTTP/1.1 200 OK.

That’s the end of the securing multicloud and multicluster application using Istio.
Published at DZone with permission of Ravi Verma. See the original article here.
Opinions expressed by DZone contributors are their own.
Comments