Self-Managed Keycloak for App Connect Dashboard and Designer Authoring
This tutorial explains how to use your Keycloak instance to manage authentication and authorization for App Connect Dashboard and Designer Authoring.
Join the DZone community and get the full member experience.
Join For FreeWith the release of the IBM® App Connect Operator version 12.1.0, you can now use your existing Keycloak instance to configure authentication and authorization for App Connect Dashboard and Designer Authoring.
Building on top of the capability to use Keycloak, which was first available in IBM® App Connect Operator version 11.0.0, this feature extends the supported platforms from Red Hat® OpenShift® Container Platform (OCP) only to also include Kubernetes. It has in addition removed the dependencies on the IBM® Cloud Pak foundational services and IBM® Cloud Pak for Integration operators. It is worth noting that this new feature is only available with App Connect licenses.
This article contains a tutorial on how to use your Keycloak instance to manage authentication and authorization for App Connect Dashboard and Designer Authoring. There are two scenarios. Scenario 1 covers how to configure App Connect Dashboard with your Keycloak instance on Kubernetes, whilst scenario 2 covers configuring App Connect Designer Authoring on Kubernetes. While you can follow this tutorial for OCP with the kubectl command-line tool, the App Connect documentation and a related tutorial on how to use Keycloak with IBM® App Connect Operator version 11.0.0 provide further guidance on how to use your Keycloak instance from the Red Hat UI.
Prerequisites
- Install the IBM® App Connect Operator version 12.1.0 or later.
- Use App Connect licenses only (such as AppConnectEnterpriseProduction).
- Use App Connect Dashboard and Designer Authoring versions 12.0.12.3-r1 or later.
- Kubernetes version 1.25, 1.27, 1.28 or 1.29.
- Install the kubectl command-line tool.
- Install a Keycloak instance and obtain the following information:
- The URL of Keycloak endpoint.
- The Certificate Authority (CA) certificate from Keycloak.
- The URL and credentials to access the Keycloak Admin Console.
For this tutorial, we configured a keycloak instance with the Keycloak operator version 24.0.3 on Kubernetes. If you do not have an existing Keycloak instance and would like to create one to complete this tutorial, you can follow the documentation for the Keycloak operator. You MUST skip versions 25.0.0 and 25.0.1, which introduced a defect, where user client roles are not returned by token introspection from Keycloak. When you are following that documentation to set up a database for Keycloak, you must modify the default values for POSTGRES_USER and POSTGRES_PASSWORD in the example yaml.
Article index
- Scenario 1: Create and access App Connect Dashboard with your Keycloak instance on Kubernetes.
- Part 1: Create a keycloak client for App Connect Dashboard.
- Part 2: Create Keycloak related secrets on your Kubernetes cluster.
- Part 3: Create an App Connect Dashboard to use your Keycloak instance.
- Part 4: Access your App Connect Dashboard.
- Scenario 2: Create and access App Connect Designer Authoring with your Keycloak instance on Kubernetes.
- Part 1: Create a keycloak client for App Connect Designer Authoring.
- Part 2: Create Keycloak related secrets on your Kubernetes cluster.
- Part 3: Create an App Connect Designer Authoring to use your Keycloak instance.
- Part 4: Access your App Connect Designer Authoring.
- Troubleshooting.
- Invalid parameter: redirect_uri.
- Something went wrong: initial connection from App Connect Dashboard or Designer UI to Keycloak.
- Something went wrong: error validating Keycloak client roles.
Note: In this article, resource names are highlighted in dark red. Keywords that are displayed on a UI are highlighted in bold.
Scenario 1: Create and Access App Connect Dashboard With Your Keycloak Instance on Kubernetes
Part 1: Create a Keycloak Client for App Connect Dashboard
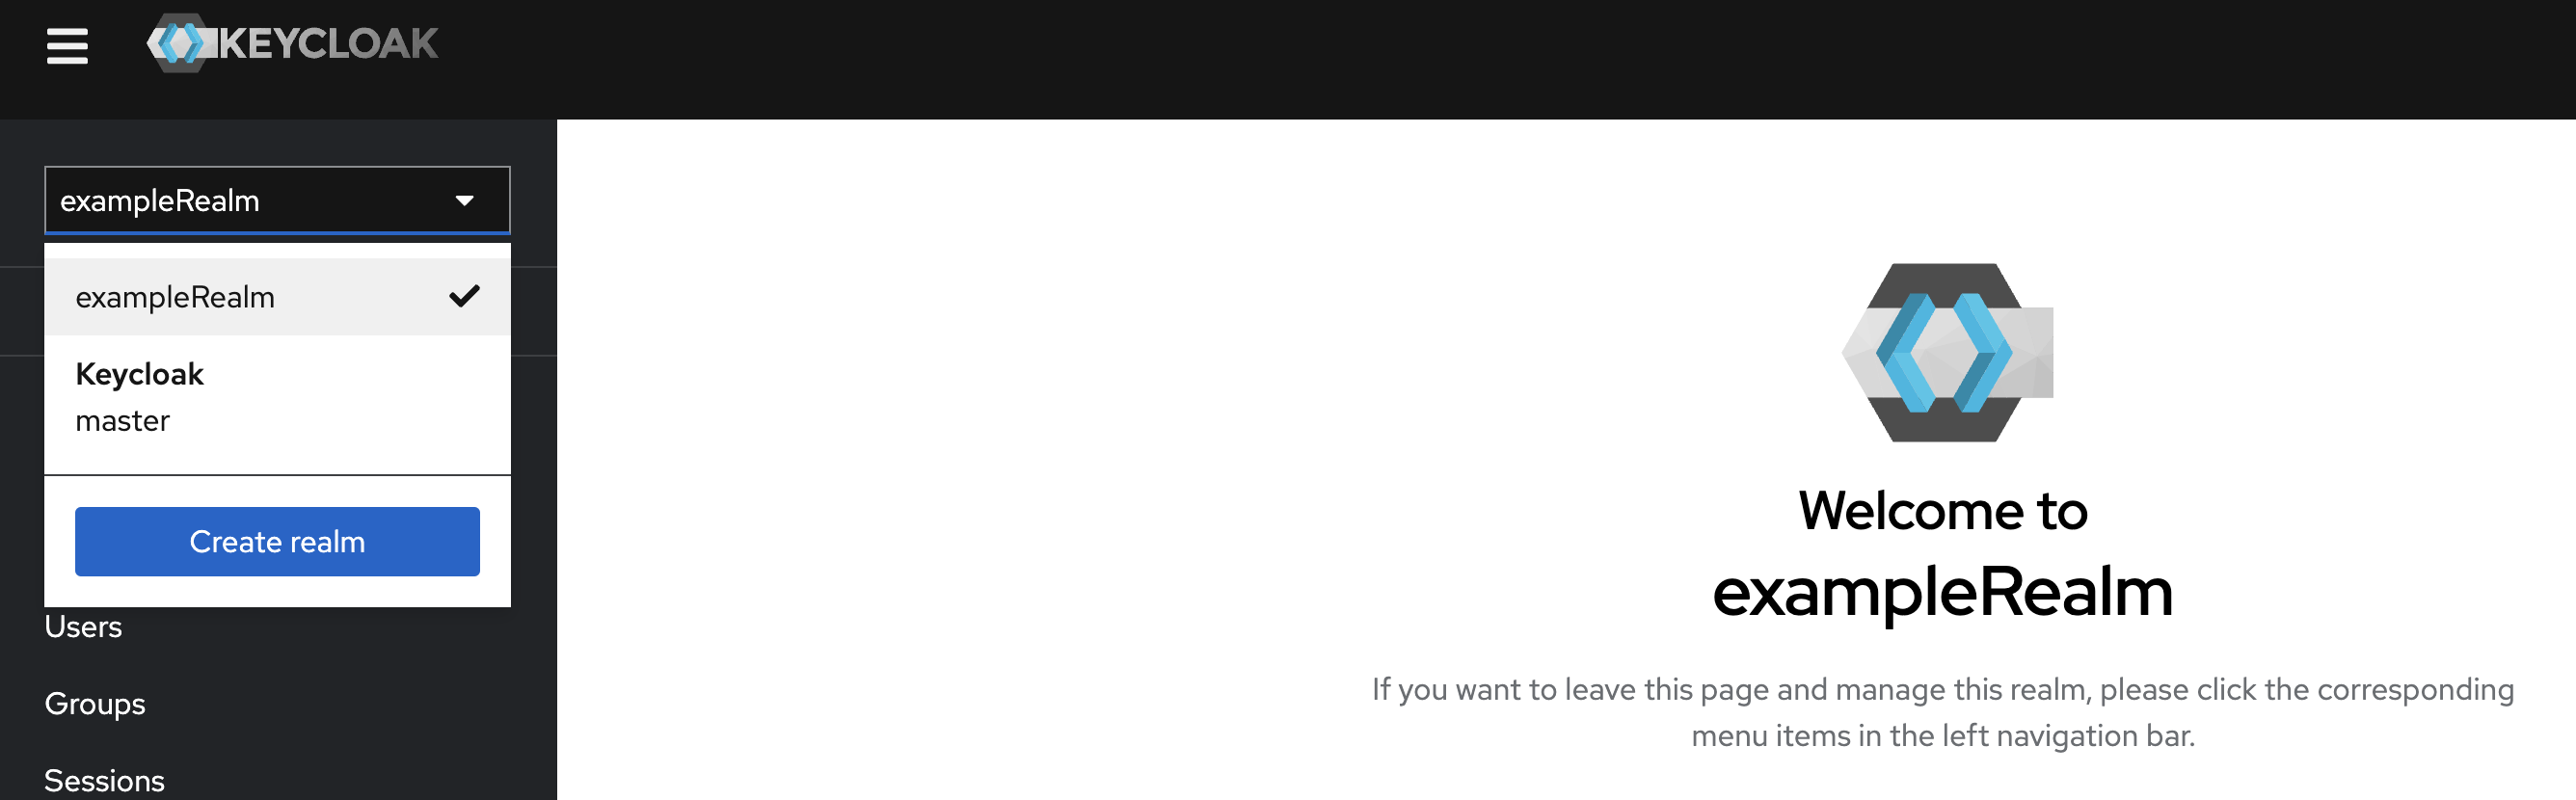
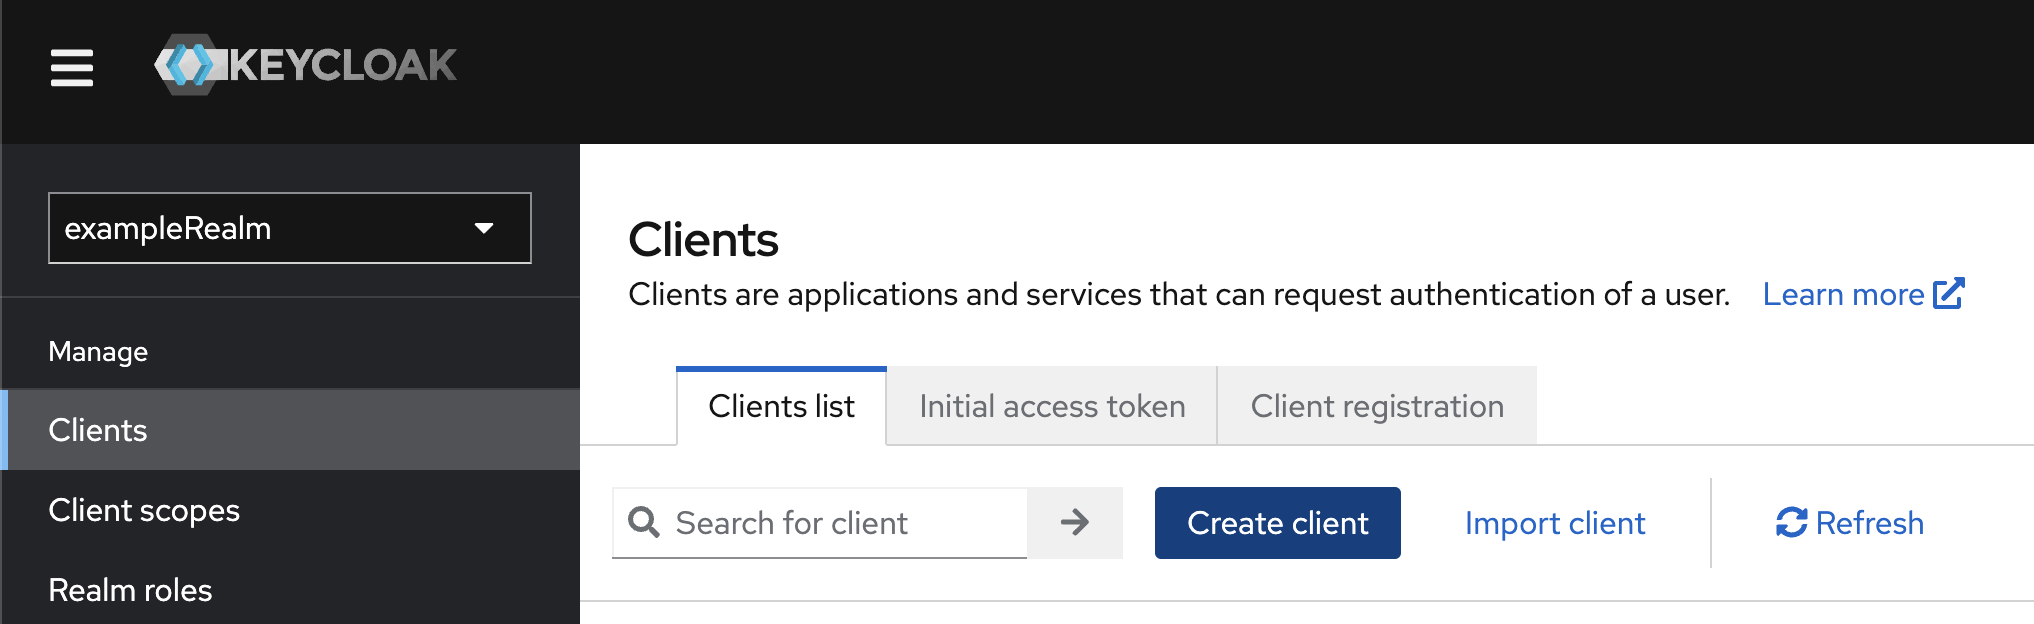
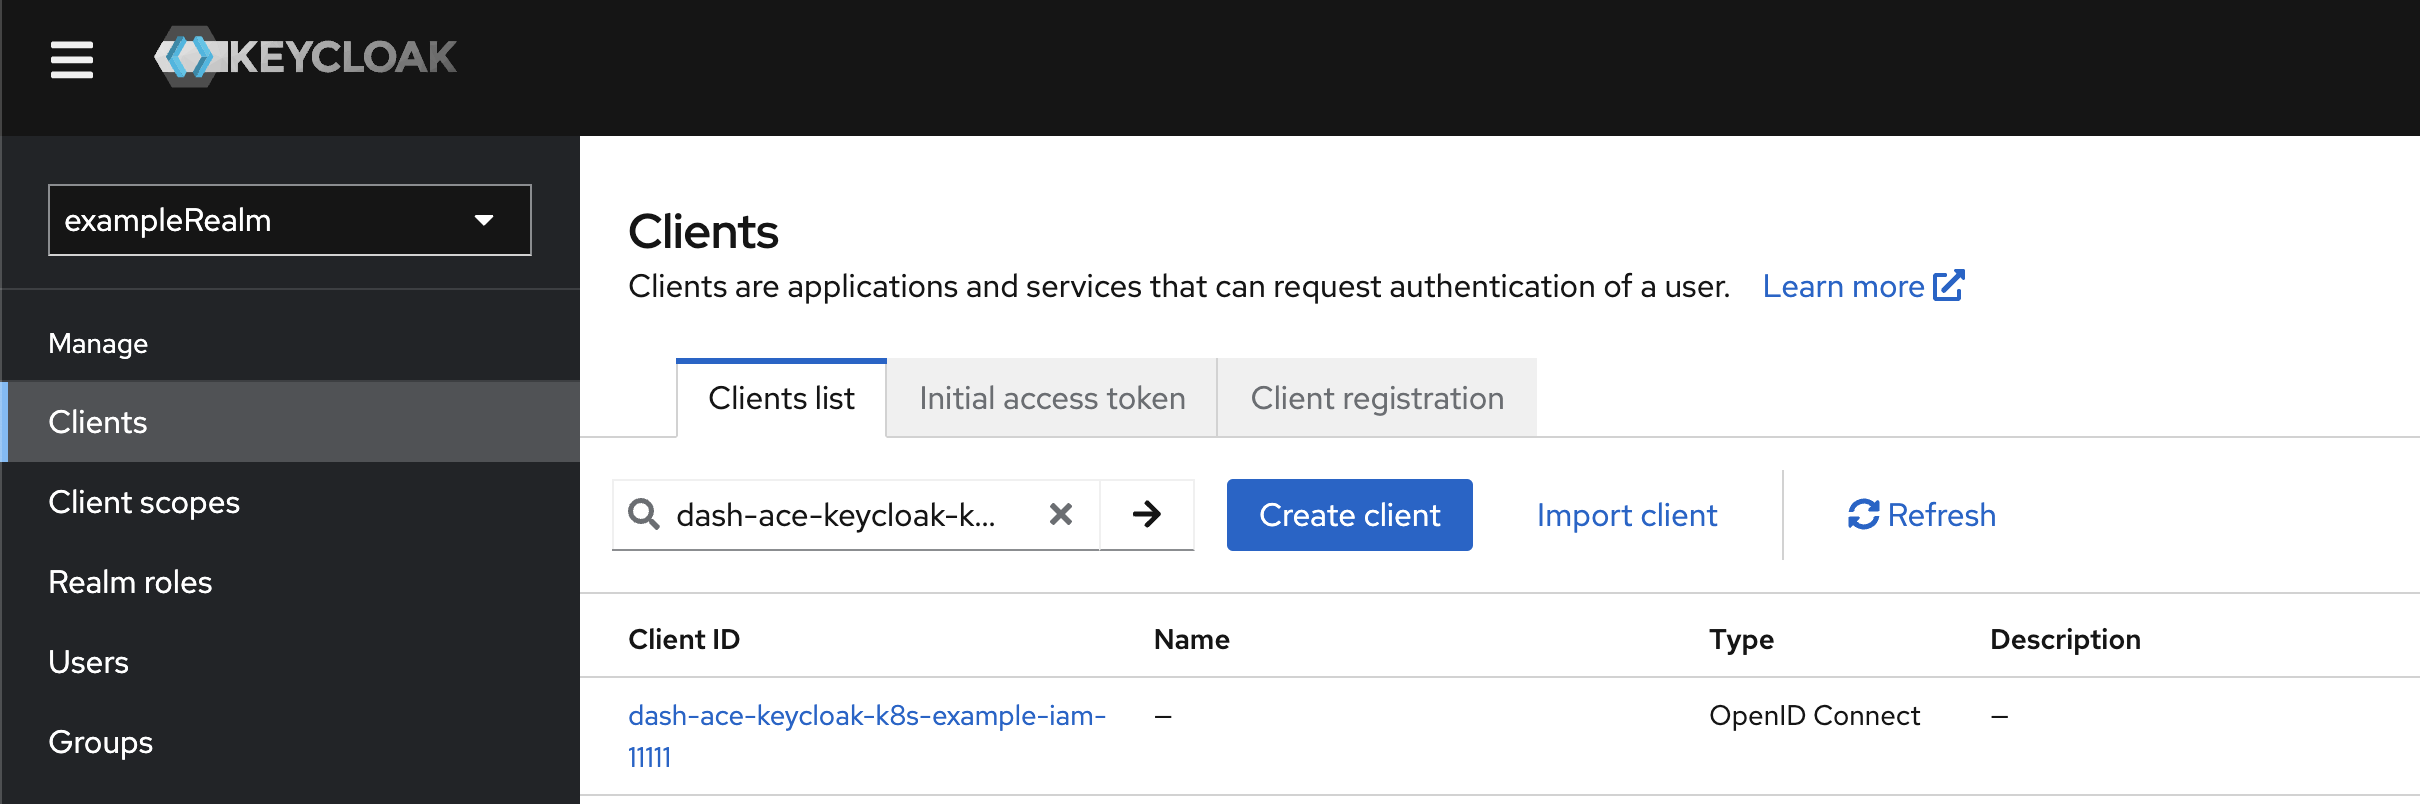
- From your Keycloak admin console, use the navigation pane to select a realm from the drop-down list. In this tutorial, we have set up a realm called exampleRealm. Next, on the navigation pane, select Clients, and then click Create client to create a Keycloak client.
- Set Client ID and click Next. In this tutorial, the client ID for App Connect Dashboard is set to dash-ace-keycloak-k8s-example-iam-11111. It contains a number of parts to make it uniquely identifiable, such as the App Connect resource type (dash for App Connect Dashboard), the namespace where the App Connect resource will be created, the name of the App Connect resource and a random five digits at the end.
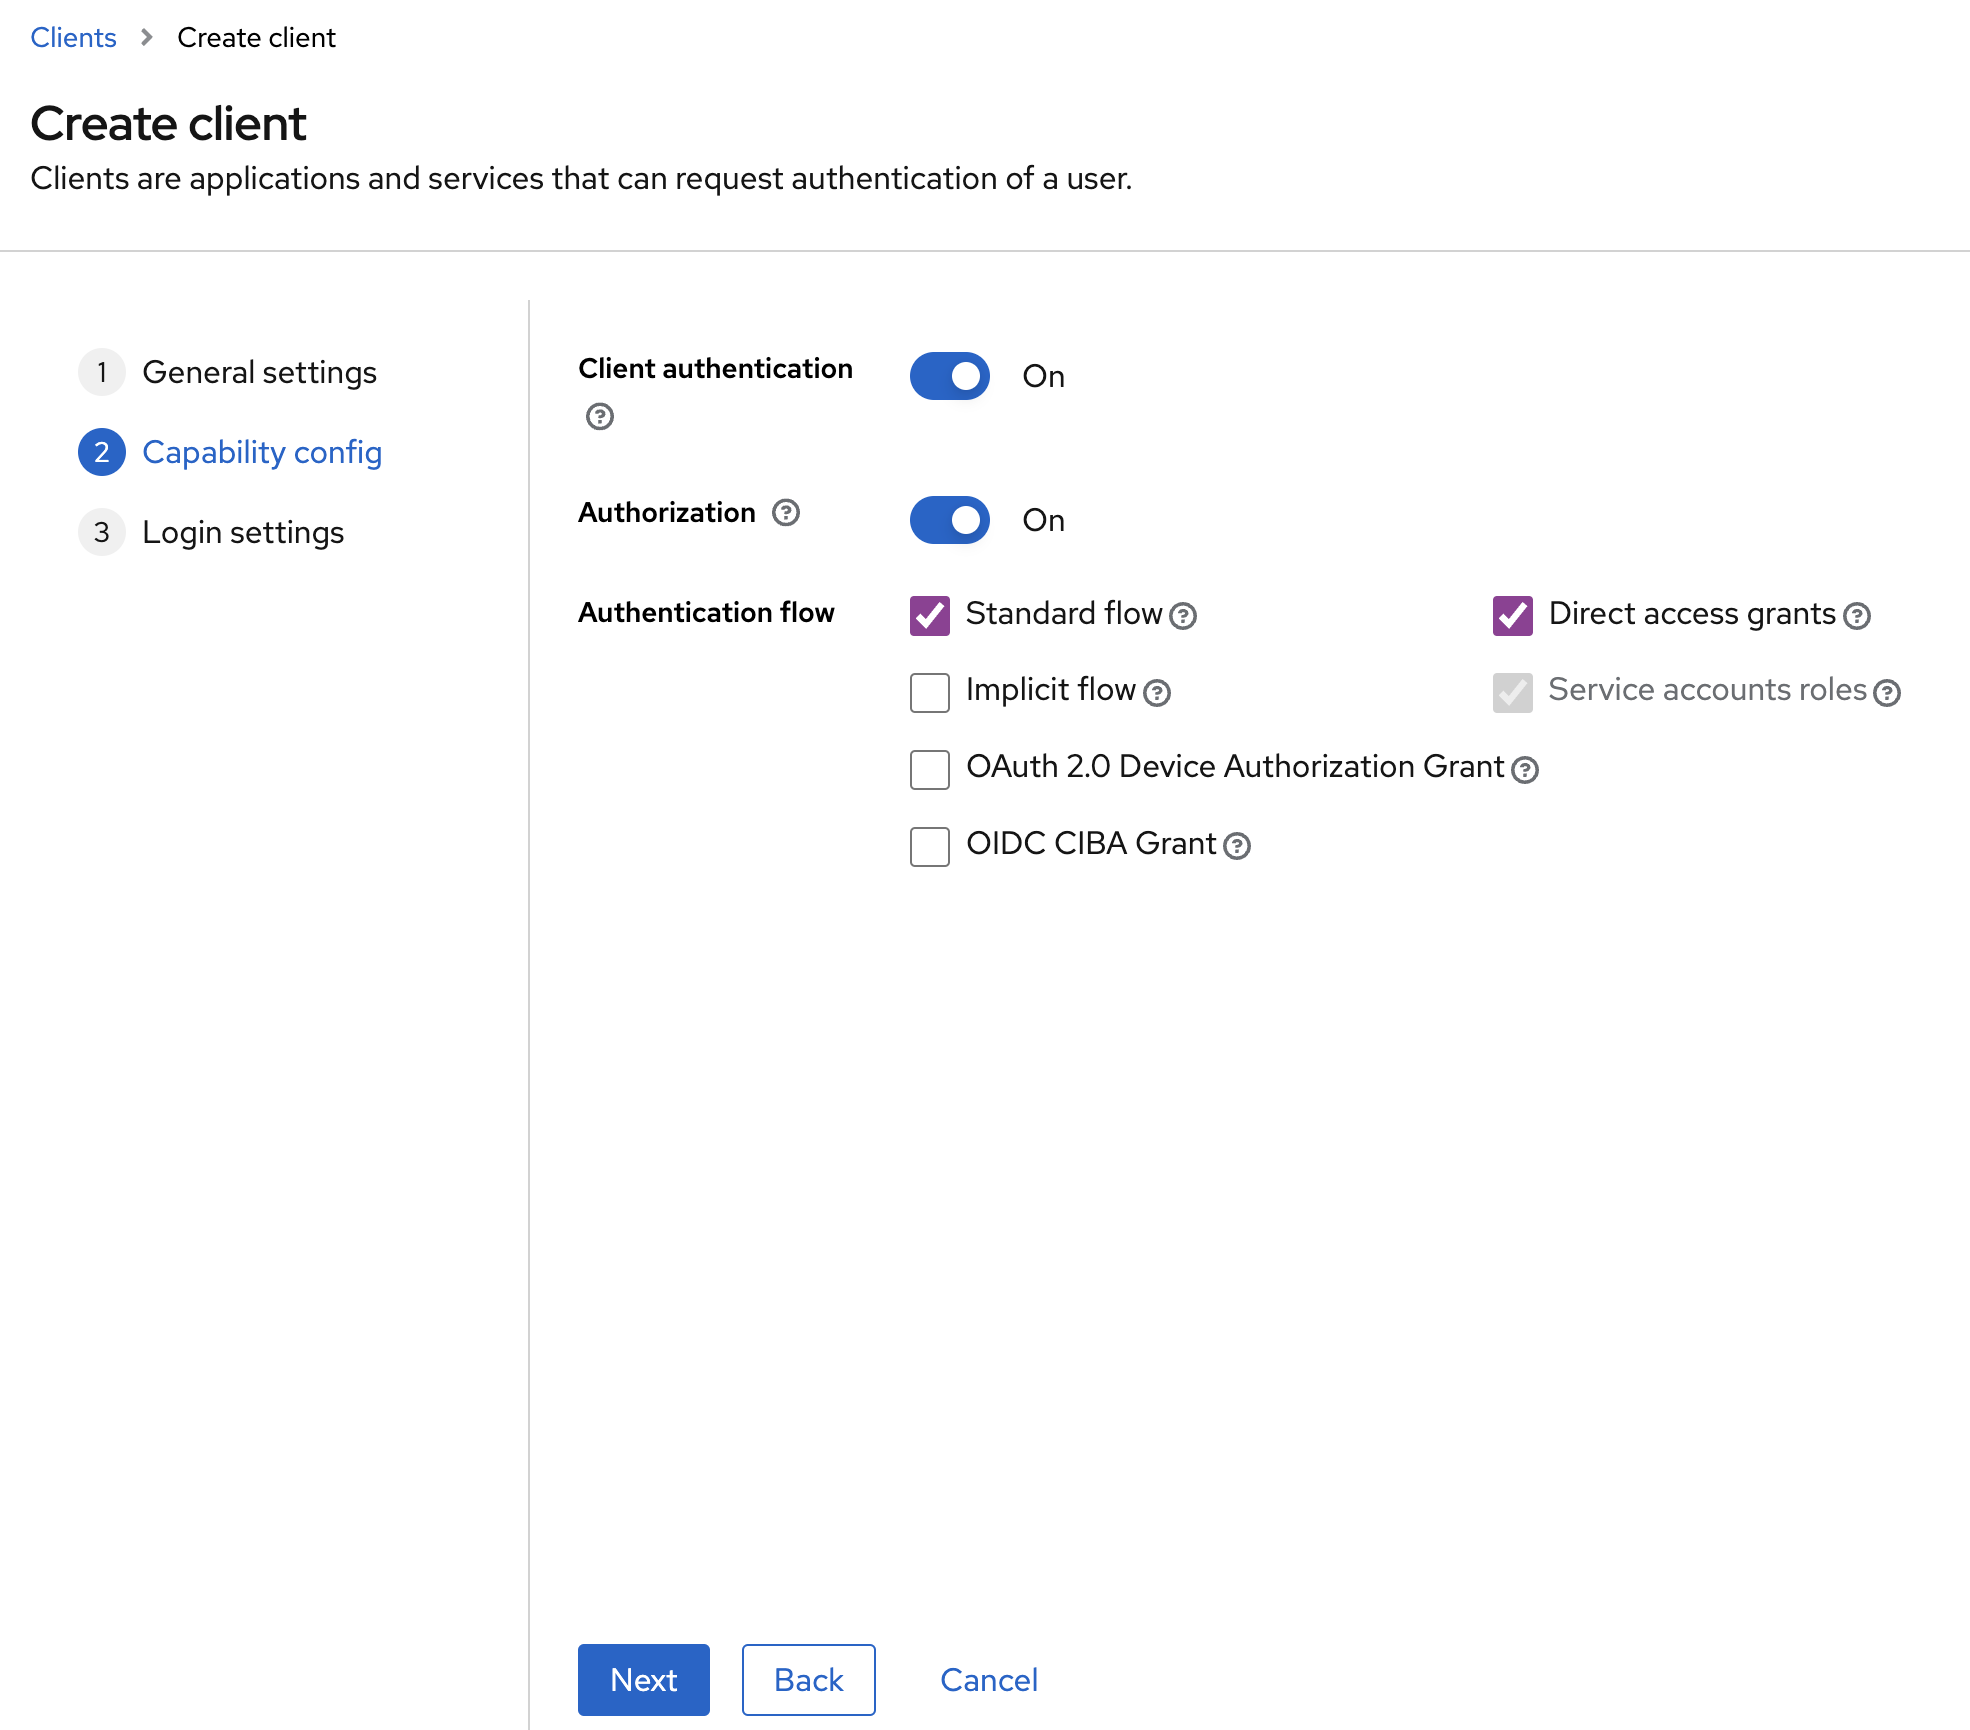
- Toggle to enable Client authentication and Authorization. Click Next.
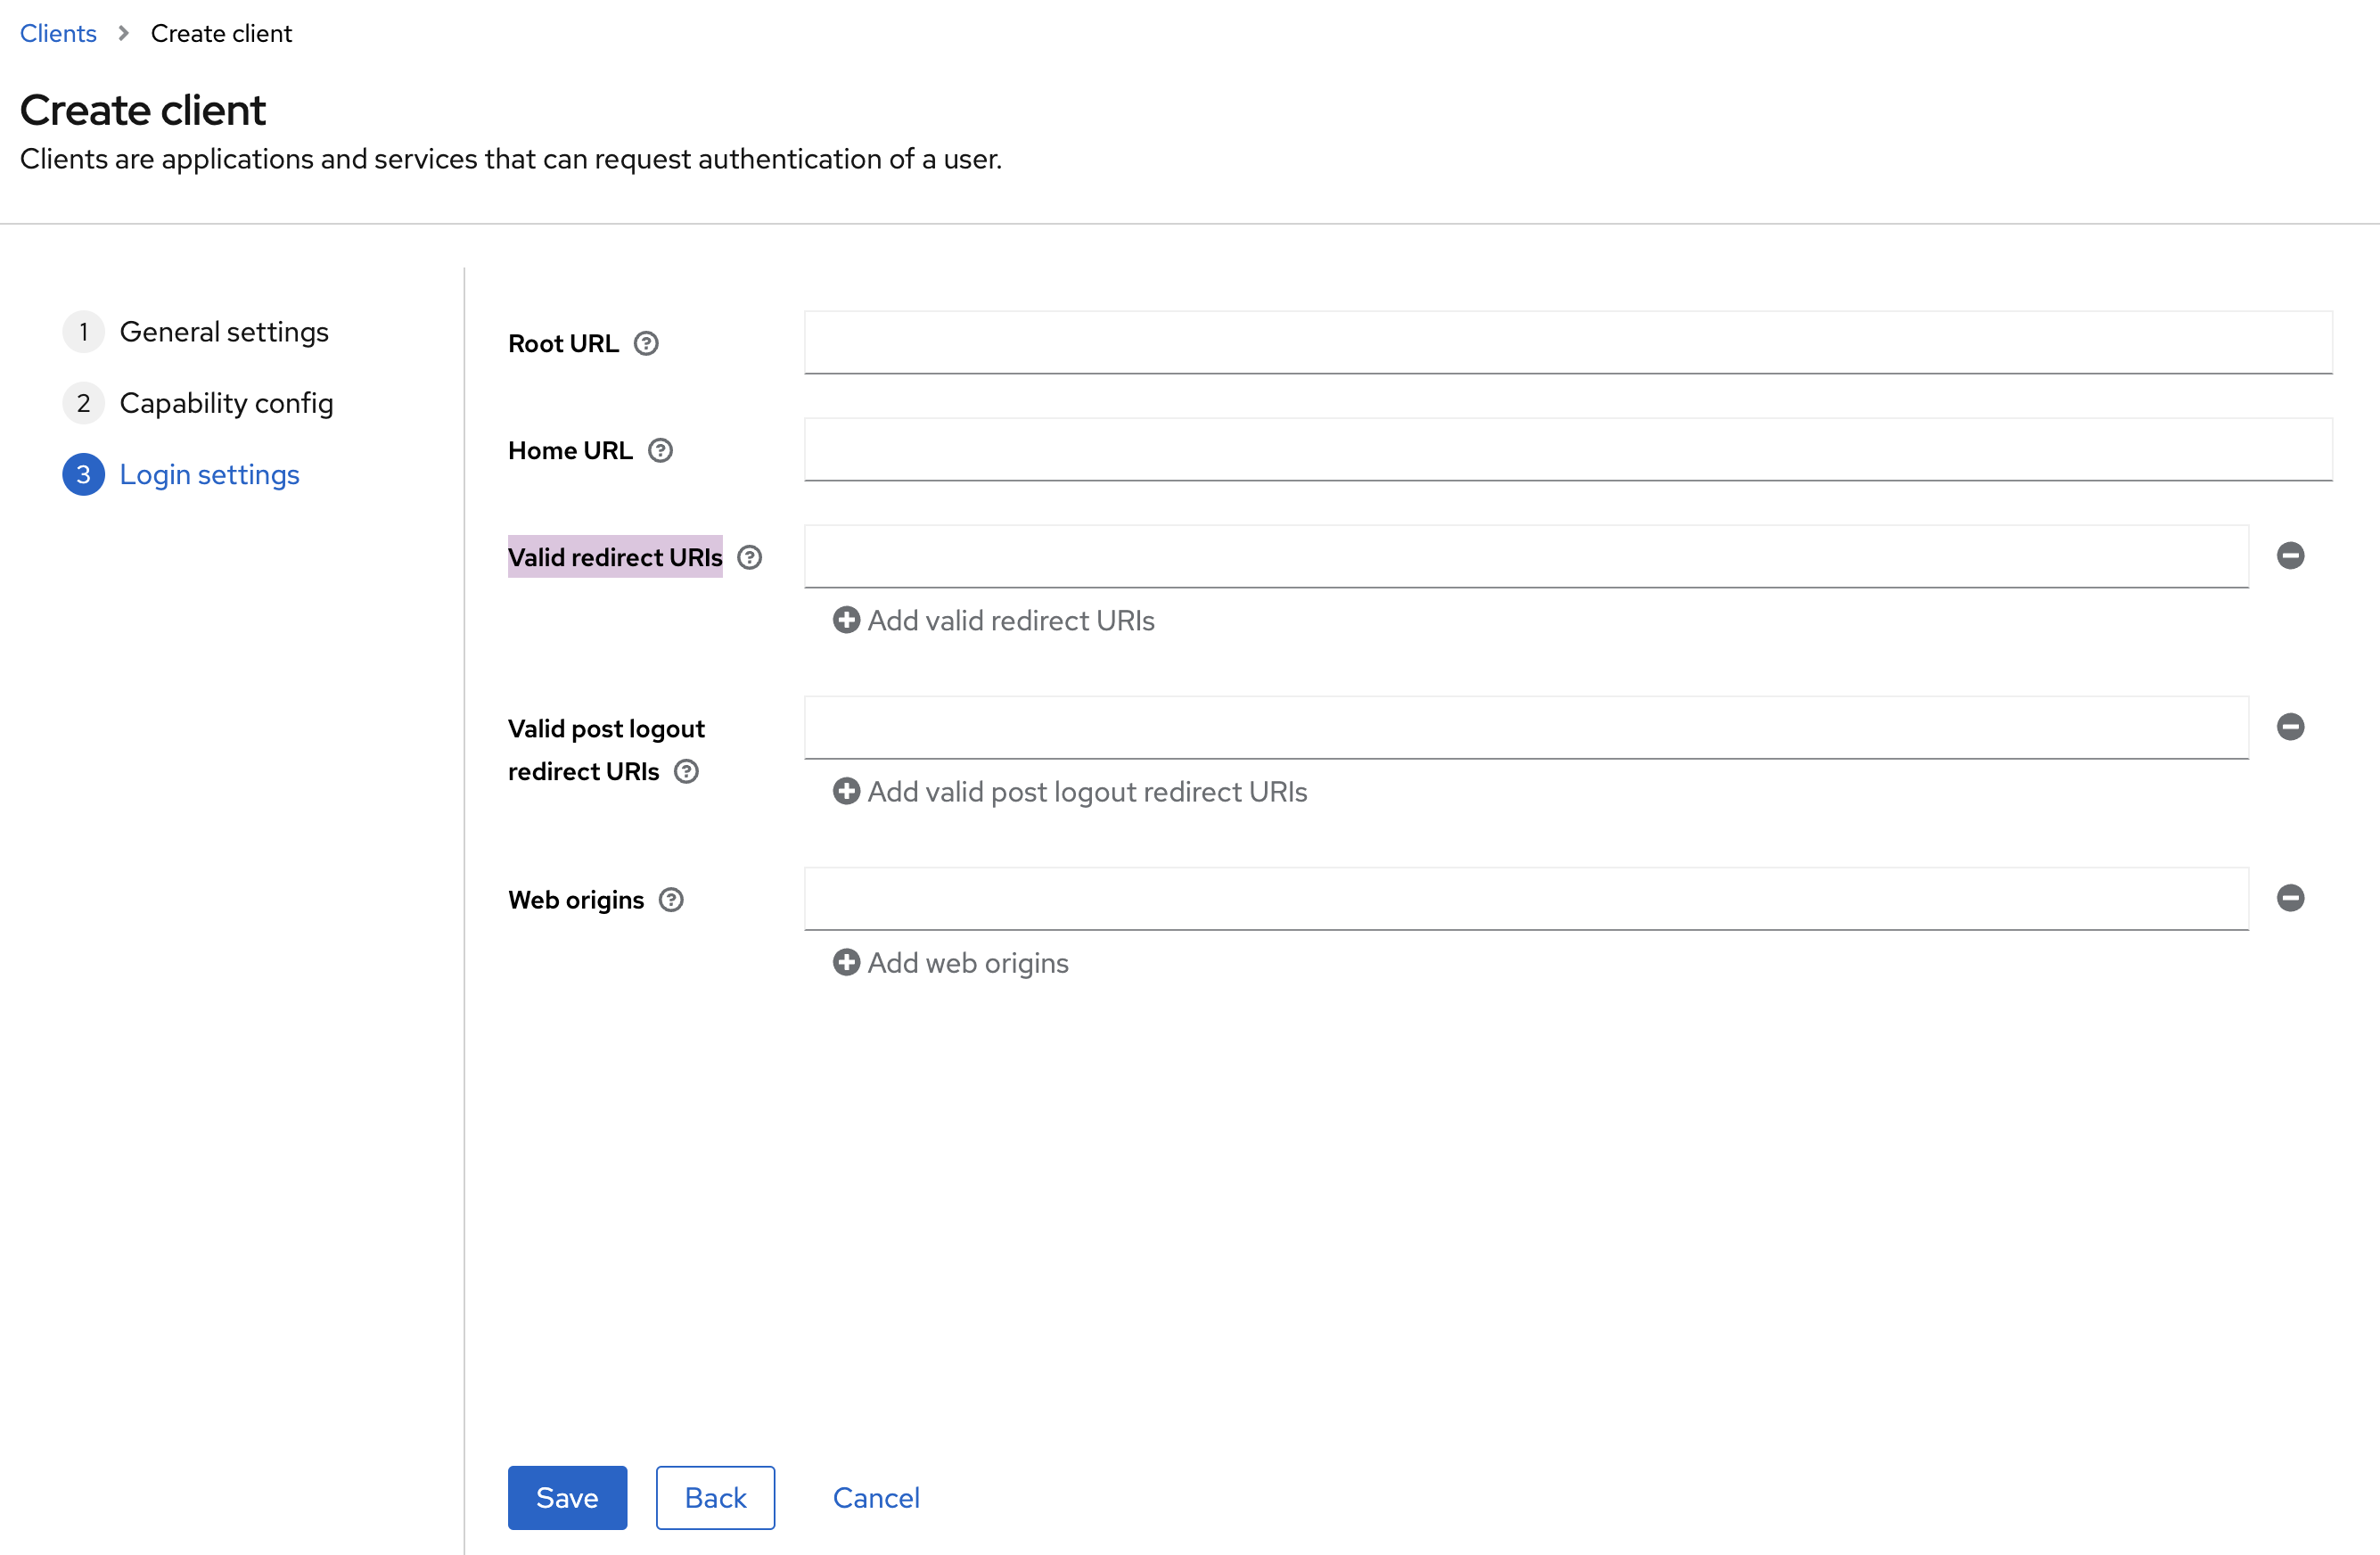
- Click Save to create the client. You will come back to set Valid redirect URIs and Valid post logout redirect URIs later, so that Keycloak can redirect you to the App Connect Dashboard UI after a successful login, and to the landing page after logout respectively. Note that logout is only available on App Connect Operator version 12.4.0 or later and operand version 13.0.1.0-r1 or later.
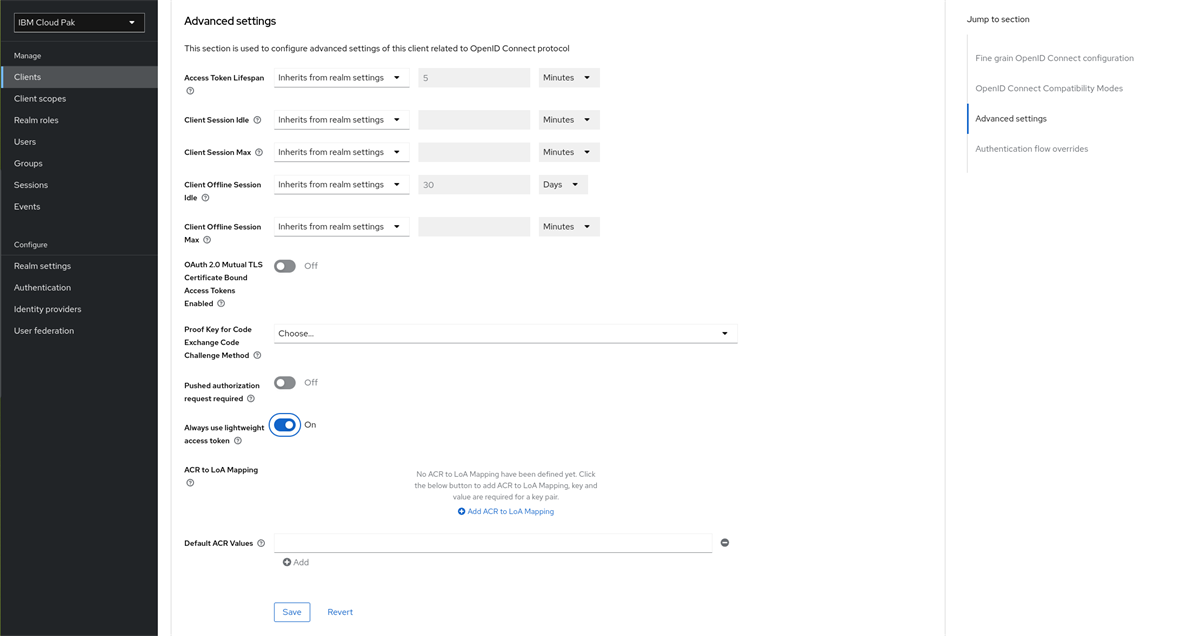
- When using a Keycloak version from v24.0.0 onwards, you should make use of light-weight access tokens. Without light-weight access tokens you may see problems logging in when a user is assigned a large number of roles. On the navigation pane, select Clients. Click the client ID you have created from the Client ID column. Click Advanced, then jump to the Advanced settings section. Toggle on the setting for Always use lightweight access token and then click Save.
-
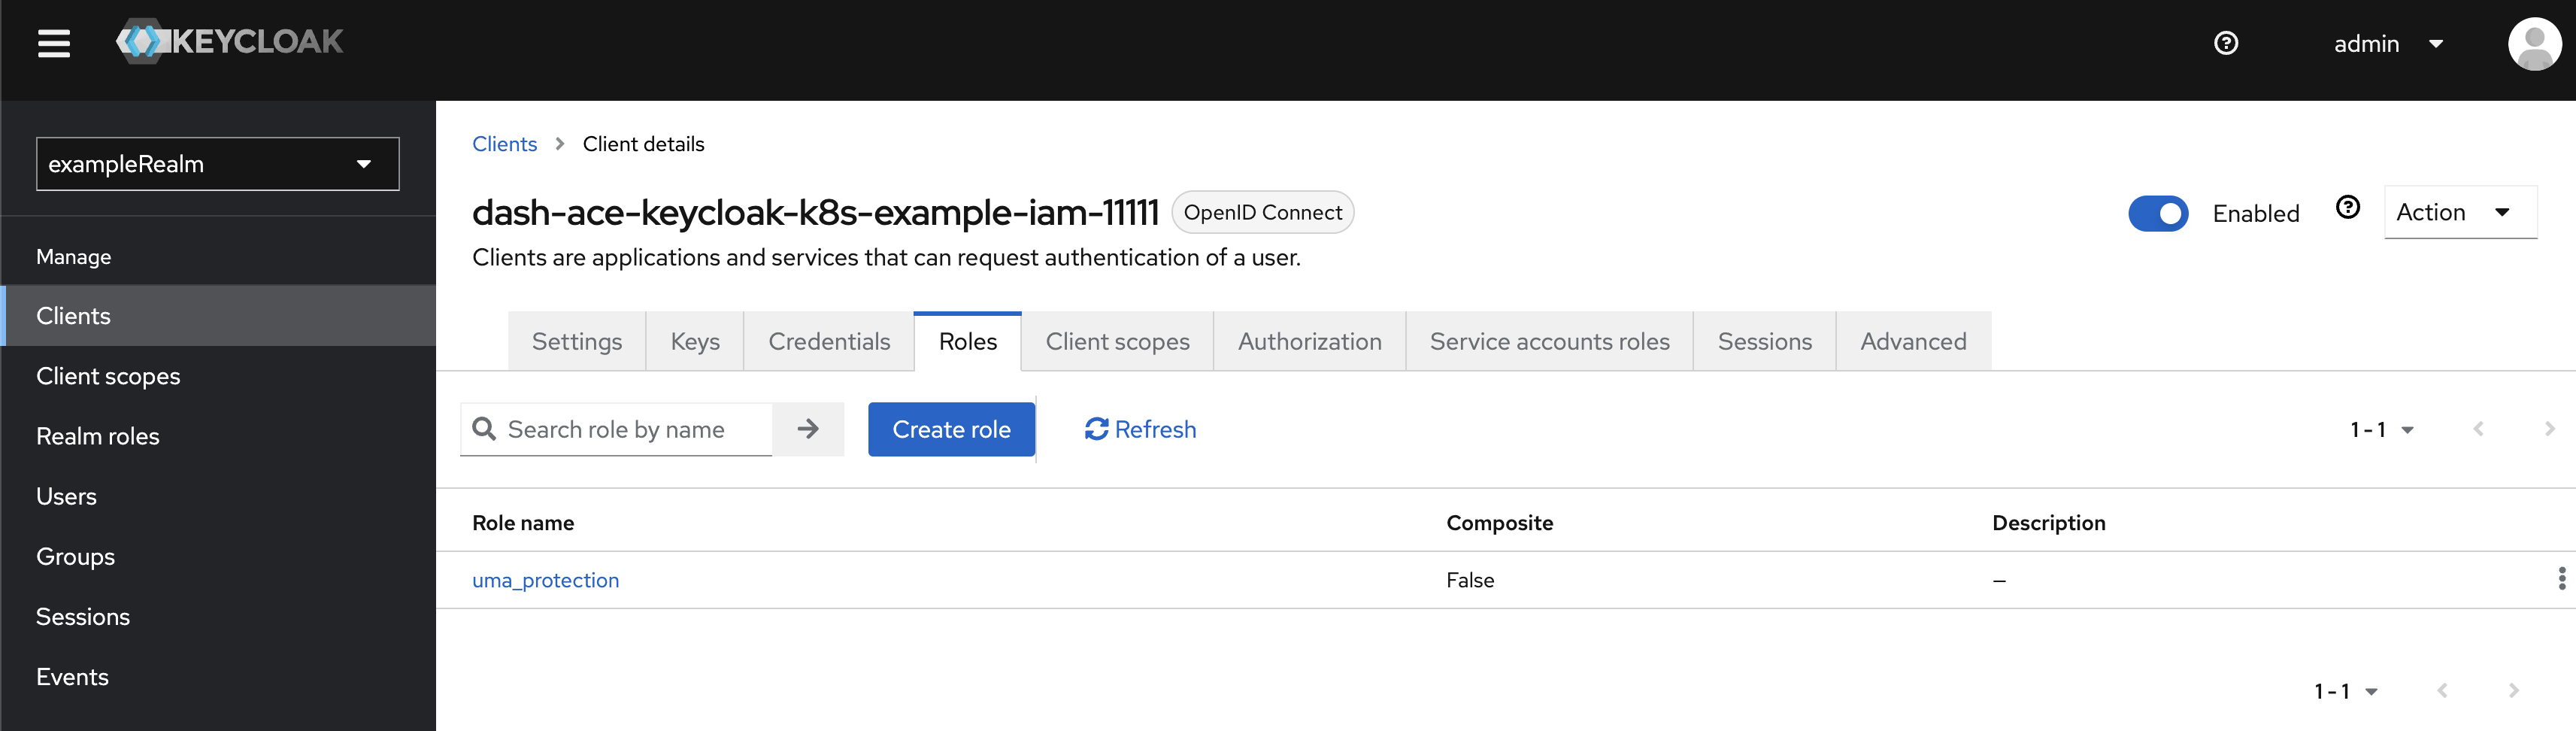
Next you need to configure the client with the available roles and required client scope for App Connect Dashboard. On the navigation pane, select Clients. Click the client ID you have created from the Client ID column.
- To create roles, click Roles, then click Create role. There are two roles available for App Connect Dashboard, which are dashboard-viewer and dashboard-admin. The former gives you a view-only access to the Dashboard, which means you can only view resources. The latter enables you to perform administrative tasks, such as creating an IntegrationRuntime and uploading a BAR file.
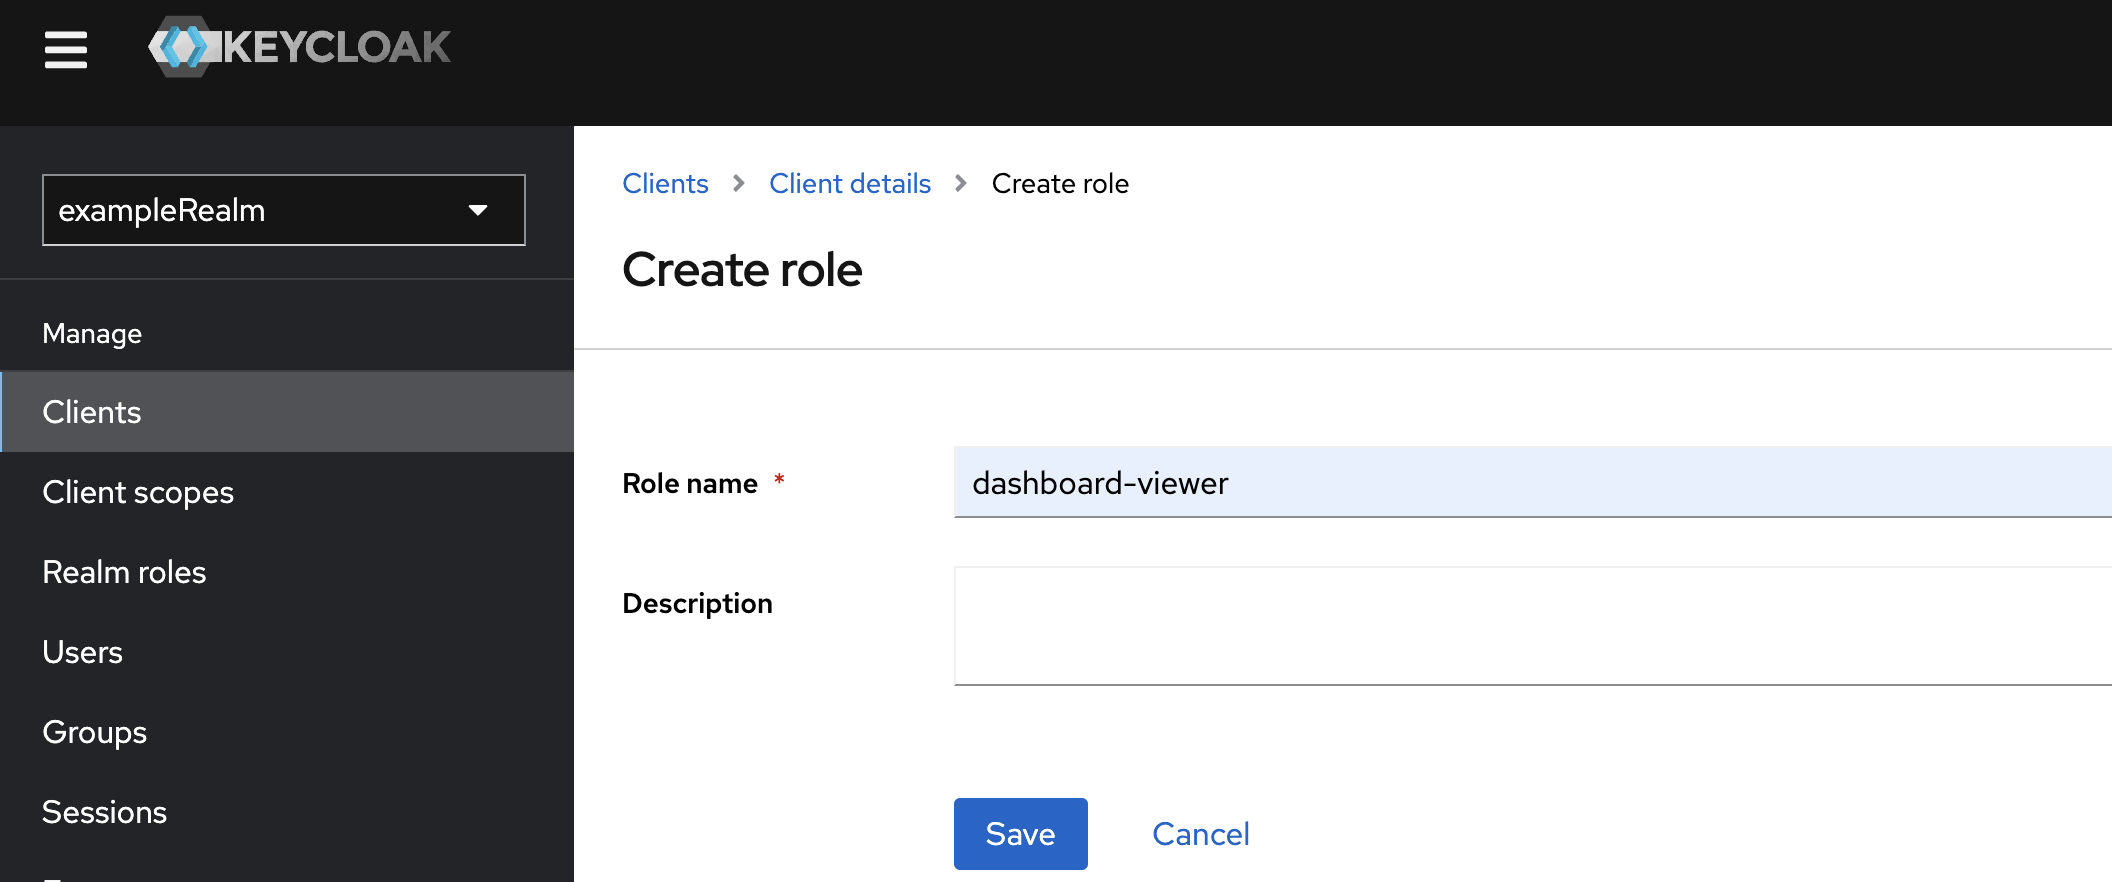
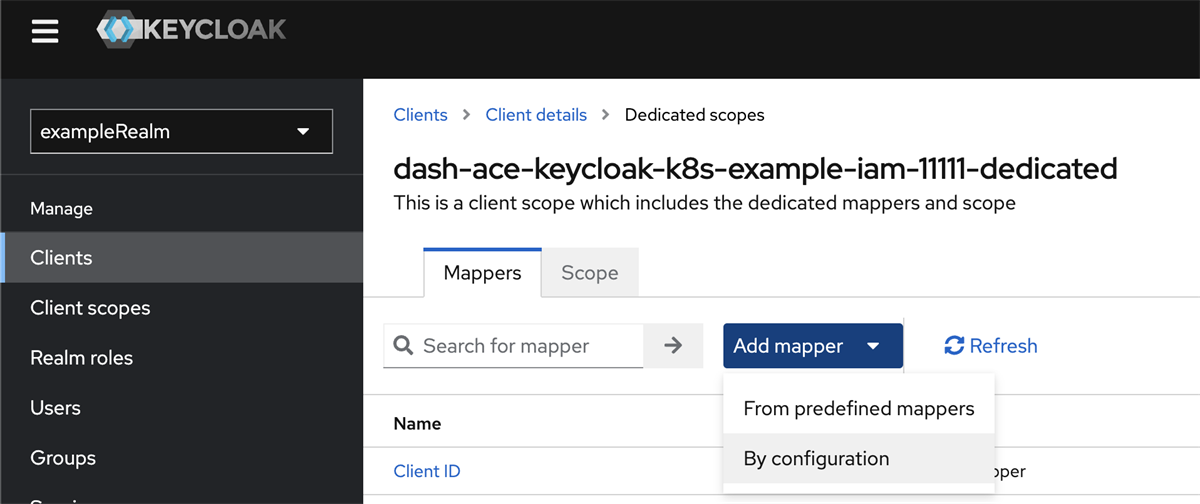
In this tutorial, we will create both roles for the Keycloak client. To create a viewer role, enter dashboard-viewer in Role name and click Save. Next, repeat this step to create a dashboard-admin role. - Now you will add a required mapper to the Keycloak client. Click Client scopes, then click Add client scope. Next, click the client scope named dash-ace-keycloak-k8s-example-iam-11111-dedicated.
Click Add mapper and select By configuration.


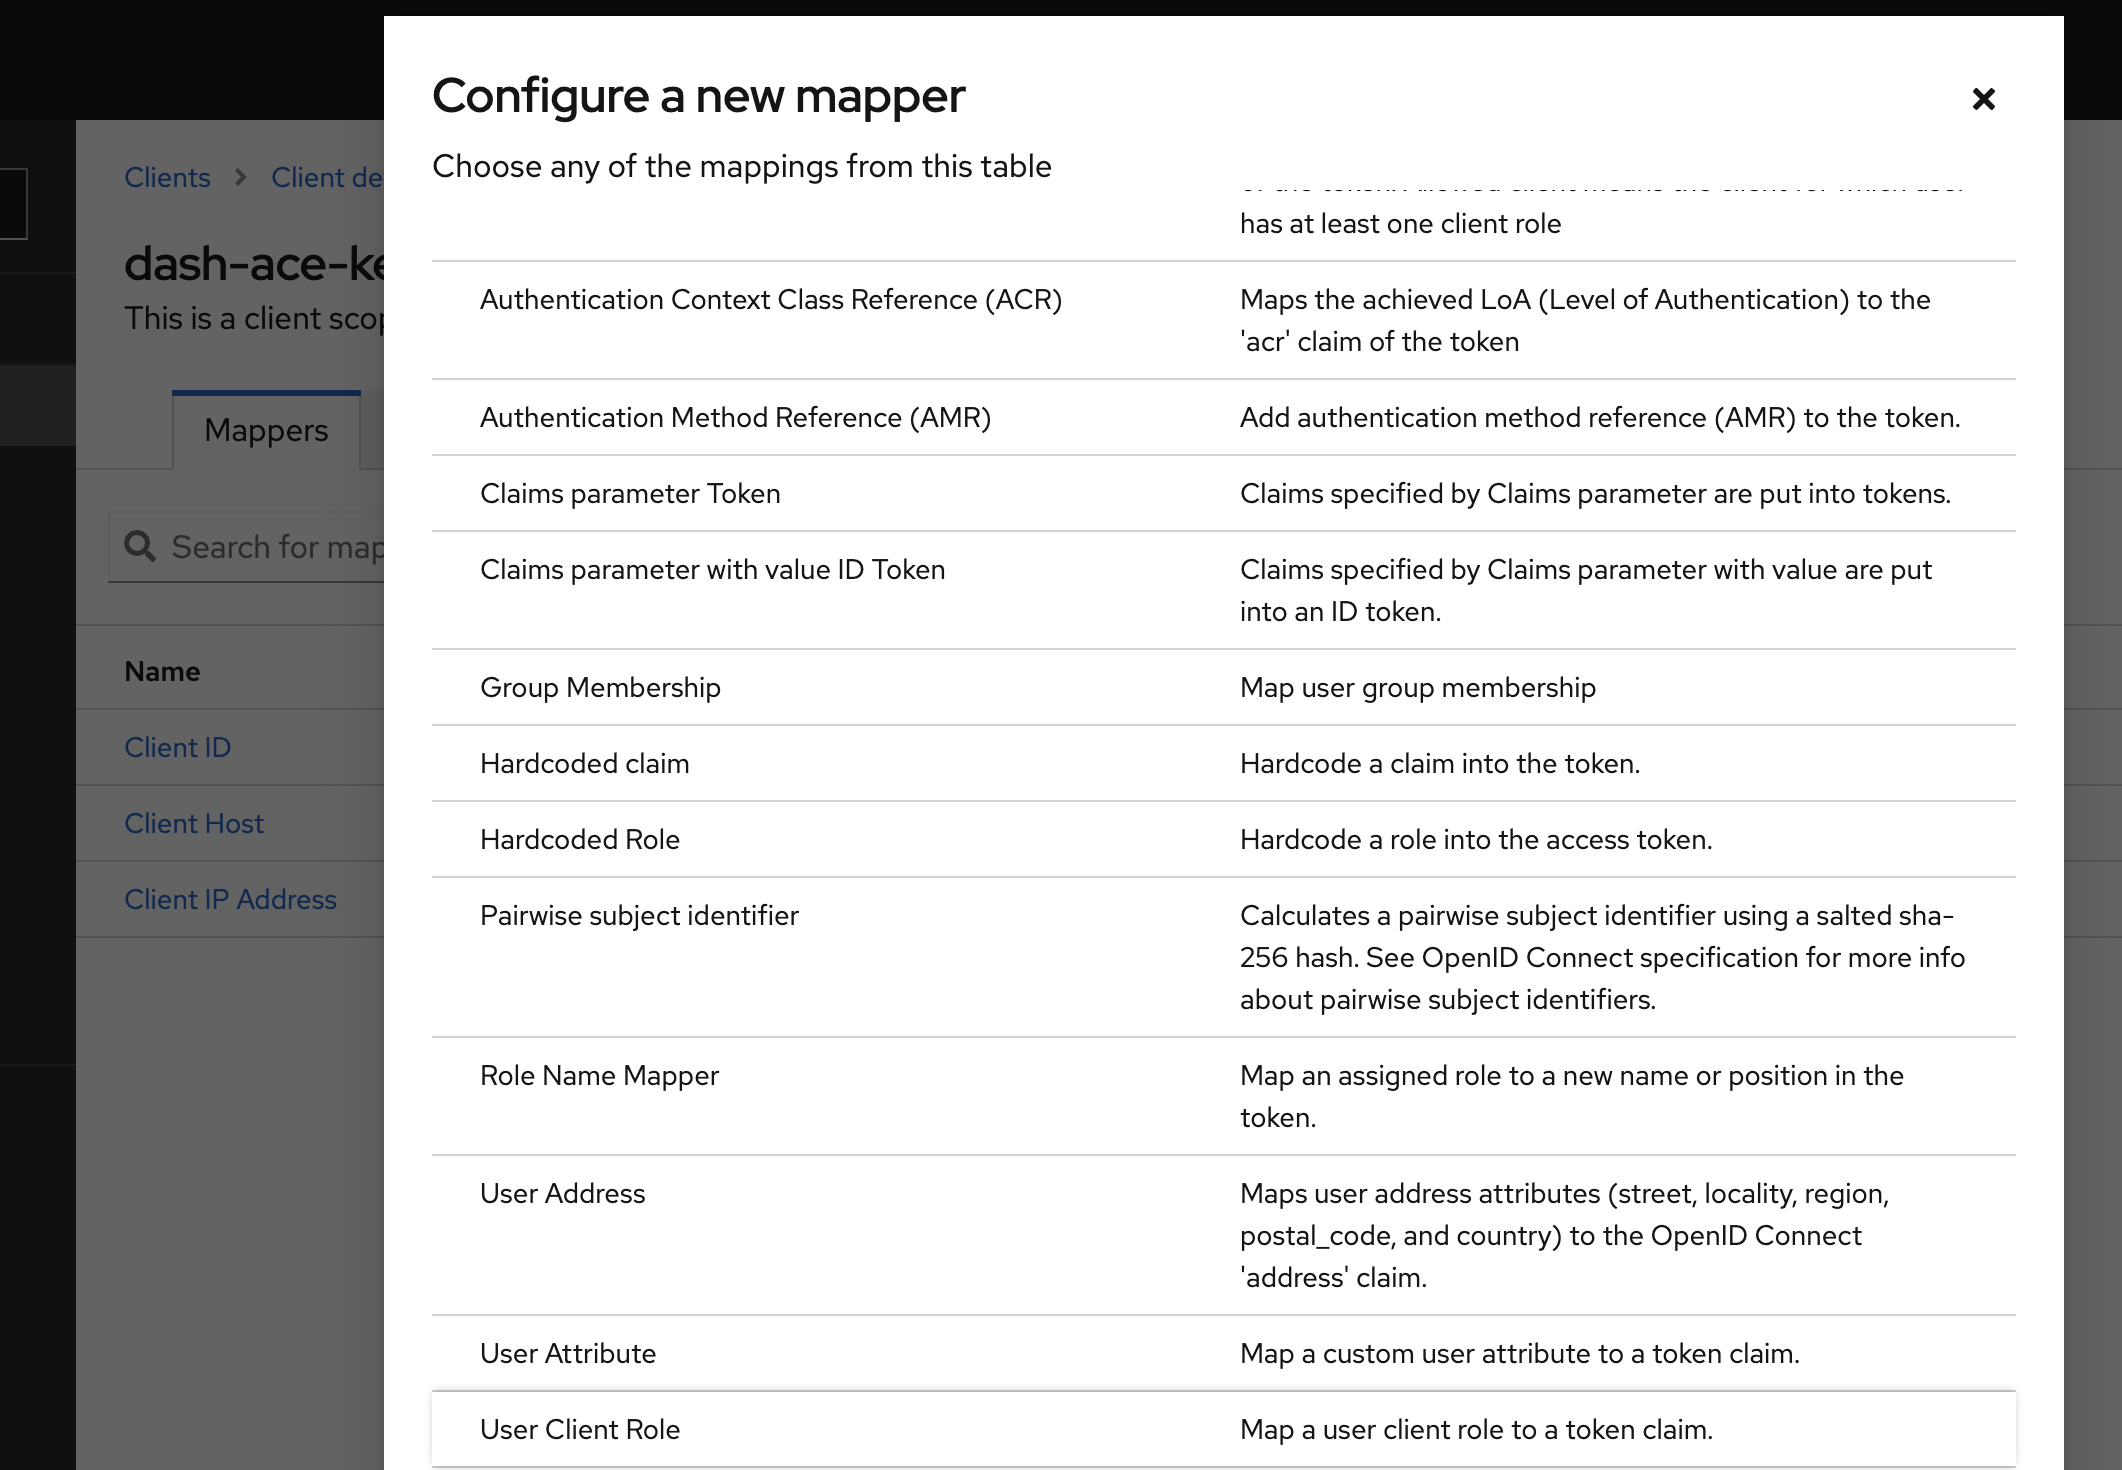
- Set Name to a name of your choice. In this tutorial, we set it to effective-client-role.
- From the Client ID drop-down list, select your Keycloak client.
- Set Token Claim Name to effective-roles, which is a required value for the App Connect Dashboard and Designer Authoring to validate user roles.
- Toggle to enable Multivalued, Add to ID token, Add to access token, Add to lightweight access token, Add to userinfo and Add to token introspection.
- Finally, click Save to complete this mapper.
![Save to complete mapper]()
- Note: The Red Hat Keycloak interface might not have the toggle option for Add to token introspection. In that case, it is enabled by default.
Part 2: Create Keycloak Related Secrets on Your Kubernetes Cluster
- Create a namespace named ace-keycloak-k8s. In this tutorial, this namespace will be used to install these secrets as well as App Connect resources. To create the namespace with the kubectl command, you need to log into your Kubernetes cluster from a terminal, and then run the following command:
kubectl create namespace ace-keycloak-k8s - Secret 1: Keycloak client secret - Create a secret to store credentials of the Keycloak client.
- This secret must contain two key-value pairs. The keys must be named CLIENT_ID and CLIENT_SECRET. Copy the following YAML template into a file named kcClientSecret.yaml.
YAMLkind: Secret apiVersion: v1 metadata: name: dash-ace-keycloak-k8s-example-iam-11111 namespace: ace-keycloak-k8s labels: app: keycloak data: CLIENT_ID: ZGFzaC1hY2Uta2V5Y2xvYWstazhzLWV4YW1wbGUtaWFtLTExMTEx CLIENT_SECRET: modify-this-value type: Opaque
The value of CLIENT_ID is a base64-encoded value of the client ID that you created in part 1. The base64-encoded value can be obtained by running the following command in a terminal:echo -n "dash-ace-keycloak-k8s-example-iam-11111" | base64- Note: You should change metadata.name and the CLIENT_ID values accordingly, when you are creating a client secret for App Connect Designer Authoring.
-
You must replace the value of CLIENT_SECRET with the following steps:
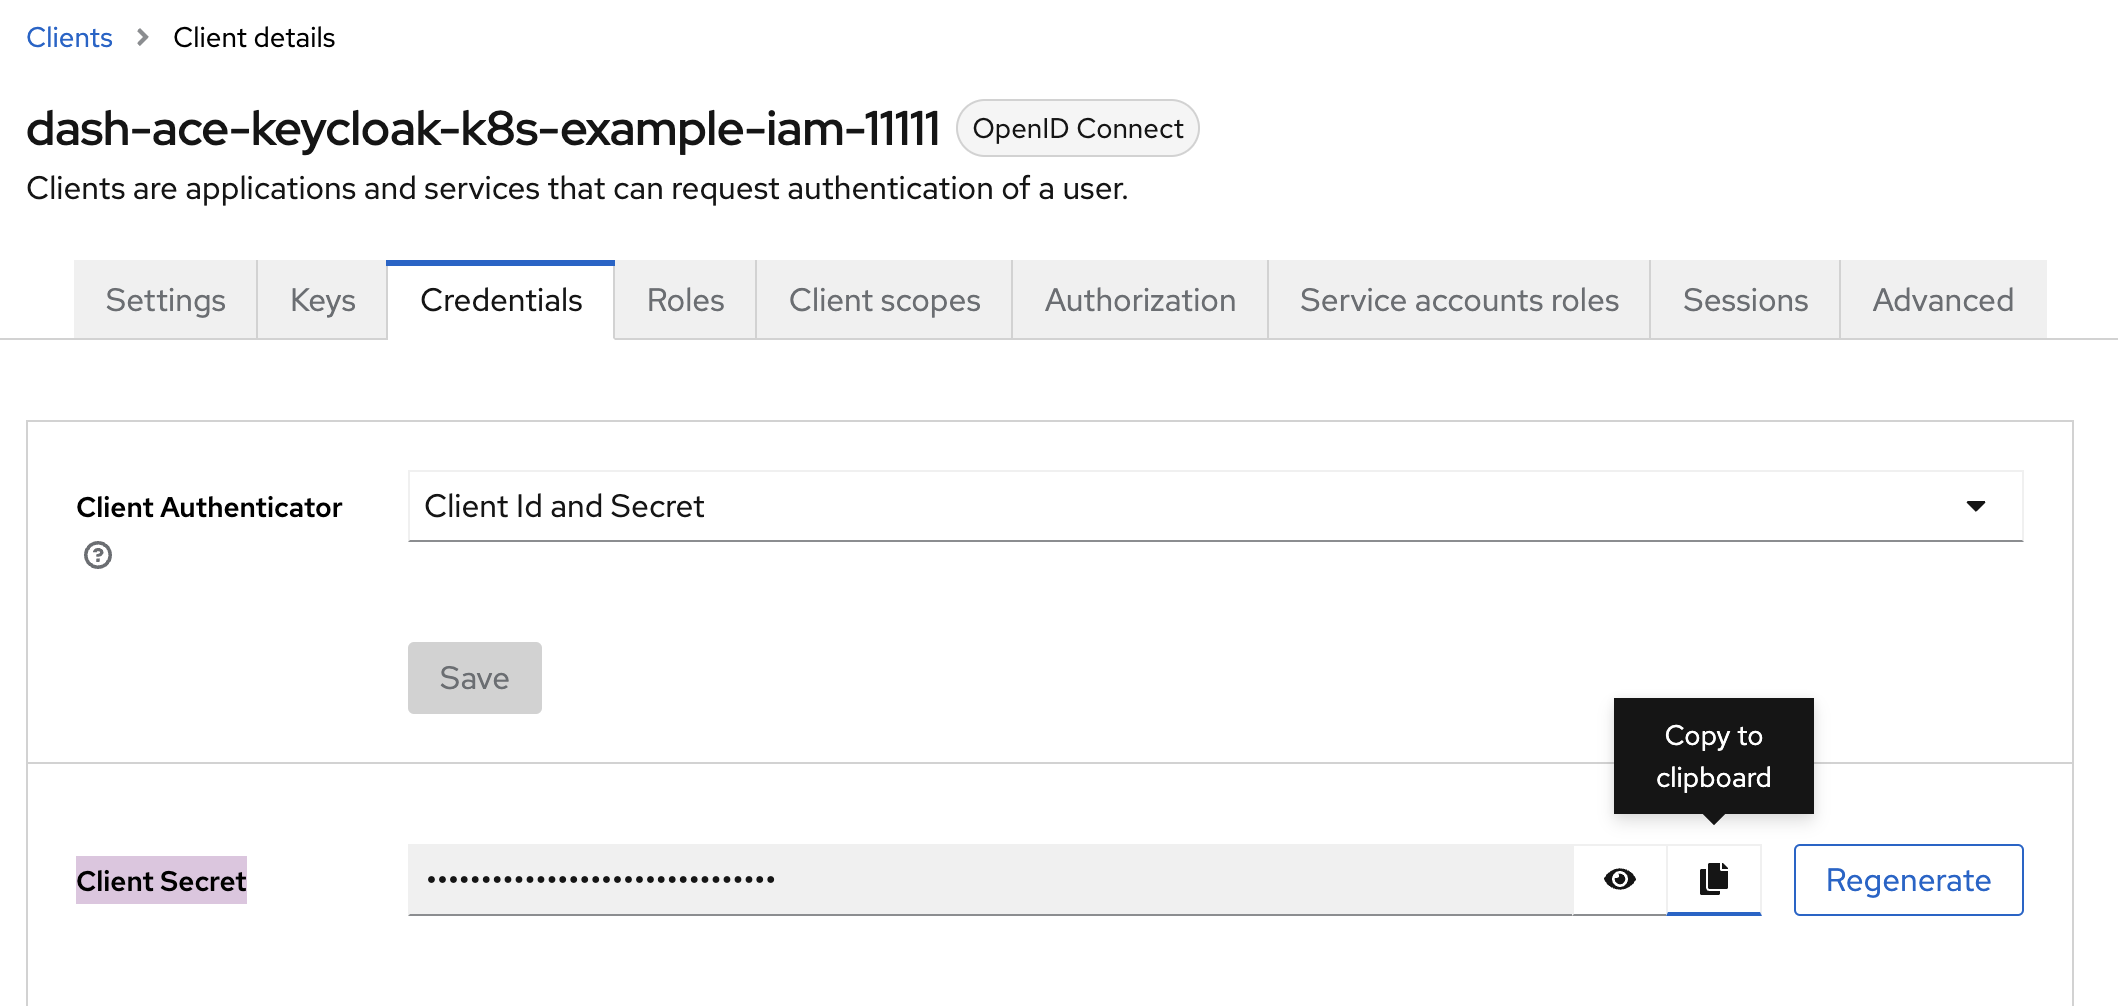
- Select your Keycloak client from the Keycloak admin console, and then click Credentials. Copy the client secret from the Client Secret field. Note that the following example shows a Keycloak client for App Connect Dashboard, you should change the CLIENT_SECRET value accordingly, when you are creating a client secret for Designer Authoring.
- Base64 encode the copied value. For example, run the following command in a terminal:
echo -n "client-secret-value" | base64
- Use the base64-encoded value to set CLIENT_SECRET in the yaml file.
- Create the secret on your cluster by running the following command:
kubectl apply -f kcClientSecret.yaml -n ace-keycloak-k8s
- This secret must contain two key-value pairs. The keys must be named CLIENT_ID and CLIENT_SECRET. Copy the following YAML template into a file named kcClientSecret.yaml.
- Secret 2: CA certificate Secret - Create a secret to store the CA certificate from Keycloak.
This secret must contain a key-value pair. The name of the key is not fixed, but is default to ca.crt. You can specify your own key name, such as myca.crt. In that case, you must specify it in the App Connect Dashboard or Designer Authoring CR fields spec.authentication.integrationKeycloak.tls.caCertificate and spec.authorization.integrationKeycloak.tls.caCertificate.
Copy the following YAML template into a file called kcCASecret.yaml.
YAMLkind: Secret apiVersion: v1 metadata: name: example-tls-secret namespace: ace-keycloak-k8s labels: app: keycloak data: ca.crt: modify-this-value type: Opaque
You must replace the value for ca.crt with the following steps:- See your Certification Authority to obtain the CA certificate.
- Base64 encode the CA certificate. For example, in a terminal, run the following command:
echo -n "-----BEGIN CERTIFICATE-----abcdefg-----END CERTIFICATE-----" | base64 - Use the base64-encoded value to set the value for ca.crt in the yaml file.
- Create the secret on your cluster by running the following command:
kubectl apply -f kcCASecret.yaml -n ace-keycloak-k8s
Part 3: Create an App Connect Dashboard To Use Your Keycloak Instance
- On Kubernetes, create an ingress resource for your App Connect Dashboard. Follow the documentation to create one and note down the spec.tls.hosts in the ingress YAML file.
Note: With App Connect Operator 12.8.0 or later, an App Connect Dashboard at version 13.0.2.1-r1 or later supports ingress out of the box on IBM Cloud Kubernetes Service. So, to automatically create an ingress resource for your Dashboard, simply set spec.ingress.enabled to true in the Dashboard CR, as described in the Creating ingress resources for your App Connect Dashboard and integration runtimes out of the box on IBM Cloud Kubernetes Service blog.
- Copy the following YAML template into a file named dashboard_iam.yaml.
YAML
apiVersion: appconnect.ibm.com/v1beta1 kind: Dashboard metadata: name: example-iam-dash labels: backup.appconnect.ibm.com/component: dashboard namespace: ace-keycloak-k8s spec: api: enabled: true license: accept: true license: L-XRNH-47FJAW use: AppConnectEnterpriseProduction pod: containers: content-server: resources: limits: memory: 512Mi requests: cpu: 50m memory: 50Mi control-ui: resources: limits: memory: 512Mi requests: cpu: 50m memory: 125Mi imagePullSecrets: - name: ibm-entitlement-key switchServer: name: default authentication: integrationKeycloak: auth: clientSecretName: dash-ace-keycloak-k8s-example-iam-11111 enabled: true endpoint: 'https://example-keycloak.test.com' realm: exampleRealm tls: secretName: exmaple-tls-secret ingressHost: example-iam.example-keycloak.test.com authorization: integrationKeycloak: auth: clientSecretName: dash-ace-keycloak-k8s-example-iam-11111 enabled: true endpoint: 'https://example-keycloak.test.com' realm: exampleRealm tls: secretName: exmaple-tls-secret ingressHost: example-iam.example-keycloak.test.com storage: size: 5Gi type: persistent-claim class: ibmc-file-gold-gid displayMode: IntegrationRuntimes replicas: 1 version: '12.0.12.3-r1' - Set spec.authentication.integrationKeycloak.auth.clientSecretName and spec.authorization.integrationKeycloak.auth.clientSecretName to dash-ace-keycloak-k8s-example-iam-11111. This is the client secret that was created in part 2.
- Ensure spec.authentication.integrationKeycloak.enabled and spec.authorization.integrationKeycloak.enabled are set to true, which enables authentication and authorization for App Connect Dashboard.
- Set spec.authentication.integrationKeycloak.endpoint and spec.authorization.integrationKeycloak.endpoint to the URL of Keycloak endpoint. You can find the value in the KC_HOST environment variable in your Keycloak pod. Run the following command to get the value:
kubectl get pod <keycloak-pod-name> -n <namespace-for-keycloak-pod> -o=jsonpath='{.spec.containers[0].env[?(@.name == "KC_HOSTNAME")].value}'- Note: If the endpoints are not provided, whilst authentication and authorization are enabled, the IBM® Cloud Pak foundational services must be installed to provide authentication and authorization for App Connect Dashboard and Designer Authoring. This is supported on OCP only.
- Set spec.authentication.integrationKeycloak.realm and spec.authorization.integrationKeycloak.realm to the Keycloak realm, where the Keycloak client dash-ace-keycloak-k8s-example-iam-11111 exists. In this tutorial, it is exampleRealm.
- Set spec.authentication.integrationKeycloak.tls.secretName and spec.authorization.integrationKeycloak.tls.secretName to example-tls-secret. This is the CA secret that was created in part 2. Because we used the default name ca.crt for the CA secret, we do not need to specify spec.authorization.integrationKeycloak.tls.caCertificate and spec.authorization.integrationKeycloak.tls.caCertificate. Therefore the caCertificate fields are not included in the example CR dashboard_iam.yaml.
- Set spec.authentication.integrationKeycloak.tls.ingressHost and spec.authorization.integrationKeycloak.tls.ingressHost to the spec.tls.hosts value obtained in step 1.
Note: Skip step 8 if you are creating a Dashboard instance at version 13.0.2.1-r1 or later and have set spec.ingress.enabled to true in the Dashboard CR.
- Follow the documentation on entitlement key to create a ibm-entitlement-key Secret. This enables you to download the required images for App Connect Dashboard.
- Follow the documentation on Dashboard storage to set spec.storage.class.
- (Optional) Set spec.version to 12.0 to pick up the latest App Connect Dashboard operand version.
- Create the App Connect Dashboard resource with the following command:
kubectl apply -f dashboard_iam.yaml -n ace-keycloak-k8s
Part 4: Access your App Connect Dashboard
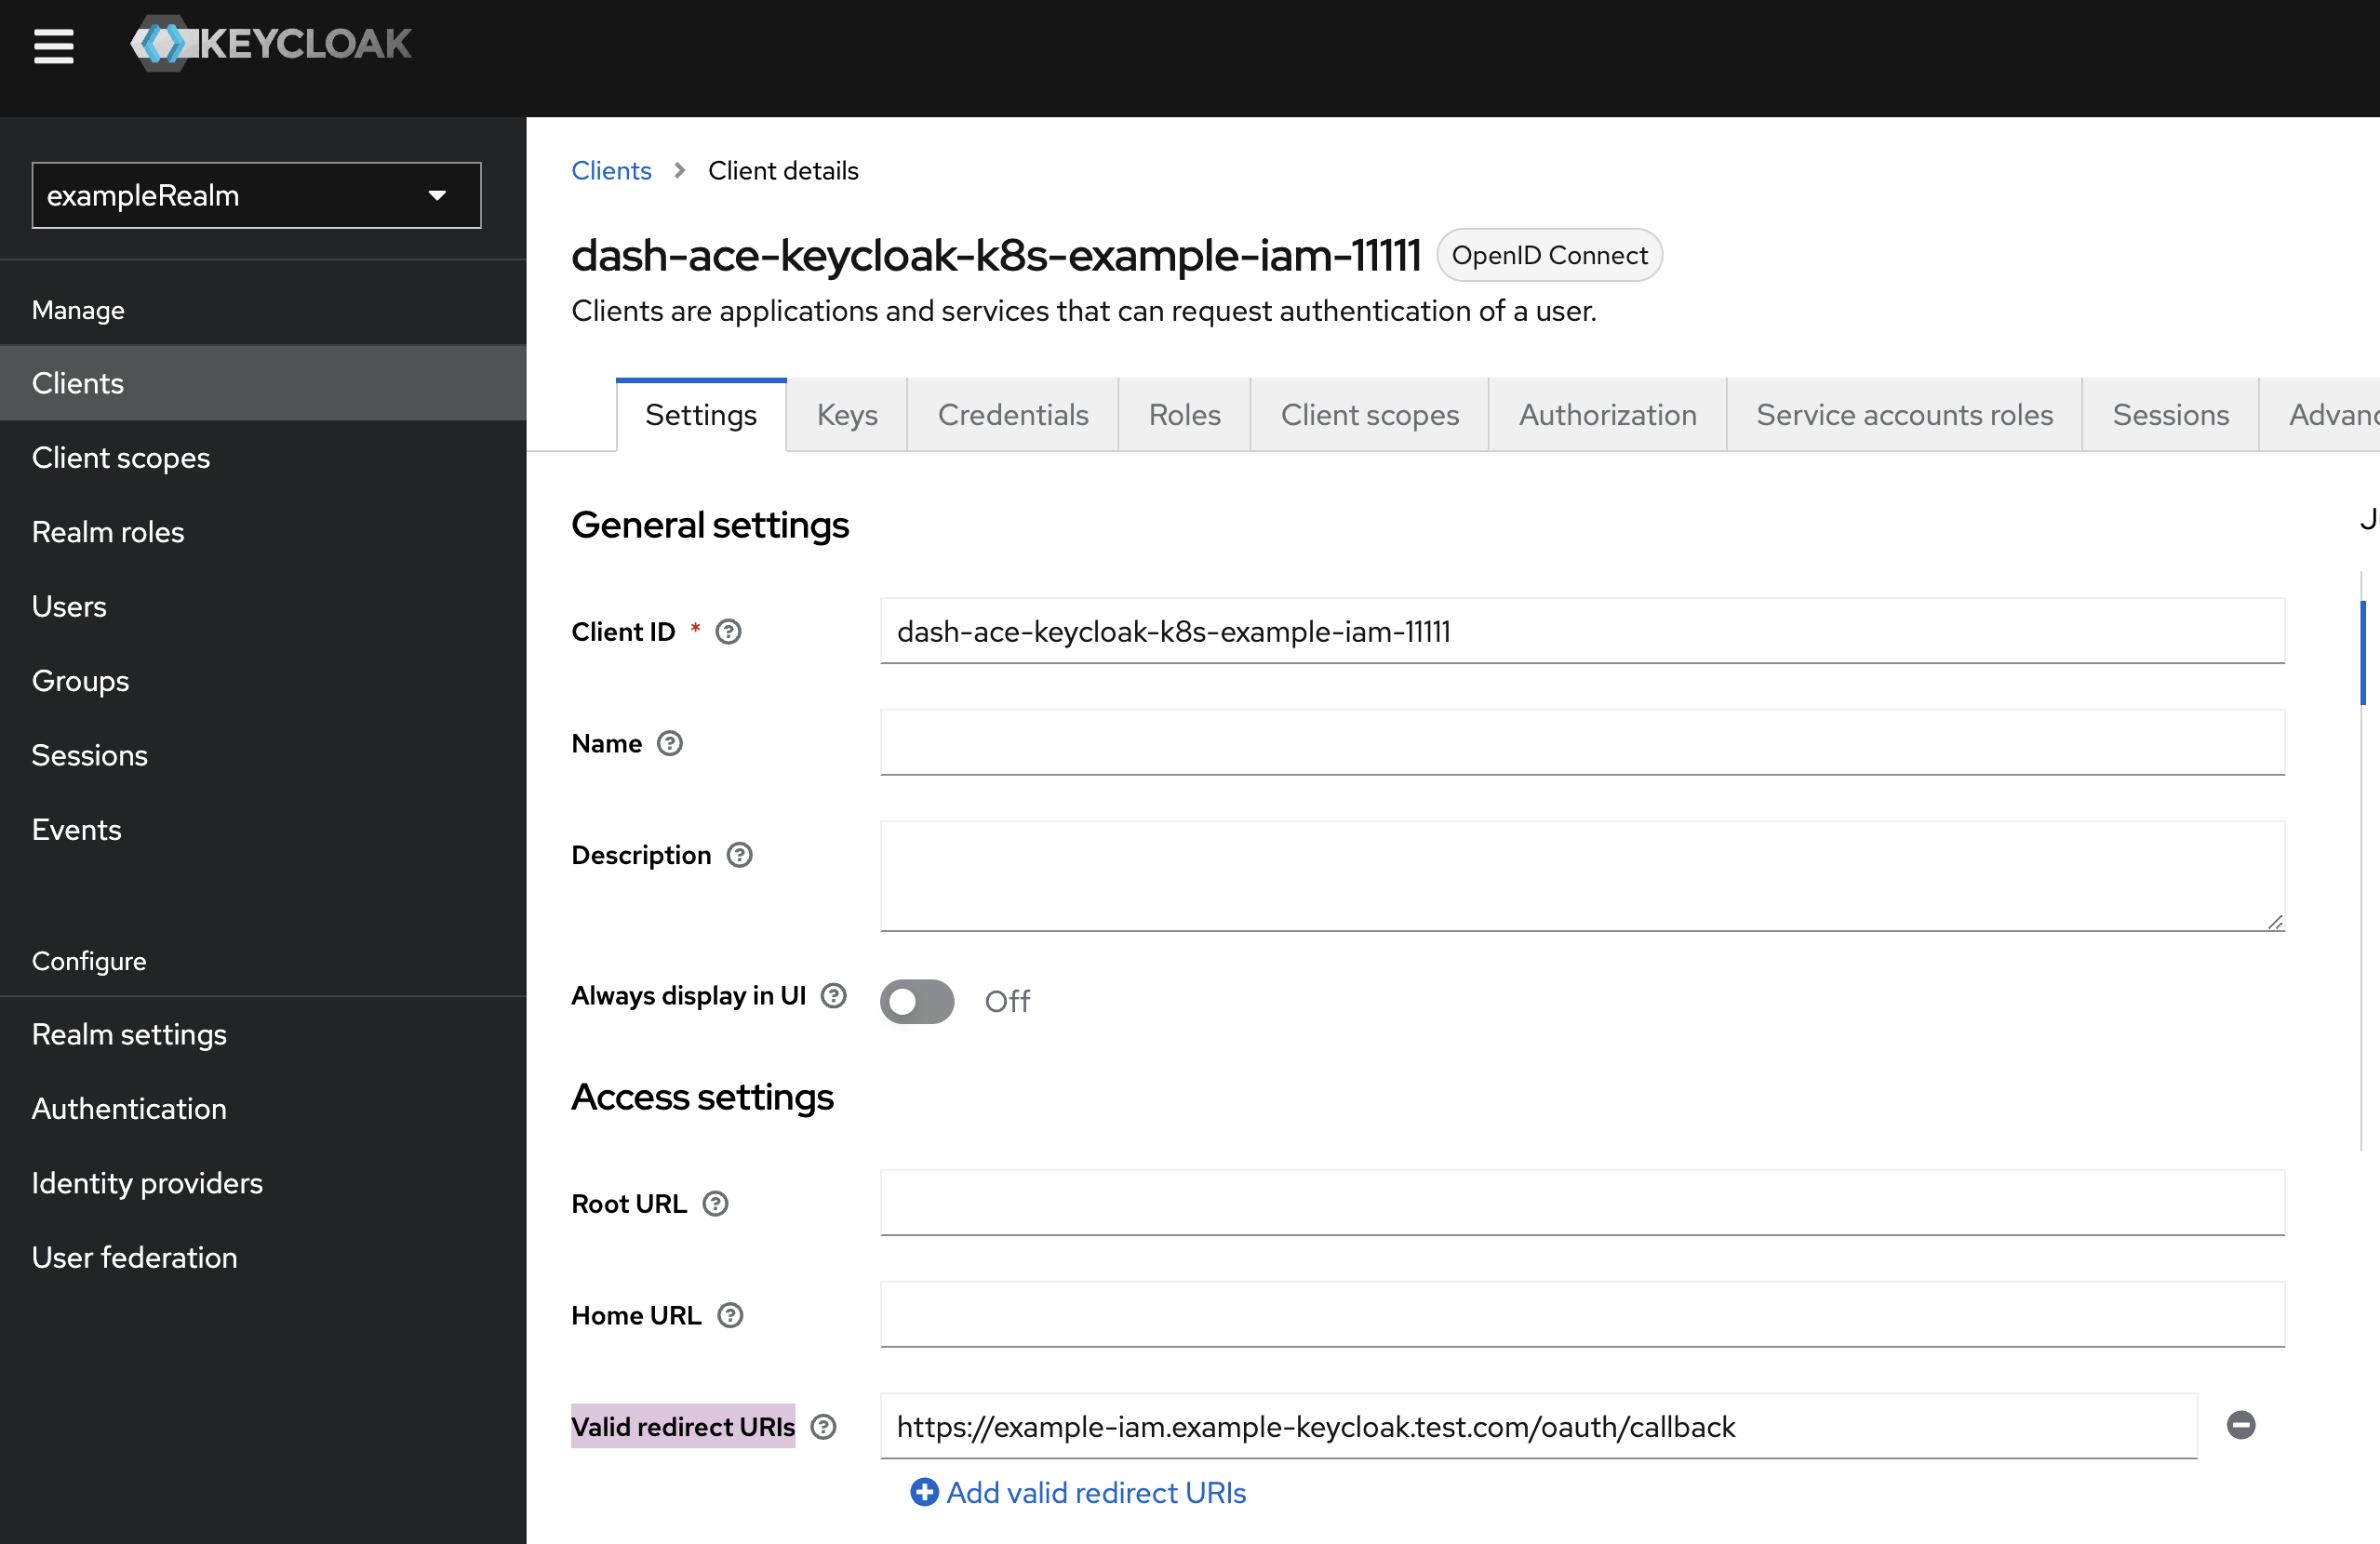
- From your Keycloak admin console, use the navigation pane to select a realm from the drop-down list. In this tutorial, we have set up a realm called exampleRealm. Next, on the navigation pane, select Clients and click the client dash-ace-keycloak-k8s-example-iam-11111.
- Set Valid redirect URIs to <ACE_INGRESS_HOSTNAME>/oauth/callback. ACE_INGRESS_HOSTNAME is the URL of the App Connect Dashboard UI. You can obtain the value of ACE_INGRESS_HOSTNAME with the following command:
kubectl get configmap example-iam-dash-dash -o=jsonpath='{.data.ACE_INGRESS_HOSTNAME}' -n ace-keycloak-k8s
The name of the configmap resource is in the format of <dashboard metadata.name>-dash. - If you are on App Connect Operator version 12.4.0 or later and Dashboard operand version 13.0.1.0-r1 or later, set Valid post logout redirect URIs to https://<ACE_INGRESS_HOSTNAME>.
- Now you need to create a user to log in to the Dashboard. To do so, you can follow steps 6 to 10 in the Create a user and configure user roles section of the Keycloak tutorial for IBM® App Connect Operator version 11.0.0.
- In a Web browser, navigate to <ACE_INGRESS_HOSTNAME>. As a result, a request is sent to the control-ui container in the Dashboard pod. With information on the Keycloak client and Keycloak endpoint, the request is redirected to Keycloak to provide authentication and authorization for App Connect Dashboard. You can use the user created in step 3 to log in.
- If you are directed to an error page, refer to the troubleshooting section.
-
Keycloak validates the user information, and forwards the request to the Valid redirect URIs that you configured in the Keycloak client. As a result, congratulations, you are now logged into the App Connect Dashboard.

Scenario 2: Create and Access App Connect Designer Authoring With Your Keycloak Instance on Kubernetes
Part 1: Create a Keycloak Client for App Connect Designer Authoring
- Step 2: Set the client ID to designer-ace-keycloak-k8s-example-iam-11111.
- Step 5 and 6: Ensure the client ID designer-ace-keycloak-k8s-example-iam-11111 is selected.
- Step 7: Instead of creating Dashboard specific roles, you need to create a role for App Connect Designer Authoring. There is one role available, which is designerauthoring-admin. The role enables you to perform administrative tasks, such as creating and importing a flow.
- Step 8: In addition to adding a mapper named User Client Role, which is also required by App Connect Designer Authoring, you need to add three new mappers for App Connect Designer Authoring as follows:
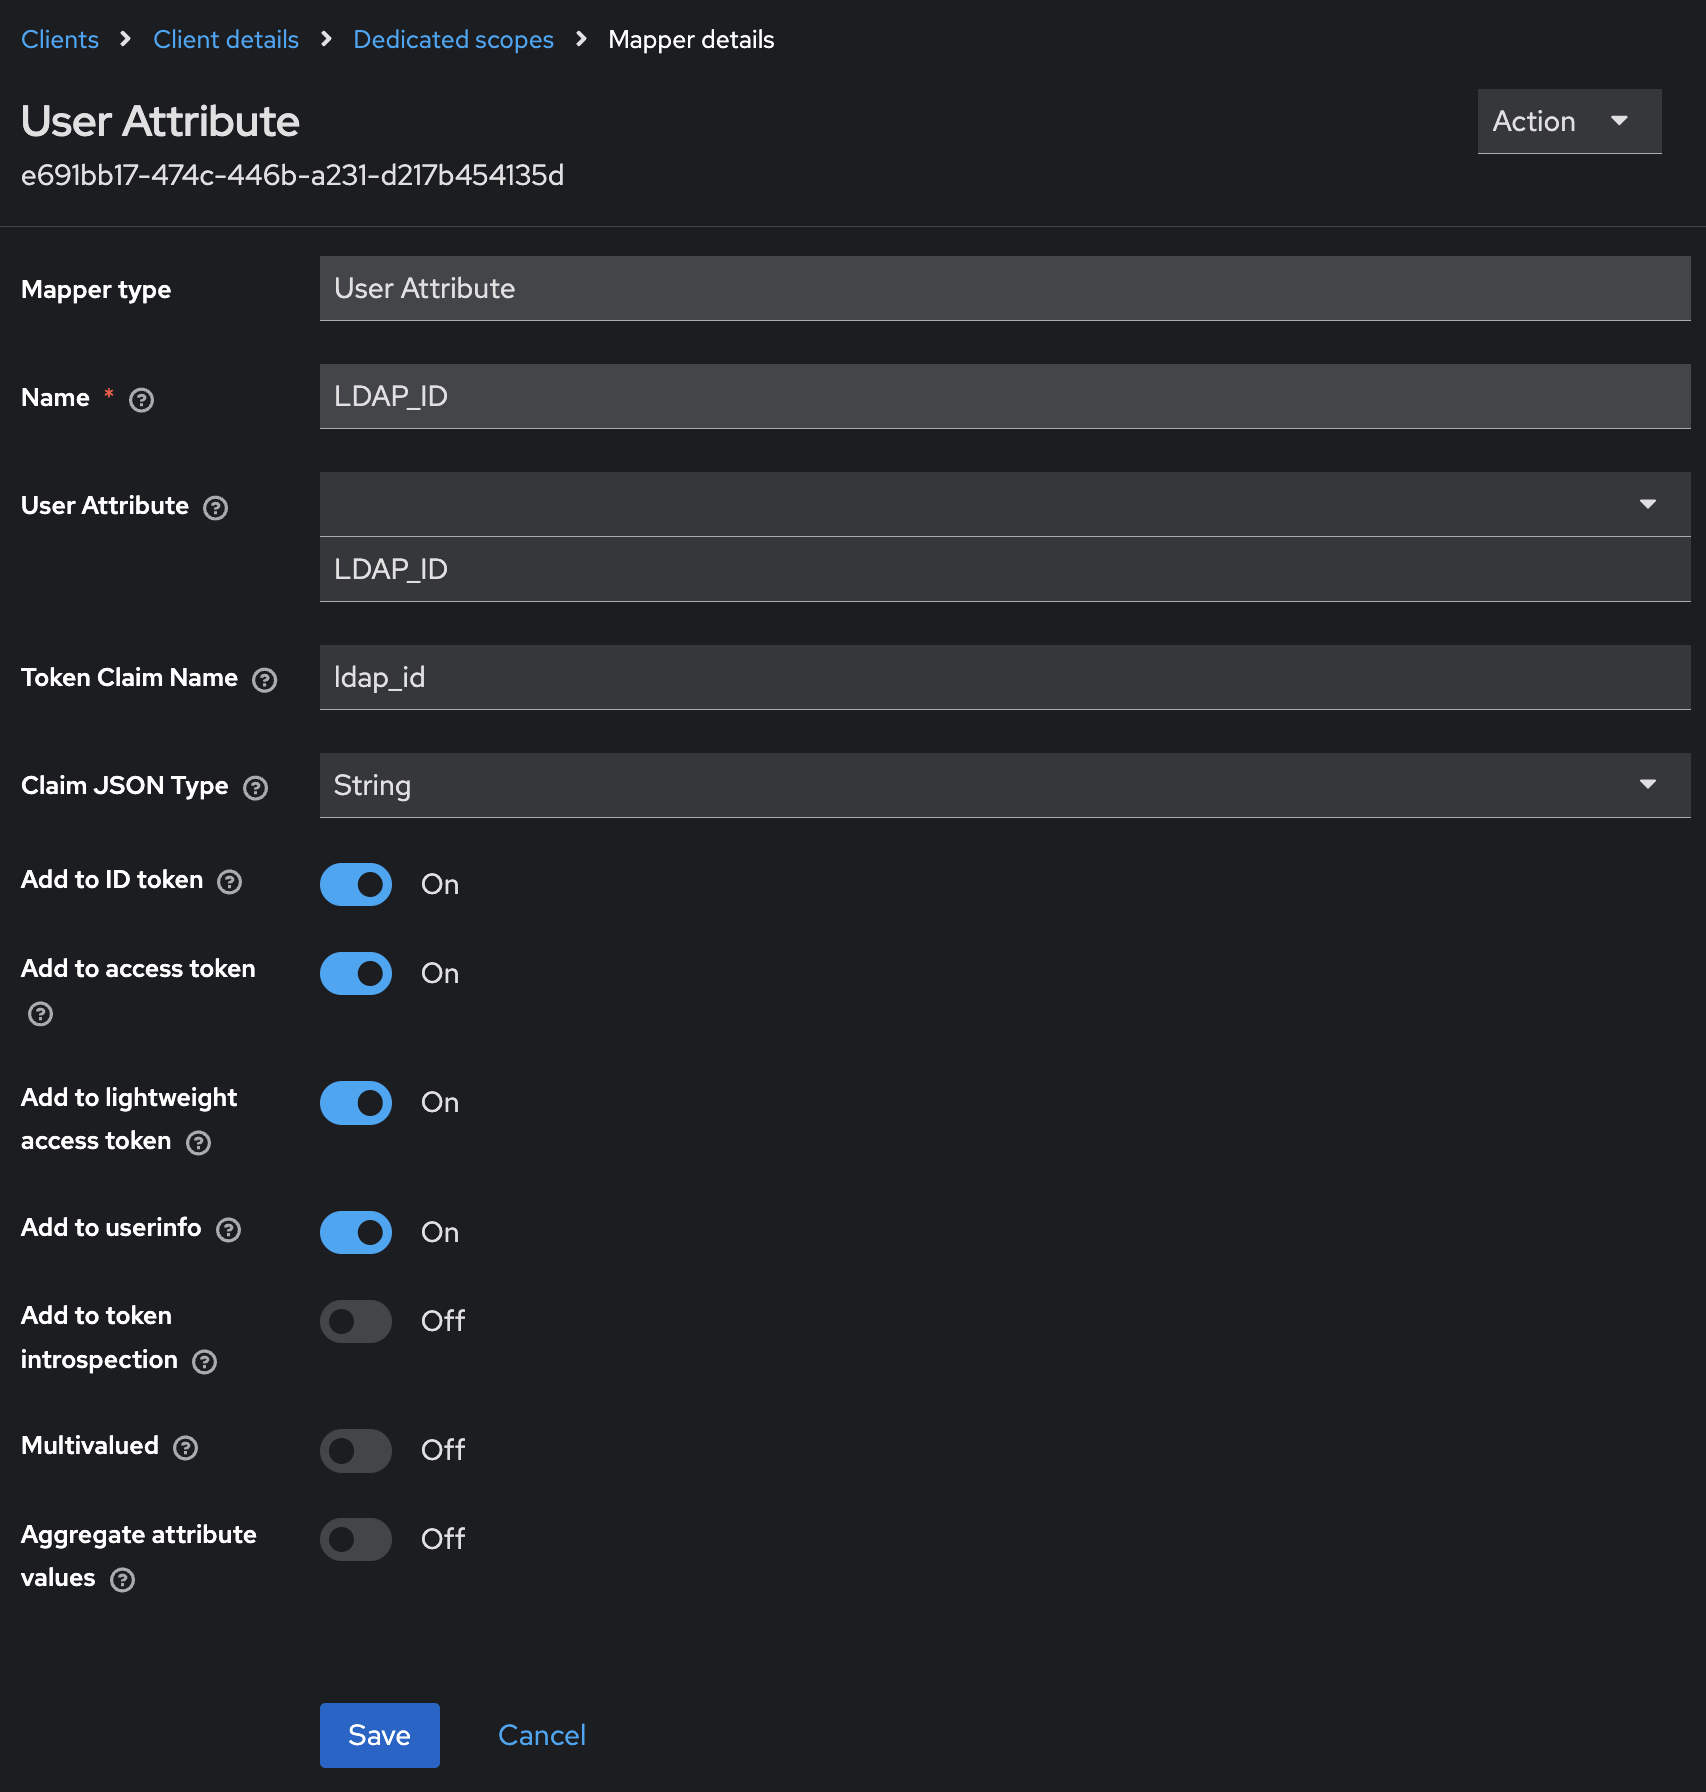
- Add a mapper of the User Attribute type:
- Click Add mapper and select By configuration. Click User Attribute from the table of predefined mappings.
- Set Name to a name of your choice. In this tutorial, we set it to LDAP_ID.
- Set User Attribute to LDAP_ID.
- Set Token Claim Name to ldap_id, which is a required value for the App Connect Designer Authoring to validate user roles.
- Toggle to enable Add to ID token, Add to access token, Add to lightweight access token and Add to userinfo.
- Finally, click Save to complete this mapper.
![Click Save to complete this mapper.]()
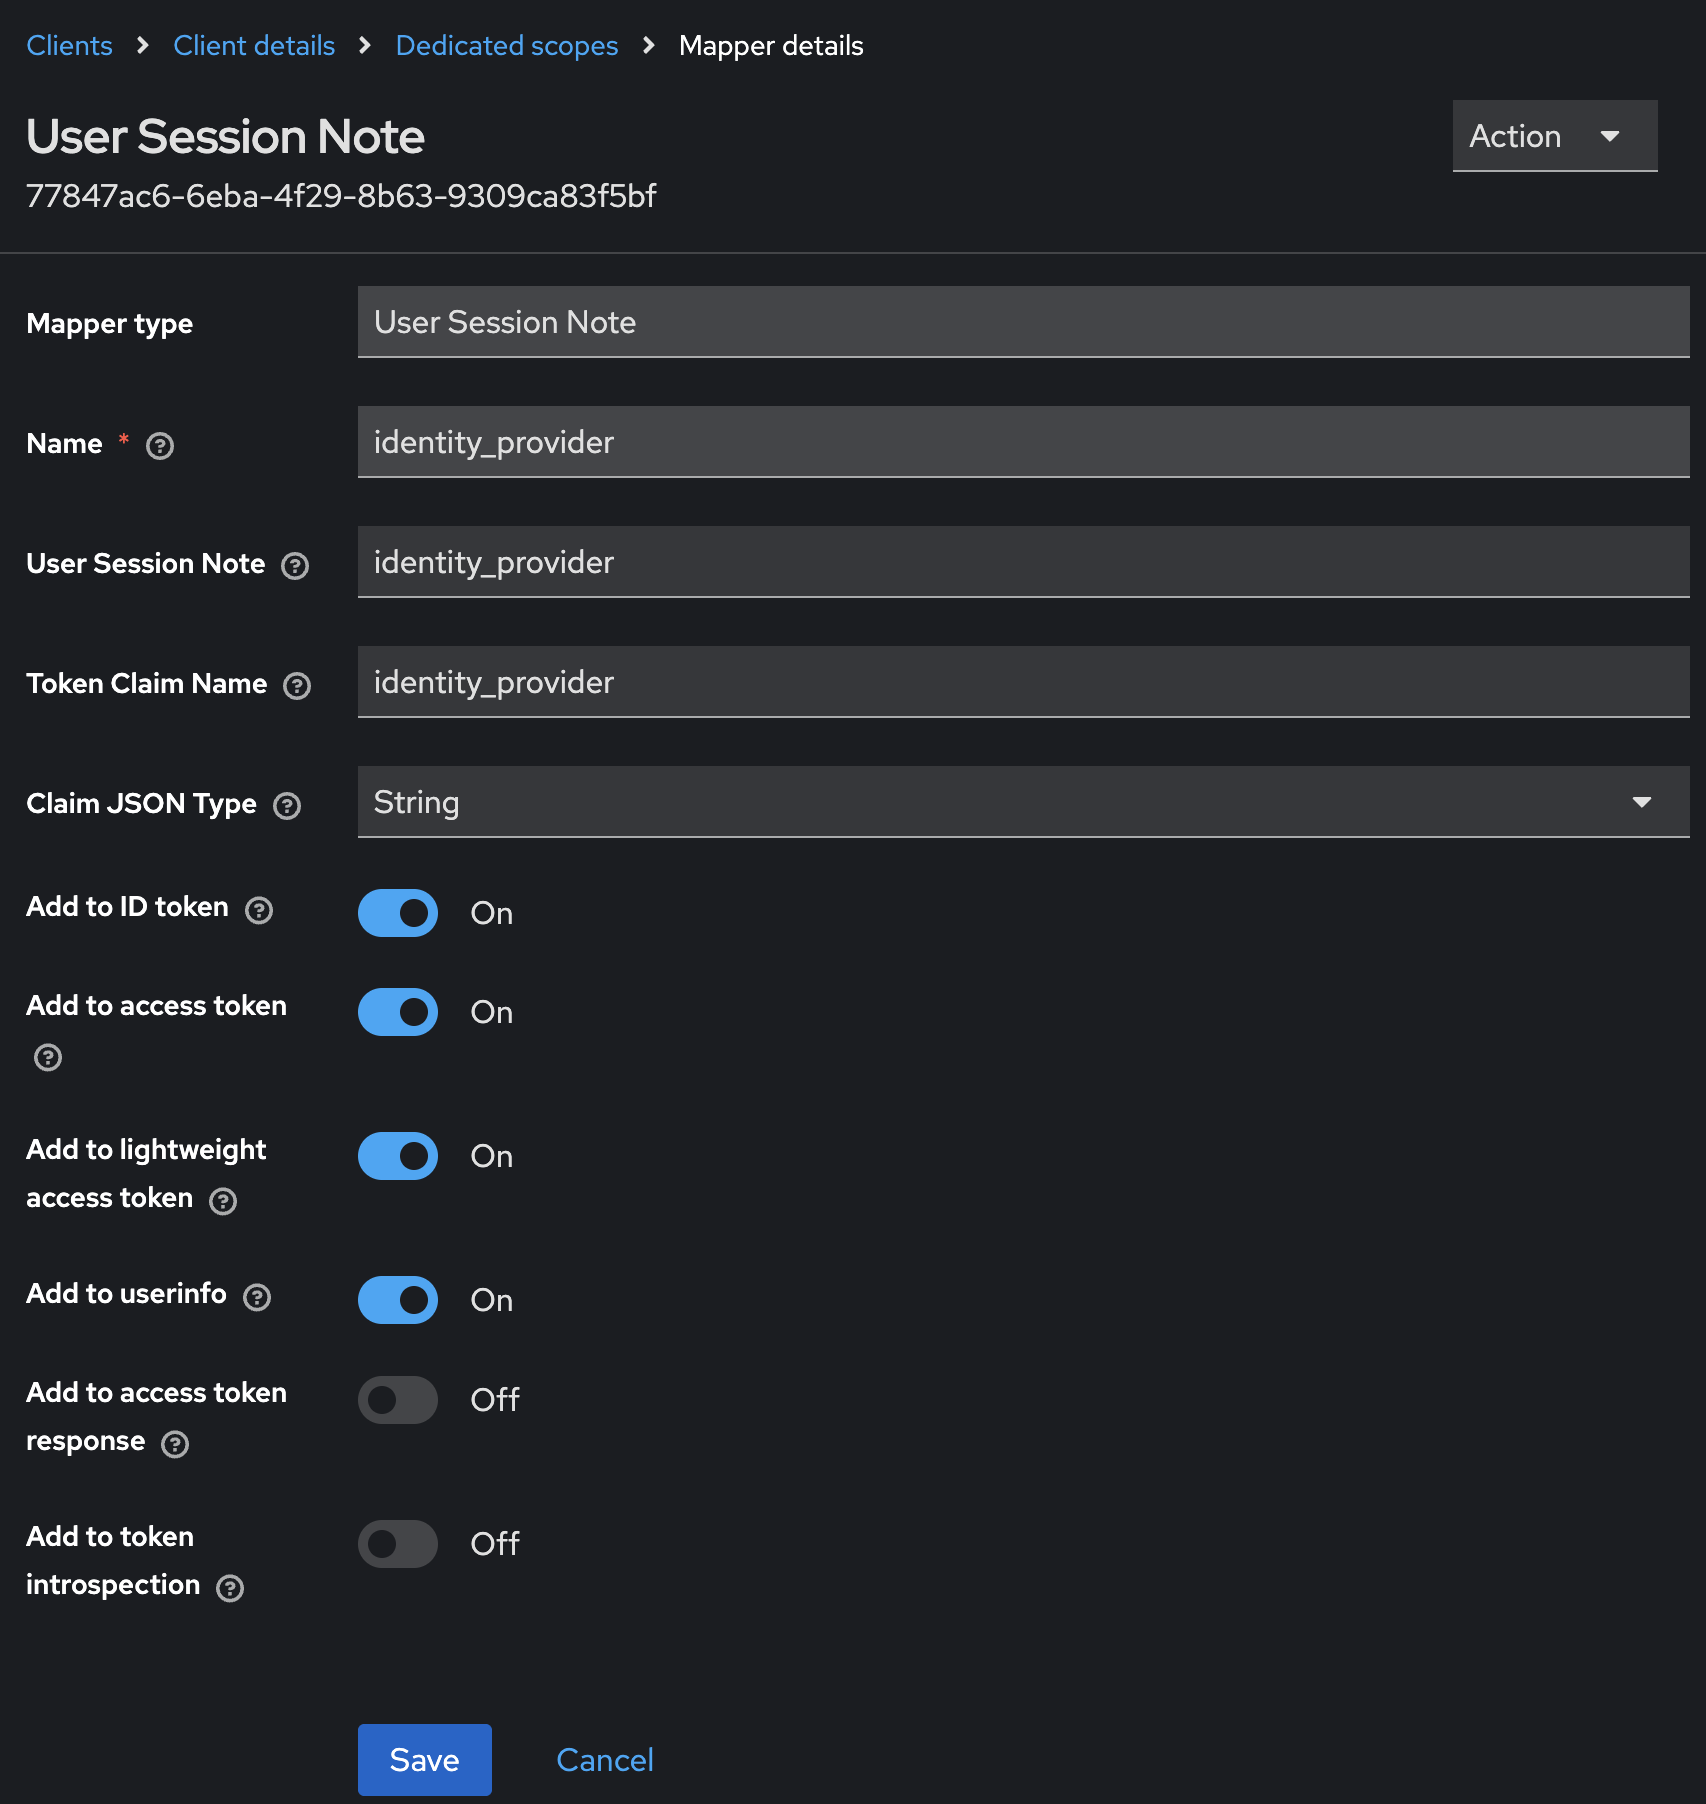
- Add a mapper of the User Session Note type:
- Click Add mapper and select By configuration. Click User Session Note from the table of predefined mappings.
- Set Name to a name of your choice. In this tutorial, we set it to identity_provider.
- Set User Session Note to identity_provider.
- Set Token Claim Name to identity_provider, which is a required value for the App Connect Designer Authoring to validate user roles.
- Toggle to enable Add to ID token, Add to access token, Add to lightweight access token and Add to userinfo.
![Enable Add to ID token, Add to access token, Add to lightweight access token and Add to userinfo.]()
- Finally, click Save to complete this mapper.
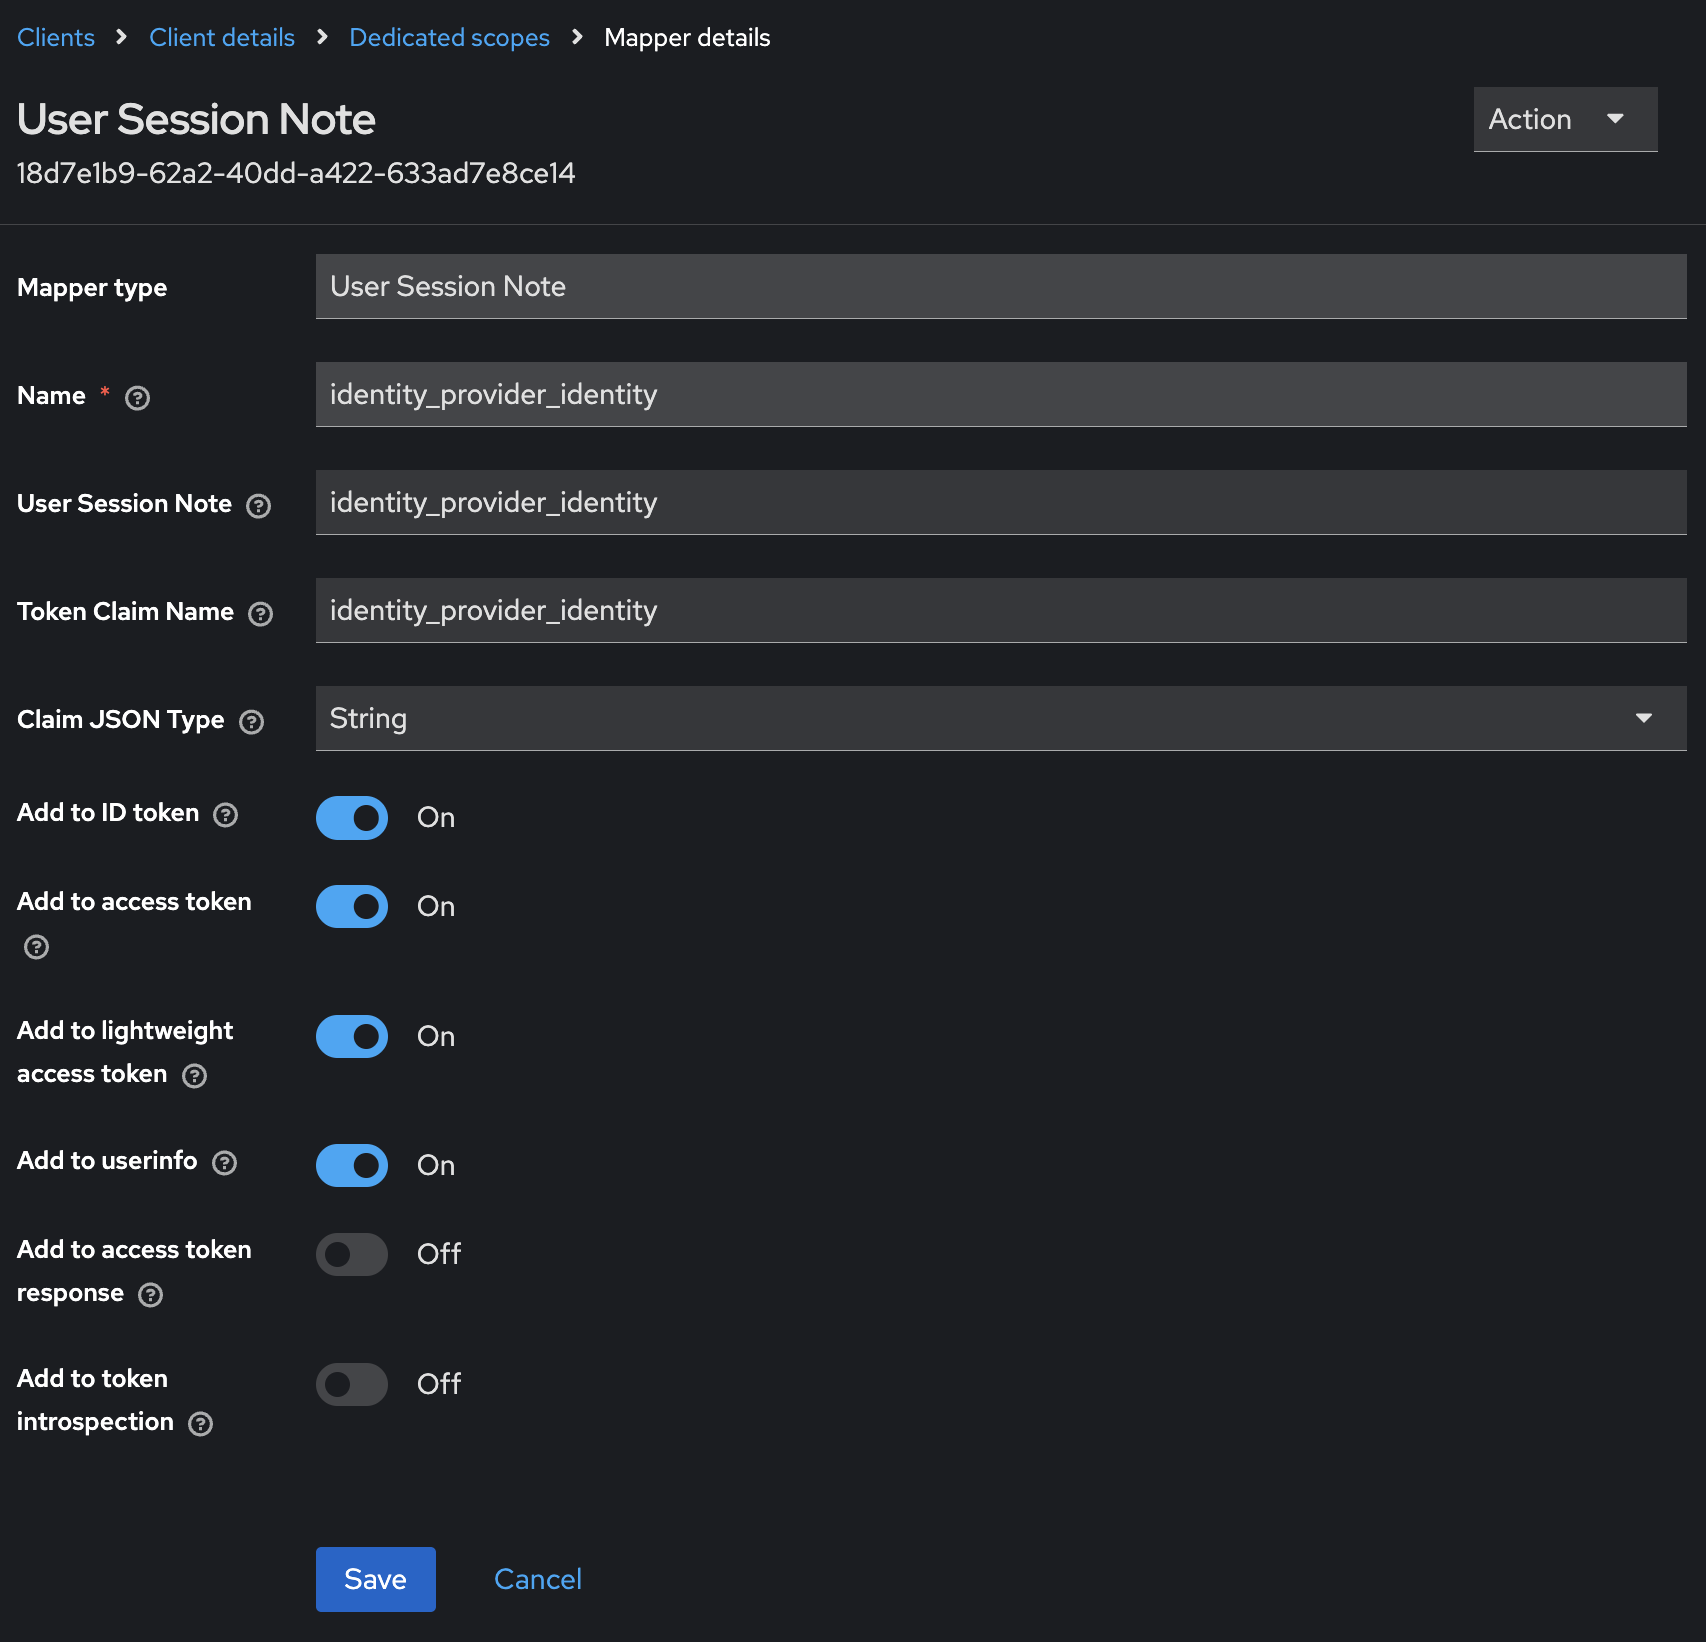
- Add a mapper of the User Session Note type:
- Click Add mapper and select By configuration. Click User Session Note from the table of predefined mappings.
- Set Name to a name of your choice. In this tutorial, we set it to identity_provider_identity.
- Set User Session Note to identity_provider_identity.
- Set Token Claim Name to identity_provider_identity, which is a required value for the App Connect Designer Authoring to validate user roles.
- Toggle to enable Add to ID token, Add to access token, Add to lightweight access token and Add to userinfo.
![Add to ID token, Add to access token, Add to lightweight access token and Add to userinfo.]()
- Finally, click Save to complete this mapper.
Part 2: Create Keycloak Related Secrets on Your Kubernetes Cluster
- If you have already completed Scenario 1 in the same Kubernetes environment, you can skip the creation of the ace-keycloak-k8s namespace, and the secret to store the CA certificate from Keycloak.
- You need to use the client ID for App Connect Designer Authoring, which is designer-ace-keycloak-k8s-example-iam-11111. The CLIENT_SECRET should be obtained from this client ID.
Part 3: Create an App Connect Designer Authoring To Use Your Keycloak Instance
- On Kubernetes you need to create an ingress route for your Designer Authoring. Follow the documentation to create one and note down the spec.tls.hosts in the ingress yaml.
Note: With App Connect Operator 12.9.0 or later, an App Connect Designer Authoring at version 13.0.2.2-r1 or later supports ingress out of the box on IBM Cloud Kubernetes Service. So, to automatically create an ingress resource for your Designer Authoring, simply set spec.ingress.enabled to true in the Designer Authoring CR, as described in the Creating ingress resources for your App Connect Designer Authoring and switch servers out of the box on IBM Cloud Kubernetes Service blog.
- Copy the following YAML template into a file named designer_iam.yaml.
YAML
apiVersion: appconnect.ibm.com/v1beta1 kind: DesignerAuthoring metadata: name: example-iam-designer labels: backup.appconnect.ibm.com/component: designerauthoring namespace: ace-keycloak-k8s spec: imagePullSecrets: - name: ibm-entitlement-key license: accept: true license: L-XRNH-47FJAW use: AppConnectEnterpriseProduction couchdb: storage: size: 10Gi type: persistent-claim class: ibmc-file-gold-gid replicas: 1 designerMappingAssist: incrementalLearning: schedule: Every 15 days enabled: false authentication: integrationKeycloak: auth: clientSecretName: designer-ace-keycloak-k8s-example-iam-11111 enabled: true endpoint: 'https://example-keycloak.test.com' realm: exampleRealm tls: secretName: example-tls-secret ingressHost: example-iam-designer.example-keycloak.test.com authorization: integrationKeycloak: auth: clientSecretName: designer-ace-keycloak-k8s-example-iam-11111 enabled: true endpoint: 'https://example-keycloak.test.com' realm: exampleRealm tls: secretName: example-tls-secret ingressHost: example-iam-designer.example-keycloak.test.com designerFlowsOperationMode: local replicas: 1 version: '12.0.12.3-r1' - Set spec.authentication.integrationKeycloak.auth.clientSecretName and spec.authorization.integrationKeycloak.auth.clientSecretName to designer-ace-keycloak-k8s-example-iam-11111. This is the client secret that was created in part 2.
- Ensure spec.authentication.integrationKeycloak.enabled and spec.authorization.integrationKeycloak.enabled are set to true, which enables authentication and authorization for App Connect Designer Authoring.
- Set spec.authentication.integrationKeycloak.endpoint and spec.authorization.integrationKeycloak.endpoint to the URL of Keycloak endpoint. You can find the value in the KC_HOST environment variable in your Keycloak pod. Run the following command to get the value:
kubectl get pod <keycloak-pod-name> -n <namespace-for-keycloak-pod> -o=jsonpath='{.spec.containers[0].env[?(@.name == "KC_HOSTNAME")].value}'- Note: If the endpoints are not provided, whilst authentication and authorization are enabled, the IBM® Cloud Pak foundational services must be installed to provide authentication and authorization for App Connect Dashboard and Designer Authoring. This is supported on OCP only.
- Set spec.authentication.integrationKeycloak.realm and spec.authorization.integrationKeycloak.realm to the Keycloak realm, where the Keycloak client designer-ace-keycloak-k8s-example-iam-11111 exists. In this tutorial, it is exampleRealm.
- Set spec.authentication.integrationKeycloak.tls.secretName and spec.authorization.integrationKeycloak.tls.secretName to example-tls-secret. This is the CA secret that was created in part 2. Because we used the default key name ca.crt for the CA secret, we do not need to specify spec.authorization.integrationKeycloak.tls.caCertificate and spec.authorization.integrationKeycloak.tls.caCertificate. Therefore the caCertificate fields are not included in the example CR designer_iam.yaml.
- Set spec.authentication.integrationKeycloak.tls.ingressHost and spec.authorization.integrationKeycloak.tls.ingressHost to the spec.tls.hosts value obtained in step 1.
Note: Skip step 8 if you are creating a Designer Authoring instance at version 13.0.2.2-r1 or later and have set spec.ingress.enabled to true in the Designer Authoring CR.
- Follow the documentation on entitlement key to create a ibm-entitlement-key Secret. This enables you to download the required images for the App Connect Designer Authoring.
- Follow the documentation on Designer Authoring storage to set spec.storage.class.
- (Optional) Set spec.version to 12.0 to pick up the latest App Connect Designer Authoring operand version.
- Create the Designer Authoring resource with the following command:
kubectl apply -f designer_iam.yaml -n ace-keycloak-k8s
Part 4: Access Your App Connect Designer Authoring
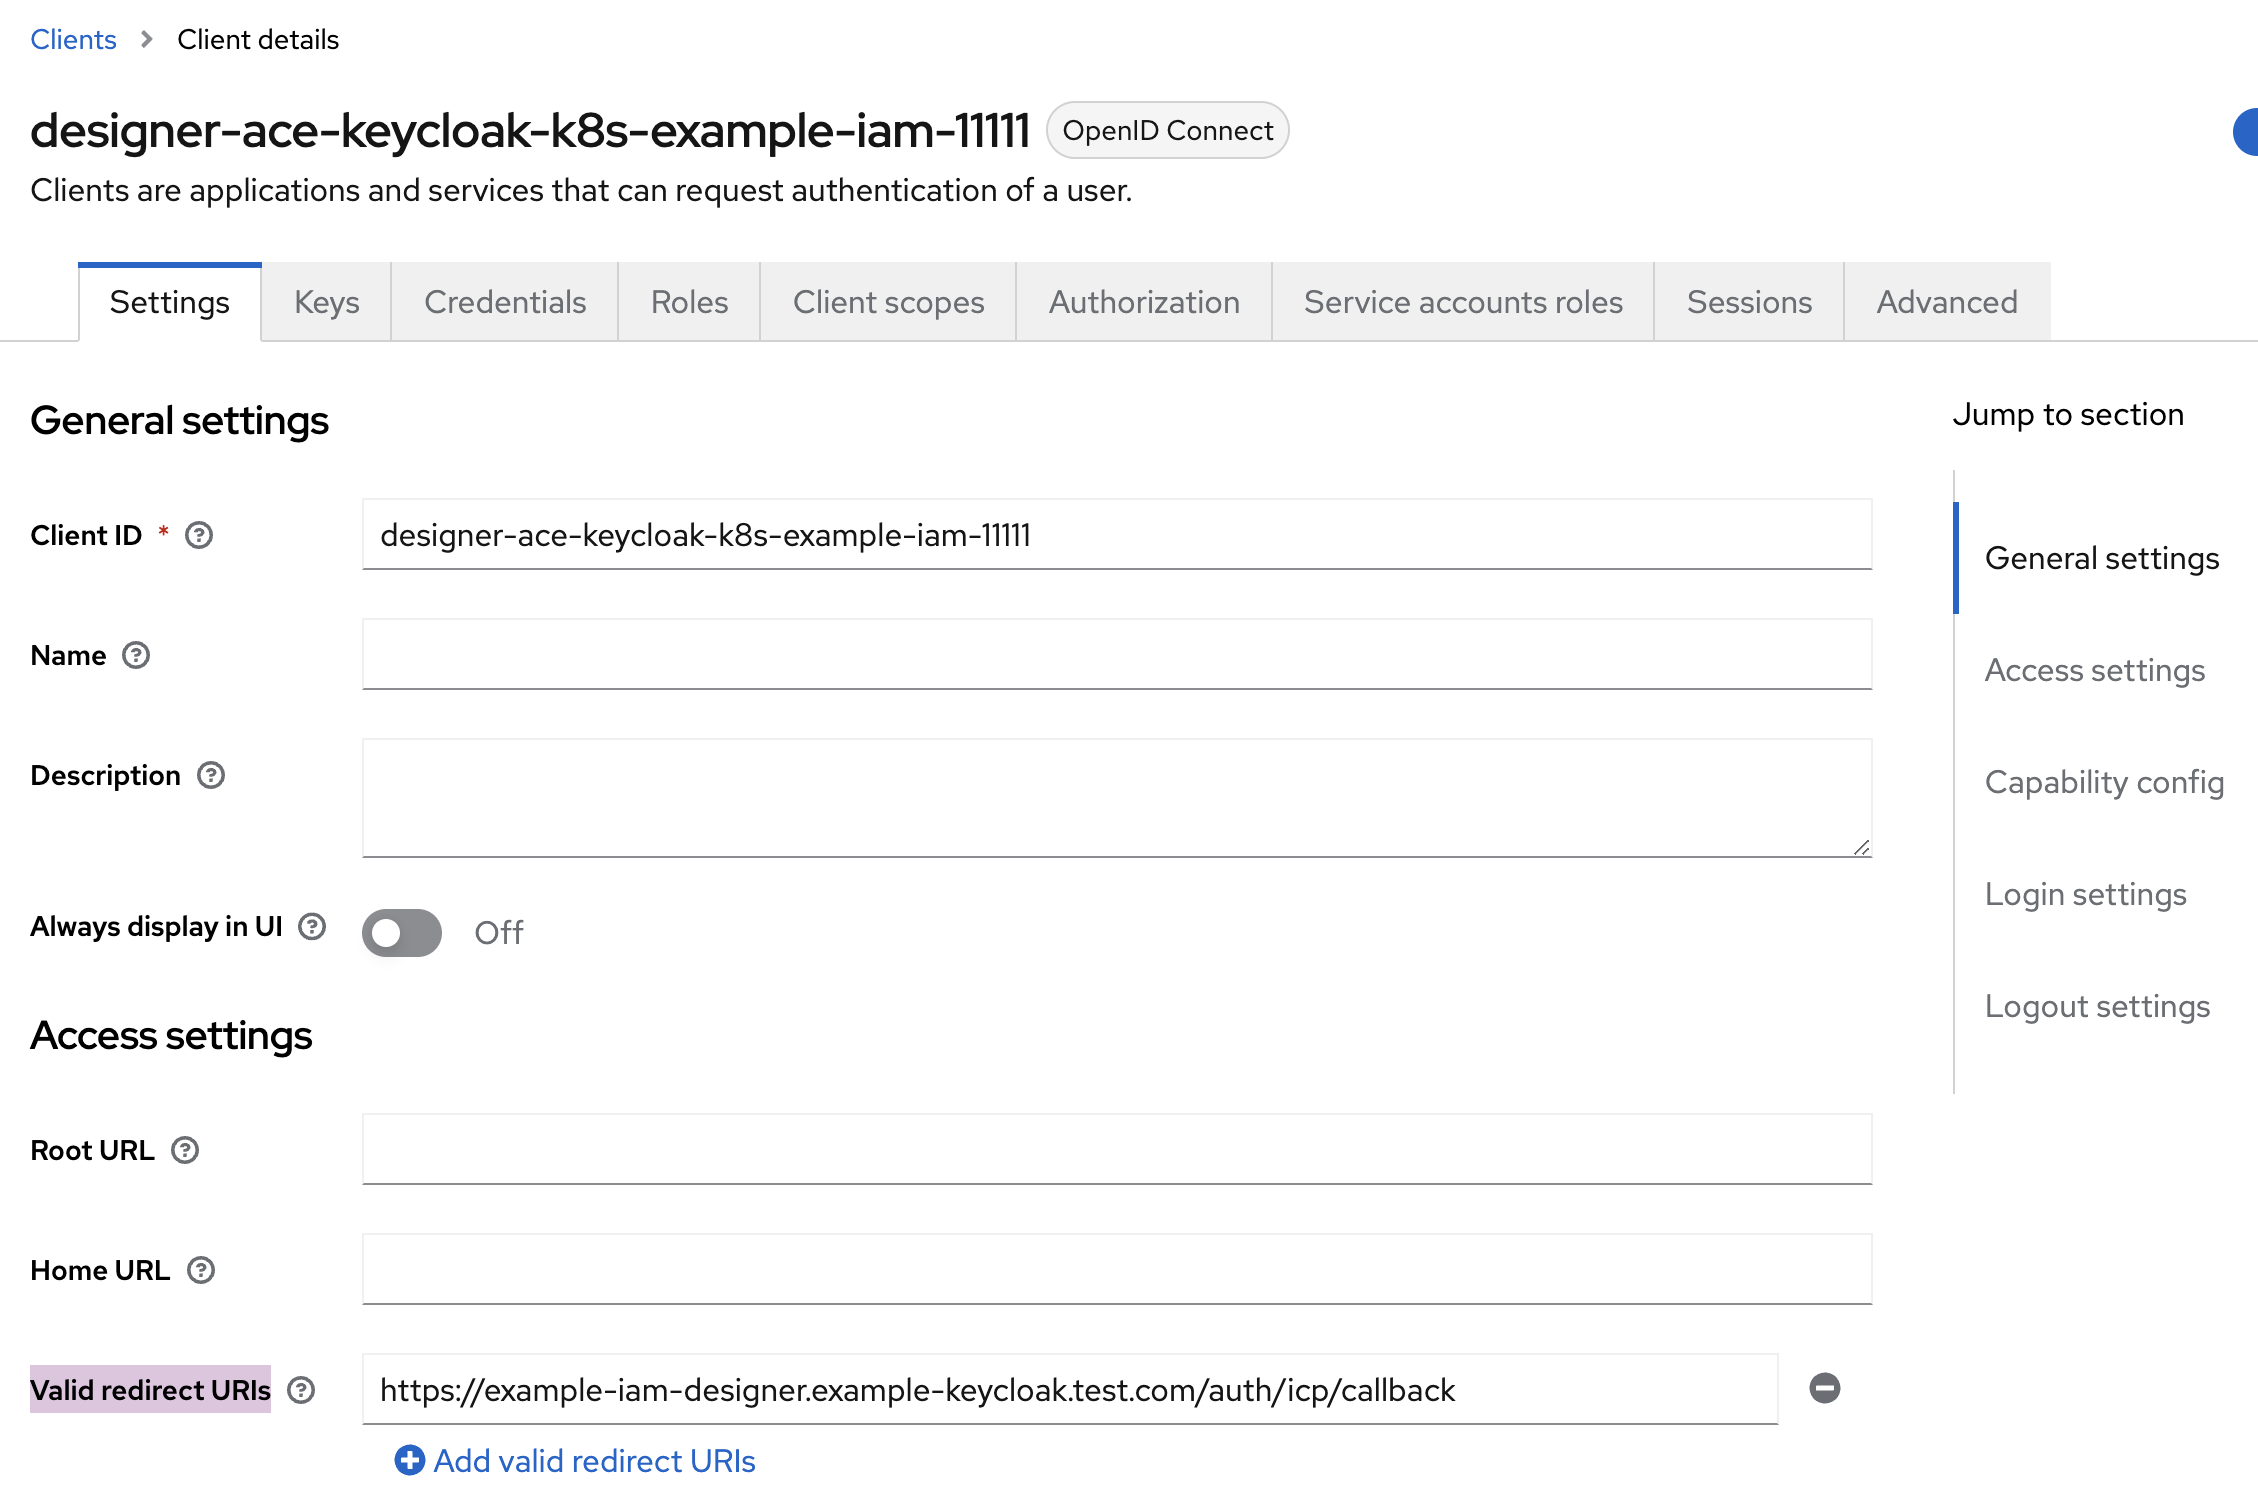
- From your Keycloak admin console, use the navigation pane to select a realm from the drop-down list. In this tutorial, we have set up a realm called exampleRealm. Next, on the navigation pane, select Clients and click the client designer-ace-keycloak-k8s-example-iam-11111.
- Set Valid redirect URIs to <FIREFLY_ROUTE_UI>/auth/icp/callback, where FIREFLY_ROUTE_UI specifies the URL of the App Connect Designer UI. You can get the value of FIREFLY_ROUTE_UI with the following command:
kubectl get configmap example-iam-designer-designer-env -o=jsonpath='{.data.FIREFLY_ROUTE_UI}' -n ace-keycloak-k8s
The name of the configmap resource is in the format of <designer authoring metadata.name>-designer-env. - If you are on App Connect Operator version 12.4.0 or later and Designer Authoring operand version 13.0.1.0-r1 or later, set Valid post logout redirect URIs to <FIREFLY_ROUTE_UI>.
- Now you need to create a user to log in to App Connect Designer Authoring. To do so, you can follow steps 6 to 10 in the Create a user and configure user roles section of the Keycloak tutorial for IBM® App Connect Operator version 11.0.0.
- In a Web browser, navigate to <FIREFLY_ROUTE_UI>. As a result, a request is sent to the ui container in the Designer Authoring pod. With information on the Keycloak client and Keycloak endpoint, the request is redirected to Keycloak to provide authentication and authorization for App Connect Designer Authoring. You can use the user information created in step 3 to log in.
- If you are directed to an error page, refer to the troubleshooting section.
-
Keycloak validates the user information, and forwards the request to Valid redirect URIs that you configured in the Keycloak client. As a result, congratulations, you are logged into the App Connect Designer Authoring.
- If you are directed to an error page, refer to the troubleshooting section.
Conclusion
The IBM® App Connect Operator (version 12.1.0 or later) offers enhanced Keycloak support, which enables you to use an existing Keycloak instance to configure authentication and authorization for App Connect Dashboard and Designer Authoring. This new feature is available on both OCP and Kubernetes.
Troubleshooting
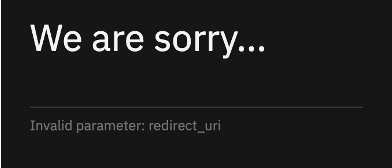
- We are sorry: Invalid parameter: redirect_uri.
How to recreate this problem? You entered the URL of the App Connect Dashboard UI or Designer UI on a Web browser. It directed you to the following error page, before reaching the Keycloak UI.
This could indicate one of the following:- The client secret, which you created in part 2, does not contain the correct name or credential for the Keycloak client. You need to verify that the secret contains the expected keys and correct values. You then need to update the secret otherwise.
- If you updated the client secret, you must recreate the related App Connect Dashboard or Designer Authoring to pick up the change.
- The Keycloak client does not contain a correct Valid redirect URIs. You need to verify this parameter on your Keycloak client.
- The client secret, which you created in part 2, does not contain the correct name or credential for the Keycloak client. You need to verify that the secret contains the expected keys and correct values. You then need to update the secret otherwise.
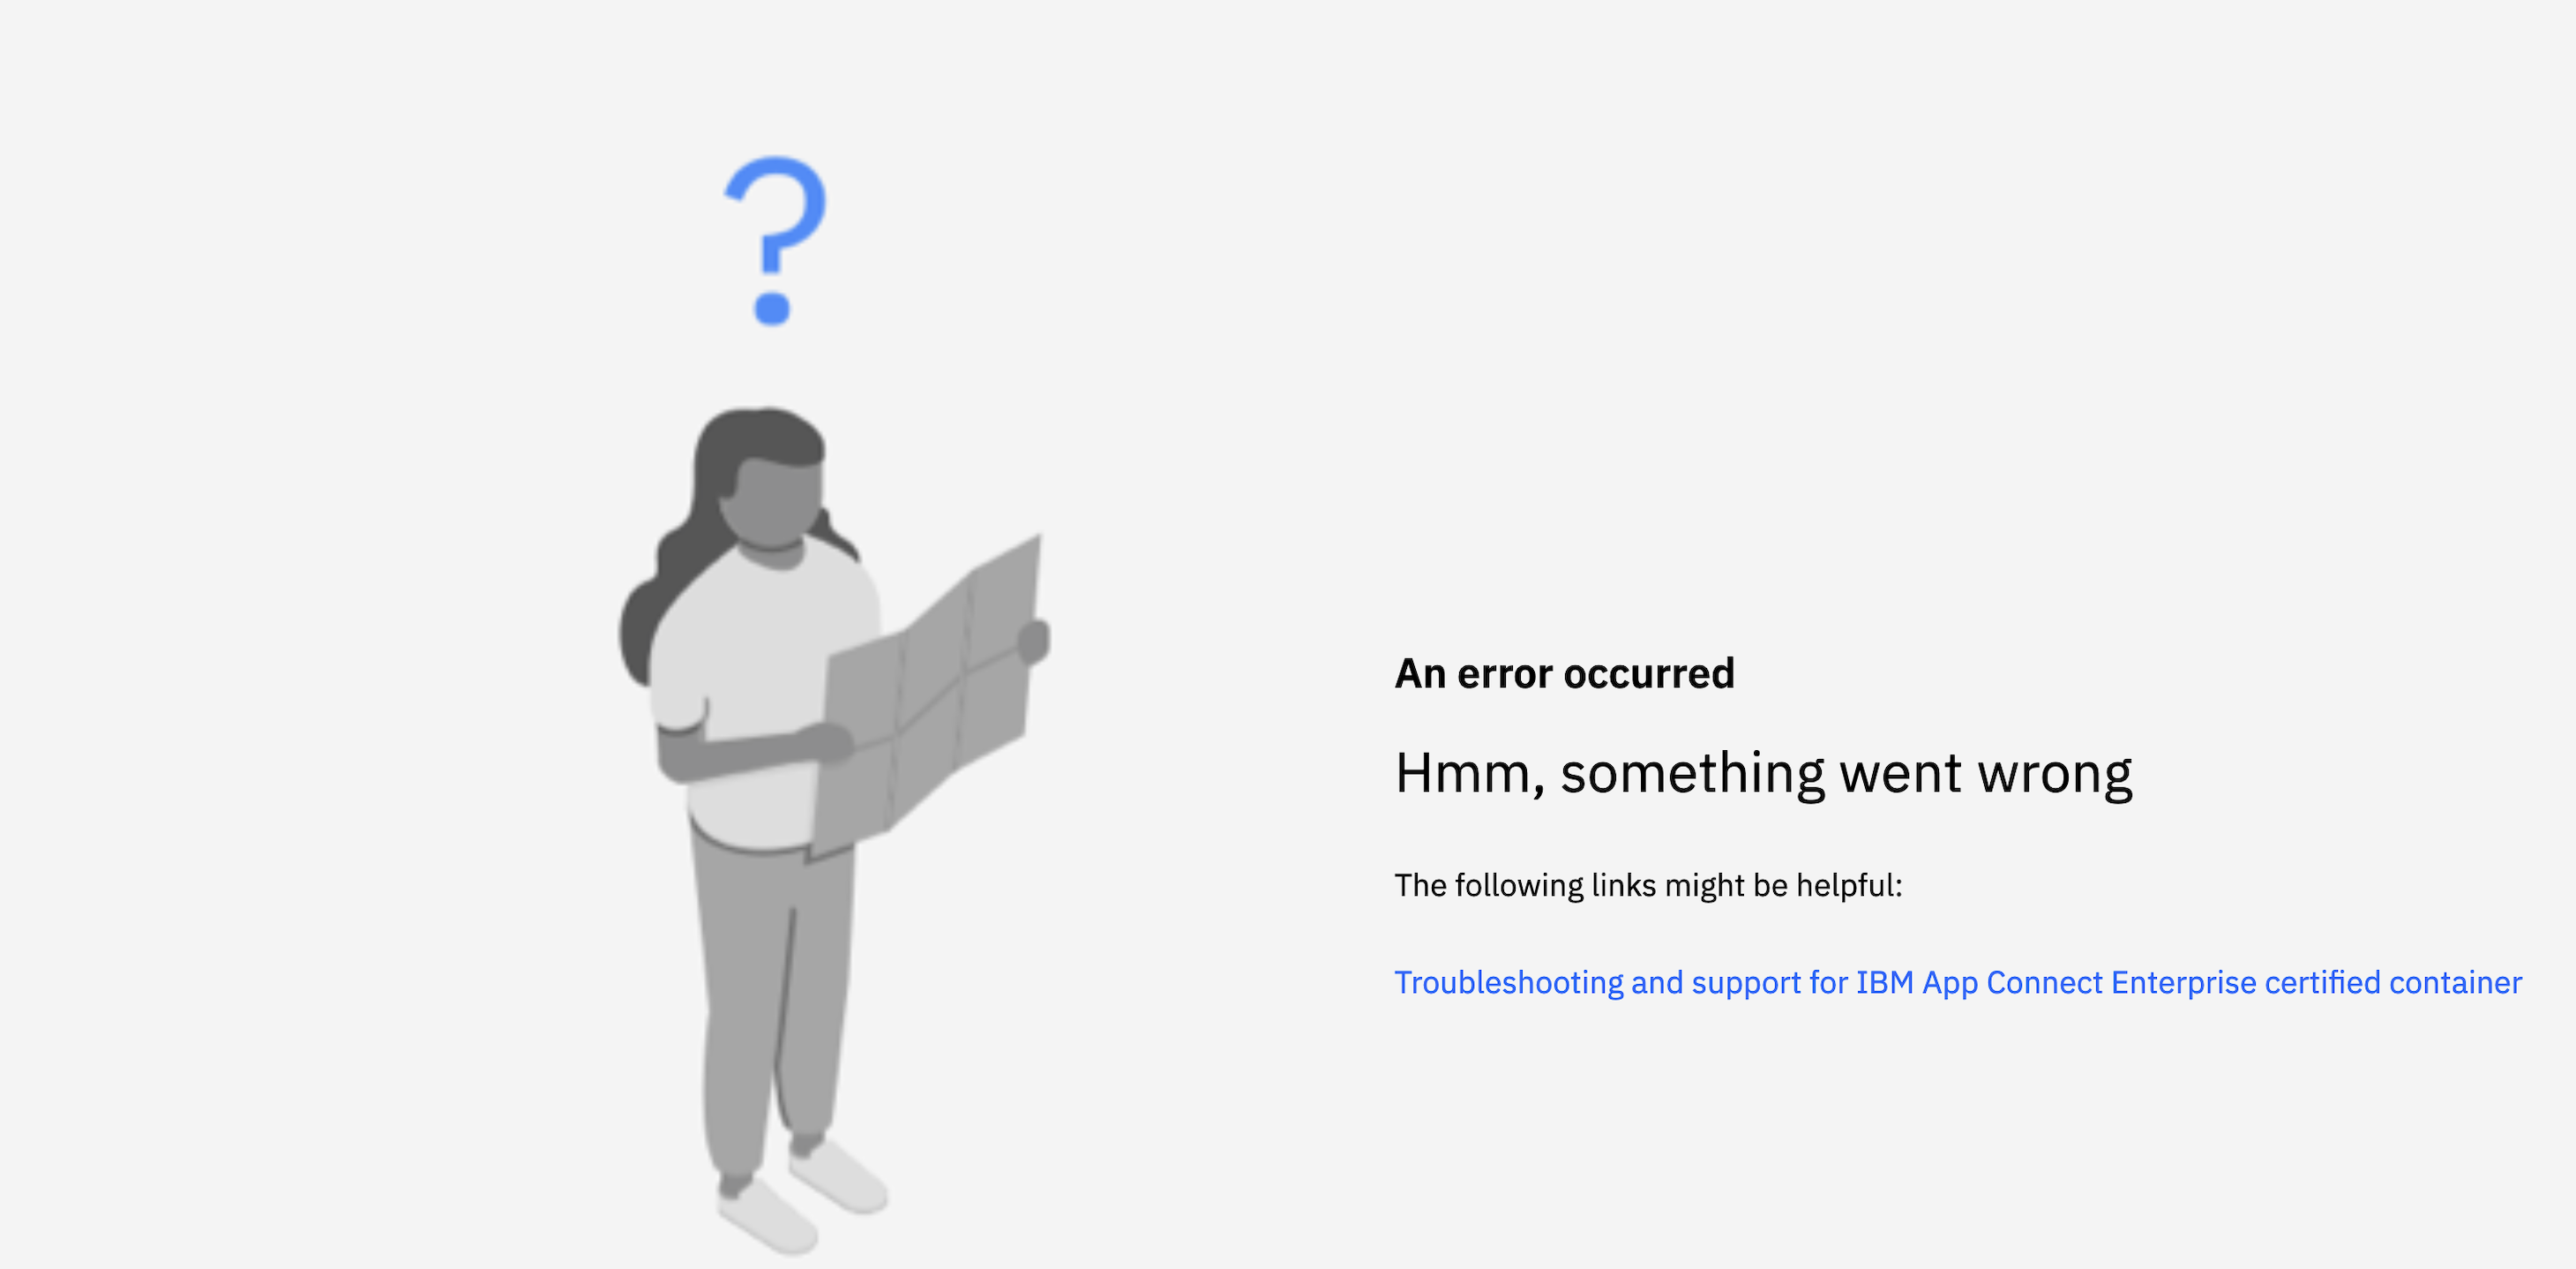
- Something went wrong: initial connection from App Connect Dashboard or Designer UI to Keycloak.
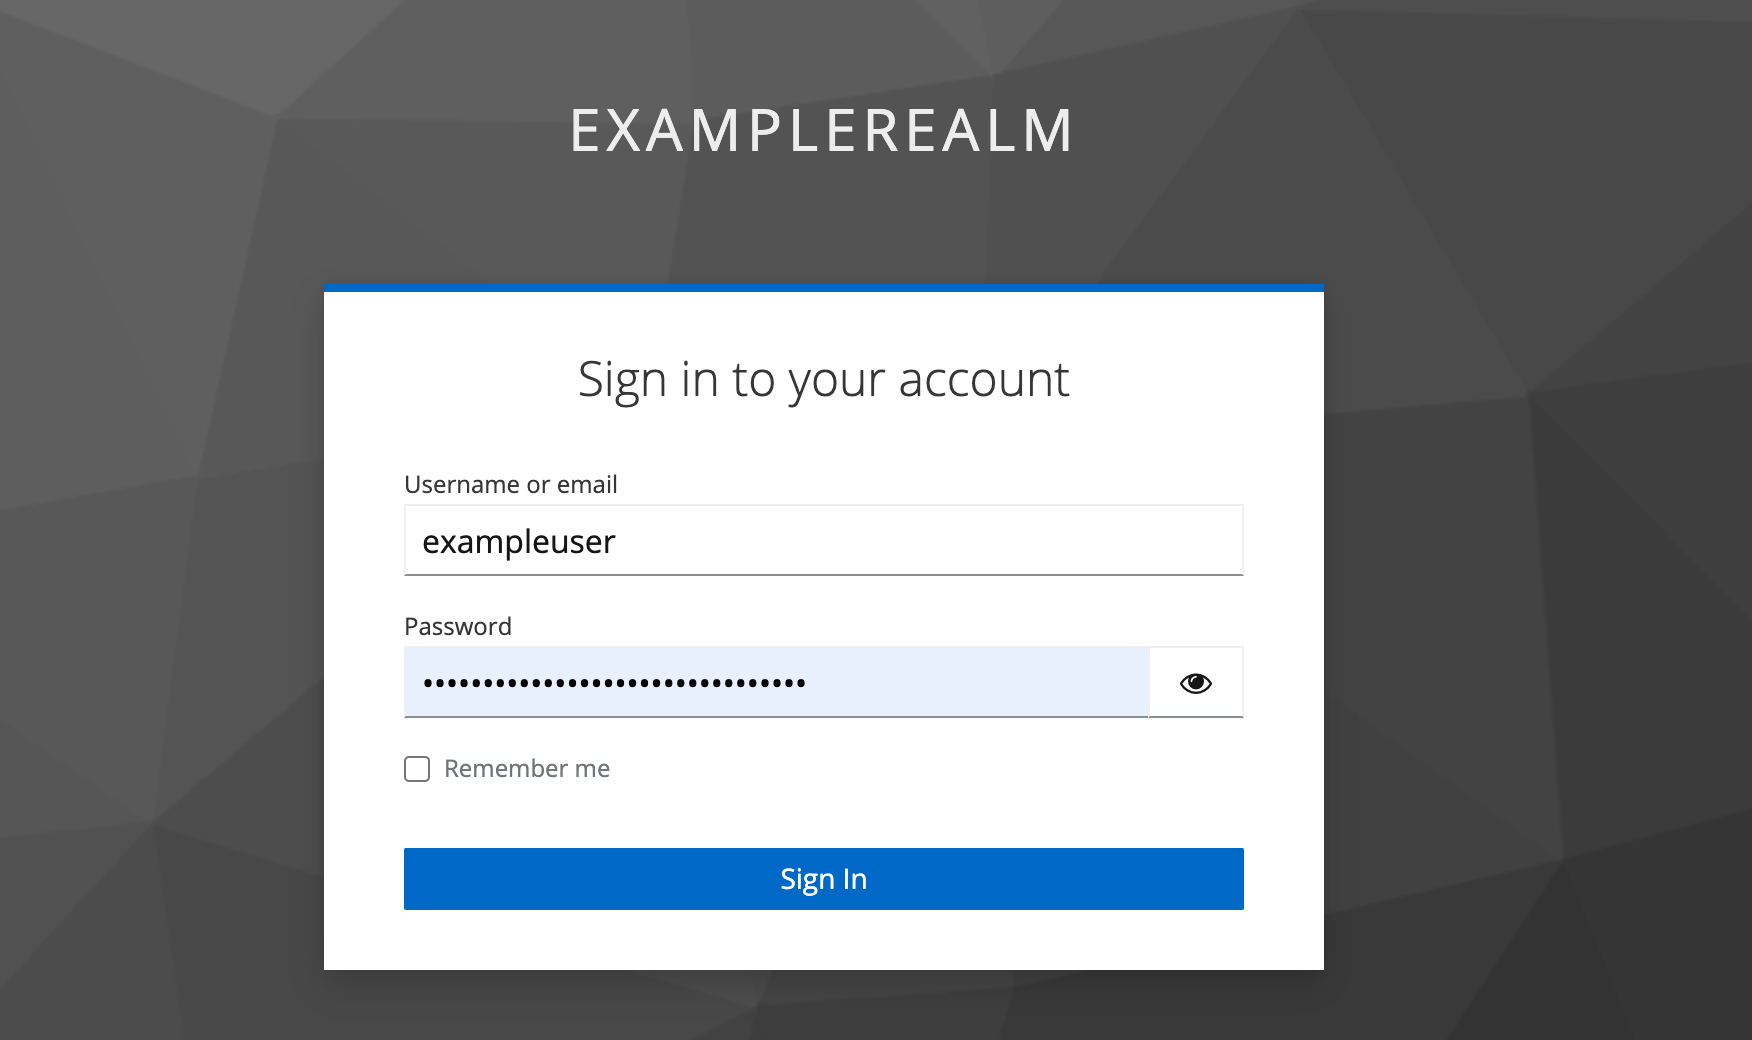
How to recreate this problem? You entered the URL of the App Connect Dashboard UI or Designer UI on a Web browser. It directed you to the following error page, before reaching the Keycloak UI. - Something went wrong: error validating Keycloak client roles.
How to recreate this problem? You entered the URL of the App Connect Dashboard UI or Designer UI on a Web browser, which took you to the Keycloak UI to log in as follows.
After you entered the username and password, and then clicked Sign In, you arrived at the following error page.- Check the logs from your App Connect Dashboard or Designer Authoring pod. Run the following commands:
kubectl logs <dashboard pod name> -c control-ui | grep -i "cannot find the highest role"kubectl logs <designer authoring ui pod name> -c <designer-authoring-name>-ui | grep -i "cannot find the highest role"
If the cannot find the highest role error message is in the pod log, you need to ensure the User Client Role mapper, which you added in step 7 of part 1 in scenario 1, was added to your Keycloak client. Ensure the Token Claim Name is set to effective-roles, and Add to Token Introspection is enabled.
Otherwise you can change the string after grep -i to failed to obtain access token or InternalOAuthError. If one of these error message is found in the pod log, you need to ensure the App Connect Dashboard or Designer Authoring has been recreated, if you have updated the secret containing the CA certificate.
- Check the logs from your App Connect Dashboard or Designer Authoring pod. Run the following commands:


Published at DZone with permission of Shanna Xu. See the original article here.
Opinions expressed by DZone contributors are their own.
Comments