How to Set Up Selenium Grid 4 With Docker Compose
This article serves as a guide to setting up Selenium Grid 4 with Docker Compose for efficient, scalable, cross-browser test automation and parallel execution.
Join the DZone community and get the full member experience.
Join For FreeSelenium WebDriver is a popular web automation tool. It automates browsers and enables software teams to perform web automation testing across multiple popular browsers, including Google Chrome, Mozilla Firefox, Microsoft Edge, and Safari.
To scale this testing across different platforms and browser versions, Selenium Grid 4 can be utilized. It works seamlessly with Selenium WebDriver, allowing tests to run in parallel across different browsers, making cross-browser and cross-platform testing faster and efficient.
In this tutorial, we will learn about Selenium Grid 4, its components, and when to use it. We will also perform a hands-on activity by starting Selenium Grid 4 with Docker Compose.
What Is Selenium Grid 4?
Selenium Grid 4 allows running Selenium WebDriver tests on different machines(virtual or real) by forwarding commands from test scripts to browsers running on remote systems. This makes it easier to test across multiple environments and speeds up test execution.
The main objective of Selenium Grid is to:
- Make it simple to run tests in parallel on multiple platforms and browsers.
- Enable testing across different browser versions.
- Perform cross-platform testing.
Selenium Grid 4 Components
There are six main components of Selenium Grid, which are explained below:
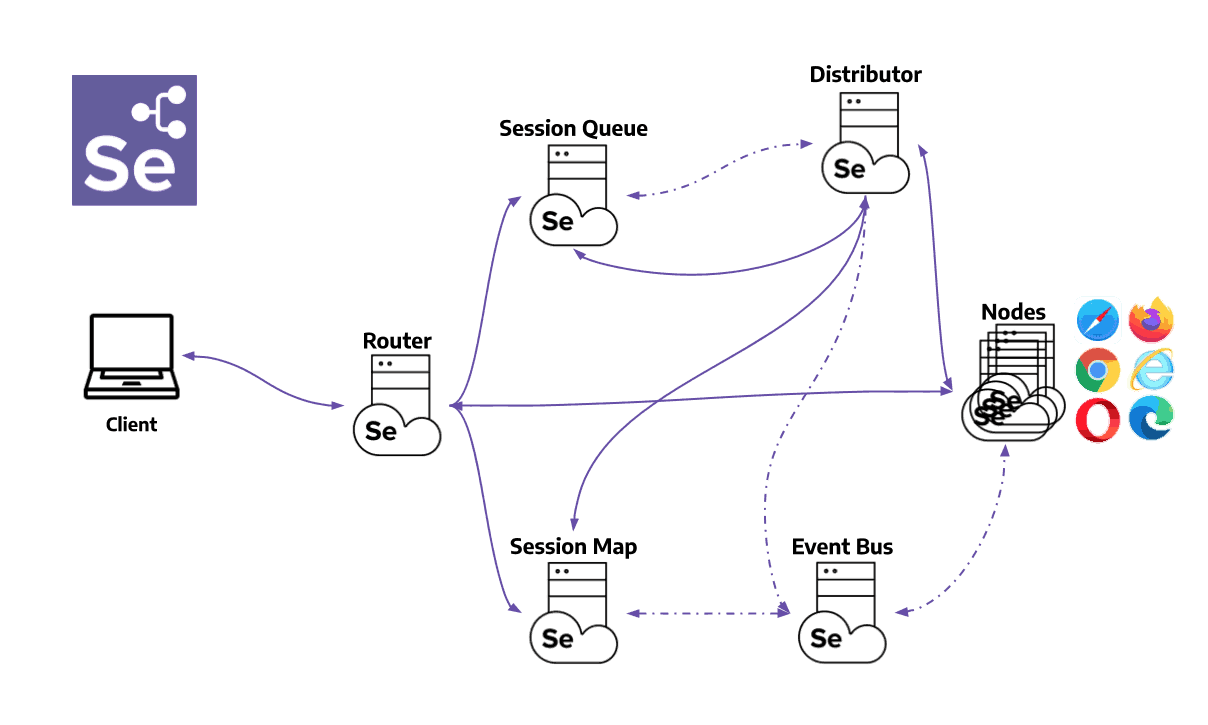
1. Router
The Router acts as an entry point. It manages all the incoming requests and performs the following actions:
Handling New Session Request
When the Router receives a new session request, it forwards this request to the “New Session Queue”, which is responsible for managing and scheduling session creation.
Handling Existing Sessions
When a session request is received by the Router that belongs to an existing session, it performs the following actions:
- It queries the Session Map, which tracks the existing sessions.
- The Session Map provides the Router with the Node ID where the session is running.
- The Router then forwards the request directly to the Node.
Load Balancing
The Router also acts as a load balancer in the Grid. It ensures that the requests are sent to the Nodes or Queues that can handle them in the best way.
It avoids overloading any part of the Grid and helps distribute the test execution evenly.
2. Distributor
The Distributor manages the registration and capabilities of Nodes in the grid. The following are its two main responsibilities:
Register and Keep Records of All Nodes and Their Capabilities
- A Node sends the registration event through the Event Bus.
- The Distributor listens to the Event Bus. It picks up the registration event and begins the verification process.
- The Distributor sends an HTTP request to the Node to verify if it's online and ready to accept sessions.
- On successful verification of the HTTP request, the Distributor registers the Node as part of the Grid.
- The Distributor keeps track of all Nodes' capabilities through the GridModel.
Query the New Session Queue and Process Any Pending New Session Requests
- The Router forwards the New Session Request to the New Session Queue.
- The request will wait in the queue until the Grid is ready to process it.
- The Distributor continuously polls the New Session Queue to check if there are any pending session requests.
- When a pending request is found, the Distributor looks for a suitable Node that matches the required capabilities and available capacity to run the session, and then the session is created.
- Next, the Distributor records the session ID and the Node handling it in the Session Map.
3. Session Map
The Session Map is a storage system that keeps a record of which Session ID is running on which Node. It helps the Router figure out where to send each request by telling it which Node is handling a specific session.
4. New Session Queue
The New Session Queue stores all incoming session requests in the order they arrive(FIFO). It has configurable parameters for how long a request can wait before timing out, and how often the system should check for these timeouts.
The following are the processes where the New Session Queue is used:
The Router Adds Requests to the Queue
The Router receives the New Session Request and adds it to the New Session Queue. It then waits for a response while the request stays in the queue.
Queue Checks for Timeouts
The New Session Queue, based on the timeout setting, checks if any requests have waited too long. If the request has timed out, it is rejected and removed from the queue immediately.
The Distributor Checks for the Available Slots, Matches, and Assigns the Node
The Distributor continuously checks for available Nodes. On finding an available Node, the Distributor polls the queue for a Session Request that matches the slot’s configuration and attempts to create a new session. If a request matches the available Node’s capabilities, the Distributor tries to assign it to that slot.
If no slots are available, the Distributor sends the request back to the queue to retry later. The request is rejected if the request times out while waiting to be retried or added back to the front of the queue.
On successful creation of the session:
- The Distributor sends the session details back to the New Session Queue.
- The New Session Queue sends it back to the Router.
- The Router finally returns the session to the client.
5. Node
A Selenium Grid can have several Nodes, each running on a separate machine. Each Node handles the browser instances available on the machine it’s running on.
The Node connects to the Distributor via the Event Bus and sends its configuration details as part of the registration message.
By default, the Node automatically registers all browser drivers found in the system path of the machine on which it is running. It creates one slot per available CPU for Chromium-based browsers and Firefox, while only one slot is created for Safari. With custom configuration, the Node can also run sessions inside Docker containers or forward commands as a relay.
A Node simply runs the commands it receives — it doesn’t make decisions or manage anything beyond executing instructions and sending back responses. Also, the machine hosting the Node can use a different operating system from the rest of the Grid components.
Event Bus
The Event Bus facilitates internal communication between the different parts of the Grids, i.e., the Nodes, Distributor, New Session Queue, and Session Map.
Instead of using heavy HTTP calls, the Grid uses simple messages to talk internally, which makes things work faster.
The Event Bus should be started first when setting up the Grid in fully distributed mode.
6. Selenium Grid Node and Hub Configuration Flags
The list of all related flags that can be used while configuring the Node and Hub for Selenium Grid 4 is listed here.
When to Use Selenium Grid?
In general, there are two reasons to use Selenium Grid:
- To execute tests across different browsers, different browser versions, and on browsers running on different operating systems.
- To reduce the time of test execution and get faster feedback.
Getting Started With Selenium Grid 4
Selenium Grid 4 can be started in the following four ways:
- Standalone mode
- Hub and Node mode
- Distributed mode
- Docker-based
We will be using the Docker-based approach in this tutorial and using Docker Compose to start the Selenium Grid 4.
What Is Docker Compose?
Docker Compose is a tool designed to simplify the setup and management of multi-container applications. It lets us define all the services in a single YAML file, so the entire stack can be started or stopped with just one command.
One of the biggest benefits of Docker Compose is that it allows us to keep the application’s setup in a single, version-controlled file at the root of the project. This makes it easy for others to contribute.
Using the Docker Compose file and running the below command:
docker compose upWithin minutes, everything is up and running. This convenience and speed are what make Docker Compose so powerful.
How to Set Up Selenium Grid 4 With Docker Compose
To set up Selenium Grid 4 with Docker Compose, we need to create the following YAML file with all the respective components of Selenium Grid 4:
version: "3"
services:
  chrome:
    image: selenium/node-chromium:latest
    shm_size: 2gb
    depends_on:
      - selenium-hub
    environment:
      - SE_EVENT_BUS_HOST=selenium-hub
      - SE_EVENT_BUS_PUBLISH_PORT=4442
      - SE_EVENT_BUS_SUBSCRIBE_PORT=4443
      - SE_NODE_MAX_INSTANCES=4
      - SE_NODE_MAX_SESSIONS=4
      - SE_NODE_SESSION_TIMEOUT=180
    networks:
      - selenium-jenkins-network

  firefox:
    image: selenium/node-firefox:latest
    shm_size: 2gb
    depends_on:
      - selenium-hub
    environment:
      - SE_EVENT_BUS_HOST=selenium-hub
      - SE_EVENT_BUS_PUBLISH_PORT=4442
      - SE_EVENT_BUS_SUBSCRIBE_PORT=4443
      - SE_NODE_MAX_INSTANCES=1
      - SE_NODE_MAX_SESSIONS=1
      - SE_NODE_SESSION_TIMEOUT=180
    networks:
      - selenium-jenkins-network

  selenium-hub:
    image: selenium/hub:latest
    container_name: selenium-hub
    ports:
      - "4442:4442"
      - "4443:4443"
      - "4444:4444"
    networks:
      - selenium-jenkins-network

networks:
  selenium-jenkins-network:
    external: true
This Docker Compose file spins up a distributed Selenium Grid 4 setup with 3 services:
- Selenium Hub
- Chrome Node
- Firefox Node
All these services are connected to the same Docker Network, so the Grid could be accessed or used by other services such as Jenkins agents.
Decoding the Docker Compose File
Version
version: "3"The version specifies the Docker Compose file format version. It is defined by the Compose Specification for backward compatibility.
Services
It defines all the services that make up the application. In our case, there are three services defined, “chrome”, “firefox”, and “selenium-hub”.
Chrome Service
chrome:
    image: selenium/node-chromium:latest
    shm_size: 2gb
    depends_on:
      - selenium-hub
    environment:
      - SE_EVENT_BUS_HOST=selenium-hub
      - SE_EVENT_BUS_PUBLISH_PORT=4442
      - SE_EVENT_BUS_SUBSCRIBE_PORT=4443
      - SE_NODE_MAX_INSTANCES=4
      - SE_NODE_MAX_SESSIONS=4
      - SE_NODE_SESSION_TIMEOUT=180
    networks:
      - selenium-jenkins-network
The Chrome service pulls the node-chromium latest image and runs a Selenium node with Chromium browser support.
I have a MacBook M2 machine, so I am using images with arm architecture. Check out Multi-arch images via Docker Selenium for more details. Check out Docker Selenium GitHub repository for more Docker files setup.
The shm_size sets the 2 GB shared memory size to prevent browser crashes inside the Docker container.
The depends_on controls the order in which the service starts up. It ensures that the selenium-hub service starts before the Chrome service.
Environment variables are defined using the environment key.
environment:
      - SE_EVENT_BUS_HOST=selenium-hub
      - SE_EVENT_BUS_PUBLISH_PORT=4442
      - SE_EVENT_BUS_SUBSCRIBE_PORT=4443
These specific variables guide the Chrome node on how to connect to the Event Bus provided by the Selenium Hub.
- SE_NODE_MAX_INSTANCES=4
- SE_NODE_MAX_SESSIONS=4
- SE_NODE_SESSION_TIMEOUT=180
The SE_NODE_MAX_INSTANCES and SE_NODE_MAX_SESSIONS Environment variables allow Chrome node to handle up to 4 sessions in parallel.
The SE_NODE_SESSION_TIMEOUT handles the Chrome node session timeout. If a session remains idle for 180 seconds, it will be cleaned up.
networks:
- selenium-jenkins-network
This tells Docker that the Chrome node should connect to a specific selenium-jenkins-network Docker network.
Firefox Service
firefox:
    image: selenium/node-firefox:latest
    shm_size: 2gb
    depends_on:
      - selenium-hub
    environment:
      - SE_EVENT_BUS_HOST=selenium-hub
      - SE_EVENT_BUS_PUBLISH_PORT=4442
      - SE_EVENT_BUS_SUBSCRIBE_PORT=4443
      - SE_NODE_MAX_INSTANCES=1
      - SE_NODE_MAX_SESSIONS=1
      - SE_NODE_SESSION_TIMEOUT=180
    networks:
      - selenium-jenkins-network
The Firefox service pulls the node-firefox latest image and runs a Selenium node with Firefox browser support.
Like Chrome service, this service also has a 2 GB shared memory to prevent browser crashes inside the container and depends on the Selenium-Hub service.
Unlike Chrome node, this service can handle only one session as the variables are set to 1; however, it is configurable and can be increased as required.
The Firefox node will also be connected to the Docker network selenium-jenkins-network.
Selenium Hub
selenium-hub:
    image: selenium/hub:latest
    container_name: selenium-hub
    ports:
      - "4442:4442"
      - "4443:4443"
      - "4444:4444"
    networks:
      - selenium-jenkins-network
The Selenium-Hub service pulls the latest hub image from Docker Hub and creates a Docker container named “selenium-hub”. This name is useful in case we need to check the logs inside the Docker Containers. It runs the hub, which is the main component for Selenium Grid.
The following are the details related to the ports:
- 4442 port is the Event Bus publish port.
- 4443 is the Event Bus subscribe port.
- 4444 is the Web UI / Router endpoint. This is the port used for navigating the Selenium Grid over the browser.
The Selenium hub service will also be connected to the Docker network selenium-jenkins-network.
Docker Network
This network configuration part is not necessarily required in the Selenium Grid Docker Compose. I have planned to run the Selenium automation tests on Selenium Grid with Docker Compose in Jenkins. Hence, this network configuration is set up.
networks:
  selenium-jenkins-network:
    external: true
The Networks key in Docker Compose allows us to define and configure a custom network for our services. This “selenium-jenkins-network” network must already exist. This network, named “selenium-jenkins-network”, was not created by Docker Compose.
We can create a Docker network manually by running the following command using the terminal:
docker network create selenium-jenkins-networkOnce the network is successfully created, we can move to the next step and start Docker Compose.
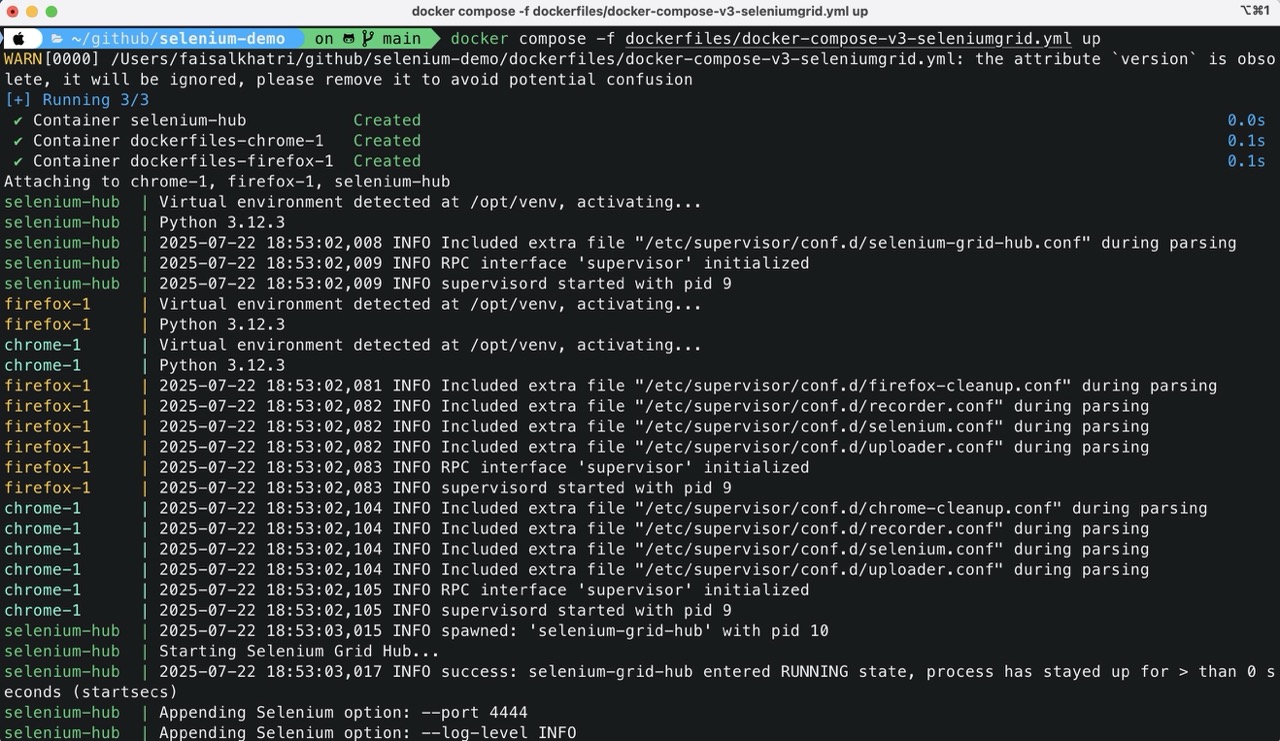
Starting Selenium Grid 4 With Docker Compose
The following command should be run after navigating to the folder where the Docker Compose file is placed.
docker compose -f docker-compose-seleniumgrid.yml up -dI have named the Docker Compose file “docker-compose-seleniumgrid.yml.” -f options take filename as the parameter.

The “-d” in this command stands for “detached mode”. It will run the services in the background, freeing up the terminal for other tasks.
In case we need to check the logs, we can run the following command:
docker compose -f docker-compose-seleniumgrid.yml logsTo check the logs for a specific service, we can append the name of the service in the command as given below:
docker compose -f docker-compose-seleniumgrid.yml logs chromeThe Docker Compose can also be started and run without using the “-d” flag. It will start the containers in the foreground and show all the real-time logs in the terminal.
Selenium Grid UI
After the command is executed successfully, open any browser and navigate to http://localhost:4444 and check out the live Selenium Grid running on your local machine.
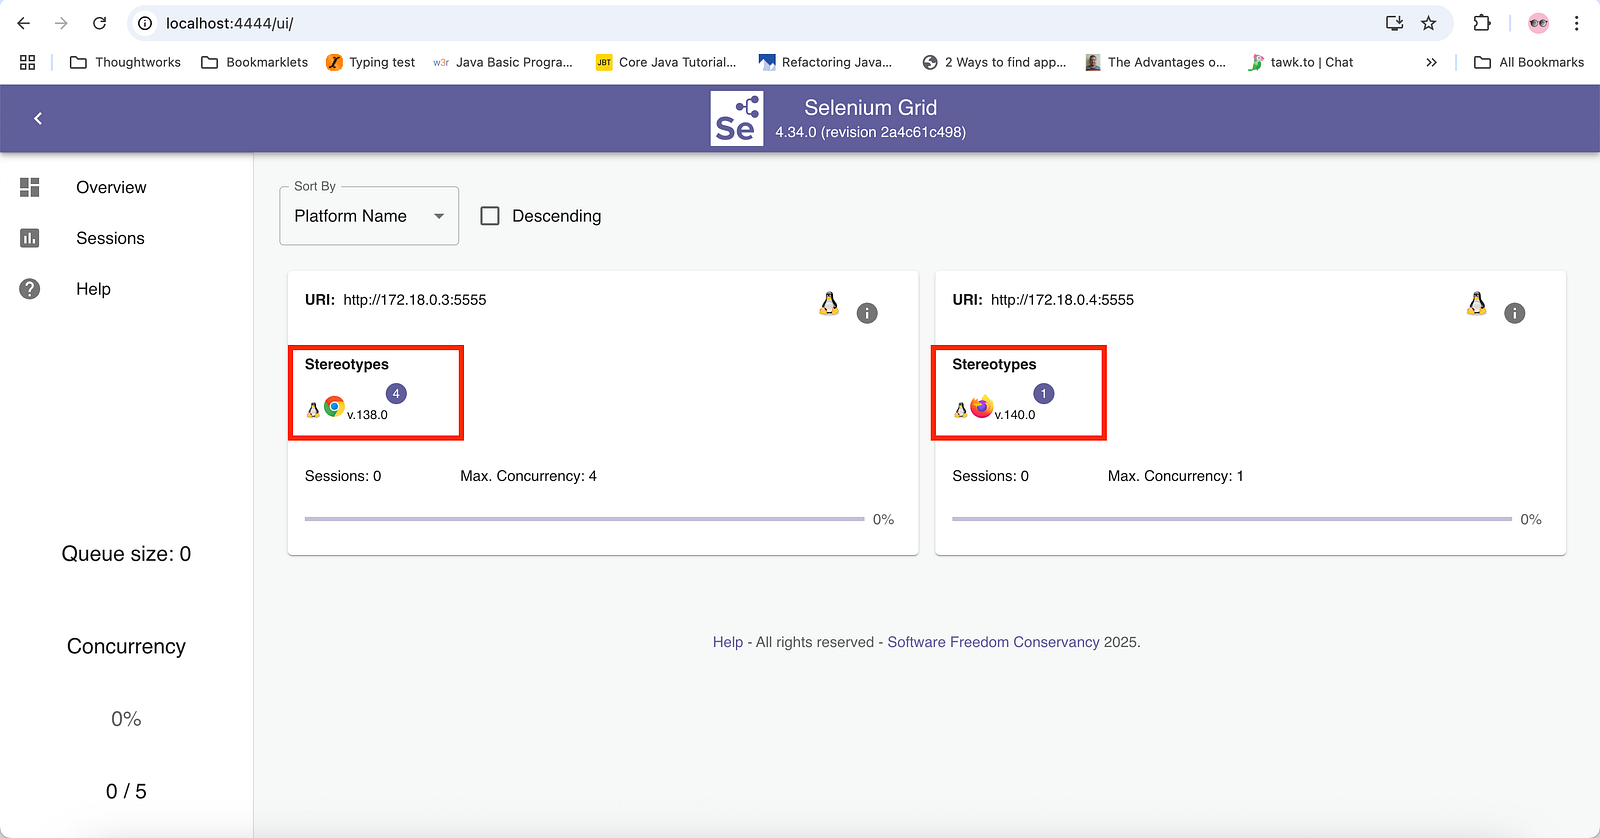
As defined in Docker Compose, we can see that four instances of the Chrome browser are available, while one instance of Firefox is available.
Stopping Selenium Grid 4 With Docker Compose
As we learned, two different ways to start Selenium Grid 4 with Docker Compose. The grid can be stopped in the following ways, respectively, how they were started:
If the Grid was started in detached mode (using -d in the command), the following command should be used to stop it:
docker compose -f docker-compose-seleniumgrid.yml down
If the Grid was started in foreground mode, press CTRL + C to stop.

After the Grid is stopped, open the browser and try navigating to http://localhost:4444. It should not show the Selenium Grid UI.
Scaling the Browsers in Selenium Grid 4 With Docker Compose
Scaling browsers in Selenium Grid is easy and flexible with Docker Compose. For example, if we want to scale up the Chrome service and run 3 more instances, we can simply stop the current Docker Compose session and start it again using the command below:
docker compose -f docker-compose-seleniumgrid.yml up -d --scale chrome=4
If we now check the Selenium Grid UI, we should be able to see a total of 4 Chrome service instances up and running. Each Chrome service has four instances of the Chrome browser, so in total, we have 16 Chrome browser instances running.
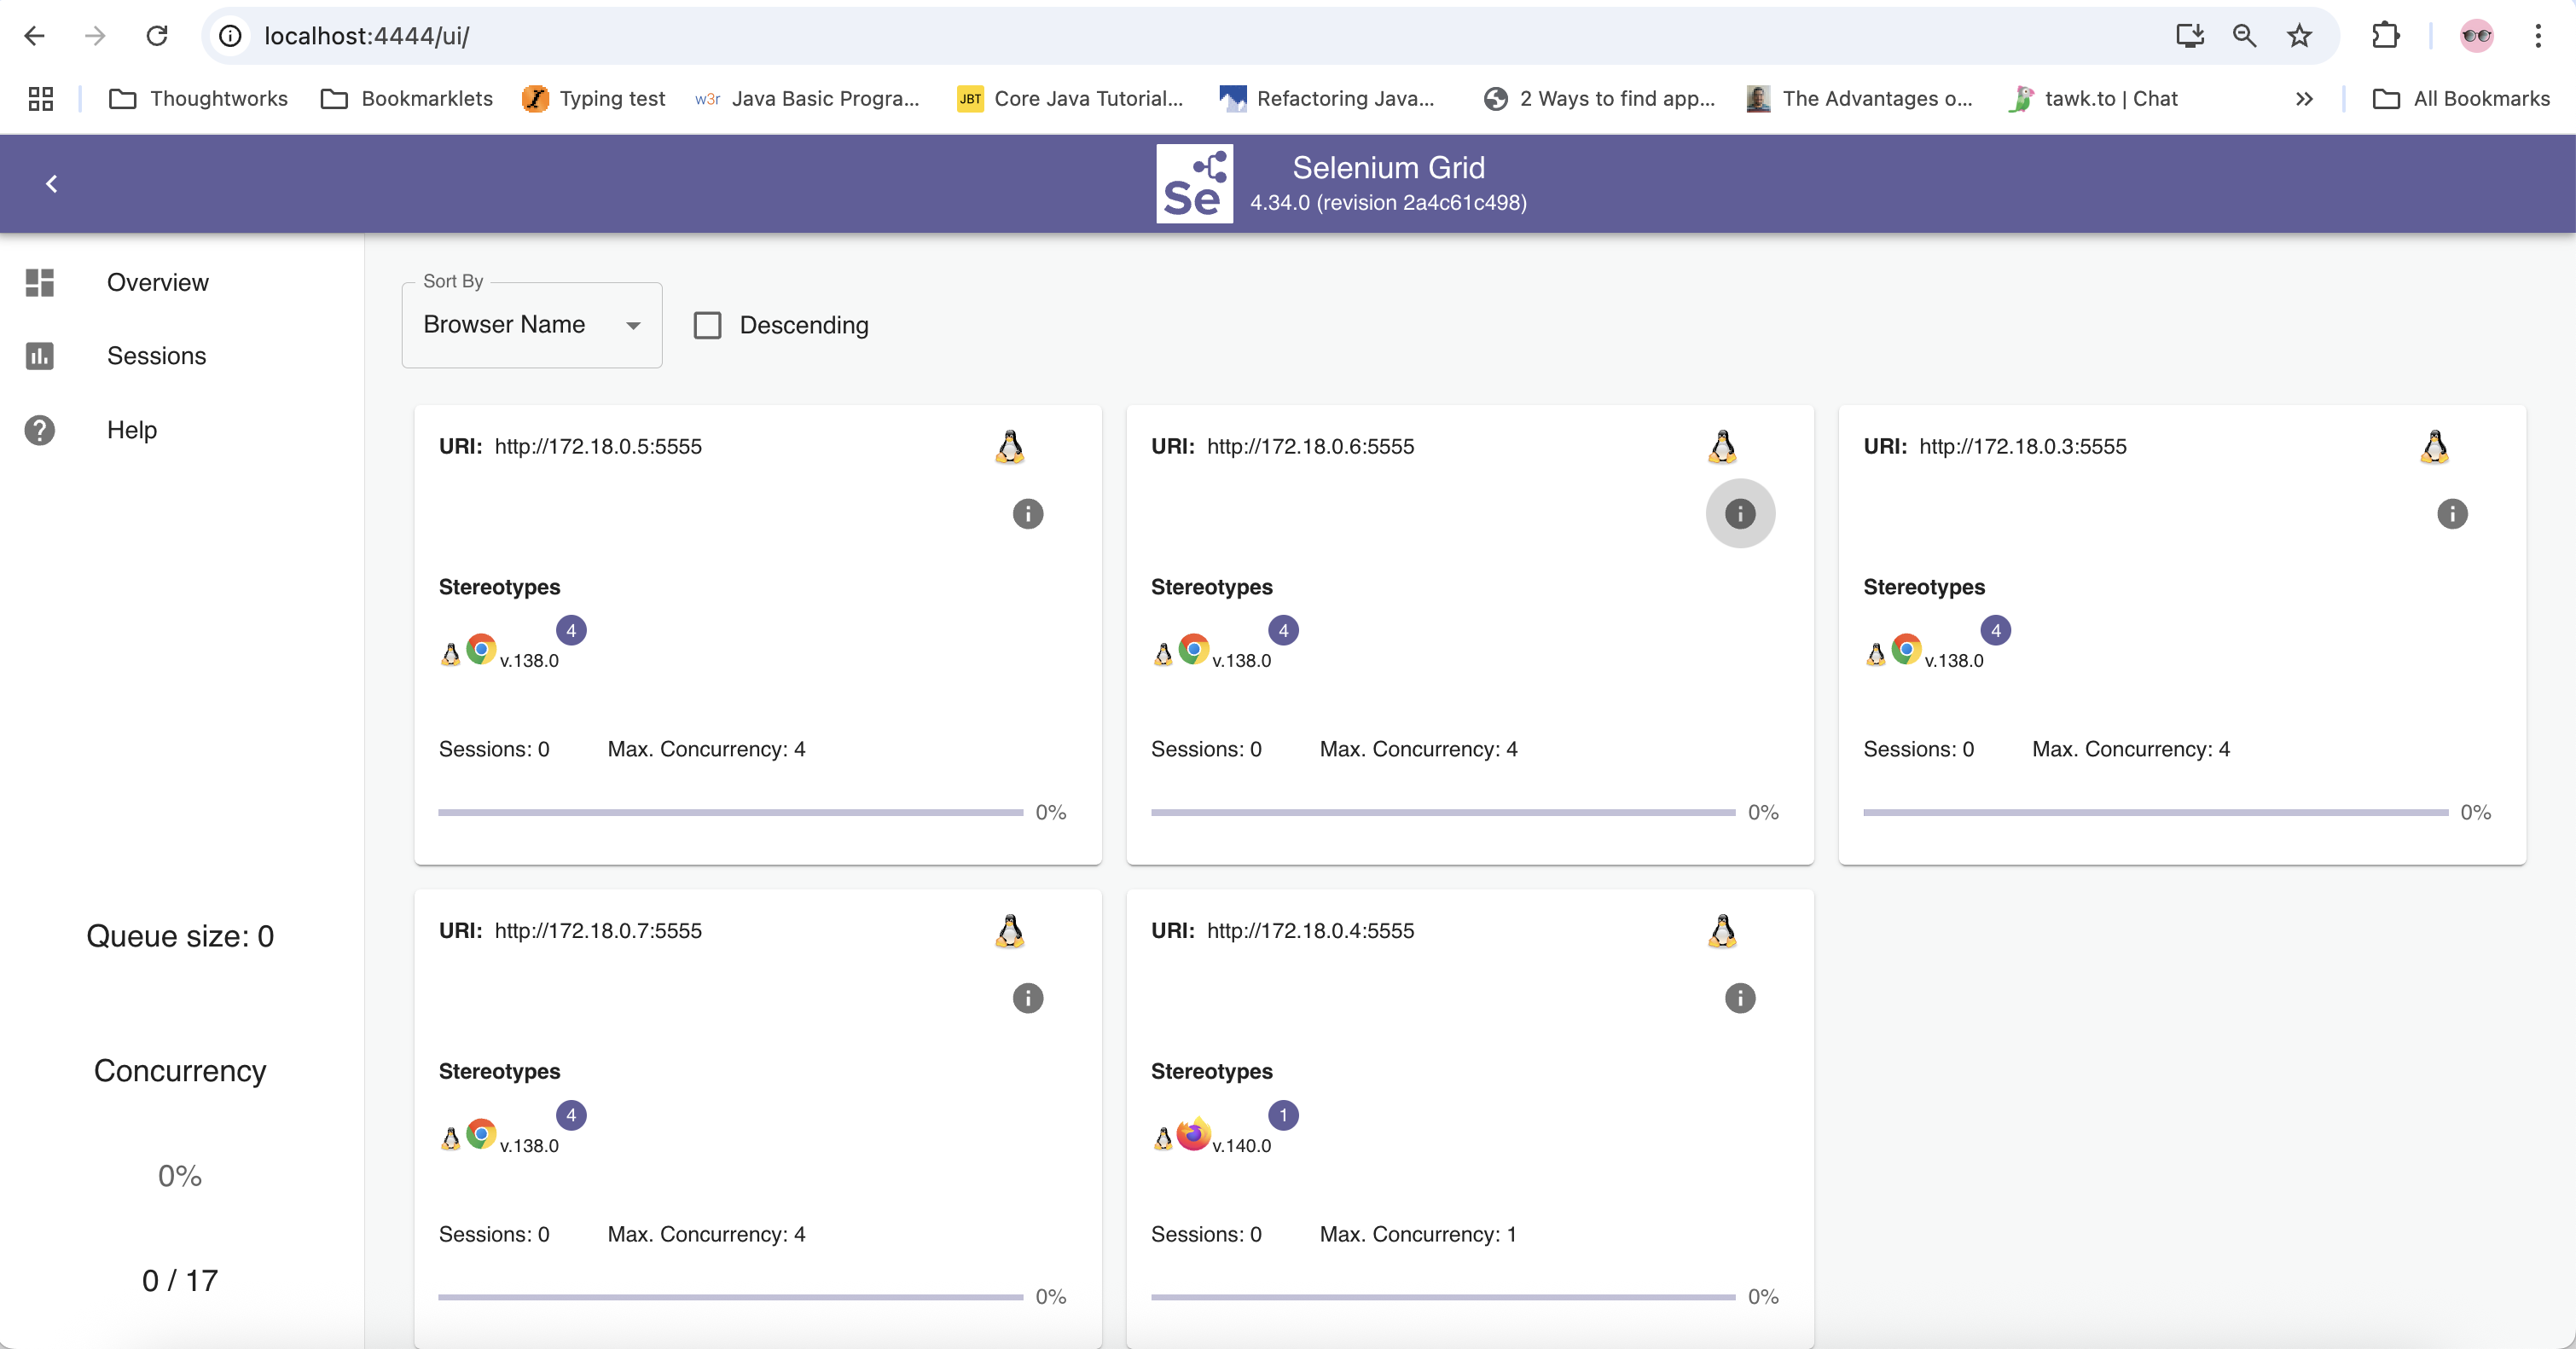
We can use these browsers and execute tests in parallel using Selenium Grid 4 with Docker Compose.
Incredible! We can easily scale up browser instances right at our fingertips, whenever needed.
Summary
Selenium Grid 4 can be of great help to run the regression or end-to-end tests in parallel and reduce the execution time. This can help us get faster feedback on the builds.
With Docker Compose, we can spin up the Selenium Grid easily within seconds. It also offers the flexibility to scale the browser instance as required at our fingertips.
Happy testing!
Published at DZone with permission of Faisal Khatri. See the original article here.
Opinions expressed by DZone contributors are their own.
Comments