Setting Up Automation for Webhooks Testing
Learn how to use Python to set up automated testing for webhooks, a new API concept, in his tutorial from our Automated Testing guide.
Join the DZone community and get the full member experience.
Join For FreeThis article is featured in the new DZone Guide to Automated Testing: Your End-to-end Ecosystem. Get your free copy for more insightful articles, industry statistics, and more!
Webhooks are a new API concept that many companies have begun adapting. Unlike an API, which responds when you make a request, Webhooks are triggered when an event occurs in your application. Automating this process might be a little confusing to those unfamiliar with it, so I will provide some high-level information on how to set up automation for this type of testing.
How It Works
From a high-level perspective, Webhooks simply allow applications to provide real-time information as events occur. Imagine that you have created a spreadsheet and you would like to be notified any time information is added, updated, or deleted. This is where Webhooks come in handy — they send a callback back to your service that notifies you that a change has been made with relevant data pertaining to the change. This allows you to receive real-time updates rather than constantly having to make API calls to check if something has been changed.
How to Automate
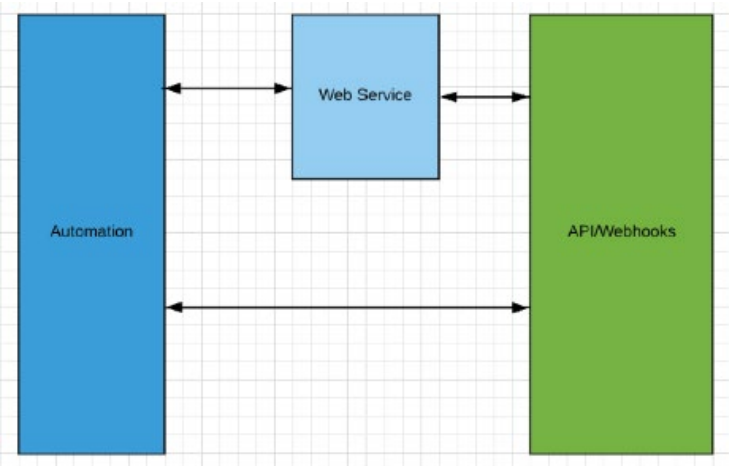
To automate this process, you will need your framework to actively listen for callbacks from the API service so that you can then verify if the data received is correct. In short, every time you run automation, you need to run a web service along with it in order for Webhooks to work. This approach will work — but scaling issues will become apparent quickly. In order to deal with these issues, you will need to decouple your web service from your automation framework. What this means is that you will need to write a web service that will be running in background independent of your automation. Once it is running, automation will subscribe to the Webhooks API by providing the callback URL of your web service. Once you have the web service in place, your automation is free to make changes in your app through the API or UI and then verify if the information is correct by pulling that data from your web service.
However, if you plan to have multiple automation runs at the same time, then you will need to keep track of that information in your web service. So, in short, you will need to assign a unique identifier to each run. In our automation, we call this the session key; each run needs to create its own session and use that session key to grab the callback data received from the Webhook API server.

Implementation
Here is an example overview of how this may work:
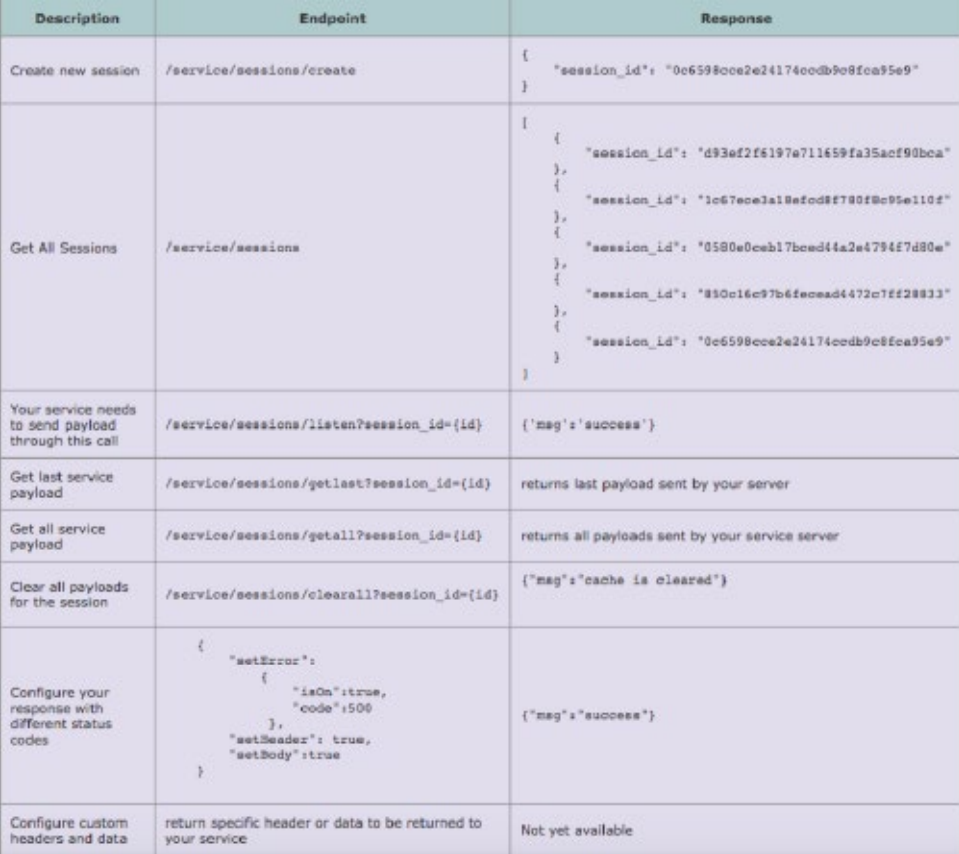
Send a request to your service to create a session. The service will return a session ID.

Call your API to subscribe to Webhooks by providing your callback URL along with the session key provided earlier. This will be your API endpoint along with the payload, which includes your callback URL. Your callback URL will look something like this: mysrvcurl/service/sessions/listen?session_id={id}.

At this point, you can start testing your application by making changes and verifying that Webhooks are sending you correct information back to the callback URL that you provided. At a very high level, something like this could be done to retrieve the latest callback:

Here is a sample of a web service definition:

There are various ways that this web service can be implemented, but ours was designed in Python using the webpy module. It is very light-weight and easy to use, and can spin up a web service within minutes.
The following is a sample code detailing how to quickly get your Hello World service running in Python:
import web
urls = (
  '/', 'index')
class index:
  def GET(self):
  return "Hello World"
if __name__ == "__main__":
  app = web.application(urls, globals())
app.run()
To run this code, run python filename.py. This will run on port 80 by default so you can navigate to localhost:80 to access it. At this point, we can start defining our operations. The following is an example of all the endpoints you may need to write at minimum:
#definition of available endpoints
urls = (
  '/', 'index',
  '/service/sessions', 'sessions',
  '/service/sessions/create', 'create',
  '/service/sessions/getlast', 'getcache',
  '/service/sessions/getall', 'getallcache',
  '/service/sessions/clearall', 'clearcache',
  '/service/sessions/listen', 'posthook',
  '/service/sessions/configure', 'confighook',
)
Once the endpoints are defined, an implementation for each will need to be written. Here is some sample code of what that implementation may look like:
class create:
  def GET(self):
  session_id_list = []
session_id = binascii.b2a_hex(os.urandom(15))
response = {
  'session_id': session_id
}
session_id_list.append(response)
return session_id# post method
for webhook server callback;
We are
taking the header hook challenge value and returning
it back in our response
class posthook:
  def POST(self):
  try:
  session_id = web.input().session_
id.strip()
except:
  return {
    'Error': 'session_id required'
  }
shc = web.ctx.env.get('HTTP_WEB_HOOK_
    CHALLENGE ')
    challenge_key = shc
    if (configCache and session_id in
      configCache):
      flag = configCache.get(session_id)['setHeader']
    body_flag = configCache.get(session_id)['setBody']
    if (flag != False):
      web.header("Web-Hook-Response", shc)
    if (body_flag == False):
      challenge_key = None
    else :
      web.header("Web-Hook-Response", shc)
    payload = web.data() return setData(payload, challenge_key, session_id)
    // get last payload
    def getLastCachedPayload(session_id):
    cLen = len(cache) result = cache.get(cLen - 1) if (result == None):
      return {
        'info': 'cache is empty. try to post
        some payload first '}
        else: while cLen > 0: cLen = cLen - 1
        result = cache.get(cLen)
        if result[0]['session_id'] == session_id: return json.dumps(result[1], indent = 4)# will
        return all cached data
        def getAllCachedData(session_id): datalist = []
        for k in cache.keys(): result = cache.get(k)
        if result[0]['session_id'] == session_id: datalist.append(result[1])
As you can see by the definition and examples above, Webhooks can be implemented quite quickly. Webhooks are a newer concept, but even so, it is a good idea to see if there already exists something that may fit your needs. Most of what existed at the time when our team began using Webhooks was not open-source, so I decided to write one for us. A UI can be designed for this, as well, allowing your manual testers to have an easy-to-use tool to test Webhooks for you, saving everyone time.
Other Considerations
SSL will be required for this to work and you may not have acertificate right away. One way to get around this to use servicelike NGROK. The NGROK service allows you to create a secure URLconnection to your localhost server and can be used until you getyour own certificate.
If you are planning to have a large amount of concurrent automation runs, then you will need to configure your webpyservice to handle load more efficiently. There are few ways to do this, such as running it behind NGINX or using Lighthttpd. Lighthttpd is pretty easy to configure and you can find instructions for configuring it here.
This article is featured in the new DZone Guide to Automated Testing: Your End-to-end Ecosystem. Get your free copy for more insightful articles, industry statistics, and more!
Published at DZone with permission of Slaven Slugic. See the original article here.
Opinions expressed by DZone contributors are their own.

Comments